Currently, in stores you can find an endless number of various cabinets, chests of drawers, racks, hanging shelves, multifunctional drawers for clothes and personal items. But if you decide not to plunge into a long search, but to follow the thread of your imagination, then with the help of the following master classes you will learn how to update an old cabinet with your own hands beyond recognition.
After reading the article, you should not have any questions about how to paint a varnished, chipboard or wooden cabinet , what paint to paint and make it suit your own style, and you will also learn some of the intricacies of this work.
Painting a wooden cabinet made of chipboard
Paint selection
- For processing wood and chipboard, you can use alkyd or acrylic ,
- spray or regular wood paint,
- for deeper coloring - varnishes, but most often preference is given to acrylic paints .
They are non-toxic, dry at room temperature, which in our case and when painting home furniture is very convenient, they are presented in a wide range in stores, they can be colored , i.e. dilute with white paint to achieve the desired color. In addition, there is a choice of acrylic paints with a mother-of-pearl effect or, for example, metallic.
- Varnishes are used mainly to give furniture an antique , but well-groomed, noble and rich look. In this case, the surface is painted several times after each layer has completely dried.
- Varnishes are also necessary to fix the color and protect the surface from scratches and minor damage.
- You will need varnish even if you decide to paint the chest of drawers in an antique or Provence style.
Selecting Brushes and Rollers
After choosing paint, special attention should be paid to brushes and rollers. Why shouldn't you save on painting supplies if you decide to update your chest of drawers yourself?
- With the correct technology for processing the old surface and good painting, the cabinet will retain its appearance for several years .
- If you use bad brushes, you will not protect freshly painted furniture from sticking hairs or lint, which is almost impossible to fix unnoticed.
If you have a task to paint a large smooth surface, then a roller and aerosols will .
- a roller to take the right amount of paint and remove smudges, but if aerosols are used correctly, the surface will ultimately be smoother.
- To paint medium and small cabinet parts, protrusions, bas-reliefs, 2 brushes will be enough - wide and narrow.
ATTENTION: During work, do not leave the brushes dry, it is better to put them in a jar of water, otherwise they will quickly become unusable
Technologies and painting methods
Don't forget about other important painting tools and materials, such as sandpaper or sander, primer, putty, solvent and varnish. All this is necessary to comply with the correct dyeing technology.
Equipment:
- Sandpaper of different grits is needed to pre-grind the old paint layer and sand the surface.
- A primer will be needed to seal small cracks on the surface of wood or chipboard.
- Putty (you can use car putty) and a putty knife will come in handy if there are deep scratches or chips.
- Solvent or white spirit is needed to degrease the surface before painting for better impregnation.
- The varnish performs a protective function and gives the furniture shine.
In general, preparing a cabinet for painting consists of 5 short but very important steps .
- First, carefully remove the old paint and use medium-grain sanding paper (or a machine) to level the working surface.
- All dust must be wiped off, but without using wet rags, sponges , etc. Otherwise, the old paint will only be absorbed better, and the new paint will not adhere well.
- After processing with the finest grains, degrease with white spirit (acetone) and apply a primer layer for better adhesion to the paint.
- If there are large chips, then first fill them with putty and rub them until smooth. Afterwards we apply one or two layers of primer.
When you know all the stages of preparation, it’s time to move on to the main stage and figure out how to paint a wooden chest of drawers and chipboard.
How to create color transitions and painting
It is not difficult to create a unique piece of furniture. To do this, you can decorate the cabinet with painting, a color gradient, create a textured surface, or use a stencil in the design. The choice of method depends only on the imagination of the owner and the design of the room.
The drawing is applied to an already painted base with acrylic paints. The theme is chosen in accordance with the design of the room. Geometric motifs, patterns, and flower images look very attractive. A cabinet decorated as an antique can be decorated with gold ornaments.
A new trend in furniture fashion is color gradient. To create a smooth transition of shades of the same color, paints with different amounts of pigment are used or additional colors are purchased. This design looks especially good in a children's room or teenager's bedroom.
Color is especially important in a child's room
How to paint so that the surface is cracked
Artificial aging - craquelure - looks beautiful. To achieve the cracking effect, use a special varnish. The thicker its layer, the wider the cracks become. After drying, the cabinet is treated with a matte protective varnish.
Cracked facades - craquelure technique
Stencil painting: master class
Using a stencil allows you to get a unique painting on furniture. The pattern is applied to an already painted surface, and after drying it is covered with matte varnish for protection:
- Choose paint with a semi-liquid or thick consistency to prevent bleeding from under the stencil.
- Prepare a foam roller or swab. The cabinet must be pre-painted in the main color.
- Place the stencil on the surface and, if possible, secure it with masking tape to prevent movement while working.
- Dip the swab into the paint and apply light pressure to the holes of the stencil.
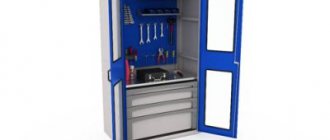
Master class No. 1. Stencil painting
Everything is mixed in this closet - romanticism, Chinese motifs, and even something from Gzhel. Everyone sees something different in him. Let's learn painting techniques.
Materials and tools
- Prepared cabinet;
- white paint;
- solvent;
- blue spray paint;
- gold paint;
- stencil;
- brushes
Step by step guide
Step 1.
- We remove all fittings, locks, handles, etc. from the cabinet. Using familiar technology, we will prepare a wooden cabinet for painting.
- We spread newspapers or a large piece of polyethylene on the work surface (on the floor) so as not to damage other furniture.
Step 2.
- We take white enamel and solvent. In a small plastic jar, dilute paint and solvent according to the instructions on the paint can.
- The paint consumption is also written on the can; it is better to use this information and immediately dilute the required amount. If you mix too little paint, you may end up with a different color the second time.
- We make the background of the picture - apply the first layer of paint . Leave until completely dry.
Step 3.
- If the color turns out saturated and you like it, then take a stencil and apply it to the cabinet . Carefully glue on the front side and side walls so that there are no bubbles.
- Shake the spray paint well and spray it over the stencil . For an even color, one layer of blue paint will be enough, so we do everything the first time.
Step 4.
While the blue paint dries, paint the hardware removed from the cabinet in gold leaf. After the parts have dried, screw them into place.
We remove the stencil from the cabinet and place it in the most visible place in the room - after all, it now deserves special attention!
You can decorate the closet with a stencil, for example, with flowers.
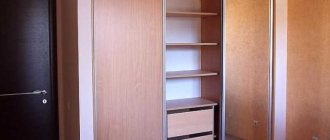
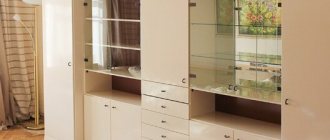
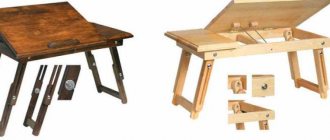
Master class No. 2. Updating a chipboard cabinet
This cabinet looked very cheap since it was made from chipboard. But we updated it with a beautiful ornament for a children’s room, now it can fit into even a high-tech or modern interior.
Materials and tools
- Prepared cabinet;
- white paint;
- pencil;
- knife;
- building level;
- sponge brush;
- masking tape;
- additionally: protective paint (enamel).
Decoration process
Step 1.
- We will prepare the furniture by cleaning the surface from roughness, chips, and cracks using putty and primer.
- After using special products, you need to let the surface dry completely .
- We take masking tape and stick it on the front side of the chest of drawers according to your individual idea.
- We make combinations of triangles along the top and bottom edges, rhombuses in the middle, rectangles at the top and bottom. We cut off the strips and make shapes from them, as shown in the photo.
- We make a rhombus by cutting strips of equal length and placing them perpendicular to each other.
- To make rectangles, first apply the tape evenly, parallel to the cut of the chest of drawers, and use a building level and a pencil to mark equal intervals. Cut through one.
TIP: Watch the placement relative to the fittings (handles, locks) and the gaps between the drawers - it’s better to be symmetrical than even.
Step 2.
- I follow the instructions on the paint can, take a sponge brush and rub in a thin layer to create an antique effect. Let the layer dry.
- After the first layer has dried, apply the second . Then the color will be quite saturated and contrasting compared to the background.
- When you have achieved the desired color and the paint has completely dried, carefully at an angle of 45 degrees remove the masking tape (tape).
Step 5.
The final stage is the application of protective enamel. It will extend the life of the chipboard cabinet and protect it from minor mechanical impacts such as moisture and dust.
And now the stylish wardrobe is ready for active use!
Color options can also be the same as in the photo below.
Choosing paint
Before you start working, you need to choose a paint. At home, painting is best done with acrylic dyes. They are easily diluted with water, and you can get the desired shade by adding the desired pigment.
Choose high-quality furniture paint.
The main advantage of acrylic paint over oil or alkyd paint is the absence of a pungent odor. Don’t think that only professionals can change the color of furniture; even a beginner can do it. Remember that the applied layer can be washed off only in the first hours after painting. Once the surface is dry, you won't be able to change anything.
Furniture can be easily updated, you just need to paint it.
A wooden cabinet in the living room or a kitchen set made of MDF and chipboard can also be repainted with alkyd enamel. It comes in glossy, matte and semi-matte. It lies evenly on the surface and has a rich palette of shades. The truth is that it has a slight unpleasant odor, so it is better to paint in a well-ventilated area.
Interior items made from chipboard absorb moisture to a lesser extent than wood.
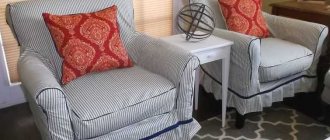
Master class No. 3. Painting a polished cabinet
Some people can’t believe that you can make such a piece of vintage-style candy out of an old polished cabinet, without losing functionality. And then we'll tell you how to do it.
Materials and tools.
- Old polished cabinet;
- vintage paint (regular acrylic matte);
- white spirit or acetone;
- brushes;
- sandpaper or sanding machine;
- gold handles for drawers.
Painting process
Step 1.
Despite the fact that we are creating a vintage effect, there is no real need for the dresser to look shabby. Therefore, we carefully prepare it for painting.
- To do this, we remove all the old fittings and sand the entire surface of the chest of drawers. First we use coarse sandpaper, then fine-grained sandpaper.
- It is not necessary to putty and prime, except for serious chips on the surface. Degrease the surface with white spirit or acetone and let it dry.
TIP: Since the paint will be applied in several layers, it is very important that it is well absorbed into the wood.
Step 2.
- Cover with the first layer of paint. Very thin, you don’t have to try too hard and leave unpainted areas.
- Sand the first layer with fine-grained sandpaper. We clean off dust, but do not use wet rags, sponges, etc. in the process. Wash only with a dry cotton lint-free cloth.
- Next, apply a second layer of paint, also rubbing it in. Let it dry and rub it in a little again.
- We repeat this until the color becomes even, but a little rough. For this we used matte paint with a vintage effect. After a few days, it will be completely absorbed and dry and begin to turn yellow (pay attention to the instructions on the can so that you don’t have to repaint everything again later). To avoid this, you can try this coloring method on a small and inconspicuous area. Proceed with full coloring when you are satisfied with the result.
If you bought new handles, check if they match your color and screw them into place. Golden brass carved handles with patterns match the white aged chest of drawers.
Check the chest of drawers to see if it meets your requirements - it is still comfortable, beautiful, and, paradoxically, modern. Vintage is in fashion now!
What paint to paint the cabinet?
When choosing paint, it is best to give preference to acrylic, which has almost no odor, is easily diluted with water and mixed to obtain the desired color. It also washes off well, which makes it possible to correct flaws when painting. When the paint dries, the water in it evaporates and the paint becomes stronger, which must be taken into account when applying layers.
The closet does not have to be monochromatic. It can be painted in two colors. For example, take one paint in a neutral beige color and another in a brighter color. If it is not possible to select the desired paint, then you can purchase white acrylic paint and add color to it until the desired shade is obtained. When choosing a suitable shade, you can try it on a small area of the closet to determine the required saturation.
Padding
Acrylic primer is best suited for priming the surface of a cabinet before painting, since its components combine very well with the composition of acrylic paint.
Applying acrylic primer is easy, but before starting work it is recommended to read the instructions for using this material. It is important to adhere to the drying time of the soil and the calculation of the surface area to be treated.
The primer is applied using a roller (this is faster) in a thin layer and left until it dries completely.
Wallpaper or film
When using film or any other paper covering to update your cabinet, you should remember that we use the cabinet every day. And usually such a coating does not last long, but it is very simple to implement.
We recommend using this method in conjunction with painting: look at the beautiful ideas for decorating a cabinet using film and painting.
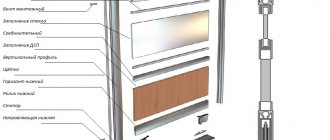
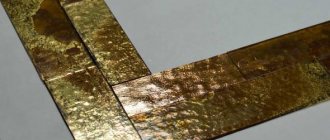
Using molding to decorate an old built-in wardrobe
One of the most effective ways to update an old built-in cabinet with your own hands is to stick on the molding. Moreover, any molding can be used.
Furniture , with a corresponding adhesive base (resembling double-sided tape). The simplest one is a shiny strip of different widths for cutting and sticking on your own. But the bulk of moldings are made of MDF.
furniture molding for decorating an old cabinet
Construction , used for finishing walls and ceilings. It can be gypsum or polyurethane foam. The latter is extremely easy to apply and then paint.
building molding made of polyurethane foam for decorating an old cabinet
Joinery blanks from solid wood of various shapes. Available both ready-made and to order.
overlay blanks for decorating an old cabinet
Spot painting for polished cafe
Spot painting is perfect for a polished cabinet. In this case, there is no need to remove the varnish and sand the surface. The technique is simple:
- Drawing using a marker
- The marker is painted with paint using dots. Learn more about the technique of dot painting of plates here.