How to remake a Soviet wall: repainting ideas
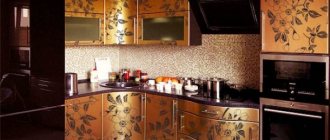
An old Soviet wall can be transformed into modern and stylish furniture. It is enough to repaint the visible parts with the facades and rearrange the blocks - it is better to move them apart by inscribing photo wallpaper or a picture with a perspective in the center, or maybe draw a perspective on the wall and insert a TV:
Such objects from the 70-80s of the twentieth century still live in many apartments.
If you are not ready to completely get rid of old furniture, then you can remodel and update it. The work is not easy, but the result is worth it!
Step 1. First, we completely disassembled the furniture. All fasteners, fittings and decorative elements were removed. To avoid confusion, all parts were numbered in accordance with the diagram. And sent for restoration.
Step 2. Next, you need to remove all defects and irregularities (chips, cracks, scratches). This is done using special pastes and primers, which, after application, are dried and sanded to a perfectly smooth surface.
Step 3. Now the parts are painted in the selected color. In this case it is light beige.
For painting, a spray gun is used, with which paint from a container under pressure is distributed over the surface in a thin, uniform layer. Neither a brush nor a roller can achieve such an effect!
Step 4. It is important to pack everything carefully and securely, and then installation - putting the “wall” back together
During installation, it’s time to replace old fittings and fasteners with new and modern ones. And don’t forget to put hinges with closers on the doors!
Insert TV and picture/photo wallpaper/wall painting. You can even insert a chair between wall fragments:
By the way, the wall in the top photo was simply refreshed by me in a deeper mahogany color
Glass doors can be frosted or decorated with patterns:
Specifically for the wall model above - if the central pencil case is moved to the left, then the sides for the shelves with glass doors will have to be made from the top plate of the cabinet - my husband has already done this, with a little skill in working with a saw and a drill, and you will get this style:
OR THIS:
More ideas for other wall models:
In general, a symmetrical arrangement for light furniture is the most profitable classic option!
Dear decoupage artists, do you know a way to style a marble box? Here it is used on the doors!
Great luck if your old wall-chest-display has a symmetrical shape from the beginning. Then you will get very effective alterations:
Or you can even remove the doors at the wall, as is proposed in modern facades! but then it won’t be as functional:
It's still better with doors.
How to update Soviet furniture
Sometimes it’s enough just to monotonously repaint Soviet furniture so that it looks beautiful in a new stylish interior.
However, there are other interesting ways to decorate old sets that will help if you want fresh, extraordinary solutions. Let's give a mini-list of ideas.
1) You can paint furniture through lace or tulle.
2) Use a multi-layer gold or bronze coating - a marker of an expensive classic.
3) Slate paint on facades will look even more interesting and modern.
4) Cover the furniture body with self-adhesive film. Suitable, for example, is a self-adhesive with a wood or small floral print, like a country one.
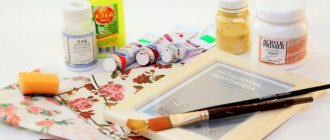
5) Another similar technique is decoupage. Its essence: individual pieces of furniture are decorated using a stylized pattern or textured fabric. For this purpose, special decoupage napkins, pieces of wallpaper, notes, and embossed leather are used.
6) Aging the furniture. Soviet furniture can be given an antique charm, but in this case professional techniques are needed - patina, craquelure.
By combining different techniques, in particular, aging and decoupage, professionals create gorgeous effects.
7) You can update only the fittings - select details in accordance with the new style of the room.
 When updating upholstered furniture, you can reupholster the fabric and decorate the body with noticeable decorative seams and buttons.
9) Or make covers individually.
There are radically different examples of converted Soviet chairs and armchairs in the Stoolstory assortment. Inspiration and new ideas can be found on their Instagram.
How to update an old wall with your own hands
Many people wonder how to update an old wall with their own hands if it has already lost its relevance, but is still durable. There are several ways to make furniture more comfortable and suitable for a modern interior.
Similar articles:
Self-adhesive film for furniture How to remake a Soviet wall Kitchen table restoration Do-it-yourself restoration of old furniture
Interesting interior solutions
Before you update an old furniture wall from the times of the USSR, you need to make sure that its fasteners are intact and, if necessary, replace them. The set can acquire a more modern look if you do not display all its modules in one row, but distribute them in different corners of the room or apartment.
If the cabinets will stand as a solid wall, then you should do the following:
- remove mezzanines, glass and other doors, leaving only the lower shelves and drawers closed;
- attach cornices to the top of the wall;
- Decorate the side parts with columns.
You can beat the Soviet wall in a modern interior if you leave the bottom row of cabinets, above which you hang shelves and racks at different levels.
If the set is topped with mezzanines, you can update the old Soviet wall by making a fashionable hanging wall out of them. To do this, remove the doors and the back. The resulting sections are hung vertically or L-shaped. The shelves in such a module will have to be redone and, when filling them, the strength of the wall will have to be taken into account.
Door repair
The most common breakdown of cabinet furniture is the failure of doors. This could be a simple misalignment due to unaligned hinges, wear, tearing out of the fasteners from the base, or spontaneous opening.
Often, door misalignment occurs due to improper adjustment of the fittings. Its design provides for the presence of 2 auxiliary bolts. One is responsible for the fit, the other regulates the position of the doors relative to the front plane. By experimenting with them a little, you can return the doors to the correct position.
If this step does not bring a positive result, the loop will need to be replaced. There is nothing complicated about this. You just need to buy another loop and put it in a given place, screw it in with self-tapping screws and adjust it.
To keep the doors closed, magnetic strips and response blocks are used. The first thing to do if spontaneous opening occurs is to clean both halves or correct their position relative to each other. It didn’t help, which means they need to be replaced.
Required tools and materials
To restore old furniture you will need the following:
- sandpaper on foam rubber;
- putty for wood;
- primer;
- spatulas;
- screwdrivers;
- spray gun, rollers or brushes for painting;
- wide brush, dust removal brushes;
- edge for processing ends of the required width;
- iron for gluing it;
- brushes;
- sponge;
- rags;
- construction knife;
- accessories.
For protection you must have goggles, a respirator and gloves.
Cosmetic repair of cabinet furniture
Minor damage can be repaired without resorting to radical action. These include scratches on the varnish coating, small chips in places of constant mechanical impact, the presence of small areas where the varnish has lost color or transparency under the influence of high temperatures and moisture.
Scratches just need to be waxed and thoroughly polished with felt. With chips the situation is a little more complicated. First, the edges are sanded with fine sandpaper to create an even transition from the old layer to the base material. Then this place is varnished several times with intermediate sanding. The entire surface is leveled to smooth lines of the original state.
Removing chips is similar to the process of partially restoring the original appearance of the paint surface. First you need to identify the area that will be restored and completely get rid of the coating on it. Then the same painting and varnishing takes place using carefully selected color products. Don’t forget to smooth out the transition after each layer using a grinding machine or the finest sandpaper.
Cosmetic repairs also require peeling off the laminated film or veneer on the surface of MDF and chipboard in some places. This occurs as a result of constant exposure to elevated temperatures and the loss of the adhesive layer of its bonding properties. The problem is resolved by gluing the coating using construction adhesive or PVA.
Types of update
Before you update a furniture wall with your own hands, you should decide whether it is functional enough. If the answer is positive, it is enough to repaint it in a different color and add or remove decorative elements.
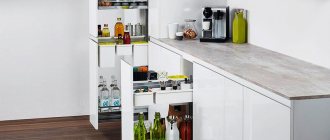
To make furniture more comfortable, retractable systems are being changed. In old chipboard cabinets, the guides are wooden or plastic. It is better to install modern ball and roller systems that allow drawers to be pulled out easily. Replace hanger pipes and door hinges. For convenience, deep cabinets are equipped with LED lamps.
When remodeling the wall, you can leave only the frame intact. Complete renovation of old furniture requires time and space to work and dry. Before you get started, you need to consider the following:
- style;
- color;
- decor;
- how and where it will be located.
In order to change the appearance of the wall, sometimes it is enough to replace the fittings and fasteners with new ones.
Restoration of an old wall
After a skillful transformation, furniture from the 50s and 60s in the minimalist or art deco style will look elegant. If the doors cannot be repaired, they must be replaced by ordering new ones of the required sizes from the factory. Most old walls have a monosyllabic color that imitates the color of natural wood. Modern facades can contrast with the body and consist of one or more colors. The latter option benefits from combining furniture with the tone of the walls and floor.
When replacing the doors of an old furniture wall, you can order not only hinged, but also folding and folding doors. The most popular and budget material option is chipboard. You can order glass inserts or leave some of the shelves open. The hole for the hinges on the body fits modern ones.
Decoration
Today, stencil designs on furniture are popular. They are easy to make using a piece of patterned tulle and spray paint. But you can decorate a Soviet wall without using paint, for example, by decorating some of its details with a decorative cord laid out in a pattern or using metal elements that are also part of the structure.
The nobility of the furniture is given by the decor made of polyurethane, which imitates exquisite and expensive wood carving. The following elements are mainly used for the wall:
Complex relief figurines with balustrades and consoles do not fit all furniture. The decor is tinted to match the color of the wood, silvered or patinated. The stucco molding must be painted 2 days before installation. The polyurethane decor is attached only to a dry base with special glue.
Transforming a wall with furniture varnish
The following varnishes are suitable for furniture:
- oil;
- alkyd;
- alcohol;
- nitrocellulose;
- polyurethane.
It is important to study the instructions and chemical composition of all products that will be used in surface treatment. Primer and varnish binders must be compatible. Do not cover the surface with a thick layer - this will cause drips and bumps. It is better to apply with a spray in 2-3 stages. You should start from the back side of the wall facades. To give the furniture a particular shade, it is treated with stain before varnishing. Treating a painted wall will protect it from scratches.
When updating furniture, you can't rush. After each cycle, you need to leave enough time for drying.
Application of self-adhesive wallpaper
In this way, old furniture can be changed quickly and cheaply. Self-adhesive wallpaper or PVC film can be matte, glossy or with a metallic sheen. For the wall, a material that imitates wood is often chosen, although the market offers many options: stone, marble, leather, fabric, newspaper. A partially wallpapered set looks original when there are only drawers or doors under the wallpaper.
The surface must be free of grease and smooth before gluing, because... even small bulges or dents under the film will be noticeable. It is convenient to cut the wallpaper - its reverse side is lined with horizontal and vertical lines. Having cut out the desired segment, do not remove the entire paper base from it at once. This is done gradually, separating and gluing 8-10 cm of film. It is smoothed from the center to the edges with a rubber spatula. If air bubbles have formed under the self-adhesive paper, you need to pierce this area with a thin needle.
It is not necessary to disassemble the furniture before the procedure, but the fittings will need to be removed.
Restoration using staining
Color radically changes the appearance of an old wall. It is important to prepare the furniture. This can be done like this:
- Remove doors, fittings and decor, remove drawers. If the frame will be painted, disassemble it.
- Remove old varnish or paint. To do this, apply a furniture restoration product containing methylene, chloride or caustic soda to the surface. When the old coating softens (after 15-60 minutes), it is removed with a spatula.
- Fill defects - cracks, chips. After drying, sand.
- Remove dust thoroughly.
- Wipe the surface with a damp and then dry cloth, degrease with alcohol or anti-silicone.
If the layer of old coating is thin, you can treat the entire surface of the wall with white spirit, and the doors covered with veneer can simply be rubbed with coarse and then fine sandpaper along the grain.
Furniture should be restored in a ventilated area, wearing a respirator. It is convenient to work with wall parts, placing them on a large table.
What and how to repaint old furniture? It is preferable to coat chipboard products with oil, alkyd or acrylic paints. Apply at least 2 layers, and the surface to be treated must be in a horizontal position. Water-based paints are popular because they create a durable coating and dry quickly. A wall with a contrasting geometric pattern, which is created using masking tape, looks beautiful.
If there are scuffs and small scratches on the cabinet body, you can use a retouching pencil or marker to remove them. It is suitable for wooden, synthetic and laminated surfaces. The color of the pencil can be matched to the tone of the furniture. The enamel in its composition dries quickly and is resistant to moisture. Immediately after applying the product, wipe the surface with a dry cloth. No additional fastening is required.
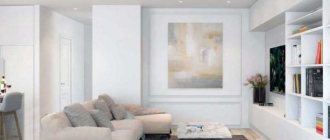
Elegant white wall
Self-adhesive film is an inexpensive material, sold at any repair store. You need white or light beige, it is advisable to choose a matte surface rather than a glossy one.
Carefully remove all decorative elements from the surface of the cabinet. Handles, rivets, glazing beads - all this must be carefully disconnected and set aside. Then clean the surface and degrease. To do this, wash all doors and walls with detergent, and then rinse thoroughly with acidified water. Remove moisture with a dry soft cloth.
Learn to protect yourself - don’t run away and don’t be silent: how to break up forever
My favorite pie with cheese, ham and green onions: incredibly delicious pastry
The woman couldn’t afford a full renovation, so she took paint (photo)
Prepare the film. Cut the pieces of the desired shape in advance with a margin of 1 cm on each side.
Apply the film to the selected surface. Then smooth it with a cloth from the center to the edges, removing the smallest blisters. If you cannot remove the air bubble, pierce it with a thin needle, and then press the film to the surface so that no marks remain.
The most important thing: cover the treated surface with a cotton rag and iron it with an iron. Set the temperature to medium and turn off the steam supply.
Everyone, take off the rag. Ready!
We recommend replacing old handles and rivets with new ones - this will modernize the design.
Bookmark new life for old furniture
Do you want to create a unique interior without extra costs?
Old furniture will help you with this, photos of the conversion of which you can find here.
There are many ways to transform old, familiar objects.
The choice of method depends on the purpose of using the furniture and the type of coating, as well as its condition at the time of repair.
After restoration, your nightstand will perfectly match the tone of the walls and fit perfectly into the bedroom interior
Transforming an old non-working fireplace into an extraordinary decorative element
You can find a step-by-step photo master class on making furniture with your own hands from old interior items on our website. The process of updating furniture includes two main stages:
Let's take a closer look at what you should focus on.
Repair of cabinet furniture
Cabinet furniture can be made of solid wood, MDF or chipboard (chipboard) panels, coated with paints or plastic laminate, and decorative inserts made of glass, metal, and plastic.
Over time, the appearance of even the highest quality interior items wears out, scratches and chips appear on the surface, the color fades, laminate and veneer peel off. In any of these cases, a complete, partial repair of cabinet furniture or its renewal is carried out.
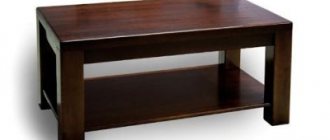
Table repair
Tables are classified according to functionality into desks, dining tables, kitchen tables and coffee tables. Depending on their purpose, their structure and, consequently, the restoration process also differ. Typically, dining tables consist of 4 legs, a bow and a tabletop. They can be solid or folding. When remodeling such furniture, it is worth paying special attention to the condition of all elements, as well as their fastening. The legs must be identical, without damage. If necessary, they can be replaced.
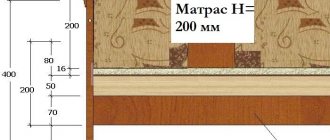
The tabletop, in turn, is the main part of the table. Its surface should be smooth, without grooves, cracks and corrosion. If necessary, wood putty can be used to achieve the desired effect. With its help, you can easily and quickly eliminate all surface imperfections. If necessary, it can also be used to repair legs. The same scheme is used when repairing coffee tables.
Kitchen tables have their own characteristics. Before starting repairs, it is necessary to conduct a full inspection of this piece of furniture. The strength of the countertop plays an important role. It must withstand heavy loads and physical impact. In this regard, the base on which it is installed must also be strong.
An example of using wood putty, which will help correct all the unevenness of an old countertop
Note! Kitchen tables are not only a place to work, but are also used to store kitchen utensils. To do this, they have built-in drawers, shelves and doors. They deserve special attention.
If the table is equipped with shelves, then you should pay attention to their fasteners. If necessary, you can purchase special caps made of wood or plastic from a furniture store; a thin, durable metal corner can also be used as a fastening for shelves. Pay attention to the condition of the canopies that secure the door. It is best to replace them with new ones, since with frequent use this part is subject to the greatest wear.
Natural wood is given freshness by special polishing agents, which can be found in any hardware or furniture store.
If the table is equipped with drawers, check how firmly their walls and bottom are connected. To make them easier to use, you can replace the fittings with which the drawers are pulled out. You can buy it at a furniture store. You can also buy various types of comfortable handles there.
Advice! When replacing awnings, choose ones that are designed for furniture. They will ensure more convenient and reliable operation of the doors.
When repairing a desk, you should pay attention to all of the above. After watching a detailed master class on remaking old furniture with your own hands, you can repeat it yourself.
An example of a restored bedside table. Now it is a bright element of the interior and a functional piece of furniture in the bedroom
Ideas for updating an old wall and other things
Since the principle of working with the surface of old furniture will be approximately the same, it is not necessary to focus exclusively on it. This way you can bring other important household items back to life.
Related article: Bedroom renovation projects in Khrushchev: stages, tips
Here are some useful ideas that may come in handy at work.
- With a little work on the surface of the old cabinet, you can give it a new life, and such a new thing will become a beautiful item in your home interior.
- An old chair like this will be a bright accent in the design and decoration of your home.
- A desk with drawers that hasn't been used for a long time will be transformed into a modern workspace. It can be decorated to your personal taste.
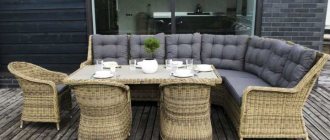
- A bulky sofa can be turned into a beautiful and comfortable soft ottoman, which can be placed in the hallway without any problems.
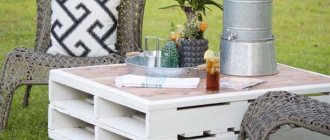
- The former table on wheels will become a fashionable, stylish cabinet that can be moved to any desired point in the house.
- Even earlier, a rough and uncouth chest of drawers, after gluing, will become a modern, light and functional piece of furniture.
- An old, seemingly unnecessary nightstand will turn into a wonderful bedside table that will decorate the design of your bedroom.
- The dressing table, which at first could simply be written off, will turn out to be an excellent work desk, also with the presence of bedside tables.
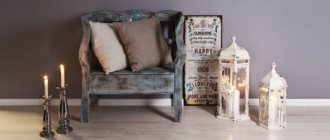
- With a little work on an old carved sofa back, you can end up with a wonderful addition to a mini-sofa.
- Decorate a nondescript cabinet with a tabletop and a door - you will get a good and useful full-fledged cabinet for various items.
- Use paint to turn an unnecessary coffee table into a real work of art with unforgettable oriental motifs.
- If you have some fabric left and an old chair, feel free to turn it into a new design project that will undoubtedly be a success.
- Work with a nondescript bedside table, after which it will be a highlight in the interior design of one of your rooms.
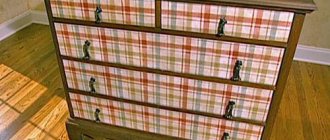
- A large chest of drawers can easily be updated and converted to one of the French motifs.
- You can easily transform your grandparents' old wardrobe into a modern one using regular wallpaper.