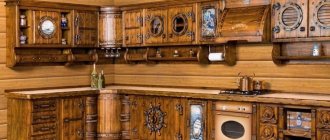
Repair and decoration
06/02/2018 Anastasia Prozheva
If you have thick cardboard at home that you cannot find a good use for, then, armed with our idea, you can easily make a small and fairly durable table.
A cardboard table cannot withstand heavy loads, so it is used as a coffee table.
Such a table will be designed for moderate loads, it can be used as a coffee table or under a computer, and it will be able to withstand the weight of the monitor.
Please note that it is best to make a corner table from cardboard with your own hands. In this case, it will receive additional support from the walls and will be more stable and reliable.
You can adapt the general principle of making a table to suit your purposes. To do this, you can decide on its shape and size yourself. This must be done before starting work in order to know in advance with what parameters the parts will be manufactured.
How can I do it?
If you wish, it will be easy to make a cabinet from boxes with your own hands for a doll of absolutely any size, design and design. In any case, making such a toy will not take too much time. For a large doll, of course, you need to make a fairly “oversized” wardrobe; for a small doll, smaller furniture will do. If desired, it will not be difficult to make such a toy of the simplest design with hinged doors. It is also easy to use boxes to glue together a more complex wardrobe, a craft with many shelves and drawers, etc.
At the final stage, such a toy can be decorated, for example, in such a way that it is as similar as possible to adult furniture, that is, it is painted “like wood.” This locker is very suitable for an older girl. A small child, of course, should make a brighter cabinet, decorated with flowers, patterns, cartoon drawings, etc.
The easiest way, of course, would be to make a wardrobe for the doll directly from the box itself. In this case, the main tool when assembling the craft will be ordinary scissors. You can also cut the box into several parts and make a cabinet of a more complex and original design out of cardboard. In this case, of course, you will need more glue.
Advantages and disadvantages of cardboard furniture
Any furniture has its pros and cons. If we consider cardboard options, we can immediately highlight several positive features:
- There is an opportunity to create individual and stylish things that no one else will have.
- A chance to inexpensively set up a photo studio - for those who are developing their own small business, cardboard furniture will be a worthy start.
- Easy transportation - transporting several kilograms of thick cardboard is much easier than wooden modules. The owner also saves on transportation costs.
- Savings - you can even find thick cardboard for free if you wish. Many stores are happy to get rid of waste paper themselves.
- Durability – if you follow the manufacturing instructions, such furniture will not be inferior in strength to standard furniture.
At home, it is quite possible to make original furniture from cardboard with your own hands.
Additionally, we can highlight environmental friendliness, when the owner of the premises can afford higher quality and more expensive furniture; recycling the old structure will not harm the environment. As for the disadvantages, here we can highlight one and the most important one - the furniture will not tolerate dampness. However, with proper care this can be easily avoided.
Box selection
Of course, in order to make a beautiful, strong and durable toy cabinet out of boxes with your own hands for a doll, first of all you need to select a suitable material for it. Corrugated cardboard is best suited for this craft. In this case, the design of the toy will be stable and will not weigh too much. You can make a doll closet from one such box, or from several different sizes.
If desired, you can use, of course, not corrugated cardboard, but ordinary cardboard to make such a doll interior item. This could be, for example, a small shoe box or, say, some kind of gift. Sometimes, when assembling doll furniture, even just matchboxes are used.
Cardboard beds
Below is a photo of such furniture, and some models look just great. Like this one, for example:
A simple mattress is thrown on top and the bed is ready. True, we are not sure that we will be able to sleep until the morning, especially if a person spins a lot in his sleep.
How do you like this cardboard bed, and even with drawers:
If the cabinets in this photo are even more or less capable of performing their functions, then the bed will last you at most a week or two. Well, this material cannot withstand heavy loads, because... This is simple STURDY PAPER.
However, this is not about that now. Let's go further and look at this model:
This is a “hidden” bed behind a shelf, installed against the wall. We would not recommend placing it directly against the wall, because climbing into it is inconvenient in this case, but the idea itself is not bad, if it were not ordinary paper.
How cute is the next photo: a baby crib.
No matter what we say above, we like this model. What's the point of buying cribs that your baby will quickly outgrow? A simple cardboard playpen is suitable here, where the child will feel comfortable. We support!
What's next for us? Is this a bed? Most likely, this is an ordinary folding bed that can turn into a stool and table. Everything is visible in the photo. The solution is well suited for some kind of outdoor trip, because... When folded, it takes up very little space.
What if it rains while on vacation outdoors?
Well, and another strange folding bed made of cardboard:
Trite, but very simple and practical. Just right for a child. For adults, double beds made from drawers underneath are suitable:
Somewhere in the beginning we considered a similar design, but there was no mattress and bed linen. It’s all there, the model looks very attractive and not disposable.
As for children, we really like furniture for kids. And here is another photo that brings a smile to your face:
A comfortable crib that can easily accommodate two little brothers (or sisters?).
Required tools and materials
Actually, the answer to the question of how to make a doll cabinet out of cardboard with your own hands is simple. In addition, the materials and tools for making such a craft will need the simplest. In addition to the box itself, to assemble the toy cabinet you will need to prepare:
- sharp scissors;
- ruler;
- a simple pencil;
- high quality glue for paper.
To design such a toy at the final stage you can use:
- paints;
- colored paper;
- napkins;
- scraps of fabric or oilcloth, etc.
It is, of course, best to make such a craft on a flat surface - for example, on a table or on the floor.
The simplest DIY cabinet made from boxes step by step
To assemble such a toy you will need several boxes of different sizes. The largest of them should be placed bottom down on the table and opened. Next, several more smaller ones should be inserted into this box in random order. Thus, inside the cabinet you will get compartments-shelves. Before installing small boxes into large ones, their walls need to be coated with glue. In this case, the doll's wardrobe will be more solid and durable.
There is no need to cut off the lid of a large box when making this craft. It should be cut in the middle so that you get two doors. At the final stage, the resulting cabinet simply needs to be turned over vertically, placing it on its end.
How to make a cabinet with legs
If desired, more substantial furniture of this type can be made for a child, but at the same time a fairly simple design. In this case, you will need boxes to assemble a doll cabinet with your own hands:
- narrow long (for example, from shoes);
- three small ones, the total width of which should be equal to the length of the large box.
You need to remove the lid from the shoe box and cut off the short sides. Also, this element should be shortened by a third. The long box itself needs to be placed on the table and two small ones glued inside it so that they touch the walls. The remaining part of the lid should be cut in half. The resulting doors need to be glued back into the box above the two compartments made at the previous stage so that 1/3 of the cabinet remains free.
Next, the finished toy should be placed vertically on the table. Then you need to insert the third small box, bottom down, into the bottom of the cabinet, without using glue. The result is a large drawer.
Let's get down to business
We will not consider a specific example of how to make furniture from cardboard. But here is a general design principle with detailed instructions.
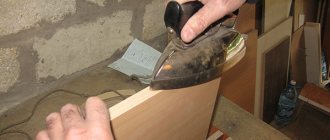
- We cut according to the existing diagram with measurements of the part. You can create patterns from paper, attach them to the base, trace them with a pencil and cut or draw directly on the base.
- It is necessary to process the received parts. To do this, rub the cuts with sandpaper. If desired, you can cover the cut areas (where the structure is visible) with tape or paper.
- Carry out the necessary manipulations for fastening. Depending on the type of connection, you will need to make appropriate cuts (if the fastening is without glue), or mark places for applying glue or attaching tape.
- All that remains is to fasten the parts along the intended lines, and our cardboard furniture is ready.
Bedside table with doors and open shelf from one scheme
We looked at the general manufacturing scheme. As you can see, there is nothing complicated about this. The work depends on the chosen scheme and the product you want to form. If you are planning to make a bed, there will be a little more work, because this scheme has more details. It also requires more strengthening. However, the manufacturing process follows the above-described scheme. The creation is ready, let's move on to design.
Assembling a cardboard table with your own hands
Legs and handles for doors
This technology can be considered a very good answer to the question of how to make a doll cabinet out of a box. However, if desired, such a design can also be improved by attaching additional parts to it.
From one of the short sides of the lid of a long box cut off at the first stage, you can, for example, roll up a tube, glue it and subsequently separate several short sections from it. These elements are subsequently glued to the bottom of the cabinet as legs. Handles for the doors of such a craft will be easy to make from pieces of wire if desired. To do this you need:
- cut two short pieces from the wire;
- make two holes in the doors at the same height;
- insert the wire into the holes so that handles are formed on the front plane and screw it on the back side of the doors.
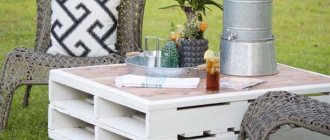
Cardboard table
Browse products for inventors. Link to the store.
I needed a new coffee table. After laying out all the packing boxes, I thought, why don't I use these cardboards to make a table? For the table legs, I decided to use a cardboard tube.
Step 1: Design
DIY electronics in a Chinese store.
At first I wanted to build a table from scratch - using cardboard sheets. Then I realized that I have one large cardboard box that I use to store my things. It will be easier to modify this field to become a tabletop than to create one from scratch. However, I didn't want to lose my coffee table storage box, so I decided to combine both - storage box + coffee table. The idea is to reduce the height of the box, add a cardboard tube as a support, and use the top lid of the box as a table top. The table top can be opened to access table storage.
Step 2: Gather your tools and materials
Corrugated cardboard box - preferably a half slotted container (HSC) because the open top lid can be converted into a table top. Corrugated cardboard sheets.
Cardboard Corner - I don't know what this thing is actually called, it's an L shaped cardboard that comes in a cardboard box to protect the edges. Cardboard tubes – 4 pcs. White PVA glue. Screws are of different sizes. Screwdriver. Stapler. Hand saw. Craft sticks - a lot. Cutter. Round refrigerator magnets – 4 pcs. Dye. Wallpaper, sticker type – 1 roll (5 mtr).
Step 3: Create a Support Beam
My cardboard box is too tall for the coffee table. Therefore, first it needs to be cut so that the final height is only 400 - 450 mm. Next, you need to create a support beam to accommodate the tabletop. This is done by cutting the top corner of the box and bending it into a rectangular beam shape. Use glue and a screw to secure the folded beam to the box. Do this on all four corners.
Step 4: Construct a Guide
The tabletop will be pushed apart on top of the support beam. To do this, use a cardboard corner as a guide. The lower part of the guide is cut to 20 mm in length. Simply add a 20mm thick strip of cardboard to the inside of the cardboard box. This will act as a guide. Next, you need to cut an L shape on the side of the box so that the cardboard corner can slide out.
Step 5: Build the Table Legs
Take a cardboard tube and remove ¼ of the circle as shown in the picture above. I use a handsaw (poor man's method) and a cutter to cut the tubing. Leave 25mm of the bottom of the tube to become the bottom support. Glue + screw tubes to each edge of the box. You now have a tabletop box with a 25mm gap from the floor.
Step 6: Build the Tabletop
Believe it or not, I spent more time making the table top than the other parts. First, cut the top lid of the box into equal halves. Make a cuboid out of the lid with the following dimensions: length 40 mm, width 39 mm and thickness 25 mm. Attach the side guides to the bottom of the cuboid. Stuff cardboard strips inside to reinforce the tabletop. The challenge is ensuring that the two tabletops are perfectly aligned with each other and at the same time can slide smoothly across the table. I add a "hole" on both ends to help open/close the sliding tops. I also add refrigerator magnets to the joining edge to secure the countertop when joined together.
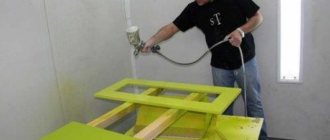
Step 7: Plaster and Paint
Use putty to fill any holes, gaps and uneven surfaces before painting. At this point I add a "frame" to the table using a mounting board. Ideally the surface should be flat and clean for the next step. Paint everything except the countertop surface.
Step 8: Add Wallpaper
It might feel weird to cover a box/table with wallpaper, but I think it's the easiest way to decorate a plain + boring table. I use sticker-type wallpaper, which is very convenient to work with. Simply measure the length of the side, cut the wallpaper and stick it. As you can see, there are bubbles in some areas of the wallpaper due to the roughness of the surface. Therefore, it is important to properly prepare the surface before applying wallpaper.
Step 9: Finishing the Countertop
I wanted to do something different for the tabletop, so I decided to cover it with craft sticks - yes, craft sticks. Use a knife to cut the sticks to variable lengths and glue them on top of the cardboard. I ended up using about 250 sticks. It's a tiring job, but it's fun at the same time. Placing the sticks into pieces is like completing a huge puzzle. And finally, I have a new coffee table - I wouldn't say it's the nicest coffee table, but I now have a table + storage. Two in one!
Wardrobe for a doll
If you wish, you can, of course, make such toy furniture with your own hands. To assemble the wardrobe, you need to prepare a fairly large corrugated box. First, it should be cut into pieces so that you get several sheets of cardboard. They will become the material for assembling the craft.
In this case, you can make such a cabinet from a box with your own hands for a doll, for example, according to the diagram presented below. When assembling such a toy, all elements of its design are made double. That is, two pieces of cardboard are glued together at once. At the same time, the elements are additionally “reinforced” by laying wire at the junction. This material will also be used in the future to fasten individual parts of the craft’s structure.
A photo of a cabinet made from boxes, made with your own hands using this technology, can be seen below the list. Actually, the very method of assembling such a toy looks something like this:
- Shelves are cut out of cardboard (two squares per square) and glued together using wire. The latter is laid between the squares in two places closer to the edges. At the final stage, the free ends of the wire are not cut.
- Cut out parts 2 and 3 and mark the places where the shelves will be located in the future. Make two holes on each mark line.
- Attach 3 shelves to the part by threading the wire into the holes made. Glue is first applied to the ends of the shelves. The wire is tightly twisted on the back side of part 3 and glued with tape. The other side of the shelves is fixed to part 2 using the same technology.
- Cut out two more parts 2 and 3 and glue them to the outer part of the resulting structure. First, a wire is laid above and below between the elements, on which the bottom and lid of the cabinet will subsequently be attached. They also lay wire to secure the back wall.
- Glue together part 4 from two pieces and make a blind hole in this wall at the top. The same hole is pierced in part 2 from the outside. Connect both walls of the cabinet, for example, with a kebab stick 12 cm long.
- Cut out the parts of the lid and bottom of the cabinet. Make holes in the resulting elements for the wire. Thread the wire through the holes and secure it. The ends of parts 2,3 and 4 are pre-coated with glue. Glue two reinforcing plates of the lid and bottom.
- Attach the back wall of the cabinet to the wire. Cut out the second element of this part and glue it to the first.
At the final stage, a do-it-yourself cabinet made from cardboard boxes, assembled using this technology, is glued inside and out with bright colored paper. Sliding doors for the toy are also cut out of cardboard and made double. They are secured inside the cabinet by gluing a kebab stick on top of them in the front plane from below and from above. Door handles are made of wire or brackets.
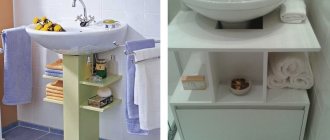
Making a countertop
First you need to make a tabletop. In order for it to withstand the load, for example, from a monitor or laptop, it needs to be made two-level. It is necessary to use a stationery knife to cut three pieces of cardboard in the shape of the future tabletop. One of them is a part for the top level, and the other two are for the bottom level. Cut thin strips of cardboard and bend them like an accordion. These strips need to be glued to one of the parts of the lower tier. To do this, coat a piece of cardboard with Moment glue or use a glue gun. The last option is much more convenient.
Drawing of a cardboard table.
The strips, folded like an accordion, are glued edgewise. It is very important that the strips of cardboard are the same width. To do this, it is best to cut them with one movement of the knife or mark them very carefully. If the difference in their width is significant, then dents will very soon appear in the surface of the tabletop. The tighter you pack the strips of cardboard, the stronger the tabletop will be.
Related article: 50 DIY gift ideas for February 14th (35 photos)
After laying the accordion on top, the second part of the lower level of the tabletop is glued on top. When the bottom element of the tabletop is ready, you can move on to the top part. You also need to glue strips of cardboard onto it like an accordion. When the glue dries on it, you need to glue the upper and lower elements of the tabletop together. To do this, use the same “Moment” glue or a glue gun.
From the same cardboard you need to cut strips equal in width to the thickness of the tabletop and glue them to its sides. Additionally, they need to be secured with masking tape. Pay special attention to the corners.
Return to contents
More complex hanger
Also, if desired, you can make a more substantial hanger of a modern design for a toy cabinet. To do this, you will need, among other things, a small box that will need to be painted with bright paint. Next, two double narrow strips of hard cardboard should be glued to the resulting box vertically (along the short sides). At the next stage, you need to stretch a thick wire between these posts. Next, pre-made wire hangers should be hung on it. In the future, you can put some doll clothes and shoes in the box of such a hanger.
Beautiful cabinet design: decoupage with napkins
The short master classes presented above, describing the process of making a cabinet from boxes with your own hands, allow you to make, of course, a very interesting toy for a child. To make such a craft, among other things, also beautiful, you can use, for example, a fairly simple technique of decoupage with napkins to decorate it. A cabinet decorated in this way will look no worse than a store-bought one.
This design technique looks something like this:
- the cabinet is painted in the background color;
- the top paint layer is separated from the napkins;
- cut out drawings from napkins;
- attach the drawings to the desired places in the cabinet;
- Glue the drawings with PVA glue or special decoupage glue.
As a result, the glue will saturate the design and it will be firmly attached to the walls or doors of the cabinet. At the final stage, the toy can also be varnished for fidelity.
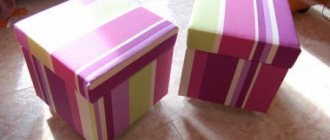
Matchbox chest of drawers
In addition to the closet, you can make such an interior item for a doll from boxes with your own hands. It will not be difficult to make a toy chest of drawers from matchboxes in just a few minutes. To assemble such furniture you will need:
- four matchboxes;
- colored thick paper;
- glue;
- match.
Four boxes for making a chest of drawers will need to be glued in series, placing them one on top of the other. Next, the structure you have learned should be covered around the perimeter with thick colored paper. You also need to cut a rectangle out of this material and secure it to the back of the chest of drawers. The front part of the structure, of course, should be left free. From here the drawers will then slide forward.
At the final stage, you also need to stick a strip of colored paper on the front side of each matchbox of the chest of drawers. If desired, drawer handles can be made, for example, from pieces of matches.