However, not everyone can afford it. In this case, we recommend making a tool cabinet with your own hands. This will not take much time, but it will bring satisfaction from the fact that you have dealt with the problem without extra costs.
Material
Before starting work, you need to take care of the materials for work. To design a tool cabinet at home you will need:
boards _
This is the main building material for the cabinet. The best option in terms of price/quality ratio is pine boards. They make the frame of the cabinet. The thickness of the boards is not critical, but experts advise using thicker boards.The tools that you will place in your cabinet will likely be heavy, so the shelves and frame must be durable;
- plywood _ Designed to create the back of a cabinet, as well as partitions for drawers. Exactly how much plywood will be needed depends on the size of the cabinet and the size of the partitions;
- timber _ It is advisable to stock up on beams made of the same material as the boards. The beams are used to create legs or runners on which the cabinet will stand.
Important . Do not use plywood as bottoms for drawers. Plywood sheets are not at all durable, so they will not be able to withstand a lot of weight.
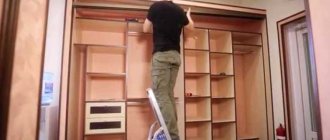
DIY shelves and doors
Doors
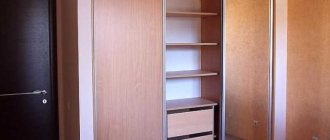
- You can choose any doors, but the best option would be to use sliding doors or accordion doors . This will save space.
Accordion door in the dressing room
- This type of door can be installed in both square, rectangular and corner wardrobes. They can be wooden, glass, plastic, fabric, louvered and even mirrored, it’s all a matter of taste and family budget.
Shelves
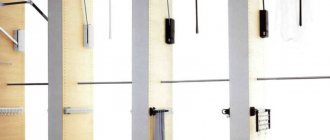
- You can make shelves and racks yourself or order them from a furniture store. The traditional set includes rods with hangers, hooks, laundry baskets, closed drawers, various shelves for clothes and shoes, and racks.
Options for wardrobe shelves
It will be cheaper, of course, to do everything yourself; to do this, make shelves from metal mesh. It is better to use welded fine mesh . It is produced chrome-plated, galvanized, with PVC coating. Such scraps can be purchased very cheaply in the store, since they are no longer suitable for sale, but just right for shelves.
- In a small dressing room, it is best to have more open shelves and several drawers. The most optimal placement of shelves is “letter G” and “letter P”.
- the racks into zones. For example, lower, middle and upper. It is better to place shoes, knitwear, and linen at the bottom. Place your casual clothes (pants, skirts, dresses, bags) in the middle zone. The top is most convenient for storing items that are rarely used, such as seasonal clothing.
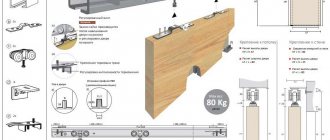
Scheme and drawing
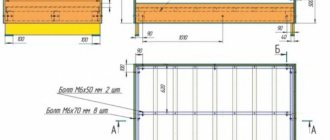
To assemble a high-quality tool cabinet at home, you cannot do without a good drawing. You can create a drawing yourself, but it is better and easier to find a ready-made sketch on the Internet.
When creating a cabinet for your own needs, you don’t have to worry too much about carefully drawing out the design, but only draw a modest sketch. Preliminarily determine the dimensions of the back and side walls, and also pay attention to the dimensions of the lid and tray.
Advice . When planning shelves, do not forget about the thickness of the boards, which will “destroy” part of the free space.
Be sure to adjust the drawers to the size of the shelves (minus 5-6 mm for freedom of movement).
It is strongly recommended to make the boxes removable, which will make working with the tool easier. When designing, it is best to plan to place the tools in the drawers in one row and one layer. This will make working more comfortable and also allow you to create a shallow cabinet.
DIY dressing room made of plasterboard
- First you need to start purchasing building materials and tools.
- Decide on the location of the dressing room.
- Develop a project. It is not enough to just draw a diagram or sketch; you also need to make markings on the walls, floor, and ceiling. Look through catalogs and various photos on the Internet.
DIY dressing room drawing
See various dressing room finishing options:
Tools and Fasteners
To create your own tool cabinet you will need:
screwdriver _ Select drills of the required diameter for the device in advance;- power saw or hacksaw . One of these tools will be needed at the preliminary stage for cutting boards;
- corners for fastening . To give the structure real strength, use special furniture corners. You may also need hinges, but only if you want to make a cabinet with doors;
- furniture screws and special nuts for them . They must be made of brass. The material does not rust and is highly durable. One of the minuses is the “biting” price of brass.;
- self-tapping screws Useful for auxiliary fastenings. However, you can do without self-tapping screws by using nails. Then stock up on a hammer as well.
Advice . For working with a wood screwdriver, galvanized screws are suitable, not steel ones. Their characteristics are the same, but steel ones are significantly more expensive.
The use of nails when assembling the structure is not recommended. It is no secret that the wood will dry out after a certain time, and the nails will not be able to provide sufficient strength.
Improving the tool box
Depending on where the tool cabinet will be located, on the balcony or in the storage room, you can make its lighting with your own hands. This will significantly improve ease of use. There are several options for resolving this issue.
For those who understand electricity, we can offer automatic backlighting. Future lighting fixtures are marked in the box and holes are cut for them so that it is possible to install a base.
It is advisable that the product is already in place, since the next step will be choosing the length of the electrical cable. It is fixed to the wall or ceiling using screws, after which it is placed in the lid and closed. Next comes the sequential connection of the backlight to the cable - first phase, then “zero”.
IMPORTANT! Any work with wires and other elements is carried out only with the electricity turned off. Now the lamps are screwed into the base and the work is checked.
Halogen lamps. This option is suitable for a large box to illuminate its shelves. Typically, such kits are sold as ready-made kits consisting of:
- switch
- transformer
- halogen lamps
- connector
- wires
Initially, lighting is marked, after which holes (0.5 cm) are made with an electric drill and cutter. After this, the cutter is turned over and the points are completed.
If this is not done, there is a risk that the tool may seriously damage the wood, which will require you to redo the shelf or door.
According to the diagram, all the elements on the floor are connected into a single chain, after which the lamps are connected to a transformer and the operation is checked. For parallel connection, blocks and terminals are used.
In order for such lighting to work fully, it is worth remembering the following important points:
- transformer power ratings should be 5% higher than the total power of the lamps themselves
- minimum power output from the transformer is 12 volts
- pay attention to the operating voltage indicators of the lamps themselves
- For the backlight to work well, the maximum cable length should not exceed 2-3 m
- the transformer is mounted in a place so that it does not heat up from other sources (battery, heater, etc.)
Mini workshop with lighting
LED Strip Light.
Perhaps the easiest way to outfit your toolbox with light.
But this does not mean that such light will be ineffective.
LED strips are sold in reels, and you can buy a specific meter or take one reel, in which 5 meters are measured at once.
Additionally, you will also need a plug and wire to connect the entire system to the mains, as well as a power supply and controller.
The work has the following stages:
- first connect the unit with the cable, and then connect the controller to the power supply
- 4 multi-colored controller wires are connected to similar colors on the tape using a soldering iron or terminal blocks
- to check, connect the plug to the socket and see if all the lights are on
- Each tape on the reverse side has an adhesive backing, which is covered with a protective film - gradually removing it, the tape is pasted in the necessary places for illuminating the box
If desired, you can purchase multi-colored ribbon. As for the intensity of lighting, it all depends on the density of light bulbs per 1 square meter. m. - the more there are, the brighter the light.
Making tool box lighting is actually not that difficult.
Assembly
The initial stage of assembling a cabinet is creating a frame . A frame is assembled from boards, as mentioned above. The boards should be cut to specific dimensions indicated in the drawing. The side walls, bottom and lid are assembled from the boards.
Advice . Make sure there are no wide gaps between the boards.
For assembly you need:
The boards should be joined according to the drawing, and then secured with auxiliary fastening (nails or self-tapping screws).
This type of fastening will not hold the structure under load too firmly, but will significantly facilitate the fastening procedure itself.- Having assembled the frame on the “temporary fasteners”, you can proceed to the installation of the main fastening. Take furniture corners and secure all the joints with them (using self-tapping screws, of course). When the structure is firmly fixed, you can begin to install furniture screws and nuts. For this purpose, the ends of the walls are drilled in the places where the shelves and the lid are attached. Please note that the length of the drill and screw must match.
- The next step is to drill holes for the furniture nuts. They need to be made perpendicular to the already drilled holes in the shelves, roof and bottom. This is the most difficult and responsible stage. Once all the holes are ready, install the main fasteners.
Congratulations, the frame with shelves is now complete!
The next stage is creating the legs . To do this, a beam is attached to the bottom of the frame (only on the reverse side), as if runners were attached. You don’t have to worry about overly strong fasteners - just use cheap self-tapping screws. After this, pre-prepared legs are attached to them in the corners.
The final stage is boxes . They are created by knocking down a frame of the desired shape and size. The bottom is attached to this frame from below. If it is necessary to add shelves, cuts are made on the inside where the partitions will be mounted.
Advice .
If the creative passion has not passed, you should start making a cabinet for books or clothes.
Types of hull structures
An interesting option for storing things is a small dressing room made from a pantry. This type of storage furniture is optimal for a small space.
You can assemble the structure yourself, using ready-made modules and components. The designers who developed the design of such a storage system for a dressing room offer one or more cabinets made of chipboard.
They are distinguished by a variety of shelves and baskets attached to the walls of the room.
The most affordable are mesh wardrobe designs; you can easily install them yourself. The advantage of such a cabinet furniture design is the possibility of configuration taking into account individual needs, specifics and size of the room.
Mesh wardrobe structures are ideal for modern studio apartments.
Metal modular wardrobe systems are recognized as popular and modern. Such systems require an aluminum frame to which hangers and shelves are attached to brackets.
Expert opinion
Romanova Ksenia Petrovna
Interior design expert and fabric store manager
As an addition to such designs, a chest of drawers is used. A similar wardrobe structure, assembled with your own hands, is easy to install and, if necessary, dismantled.
Even beginners can assemble it, because the manufacturer offers detailed instructions for assembling cabinet furniture intended for storing things. Metal wardrobes are lightweight, reliably protected from corrosion, ideal for high-tech connoisseurs.
You can install mesh and metal wardrobe systems yourself, following the manufacturer's instructions. To do this, panels are attached to the walls, then shelves are screwed to them, holders for laundry baskets, hooks, and various wardrobe elements are fixed.
Installation and dismantling of furniture frames is a lengthy procedure; you will need certain tools and equipment. Basically, furniture structures of this type are divided into three main parts:
- the upper part is used to place hats;
- the middle part is intended for storing linen and clothes;
- the lower part is a place to store shoes.
Modern furniture designs Leroy Merlin
Mesh wardrobes allow you to store things uncrumpled. Thanks to the flexibility of the manufacturer, the consumer has the opportunity to select components and parts that would fully satisfy the needs and desires, and create with their own hands their own version of the system for storing personal belongings.
An interesting solution is the option of several laundry baskets that differ in capacity. Such baskets are suitable for knitted items, socks, and underwear.
You can quickly find the item you need; there is no need to rearrange all the shelves and drawers and waste time and effort on this. Let's try to find out the main advantages of frame-type furniture structures:
- These designs have high strength, wear resistance, elegant and modern appearance. When creating such dressing rooms, modern steel alloys are used, as well as original decorative elements made from natural wood.
- When using such furniture structures, you can rationally use the space when placing personal belongings. Having a small area available, you can fit many times more things than in a simple closet. You will greatly simplify the search for the items you need, since this system includes convenient and transparent laundry baskets, universal hangers, shoe shelves, and many other convenient elements.
- The dressing rooms have excellent ventilation. You will not have the problem of the unpleasant smell of “stale” things, which is typical for standard closed cabinets made of chipboard or wood.
- You can install and dismantle such systems on your own, without involving professional furniture makers. In addition, you can easily move your dressing room from one room to another without worrying about whether it will fit through the interior doors.
The main difference between such a wardrobe system and other modules for storing things is the variety of components. You can think through every detail that will distinguish your dressing room.
It is difficult to fit such a number of things into standard cabinets that can easily be placed inside the cabinet system. Each handbag, belt, headscarf will be located in a separate basket, convenient for use.
Kansas system
The classic Kansas wardrobe system involves the use of a 2 m high rod on which laundry baskets are attached. The system has three sections 30 cm deep and 2.4 meters wide.
Expert opinion
Romanova Ksenia Petrovna
Interior design expert and fabric store manager
This dressing room assumes the presence of all the necessary elements for storing things. The top shelf is needed for gloves, hats, caps, then there are hangers for outerwear.
There are three sections where shorter clothes are stored. On special shelves that are in the dressing room, you can lay out umbrellas, gloves, and other accessories.
At the bottom of the system there are shelves for shoes. This wardrobe system is suitable for small spaces.
Aristo shelving system
The modern Aristo wardrobe system is distinguished by a huge number of shelves. This dressing room is much more compact than other dressing options, and therefore is popular among owners of small-sized city apartments.
You can choose your own version of the main components for placing things and make your own unique system out of them. If desired, over time you can supplement and modernize the dressing room by changing some parts.
The manufacturer offers the following elements to create your dressing room:
- Shelving. You can choose a ready-made version of the rack. Plastic, metal, or natural wood can be chosen as the material for the production of such a rack. Lovers of high-tech style can opt for shelving made from durable glass. The parameters of the racks, as well as the number of shelves, can be chosen according to your personal desire.
- It is quite possible to limit yourself to ordering individual shelves. You can choose their size based on the area of the room. The material for the shelves is also selected taking into account your taste preferences. Manufacturers of modern furniture systems offer transformable shelves that are characterized by a high degree of functionality.
- You can place an order for a full-fledged cabinet storage system and, with the help of professional consultants, select a dressing room that will be convenient in location and use.
- Manufacturers of cabinet furniture offer a variety of containers with which you can store a variety of items and items of clothing. For example, you can choose boxes to place tools, children's toys, and ties. If you wish, you can place a modular element on your garden plot, designing boxes for storing garden tools in it.
In addition to built-in accessories, you can also order removable elements for your wardrobe systems.
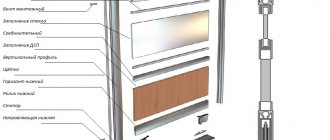
Manufacturers offer a variety of decorative furniture facades. Of particular interest are sliding doors for the dressing room.
They can significantly save space and are optimal for installation in small city apartments. As a material for doors, you can choose natural wood, durable glass, modern polymer, depending on personal preferences and material capabilities.
To visually expand the space, you can choose dressing rooms with mirror surfaces.
Elf system
The Swedish company Elfa is known in the world as a leader in the production of cabinet systems designed for storing clothes and personal belongings. This company is the official founder of mesh versions of modern wardrobe systems.
This company has been improving the furniture cabinet system for sixty years and is looking for innovative ways to modernize them. Elfa wardrobe systems can be found in all European countries, combining many years of experience and traditions of the company with the latest achievements of the global furniture industry.
Elfa furniture frame structures are rightly called the most versatile modular systems, which has made them popular among consumers. Elfa furniture cabinets are spacious despite their compact size and allow you to save space in your apartment.
The systems have high-quality ventilation; you can store things for a long time without fear of an unpleasant odor. Clothes in such frame structures retain their original appearance, remain fresh for a long time, and have a pleasant smell.
The installation of such a cabinet structure can be done with your own hands, spending a small amount of time.
Thanks to the patented quick installation system, all Elf furniture designs are assembled without the involvement of professional specialists, which saves financial resources. Installation of such a cabinet system is allowed in any part of the apartment, regardless of the parameters of the room.
You can dismantle the dressing room at any time and move it to another room. In addition, such modular designs can be supplemented with new elements to fully satisfy the needs of all members of the family.
How to make
If you plan to do the work yourself, it is recommended to watch the training video in advance to learn all the intricacies of the work, as well as take into account various errors and problems that arise in the process. The first stage of creating a dressing room is the formation of special drawings, according to which subsequent work will be carried out.
When a sketch is formed, important points are taken into account:
- Initially, a drawing is made of the immediate compartment intended to create a dressing room, and it can be represented by a small storage room or even a small niche located in the corridor, bedroom or other room of the home;
- all results are transferred to paper, and it is quite difficult to do this work yourself without experience or special skills;
- it is determined what dimensions the racks, shelves and other elements installed in the dressing room will have, and it is taken into account that the shelves should not have a depth exceeding 50 cm, and there should be a distance between them of 35 cm;
- if difficulties arise in determining the appearance of a given compartment, then it is advisable to look at the photos in the selection in order to take a ready-made drawing as a basis;
- it is important to decide whether there will be a door in the design, because if it is planned, then it is decided what size it will have, and also whether it will be standard, hinged or sliding;
- do-it-yourself wardrobe drawings and diagrams of which can be seen in the selection must be made durable, of high quality, therefore all the elements contained here must be securely fastened, so the fasteners used for these purposes are thought out.
The finished project should contain numerous calculations and photos so that you can clearly imagine how the dressing room will look in the apartment, as well as what fasteners and materials need to be purchased to complete all the work.
Construction technology
The work involves performing a number of actions:
- You should first measure the space in the garage intended for the cabinet. Then a drawing is sketched on paper and the amount of material is calculated.
- In the garage, markings are made where vertical racks and shelf mounts are supposed to be installed. If you intend to store heavy objects, then more fastenings are made.
- The corners are welded or screwed to the posts.
- Shelves are installed on the frame. If they are made of wood, then the surface is pre-treated with protective solutions.
- At the last stage, the hinges are attached and the doors are installed. Doors can be ordinary or modern, for example, roller shutters.
A cabinet of any material can be made according to these instructions.
Metal structure
Metal structures can withstand heavy things. The furniture is durable and stable.
The frame is made from metal pipes. The parts are cut out according to the intended dimensions and connected by welding. Metal sheets are attached to the frame, which will serve as shelves. At the last stage, the doors are installed.
As a disadvantage, there is a tendency to corrosion. When assembling the cabinet, a welding machine is required.
Instructions for assembling a wooden cabinet
A wooden cabinet looks beautiful indoors, it is easy to assemble, and the frame will last a long time. You can store spare parts and tools in it. The main disadvantage is the high level of flammability of the material.
Manufacturing begins with the frame. It can also be made of wood or metal. Then the side panels are installed. The shelves are made of chipboard or thick plywood. The doors are installed last.
Wardrobe with roller shutters
When opening, protective roller shutters do not require any free space around them, so the cabinet can be installed anywhere. The roller shutter opens manually or using automatic control.
For the frame you will need to purchase metal corners or pipes. Then they are cut to the required parameters and welded. It is easier to make a structure from a special metal profile. In this case, the parts are connected to each other with angles and bolts.
The frame of the roller shutter system is attached to the assembled structure using welding or bolts. Shelves made of wood or sheet metal are installed inside the cabinet.