Mattresses and all other items in the apartment need care, washing and cleaning to prevent the growth of bacteria and insects. Cleaning a mattress is very difficult. It is large, weighs a lot, and cleaning it requires a lot of time and nerves. Covers, or mattress pads as they are also called, help simplify the care of mattresses. After all, unzipping the zipper, removing the cover and washing it in the washing machine, and then using a hot iron to destroy all dangerous germs is much easier and faster. How to sew a mattress cover with your own hands is discussed in this article.
Why do you need a case?
Each mattress is covered with a cover, and sometimes even more than one. During production, mattresses are covered in stationary covers that cannot be removed. They are sewn from dense, strong fabric, usually beautiful and expensive (for example, jacquard). Unfortunately, such a mattress cover cannot be removed and washed, so to prevent its rapid wear and tear, you need to stock up on another cover - a removable one that can be washed regularly. You can buy it in a store or sew it yourself.
A mattress cover is a very necessary and useful thing.
It's no secret that the bed absorbs everything from the human skin: sweat, dirt, dead cells, and besides this, for those who like to have breakfast in bed, as well as lunch and dinner, it happens that crumbs, drops and other food particles get into bed, and not always a sheet or even a bedspread can keep the mattress clean. Therefore, regular cleaning, washing and ironing of the cover covering the mattress is extremely necessary; it can prevent the occurrence of various diseases and maintain aesthetic cleanliness and neatness.
Note! An important incentive for purchasing a removable mattress cover is wear and tear. Mattresses are expensive and it is often impossible to change them, but a mattress pad will cost much less and can be changed more often, pleasing the eye with an abundance of colors.
There are different types of mattresses and they all need a mattress protector.
All mattresses need cleanliness - a child’s mattress, a swing mattress, and a regular sleeping one; the mattress on which a child sleeps especially requires maintaining cleanliness.
Removable or non-removable cover
As mentioned above, the cover can be removable or not. Mattresses are placed in non-removable covers during their production. And the best option would be a second mattress cover, removable and put on top of the stationary one. There are original mattress covers with a fastener. Such mattress covers are convenient when purchasing a mattress, because by unzipping the zipper, you can make sure that the mattress is actually made from the material stated.
You might be interested in Features of patterns from Anastasia Korfiati: how to learn cutting and sewing
But removing such a cover for washing is very inconvenient, because it is made of thick, heavy fabric and will not fit into every washing machine. Sewing a non-removable cover is all the more irrational, because its most important function is to keep the mattress clean, and, accordingly, it itself must be clean.
Stationary zippered cover
A removable mattress pad usually has a zipper. It can be located along the entire perimeter of the mattress, only on one side, at an angle, covering one side in length and the side adjacent to it in width. The fastener can also be button, Velcro, lace, elastic, and so on.
The cover can only cover the top of the mattress
Important! It is not necessary to sew a removable mattress pad in the form of a cover covering the mattress on all sides. It is more convenient to make it hide only the top and side parts, and only slightly capture the bottom, tightening it with an elastic band.
You can't stop sewing beautifully!
Miscellaneous
How to sew a cover for a sofa or swing. Two ways of cutting and sewing.
Hello, friends!
Elena Krasovskaya is with you.
The cover we are talking about is perfect for a kitchen sofa, a yard swing or a small bench.
Let me start with the fact that I have many hobbies in my life arsenal. One of them is creating furniture for the home.
I won’t repeat myself about the origins of the hobby; the details of the story are in the publication on how to make a transforming table for cutting and sewing with your own hands.
If you also want a cutting table, look at the article, there is information on dimensions and assembly.
Of course, I don’t make furniture entirely myself. Mine: idea, planning, calculation, detailing, ordering cutting. My husband delivers materials and assembles them.
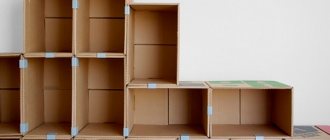
One of the incarnations is a dining area, consisting of a table, two chests of drawers, a cabinet and a small sofa.
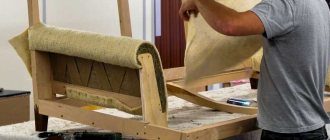
The sofa has two rectangular parts made of foam rubber, replacing the soft part of the back and seat.
We sew a cover for them.
I empirically tested three methods of cutting and sewing from different materials.
By the way, the photo uses a type of material that I’ll tell you about next time. This is the fourth. These are the advantages of knowing how to sew - you can change the interior with minimal expenditure of materials, effort and time.
Additional materials for you: How to sew a phone case How to sew a case for glasses with an applique How to sew a case for a tablet
I will share my impressions of my first experiments in sewing a sofa cover.
For some furniture models they will be an excellent solution.
Next, we’ll look at the third method of sewing a sofa cover. It is distinguished by its simplicity of cut and sewing. Any beginner can sew such a cover. If you have a garden swing, this method is best.
I recommend subscribing to any of my mailing lists to learn about new publications.
A few words about materials
To sew a cover, choose materials that are fairly dense, but not rigid. It would be great if they have water-repellent impregnation or anti-claw properties. You can look for such materials in furniture making salons.
Also suitable:
- tapestry;
- matting;
- dense types of cotton;
- “furniture” and curtain fabrics;
- in some cases, raincoat fabric or fabric for sewing workwear will be good.
The choice is now huge, it all depends on the scope and frequency of use of the sofa. For a home sofa or swing, it is better to choose materials of different types and purposes.
I will share my experience of using different materials.
In the first case, I chose curtain fabric.
It looks beautiful and fits the interior, but...
If you have small children, not very neat adults or animals, I advise you to think twice before using such materials, especially for sitting.
Any stain is extremely difficult to wash off, the seat becomes greasy even with frequent cleaning, and the appearance of the area desperately deteriorates.
In the second case - three-layer fabric with thermal stitching.
Polycotton on top and bottom, padding polyester between them. Such fabrics come from different fibers: cotton, silk, polyester, etc. It all depends on the assortment in the fabric store.
Advantages of thermal stitching:
- no needle holes;
- insulation fibers are not knocked out on the front side;
- increased durability of the canvas.
I love this type of material!
I used it to make ironing board covers, textbook covers, bedspreads, etc. The range of applications is wide, I recommend it.
There are two disadvantages when using : pillability (in simple terms, “pellets”) and loss of color.
You need to study the composition of the fiber and dyes when purchasing, and when washing the product, it is better to add special products to preserve the color.
Overall, a wonderful type of material for household items.
Let's look at two ways to cut and sew a cover for a sofa or swing.
The first is when the case consists of two separate parts.
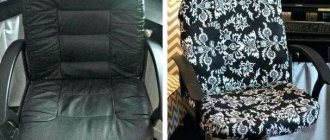
To “fit” the sofa into the interior, I sewed a cover from curtain fabric. I talked about the pros and cons above.
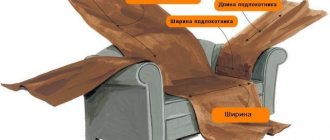
The upper part of the back and seat parts was cut from the same fabric as one of the curtains on the window. The lower part, to save material and money, was sewn from less expensive cotton fabric.
The figure shows a diagram of the parts.
I sewed a zipper into the longitudinal seam of the cover, on the back and seat parts. This makes it easy to remove and wash the cover. Choose a longer zipper, otherwise it will not be convenient to insert foam parts.
Cutting and sewing
To cut parts, you need to measure the length, width, height of the parts and cut them out according to the measurements obtained, adding seam allowances.
Sew sequentially. First, sew strips of different materials lengthwise, sew in the fastener and sew in the side parts.
If desired, you can pre-stitch the fabric or reinforce it with duplicating material. I used diamond stitching along the main fabric.
From leftover material, you can sew pillowcases for small pillows.
The advantages of this method of cutting and sewing a sofa cover:
- Foam inserts are securely fixed inside and do not “pop out”;
- Two mobile, separate parts that are easy to remove/disassemble, etc.
- You can choose any suitable material in different combinations;
Minuses:
- HIGHER material consumption than other options. If the fabric is expensive, you can feel it.
- Sufficient complexity of technological assembly. For beginners, sewing such a cover may not be a very easy task. Especially if the skills to sew a fastener onto a braid - a zipper - are not enough.
But, in general, a good option for a cover for a sofa and other mobile furniture.
Additional materials for you:
How to sew a zipper into a seam
Zip closure
A simple way to attach a zipper fastener
The second option for sewing a cover for a sofa or swing
Similar to the first one, but with a simplified cut and sewing of the cover.
In this case, the parts are cut out together, without side longitudinal inserts, as shown in the diagram.
There is no need to sew in a zipper, and the foam rubber is easily inserted inside the case.
Advantages of the method:
- Ease of cutting and sewing;
- Less material consumption;
- Easy to remove foam for washing.
Minuses:
- Due to the fact that the parts of the cover are cut together, you have to adjust it more often and “seat” the loose foam rubber into place.
Summarize
We looked at two ways to cut and sew a cover for a sofa or swing, which you can easily sew with your own hands.
Each of them is quite suitable for different types of furniture. For example, using the first method, you can sew covers for chairs, decorate pillows for children's games, or sew a cover for a mattress in a crib.
Choose what is close to you in terms of complexity and scope of application.
Next time, in more detail, I will clearly show the cutting and sewing of an excellent-looking cover. To sew this version of the cover, you do not need to have special skills.
Leave comments and share your impressions: have you ever sewed similar things with your own hands and what methods did you use?
With faith in your success and wishes of good luck, Elena Krasovskaya
This is interesting:
- Master class on sewing a sofa cover. 5 steps
- A selection of useful assistant services for…
- How to sew a cape, pareo, skirt or kilt...
- An unusual patch pocket for a coat and…
- How to sew a fashionable beanie hat with lining...
- How to sew a cosmetic bag or handbag in half an hour
Selecting tools
Before you start sewing a mattress cover, you need to prepare the tools that you may need:
- to create a pattern - paper, ruler, pencil.
- scissors;
- tape measure;
- chalk or pins for transferring the pattern onto the fabric;
- threads and needles;
- sewing machine;
- fabric and elastic.
You will need a standard set of sewing tools
What you need for sewing
Let's figure out today how to sew a pillow cover and what tools you will need for this.
If you are interested in handicraft lessons, then you should definitely visit the website https://gidrukodeliya.ru
First of all, you need to prepare a piece of material. You can choose fabric of absolutely any texture and color, the main thing is that it fits harmoniously into the overall interior of the room.
Very interesting options are when decorative pillow covers are made of the same material as the seats on chairs or ottomans.
A measuring tape and a long ruler for measuring the size of the pillow and creating a pattern, well-sharpened scissors.
Sewing needles and a set of bobby pins. Threads to match. Tailor's chalk, pencil or soap.
If desired, the zipper can be replaced with Velcro or buttons. Decorative details - buttons, applique, embroidery.
Sewing machine. If you have such an assistant, the sewing process will not take much time. However, many needlewomen cope just fine without it.
Choosing fabric for a mattress cover
Almost any fabric can be used for a mattress cover. But there is still a division of fabric types in accordance with the purpose of the cover. For example, the fabric could be:
- hypoallergenic;
- waterproof;
- warming;
- synthetic;
- combined;
- natural.
For a regular mattress cover, natural fabrics (linen, satin, calico) are still recommended. They are light, breathable, do not cause allergic reactions and wash well.
Important! Natural fabrics tend to shrink, so before you start sewing, it is recommended to wash the cut in hot water and iron it thoroughly.
Synthetic fabrics are cheaper, absorb moisture well and are suitable for people with allergies. Another advantage of synthetics is wear resistance. They are more durable, do not lose color, and are easy to wash. If there are no contraindications, then it is quite possible to use synthetics (for example: microfiber or polycotton).
Also for the cover, quilted fabrics like blankets, down or foam filling can be used.
Quilted cover
Of course, you can take any color of the fabric, some prefer bright shades with patterns or flowers, but do not forget that the cover will come into contact with moisture (sweat, accidentally spilled water, wet hair), and rich colors can fade and leave a mark on the bed linen. linen. Therefore, it is preferable to choose calm tones without unnecessary patterns.
It is better to choose a calm color
Taking measurements
The fastest and most convenient way to sew a mattress cover is to choose a model that covers the top and sides, and is secured with an elastic band. The step-by-step instructions for sewing such a product are clear and easy.
You might be interested in this How to sew a Teddy bear yourself: creating a pattern
Before sewing a mattress cover, you need to know only three measurements: the length, height and width of the mattress. The length and width of the product are laid out on a piece of fabric, then the thickness of the mattress is added on all sides and another 15 cm for the hem.
Only three measurements are needed
Important! If the width of the fabric is smaller than the width of the mattress, then you will need to measure half the width twice in length, remembering to leave allowances for the connecting seam.
How to sew a mattress cover for a baby
You can make a cover for a children's mattress with a zipper yourself
It is very easy to make a cover for a children's mattress. How to sew it yourself is easy to understand from the recommendations. You will need:
- take measurements;
- purchase and wash fabric;
- prepare tailoring tools and machine;
- cut out two rectangles: one to size, the second with an allowance of 2-3 cm on each side.
Three sides and part of the fourth, where a zipper or buttons will be sewn, are stitched and stitched by hand.
When a zipper is used, it is first basted and tried on. If everything is done correctly, it is sewn into place. After ironing, the cover can be put on.
How to transfer a pattern to fabric
The resulting pattern looks like an ordinary rectangle, and, in principle, for such a simple model it is not needed at all. But if you can’t do without it, then for quick convenience you can prepare a pattern for a quarter of all sizes, and then cut it step by step:
- spread the cloth on the floor;
- fold it in half;
- fold it in half again, only in a different direction;
- Place the prepared part of the pattern on the fabric and pin it with pins or outline it with chalk.
Pattern of a cover with an elastic band
Important! When applying part of a pattern, the main thing is to keep control and not confuse the direction of length and width.
Finishing touch
Now all that remains is to sew the cover. Baste the pieces along the stitching lines and sew them by machine (by hand). You can put a cover on the pillow.
If you plan to decorate the pillow with embroidery, applique or other decorative elements, it is much more convenient to do this before starting to sew the parts.
You don't have to come up with a design yourself. You can easily look through existing photos of a pillow cover in catalogs or various collections and repeat the model you like.
An IKEA cushion cover can be the perfect boost to develop your own design skills.
- Chair pillow - orthopedic pillows, basic models and care for them (129 photos)
Headrest pillow - how to sew it yourself. 140 photos of models for children and adults
- Double bed linen - main sizes, patterns and stylish colors (120 photo ideas)
We cut and sew a mattress cover with our own hands
After transferring the pattern onto the fabric, you can start cutting and carefully cut out the future cover along the chalk line. Since the mattress cover will have an elastic band, there will be only one seam - along the perimeter of the product.
Sew a seam around the perimeter
Moreover, it will not be just a hem seam, but one so that an elastic band can be pulled into the resulting space. First you need to hem the edges of the fabric so that it does not fray, bend it 0.5 cm, and then another 1 cm and baste or secure with sewing pins. All that remains is to sew the seam on the sewing machine.
Making a mattress from pillows
I saw this interesting thing on the Internet, a mattress made of pillows. True, it was positioned there as a children's mattress, which you can throw on the floor and relax, play, in short, so that it would not be cold to sit on the floor. I wanted to do it. Only it’s a pity for him to be on the floor, but he’s quite a huggable pillow.
You will need: padding polyester; white cotton for napkins; cotton for the pillowcase (I have two colors), but it’s all according to your wishes, a plain one is even easier; and all related sewing accessories, thread, ruler, pencil, meter, iron, scissors, etc.
I made pillows from padding polyester with a density of 200 g/sq.m according to this principle:
(photos from the Internet for clarity).
The first rectangle is made of padding polyester 50x30, the second is 44x24, the third is 38x18, the fourth is 32x12 and the fifth is 26x6.
We put them on top of each other in a pyramid, you should get 2 such pyramids. We place one on top of the other with the smallest parts inward, press and sew with a regular seam by hand.
We make 5 of these pillows.
Next you need to sew the napkins. I made a napkin measuring 51.5 x 31.5, taking into account the seam allowance (I made 0.7 cm according to the size of the sewing machine foot). You can make a standard 1 cm. We sew the napkin on three sides, insert the pillow and sew up the remaining open edge with a hidden seam. For speed, you can also stitch it on a typewriter.
It turned out to be 5 neat pillows. Next is one large pillowcase.
In order to sew a large two-color pillowcase, we will need 2 pieces of fabric that will be sewn together.
The first cut - the upper part - 150x50 cm (+ allowances for seams and edge finishing) With allowances it will be approximately: 152x52 cm.
The second cut - the lower part - 150x65 cm (overlap inside and + again allowances for finishing the edges). With allowances approximately: 152x67 cm.
First we sew two colored parts together, process all visible edges, then apply pillows and estimate the distance at which we will lay the end lines. I got 30 cm.
We assemble the pillowcase, remember that the overlap of the lower part should be on the inside. Sew together the top and bottom of the pillowcase and turn it over your face. We measure the final lines along the front part of the pillowcase. For convenience, we pin with needles so that the fabric does not move, draw lines with a pencil or a disappearing marker at a distance of 30 cm and sew on a machine, removing all excess threads.
We insert the pillows into the resulting pockets and you're done.
You can sew in some cute element; I have a cross-stitched blue heart.
Sew in an elastic band
There are several ways to sew elastic into a mattress cover. For example:
- Use an elastic band; the elastic is sewn onto the folded fabric using a zigzag stitch.
- The corner method is when pieces of elastic attached to the fabric grab the mattress at the four corners, preventing the fabric from moving.
- The standard method is to create a drawstring into which the elastic is pulled.
Note! In order to beautifully sew in an elastic band, one of the corners must be pre-processed, leaving a hole in it for pulling the elastic through, and the remaining corners must be stitched in the usual way. Insert an elastic band into the remaining hole using a pin and tighten it.
The final touch is to insert the elastic
It is more convenient to do this by pulling the cover over the mattress so as not to make a mistake with the length of the elastic band. Having stretched the elastic on the mattress, you can easily trim off the excess length and tie or sew the edges of the elastic together.
You may be interested in Constructing a pattern and sewing children's shorts
How to sew a mattress cover with your own hands: 2 master classes
Photo: Pinterest
Let's say right away: now we are not talking about a mattress topper, essentially an additional thin mattress that is placed on top of the main mattress and can perform orthopedic and other functions. Toppers are made from latex foam, coconut shavings, foam rubber, and their production is comparable in complexity to the production of a thin mattress. We are talking about a mattress cover or pad. This device primarily performs a hygienic function. The mattress protector protects the mattress from dirt and is easy to remove and wash. A mattress cover made of waterproof material will protect the mattress from moisture. A cover or pad extends the life of the mattress and protects you from many problems during its operation. This mattress cover is easy to sew with your own hands.
How to sew a duvet cover with your own hands: an easy way
Mattress cover: choosing fabric
Its functions will depend on the mattress cover material you choose:
— if the mattress cover should protect only from dirt and dust, choose thick cotton, linen, jacquard, thin terry cloth, bamboo;
Photo: parachutehome.com
- if you also need moisture-proof functions, take a fabric or material with a waterproof lamination (there is, for example, terry fabric with such a lamination);
Photo: Pinterest
— a quilted mattress cover with a thin layer of padding polyester is good for winter, it retains heat (you can use ready-made material by adding a lining);
Photo: by.all.biz
— a mattress cover with a layer of fleece or wool will have the same properties;
Photo: discoverdirect.co.uk
- a jacquard or silk mattress cover, on the contrary, is good in hot weather, as it gives a feeling of coolness (but keep in mind that silk is more difficult to work with, and the laundry will also slide more strongly on such a mattress cover).
Photo: fabricwholesaledirect.com
You can add a waterproof layer to any material or make the mattress cover double-sided - then choose an overlay model, it’s easy to make it multi-layered.
It is better to sew a mattress cover from one layer of fabric.
Also keep in mind that you need to choose a fabric/material of sufficient width: the seam on the surface of the mattress cover can be felt through the bed linen.
How to simply sew a sheet with an elastic band: master class
Mattress cover with corner elastic bands: master class
Photo: Pinterest
It is better to sew such a model from thick fabric or make it multi-layered: the mattress cover should hold its shape well.
You will need:
- measuring tape, paper, ruler and pencil for creating a pattern;
- chalk/pencil/fabric marker;
— fabric of one or several types (depending on the number of layers of the mattress cover and its functions);
- rapeseed tape 4-5 cm longer than the perimeter of the mattress cover;
— wide elastic band (3−4 cm wide);
- pins;
- scissors;
- sewing machine and thread.
1. Measure the mattress in length and width. Draw a pattern on paper and transfer it to the fabric: the part (or parts, in the case of a multi-layer mattress cover) should exactly follow the contours of your mattress, including the rounding of the corners. Add 1-2 cm on all sides. Cut out the part/parts.
2. If you are sewing a multi-layer mattress cover, fold all the parts on top of each other in the desired order. Trim the edges and pin all the layers together to secure them well to each other.
3. Prepare your rubber bands. The length of the elastic bands depends on the thickness of your mattress: each of the four elastic bands will need to firmly hold the mattress pad on its corner of the mattress. Try the elastic on the mattress and decide on the length. Cut 4 pieces of elastic the same length and trim them diagonally.
4. Pin the elastic bands to the corners of the mattress cover from the inside out, as shown in the photo.
5. Fold the rapeseed tape in half lengthwise and pin it around the entire perimeter of the mattress cover - we will use it to process the edges. Grab the ends of the elastic.
6. Sew the ribbon. The mattress pad is ready.
More clearly - in the video:
How to sew a pillowcase for bed linen: master class + video
Mattress cover with elastic band: master class
Photo: diynetwork.com
It is better to sew such a mattress cover from one layer of fabric.
You will need:
- fabric for mattress cover;
- paper, centimeter, ruler and pencil for creating a pattern;
- pencil/crayon/fabric marker;
- iron;
- elastic tape (1-2 cm wide);
- safety pin;
- sewing machine and thread.
1. Measure your mattress and create a mattress topper pattern.
This is an example of a pattern for a mattress 200 cm long, 180 cm wide, 20 cm thick. Adjust the pattern according to the dimensions of your mattress, leaving the dimensions of the 15 cm folds the same as in the diagram. Add seam allowances of 1.5-2 cm.
2. Transfer the pattern to the fabric and cut out the mattress cover piece.
3. Fold the edges of the cutouts as shown in the photo, sew and finish.
3. Fold and iron all the loose edges of the mattress pad as shown in the photo. This is how we form a drawstring for the elastic: the drawstring should be wider than the elastic you choose, at least 2-3 mm (a little more is possible).
4. Sew the hem around the entire perimeter, as shown in the photo. Leave a hole about 4-5 cm wide. Make bartacks at the beginning and end of the stitching.
5. Using a safety pin, thread the elastic into the drawstring. Before cutting off the elastic, you can try on the mattress cover: the elastic should tighten the mattress cover quite tightly, but still allow you to freely remove and put it on.
6. Cut the elastic a few centimeters longer than necessary, fold its ends, pull them out of the drawstring a little and stitch several times, closing the elastic into a circle.
7. Now stitch up the remaining hole. The mattress pad is ready!
Photo and source: viewfromthefridge.com
Accessories
When sewing a mattress cover, you will definitely need accessories. It must be strong, flexible and wear-resistant. May be useful:
- Zipper. It should not break or jam when used for its intended purpose, and at the same time, the zipper should be strong and flexible to withstand washes and vibrations of the mattress.
- Rubber. Mattress toppers with corner elastics will require a material that is wide, durable, and flexible. Weaving elastic is suitable; it holds its shape and elasticity for a long time, and tolerates washing well. The elastic band must be of medium width so that it can bend freely, but at the same time it must be strong and elastic. The elastic for use in the drawstring is similar in appearance to underwear, but at the same time it is made of latex threads and covered with polyester fiber, due to which it does not stretch for a long time and does not lose its shape.
- Edging braid. When sewing a mattress cover, edging braid may be needed to strengthen the seams and protect fabric sections from fraying, giving rigidity in the right places.
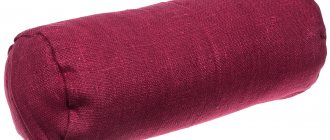
Case with zipper