Modern technologies make it possible to produce furniture of any size and design. If a suitable model is not in stock, you can always order it. However, Russians are distinguished by a special craving for independent production of furniture. Doing it using the old old-fashioned methods is not serious in our time. It is necessary to prepare furniture drawings so that the future product meets modern requirements. Design requires knowledge in this area and skills in working with open sources of information. You can always find all the necessary information on the Internet.
Development nuances
It is impossible to produce high-quality furniture without preliminary design work. To make an item yourself, you need to draw up a drawing. It is a graphic drawing of the product, made on a reduced scale and including the parameters necessary for its manufacture. Not only a design of the product is made, but also a drawing of the room where the furniture will be located.
Design is a rather complex process that requires special knowledge. Ideally, it is better to entrust this difficult job to a professional. If a person wants to start developing a drawing himself, he needs to adhere to the following algorithm of actions:
- decide on the type of future product;
- indicate its location;
- complete all measurements;
- select types of materials;
- start designing based on the results obtained;
- create a sketch;
- make adjustments if necessary;
- draw up a final technical design that allows you to assemble a high-quality product.
The project can be made based on a room with furniture that you like. For the convenience of drawing up documentation, it is recommended to use standard drawings and diagrams from manufacturers. They include:
- general form;
- list of accessories;
- assembly drawing;
- specifications;
- detailed drawings showing fastening locations, types of holes, edge locations.
You don't have to strictly follow this list. An individual manufacturer may change the contents of the list at his own discretion.
Standard sizes of kitchen furniture
The dimensions of the kitchen furniture can be seen in the figure below.
The height of the working surface is designed to be 850 mm high. the depth of the lower kitchen cabinets in accordance with the size of the gas or electric stove, if you are not planning a hob. Standard slab sizes are 500×500 or 600×600 mm. Choose the depth of wall cabinets and shelves with a size of 300 mm. This size can be reduced, but taking into account the dishes and equipment.
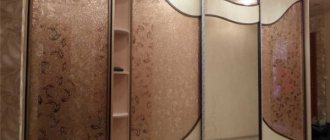
Compartments for clothes and linen in built-in wardrobes will be optimal if you think through them for certain things at once. But for reference, they are shown in the following figure.
The dimensions of the linen shelves can also be seen in the figure below, where the dimensions for storing bed linen are indicated in brackets.
The distance between the shelves themselves should be in the region of 200-400 mm. If you plan to store hats, the shelf for them should be at least 240 mm deep and 170 mm high.
It is necessary to design furniture taking into account the size and configuration of the room itself, take into account the dimensions of the passages between products, providing for different groupings of furniture.
Classification
There are several types of drawings for furniture:
- Parts drawings. They depict individual components and indicators necessary for the manufacture of furniture.
- Assembly. Display products, groups of parts, and also contain assembly data.
- Tabular. Includes data for the production of identical components.
- General views drawings. Shows the main characteristics of the product.
Tips for creating creative furniture at home with your own hands
At the preparation stage, design and working diagrams are carried out. They also have their own varieties. There are two types of design drawings:
- A preliminary design drawing depicts the architecture, shapes, structural elements and dimensions of the furniture. This document becomes the basis for preparing a technical project.
- Based on the technical design, which includes general and prefabricated diagrams, working drawings are developed.
All data on the production of the model is shown in working drawings, which are divided into documentation for serial and mass production. After testing prototypes of products, they become the main ones in furniture assembly. Custom production drawings are used to create individual, one-off items. In furniture manufacturing, breakdown is sometimes used instead of prefabricated documentation. On it the model is shown in a vertical projection in its actual size. Horizontal and vertical sections are superimposed on the breakdown.
Parts drawing
Assembly
Tabular
General view
Advantages and disadvantages of carved furniture
Wood carving can be done using industrial equipment, but handmade work is valued much more than factory work.
Patterns can only be on furniture legs.
All types of carved furniture have both pros and cons. The positive aspects include:
- Attractive appearance. Carved interior items cannot be compared with monotonous cabinets and bedside tables.
- Variability. There are many varieties of stylistic trends, materials, types of carvings, everyone can find something suitable.
- Duration of operation. Furniture made from solid wood can last for decades.
- Exclusivity. Models created with your own hands are unique; there is nothing like this in stores.
Carved furniture also has disadvantages:
- Difficulty in cleaning. Dust and dirt can accumulate in curls and slots; wooden furniture should be regularly treated with antistatic agents.
- Fragility of decor. Fine carvings must be handled properly as they can be damaged by pets and children.
To add carved furniture to your apartment design, you don’t have to spend money on creating a solid wooden cabinet; there are also inexpensive options that the average consumer can consider.
What you will need to make a sketch
To prepare a project you need a computer and special programs. When drawing up documentation for making furniture with your own hands, you will have to use some devices. The master will need: tape measure, pencil, level.
The basis for creating a project for a future product is a sketch. It is a sketch or simple drawing of furniture. To compile it, you first need to determine various parameters related to the location of the product in the room relative to the walls and other pieces of furniture, that is, draw up a room plan.
If you decide to make a kitchen set, the following parameters are determined:
- width, height, depth of the place where the furniture should be;
- location of the ventilation pipe, communications, window sills, sockets.
Guided by these data, you can make a pencil drawing of the kitchen. It is necessary to determine the size of the modules, their location in the room in relation to each other and relative to other objects. Each item must fit perfectly into the place determined by the drawing. The sketch shows “working” dimensions. They are designed to comply with technical and operational standards. At this stage, the design of the model is determined and the formation of the project itself begins.
The main stages of making cabinet furniture with your own hands, tips
Freehand sketch
Design in a computer program
Furniture making process
After developing a drawing of the future product, carved furniture is made according to a specific pattern. The initial floor of the manufacturing process is virtually indistinguishable from carpentry. Having all the necessary tools and materials, you can begin work.
First draw a pattern on paper.
When applying a design to a designed workpiece, the product must be well fixed. If you don’t have a special workbench at home, you can use a large vice. Carving is carried out with sharp movements.
It is difficult for a beginner to immediately make beautiful furniture.
The process can be done in two ways:
- First assemble the structure, and then apply the image.
- First, start with the ornament, and then assemble the object. This method is used when the product is highly complex.
When using a jigsaw when carving wood, be extremely careful and attentive. At the end of the work, the surfaces must be sanded and coated with a finishing layer.
Wooden parts are cut out with a jigsaw.
If the result seems beautiful, then the copy can be considered complete, feel free to add it to the interior.
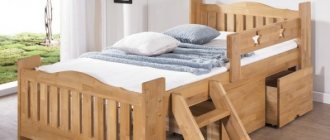
Stool
When creating a stool, special attention should be paid to the design of the lid and legs.
The chair is made with carved legs or a back, and the seat is reinforced so that it can be used for its intended purpose for a long time.
To produce the most accurate carvings, purchase a CNC machine. This will significantly speed up the workflow. It is better to choose a drawing in advance.
Be careful when making a stool.
If you don’t have a set of special tools at hand, use a stencil and a chisel. Do not overdo it with the legs of the stool; the design should not only look attractive, but also be stable.
Drawing of a stool with a round seat.
Chair
Before starting work, you should draw up a detailed diagram of the future image. To make a through ornament in the area of the back of the chair, you can use plywood. It is easy to cut and the material will not crack. There should be no major defects on the boards that will serve as the base.
Carved chairs with their exquisite appearance can decorate any living room.
Get yourself various angles, files, chisels, a jigsaw and a hand router in advance. It’s enough to simply create a carved chair with your own hands. The work is carried out in stages:
- The workpiece is placed in a stable place, and markings from the drawings are applied to the boards. Each part must be numbered.
- For cutting, it is recommended to use a circular saw or jigsaw.
- All elements undergo thorough polishing, and the blanks are covered with the outline of the future pattern.
- The workpiece is placed on the workbench and fixed. The part must be securely fastened.
Exclusive carved wood furniture.
The easiest option for beginners is sawing thread. It will not be possible to make complex shaped parts of a chair without a specialized machine. Assembly of finished polished parts is carried out using dowels or self-tapping screws.
Carved chairs will suit any room decor.
After the glue has dried, the surface must be sanded and polished. Hand-made carved wooden chairs will perfectly decorate any living room or kitchen. Don't be afraid to experiment.
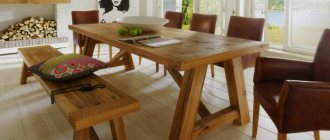
Table
Carved furniture is made mainly according to one pattern; the differences lie in the ornament and dimensions of the elements. When creating a table, the most difficult element will be designing the legs. The base is represented by a square beam.
Creating carved furniture will take some time.
A sketch is applied to the tabletop material, and an ornament is cut along the contour using a jigsaw. When the fine work is completed, you need to sand the workpiece. It is better to make decorative lintels from a single piece, similar to the tabletop.
A carved table will suit a classic living room.
The table elements can be joined with wooden dowels, and additionally apply wood glue to the joints. After the glue has dried, sand and remove dust. Finally, the product should be coated with primer. To achieve a natural nut color, use stain.
Other types of furniture
Carving elements can be applied to almost any piece of furniture. If the choice fell on geometric patterns with the correct shape, it is better to choose linden as the main material. Conifers have a different fiber structure that is not suitable for small decorations.
The patterns can be anything.
Do not use freshly cut wood for carving work. The wood will gradually dry out and many cracks will appear on the furniture. If the thread is applied to an old furniture set, it must be disassembled.
Pay attention to individual elements of furniture.
Working with an assembled product is much more difficult than working with individual elements. Before treating the surface, you need to clean it of old paint and varnish; to do this, use a hair dryer and a spatula.
Cutting map
Furniture manufacturing begins with cutting out the main consumables. More often, cabinets, tables, and chests of drawers are made from chipboard or HDF. Let's say the sheet has standard dimensions 2750 x 1830 x 16 mm. To cut out the required parts, you need to draw up a cutting map. It provides schematic documentation indicating the elements that will be needed. Based on these drawings, the worker will cut out parts that correspond to the parameters of the future product. The remaining materials that need to be returned to the customer are also marked on the map.
The cutting map is a very important document and deserves a thorough study. The first sheet is called "Specification". Here is a list of elements. The product number is highlighted in a red circle at the very beginning of the table on the left. The word "Orientation" and three lines indicate the direction of the texture. On the cutting map it is predominantly horizontal. Four columns next to each other give an idea of integrity, size, quantity and material. On the right is information about the square footage and percentages of residues, parts, waste and cut length.
An important indicator is the cut; it directly affects the cost of cutting. The tariff is determined by footage. The cutting distance in mm must be divided by 1000. To find the total footage of all sheets, it is necessary to sum up the parameters.
Sheets of material are produced with errors, so they have to be sawed off at the edges. The offset is usually 5–15 mm. This work should not be counted in the cutting footage; the contractor should be warned about this in order to avoid unnecessary expenses. To learn to understand the meaning of the symbols on the map itself, it is worth studying a specific example.
| No. | Cipher | Name | Size | Quantity |
| 1 | 1–2 | Chipboard bulkhead | 2368 x 598 | 1 piece |
| 2 | 1–1 | Chipboard bulkhead | 2368 x 598 | 1 piece |
Steps for making a simple do-it-yourself plasterboard cabinet
Dimensional data is plotted in the center of the line. The number in column 1 indicates the part number on the sheet. As for the code: the first digit here indicates the product number, the second - the part. This data and the name of the material on the map are recorded in the lower right corner. The designation of the remainder is given by the word of the same name.
Example of cutting map
Manufacturing stages
At first, it is not always clear to a beginner what to tackle first. You can find a simple master class in open sources, but in many videos and instructions they rarely pay attention to dividing the work into stages. But a detailed description is very important, as it helps to do everything consistently, quickly, and at the same time with high quality.
Stages of self-assembly of furniture, rules for decoding drawings
Drawing
A prerequisite for starting work is to find or complete a furniture drawing. It is compiled manually or using special programs on a computer. You can also find ready-made drawings in forums for craftsmen. You need to have at least the slightest skills in reading diagrams if they are taken from a third-party source. Drawings are not always correct; they need to be checked. If you don’t have such a skill, then you should consult with a knowledgeable person.
Detailing
This is called drawing up a diagram of individual parts of a product. This approach will allow you to divide the assembly process into stages. Also, from a solid drawing it is not always possible to determine the exact dimensions of the constituent elements. Having initially spent more time at this stage, it will then be much easier to assemble the furniture and make individual parts for it.
Cutting, processing of slices
When you have an idea in your head of what needs to be done, and how to get it is reflected on paper, cutting the material into sheets of the required size begins. It’s worth making as many of them as you need at once, and cutting out individual elements from each piece. It will work faster and easier this way.
After cutting, it is necessary to process the cuts. Even the best quality tool will leave nicks in the material. Sandpaper or felt cloth is used for processing.
Drilling holes for fasteners
Already on the finished parts, using a drill and a drill or a screwdriver, all the holes are made. This stage should not be taken lightly. Chipboards are very sensitive to such procedures, so you need to be careful. It is necessary to know the exact diameter of the holes in advance. You will not be able to change them in the future.
Assembly
Only after all the stages comes the furniture assembly itself. There is nothing complicated here anymore if the master thought through the drawings in advance and chose the right fasteners. The only thing you need to be careful with is the sensitivity of the material to drilling, screwing and any deformation. Too much force may strip the threads. It will not be possible to re-screw the screw into this hole; you will have to make a new one.
Finishing
The final stage is finishing and decoration. The varnish coating is responsible for how long the furniture will last. A good product will protect against deformation and moisture. You can also use a special film instead. If you plan to paint furniture, then it is done before applying a protective layer and with preliminary treatment - sanding, cleaning, leveling the surface. There is no need to think about how veneer cladding is done at home. This is a complex procedure that can only be performed in a factory.
Types of furniture staplers, their features and scope of application
Special design programs
The software facilitates furniture design, sheet cutting and product manufacturing . There are many different services available to the public to help craftsmen. Among them there are also free programs.
The “PRO 100” program allows you to virtually arrange furniture in a room and copes with configurations of parts of any complexity. Has a wide range of functions:
- compiling a list of materials and accessories;
- detailing the product with sending to the cutting program;
- creating projections and applying dimensions;
- working with ready-made modules and implementing individual models;
- calculation of the cost of the product based on the cost of raw materials.
"Basis-Furniture Maker" is considered a leader in the creation of virtual models of increased complexity. It has functions that are not available to many well-known programs. The service allows you to make all types of drawings, create a cutting map, and receive instructions for installing fasteners.
The disadvantages of the Basis-Furniture Maker program include the high cost and complexity of development.
“Oblik-furniture enterprise” is one of the most modern programs. Has two main components:
- Graphics editor. Allows you to create a project for any furniture. Elements can be easily moved from place to place. After a few minutes of work, any user begins to realize how convenient it is to use the program. First, for quick orientation, it is better to select the top view.
- Cutting sheet materials. This process has several types of calculations; the program processes the residues and adjusts the thickness of the cutting part.
The program contains a large number of projects for various products. The abundance of samples gives a wide scope for choice and allows you to create your own unique model based on them. “Obemnik-furniture enterprise” runs on Windows, Linux, MacOS.
PRO 100
Basis-Furniture Maker
Volume-furniture enterprise