Share on social media networks:
Nowadays, every home has a computer, and in most cases preference is given to a stationary model. Therefore, along with the obligatory pieces of furniture, there is usually a table of a special design that allows you to place a full set of personal PC equipment on it. These tables come in a variety of shapes. They come in classic rectangular, corner L-shaped, and semicircular. Choosing a PC desk primarily depends on the place where you plan to place the desk. Such a table should be positioned so as to ensure good illumination of the workplace. A cozy and comfortable workplace helps you get ready for work and increase productivity. To make your workplace cozy, you need to decorate it somehow beautifully. How to decorate a computer desk with your own hands? There are different ways of how you can simply and, at the same time, stylishly and originally make your workspace cozy, but first it would be a good idea to organize it correctly.
How to organize your workplace?
Of course, if you have free space to organize your office there, then you can choose any table model without much bother. But what to do if space in the apartment is tight and you have to think about where to organize your workplace.
With proper organization, a workplace can occupy not even a separate room, but a small part of it, while remaining comfortable and functional:
- To do this, dedicate an entire room. Everything you need for work can be placed on the balcony. To do this, it will have to be a little equipped and insulated. But you will get a fairly large and bright place where you can work and read a book.
- If you don't have a balcony or you can't adapt it to your needs, don't worry. A home office can fit perfectly into a niche. It’s quite possible to create a niche yourself by placing cabinets at a distance of one and a half to two meters.
Important! If you don't want your work area to be visible, you can cover it with a screen or curtain.
- If you have a large storage room in your home, then if you wish, you can arrange it and turn it into a comfortable workspace. The main thing here is to make the most of all available space, especially vertical space. With the correct arrangement of shelves, convenient and beautiful drawers, racks and hanging fixtures, your home workplace will be very functional. And if you choose everything in the same color scheme, preferably in light colors, then this will visually increase the area.
Important! Pay special attention to the lighting inside the pantry. The lamp can be placed on the left or on top, the main thing is that it illuminates your workplace well.
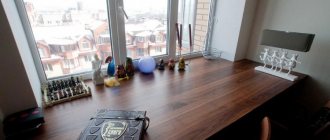
- Perhaps the easiest and most economical way to arrange your workplace is to transform the window sill. You can expand the useful surface of the window sill and use it instead of a table. By equipping the design with legs in the form of small shelves for books, you will get a comfortable workplace and save space. And the shelves can be placed both under the table and on the side wall of the apartment. If you use a chest of drawers as a stand for a table-window sill, you can even create two workplaces in this way.
Assembly steps
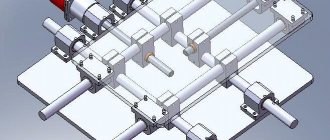
A high-quality and completely durable homemade table can only be prepared if certain steps are followed. First of all, the structural parts are created, then they are connected and the finished product is finished. As an example, we will consider the assembly of a straight-type table with shelves inside and a sliding keyboard stand. Of course, this is not a full-fledged gaming desk, but it is quite suitable for office tasks.
Advantages of silicone transparent table pads, their manufacturers
Preparing parts
Since the drawing was already prepared earlier, you first need to cut out the parts for the table. To do this, you will need a sheet of the selected material, that is, chipboard or MDF, after which a jigsaw is used. With its help they do:
- two identical side posts with dimensions 735*465 mm, which will be the outer supports;
- central post 735*380 mm, this needs to be made in one copy;
- tabletop with parameters 1200*580 mm;
- the back wall measures 1090*290 mm;
- stand used for the keyboard - 830*380 mm;
- several internal shelves of medium dimensions - 450*250 mm.
Now all the structural elements are ready for assembly, you just need to do the work efficiently.
Assembly of the structure
The so-called formation of the desktop is done using dowels and screws; some parts are glued with a special glue created just for wooden parts. Bonding is done in stages:
- Holes are created in the side wall and the rear panel where the bottom shelf will be attached.
- From them, 50–70 mm are measured horizontally and a line is drawn to this point.
- In the horizontal area, two more holes are made, located in parallel positions. This way you will get two identical holes in the side wall, two more in the central one, they are fastened with self-tapping screws.
- In the same way, the top shelf is secured, which should be located at a distance of at least 100 mm from the beginning of the board.
- The cut-out rear wall is mounted, and the alignment should be ensured in relation to the ends of the side and central panels. After marking the holes, the sheet is attached to the screws.
- Another side support, not previously involved in creating shelf space, is also attached to the rear wall. This is done through holes in the back panel.
- The guide element is fixed. To do this, measure about 50 millimeters from the top of the side and central walls and draw straight lines parallel to each other. The rails are fixed.
- The keyboard shelf with already mounted rollers and strips is inserted into the prepared grooves.
- The table top is being installed. Holes are made in the edges of the side supports and the wall located at the back, as well as at the bottom of the tabletop, coinciding with each other.
- Dowels are used, which are coated with glue and inserted into shallow holes on the side and rear panels. Part of the dowels, also coated with glue, should protrude outward.
- A tabletop is placed on the open parts and pressed down for better fixation. It will take about an hour for the glue to dry.
- The shelves on the tabletop can be secured to the same dowels. You should not make the structure too high, as it will be unstable.
At this point, the table will be almost ready, all that remains is to work on its appearance so that it becomes a full-fledged interior detail.
Finishing work
To put the original table in order, you need, first of all, to cover the edges with furniture tape. It is applied to the edge, after which a hot iron is passed over it. You can also use a hair dryer for these purposes.
Types and features of desk tops, selection criteria
If untreated wood was used for work, you need to be prepared for the fact that its surface will not be ideal. To bring the wood to a smooth state, it is first puttied in places of unevenness. They can be identified visually or by touch, but it is better to use a level. Next you need:
- Sand the surface so that it is not rough and remove any additional roughness.
- Cover with stain, which will prevent the appearance of dampness and insects eating the wood. In addition, this composition will improve the fire safety of the material.
- The entire surface is covered with varnish as evenly as possible. There should be no dust or dirt in the room, otherwise the varnish will be damaged.
The table is now finally ready for use and can be placed in a predetermined area. Caring for it will not be difficult; just wipe the surfaces regularly with a damp sponge or microfiber cloth. If the shine disappears over time, it can be easily restored using a special furniture polish.
After assembly, the table is covered with stain and varnish
Shelf for ups and holes for routing wires
Furniture edging tape is glued to the edges
Decorating the table using decoupage technique
Now let's move on directly to table decor options. So, how to decorate your desk with your own hands? One of the most popular methods is decoupage, which allows you to both decorate and renew an old table surface. This technique allows you to give a second life to old things and add originality and style to new ones.
Materials for work
You can decorate a table using this technique if you use the following materials:
- With the help of special napkins for decoupage, there are a huge variety of them, you can choose to suit every taste.
- Instead of napkins, use drawings, maps, sheet music, photographs, postcards, old newspapers and magazines.
The decoupage technique itself is simple to perform, but when it comes to large objects, such as a tabletop, the decoupage process can be called quite complex. It will not be easy for a beginner, but if you are determined, then you will definitely succeed.
Important! You can even start by practicing on a small object, for example, decorating a wooden cutting board, or something else.
Preparation
- First you need to prepare the surface on which the decor will be applied. The preparation process depends on the material from which the table is made. A chipboard table can simply be washed using detergent. The wooden surface must be sanded using sandpaper.
- If you are renovating an old table that already has cracks, you will first need to fill them with putty.
- Now you need to select a drawing and make markings.
- Cut out the desired parts of the napkin or other paper image that you decide to apply.
We arrange the decor:
- The napkins are simply glued to the tabletop, being careful not to tear them. The pattern must be smoothed out to prevent air bubbles from forming.
- Place paper products in warm water, pattern down, and allow them to soak for a minute.
- In the same position, the image is placed on polyethylene and the excess layers of paper are rolled up.
- Then the thinned pattern is smeared with glue and attached to the tabletop. The tabletop also needs to be lubricated with glue. For this purpose, it is best to use PVA glue.
- The transition between the table top and the pictures is decorated with paint of a suitable shade.
- The image is allowed to dry and the surface is covered with decoupage varnish in several layers. Each layer must dry well.
- If you want to give your table a vintage look, you can artificially age it using craquelure varnish.
Important! In addition to the tabletop, you can also decorate the legs. This table will look especially elegant. It is important not to forget that the table should be in harmony with the style of the room. For example, decorating a small computer desk can be done with cards, which will create a working and at the same time romantic atmosphere.
Construction drawing
Before starting work to make a computer desk with your own hands, you need to create plans in the form of drawings. They will allow you to correctly manufacture the elements from which a single structure will be assembled. First of all, you should determine the parameters of the table, there are only three of them: length, width (depth), height.
For a computer desk, it is important to choose a medium length. Too small will not allow you to sit comfortably, and a large one will take up a lot of space, as a result, it will also be inconvenient to use. The length should be selected according to the areas required for work:
- Personal - this is where the monitor, keyboard, and other work tools are located. For comfort, it is recommended to choose a length of about 70 centimeters.
- Area of the system unit - for its placement it is optimal to prepare a niche with a size of about 25 cm; if you plan to place it lengthwise, you will need a space of about 30 cm;
- Rotation of the tabletop in corner tables - the best indicator is 60 centimeters.
- Cabinet - this particular element is equipped with drawers where additional items are stored. Typically their length is 40 cm.
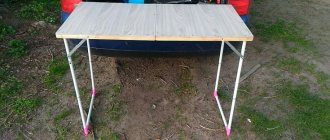
Making a table for a laptop with a cooling system with your own hands
The total length of the table should be about 170 cm, which is optimal for corner structures; a straight line can take 100–130 cm. The depth, which refers to the width of the computer desk, is also important. If there is an extension (an additional shelf above the main tabletop), the depth is selected at 70 cm; without it, 45 cm will be sufficient.
If there are drawers, you will need about 65 centimeters of depth, and corner options with shelves at the bottom will be comfortable with a depth of 85 cm. Finally, the height is selected according to the user, if he is alone. Height must be multiplied by 75 and divided by 175 cm, for example, a person with a height of 175 centimeters will need a table 75 centimeters in height.
Having decided on the basic parameters, you should prepare a drawing. If you have the skills and knowledge of design, this can be done on a sheet of paper, schematically drawing a sketch of the table and indicating the dimensions of the various elements. The work will be much simpler if you use special programs, for example “Basis Furniture Maker”.
This and similar services will not allow you to make mistakes in the drawings, they can adjust dimensions, and also mark points for marking and placing fittings. The completed diagram can be printed for use in paper form (as a ready-made action plan). In any case, you can take correctly calculated computer desk plans from the Internet and adapt them to your personal project.
Painting the table
How else can you decorate your desk? The easiest option that comes to mind is to paint it in some original way.
Strip
To make it more interesting, you can make the table striped:
- Paint the table a base color.
- Apply strips of tape and apply a couple of layers of a different color.
- Peel off the tape and you're done. Can be repeated many times to make stripes of different colors and widths.
Important! Don't forget to varnish everything to be safe. In the same way, you can create not only stripes, but also zigzags.
Chalkboard paint
A table painted with special slate paint will be black or dark green. But now you can leave notes and draw with crayons right on the table.
Important! Children will especially like this table, because to play tic-tac-toe or other board games you won’t have to look for paper, because the table will serve as an excellent field for such games.
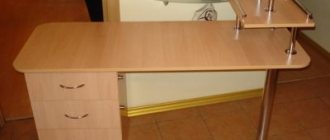
Tables with drawers and shelves
They are designed in such a way that the additional elements look very harmonious, as if they continue the body. They also come in numerous variations, so you can put everything in them and still have the same attractive look.
Thanks to the drawers, the documentation is kept in careful condition, but on the shelf you can place your favorite photo or stylish accessory.
Video material
The proposed decor options are not all possible ideas for decorating a desk. Think about it, maybe you have unnecessary materials at home from renovation or creative work that are quite suitable for giving a more interesting look to your computer desk.
Table with cabinets and extension
The same advantages as the previous version, but also with various cabinets and add-ons. Designs can be canonical, fantasy, with different curves and shapes.
- From tapestry to velor
Choosing the right bed base: criteria and selection tips
What children's furniture to choose?
Thanks to the structures that extend to the ceiling, there will be a lot of free space in the room. And only you can decide, as an equal owner of such a table model, what to do with it!
Feng Shui Table Placement Tips
According to the doctrine, the desktop should be placed diagonally from the front door, facing it. It is advisable to have a blank wall behind. If you sit with your back to the window, close the curtains tightly. It is also undesirable to turn away from the entrance. There should be no water symbols behind your back. Aquariums, paintings with ponds, decorative fountains are best placed in front of your eyes. Avoid placing your workspace under overhanging elements. They will put pressure and oppress you mentally. Try to make the wires as invisible as possible. Exposed cables not only look untidy, but also symbolize leakage and depletion of finances.
The desk chair is an integral part of the desk
Choosing a chair is a responsible task. The following factors are taken into account:
- ergonomics;
- corresponds to the height of the owner;
- style;
- color scheme;
- execution material;
- presence of armrests.
The most comfortable option is a swivel soft chair on wheels upholstered in genuine leather. You can choose a model with a swaying effect.
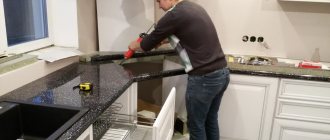
Equipment placement rules
Proper placement of equipment reduces energy costs. The computer is placed below - on the floor or on a stand. The printer is often installed under the countertop on a special shelf. But if you place the device on the right side of the structure, it will be much more convenient and convenient to use. To refill paper, print a project, or make a copy, all you have to do is turn around. Cables should not lie on the floor. They need to be connected with ties and secured to the wall or hidden under the baseboard.
A selection of unusual computer tables
Product options with original designs.
In the closet
Sliding doors open easily and provide access to the workplace or, conversely, allow you to quickly hide it. In addition, this wardrobe can be installed in the bedroom, dressing room, loggia or hallway. It is also possible to store a computer chair in it and thereby save space.
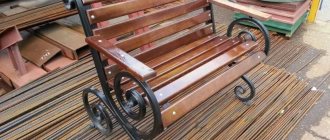
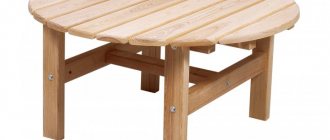
From pallets
It is an exclusive wooden structure, coated with varnish or paint and having a base in the form of a board, plywood or flat glass.
With partition
Using a partition, you can isolate your personal space from external irritants that can distract from work.
Backlit
Thanks to the organized built-in multi-colored, two-color or single-color backlight, it is possible not only to achieve a creative and interesting design, but also to significantly reduce eye strain while working or playing at the computer.
The photo shows a white computer table with blue lighting in a boy’s room.
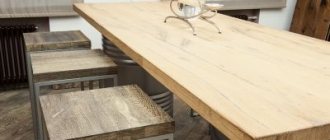
From slab
Natural, natural tabletops made of wooden slabs always have a truly monumental appearance.
Made from epoxy resin
Made using laminated wood, a base with pink, orange, purple, yellow or clear epoxy resin is also added to which fluorescent powder is added to achieve the most effective and slightly futuristic look, especially in the evening.
Decoupage
It gives the design a special charm, adds a characteristic touch of antiquity, thereby making a nondescript and unremarkable piece of furniture more original.