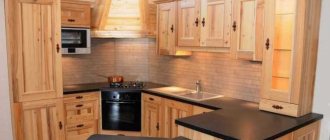
A kitchen apron is a protective strip on the wall, which is made of durable materials (glass, tiles, mosaics). The apron acts as a barrier that reliably protects the wall surface from grease, moisture, steam and elevated temperatures.
Glass is considered a good alternative to ceramic tiles, which are the most commonly used option for finishing a backsplash. Glass is considered an environmentally friendly and hygienic finishing material. Such an apron is not afraid of any impact, and besides, it is easy to clean and looks very impressive.
What determines the size of a kitchen apron?
The dimensions of the kitchen apron are determined mainly by the length of the countertop and the distance from its surface to the bottom of the upper wall cabinets. These parameters will be the length and height of the future apron. But there are cases when it is necessary to increase its height, or raise or lower the cladding in some areas of the wall.
Such cases include:
- Existence of a hood.
- There is a ventilation duct in the corner of the L-shaped kitchen.
- Wall cabinets have different heights or are not located on the same level.
- There are free sections of the wall between the wall cabinets.
Photos of glass kitchen aprons in the interior
<
>
Thus, a glass apron in the kitchen not only performs a protective function, but also allows you to diversify the interior. And the ease of its installation, durability and lack of need for special care makes it one of the most rational options for organizing the space between the upper and lower modules of the headset.
Placing the apron and determining its height
Let's consider each of the nuances in more detail.
Bottom mark
This value directly depends on the height of the floor kitchen cabinets and the thickness of the countertop. Therefore, before you start covering the wall, you need to decide on the future kitchen set.
The standard height of floor cabinets including the countertop is 85 cm. But this value may differ for some furniture manufacturers. In addition, if you make a kitchen to order, you can set this value yourself to suit your height, so that later it will be more convenient to cook. Kitchen ergonomics indicate that the countertop should be approximately 15 cm below the hostess’s elbow.
The lower mark of the kitchen apron is usually equal to the level of the working surface (height of the floor cabinets + thickness of the countertop), that is, 0.85 m from the floor level. If the hob is not built-in, the mark of the bottom of the kitchen apron is adjusted depending on what is lower: the hob or the countertop. The bottom of the wall cladding in this case starts from a lower surface (slab or countertop).
Sometimes it is necessary to lower the mark of the bottom of the apron 1-2 cm below the level of the working surface, that is, to 0.84 or 0.83 m from the floor level. It is advisable to do this if you are not going to install a kitchen plinth around the perimeter of the countertop, which could cover errors in the installation of floor cabinets (for example, due to an uneven floor). It is better to play it safe so that the bottom edge of the cladding under no circumstances ends up higher than the tabletop.
There is no point in tiling from the floor itself, since then most of it will be covered by floor cabinets. Apart from increasing labor intensity and increasing the cost of work, this will lead to nothing. But there are non-standard kitchen layouts when you still have to lower part of the wall cladding to the floor.
One such case is a ventilation duct in the corner of an L-shaped kitchen (see photo). If the kitchen set is made to order, there are no problems: the lower cabinets on both sides of the L-shaped kitchen are connected to each other at an angle of 90 degrees, while the lower section of the ventilation duct is closed with cabinet doors.
But if you install a standard kitchen in such a non-standard room, the cabinets will not fit together, and the lower visible part of the box will also have to be lined.
Top mark
The top border of the kitchen apron usually ends at the level of the bottom of the upper wall cabinets, with the exception of the cases indicated at the beginning of this article. standard height of a kitchen apron is 60 cm, that is, the height of its top will be equal to 1.45 m from the floor level (85+60 cm). This is explained primarily by the standard sizes of ceramic tiles (the most common material for a backsplash) and the ergonomics of the kitchen (the most convenient height for placing upper cabinets).
But you don’t have to adhere to this standard at all; it’s more logical to first decide on the height of the upper cabinets that is most convenient for you. The housewife should be able to freely reach the two lower shelves of the wall cabinet with her hand - build off of this.
In addition, wall cabinets can partially overlap the top of the cladding. The main thing is that there is no gap between the upper border of the cladding and the bottom of the wall cabinets.
Let us now consider other cases when an increase in the standard height is required.
Availability of hood
If there is a non-built-in hood (dome, inclined, etc.), the lining above the hob is brought either to the bottom of the hood or to the top of the wall cabinets. The difference is not fundamental, it all depends on the lining material and the design of the hood . If the hood is built-in, the cladding is installed exclusively to its bottom.
The hood must be installed in accordance with its operating instructions. On average, the distance from the hob to the hood should be 75-85 cm for a gas stove, and 65-75 cm for an electric stove.
Important ! For a gas stove, a minimum of 75 cm is required for safety reasons.
Ventilation duct in the corner of an L-shaped kitchen
The size of at least one of the sides of the ventilation duct almost always exceeds the depth of the upper wall cabinets, which is on average 35-40 cm. Therefore, the upper cabinets adjacent to it on both sides of the L-shaped kitchen are not able to close it, as is the case with base cabinets with a depth of 60 cm.
This open section of the wall (box) between two wall cabinets does not need to be lined, that is, the upper border of the apron in this place is left at the level of the bottom of the wall cabinets.
But from an aesthetic point of view, it is better to bring the cladding in this place either to the top of the wall cabinets (if the same is done in the hood area) or to the level of the bottom of the hood (if the apron above the hob is also brought to the bottom of the hood). Then the upper border of the apron will not look like a broken line, and the kitchen interior will become more harmonious.
There is a third option - do not line the ventilation duct with an apron, bringing the cladding along the walls only to its edges. A significant disadvantage of this option is that usually the sink is located in this corner, the splashes from which will fly onto the unlined edge of the box.
Different heights of wall cabinets
Sometimes in particularly advanced kitchen designs, the height of the upper wall cabinets is not the same, or they are located at different levels.
In such cases, there are three options:
- Bring the cladding on these sections of the wall to the bottom of each cabinet.
- Make the upper border of the apron with a single straight line, taking as its mark the level of the bottom of the highest cabinet (the remaining cabinets will partially cover the upper part of the cladding).
- Ignore the different heights of the cabinets, and make the height of the apron the same along the entire length - for example, 60 cm from the level of the countertop (this is the most economical option, but it does not look so harmonious).
Free sections of wall between wall cabinets
The same principle applies here as in the case of the ventilation duct. You don’t have to veneer these areas, leaving the upper border of the apron at the level of the bottom of the wall cabinets. But if you brought the cladding above the hob not to the bottom of the hood, but to the level of the top of the wall cabinets, it is more logical to do the same in these areas.
How to make a kitchen apron with your own hands - height from the countertop, standards
The wall adjacent to the kitchen table has to be washed daily. Neither plaster nor wallpaper will withstand the effects of water and detergents. You need protection that is resistant to steam and abrasives and does not absorb grease - the so-called apron. But at what height from the kitchen floor should it be? In this article we will look at standard sizes and what material to choose from.
Types of materials
Existing materials with the required properties are divided into the following categories:
Synthetic
PVC lining; PVC panels; Laminated MDF panels; Postforming; Acrylic mosaic;
Natural
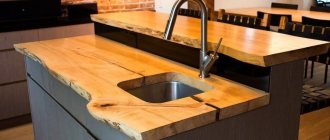
Wooden lining; Sawn sandstone;
Made from sheet glass (skenali)
glazed ceramics (including majolica); glass mosaic.
Traditionally, preference is given to tiles (more details), but there are difficulties during installation. It is preferable to mount wood, plastic, and sheet glass using the installed tabletop as a support and guide plane. Ceramic protection is placed in the absence of wall furniture, with an overlap of 5-10 cm under future cabinets, as well as upper cabinets. This approach is explained by the fragility of tile adhesive and ceramics. The ends of the table and hanging cabinets can chip the edge of the tile if they collide. The glued tiles closer to the center are stronger.
The situation is aggravated when the kitchen table is covered with tiles along with an apron with a special set containing ceramic skirting boards. They with friezes and “pencils” make up the set. In this case, “absentee” masonry is not suitable; tables and cabinets must be purchased in advance.
Criterias of choice
The ideal material for a kitchen apron has not yet been invented. Some materials are too expensive, others are difficult to process, and others take a long time to install. If we give a rating of 5 stars based on the above parameters, we get the following:
| Material | Durability | Installation | Price | Decorative properties |
| Ceramics | ***** | * | *** | **** |
| Tree | **** | ***** | ** | ** |
| Skinali | *** | ** | * | ***** |
| PVC panels - print | * | ***** | ***** | **** |
| PVC cellular panels | ** | ***** | ***** | ** |
| Glass mosaic | ***** | *** | * | ***** |
| Acrylic mosaic | **** | **** | * | ***** |
| MDF postforming | **** | ***** | *** | * |
The more stitches, the more difficult the care. But if “beauty demands”, mosaics, transverse cuts of wood, lining under epoxy varnish, pebbles under glass and in the thickness of plaster are acceptable. The choice is made according to the overall design concept, based on time and funds.
Standard kitchen apron height size
It is customary to tile “from wall to wall” and to the front horizon of the tabletop (U-shaped configuration). If the table is limited by a refrigerator or a high chest of drawers, the ceramic layer may partially extend behind them.
The selected module of furniture sections is taken into account. Sections are produced with sizes that are multiples of 10, 12, 15, 30 cm. Ceramic manufacturers do the same; tiles of these sizes are popular.
Let's say the height of the cabinets is standard. Together with the legs, drawers, and tabletop, the total height is h = 0.850 m (tall housewives can set a height that is more convenient for them). Then the first row of tiles measuring 12 x 12 cm is placed at a level from the floor: 850 – 100 = 750 mm. The tile will go ten cm down behind the tabletop, 2 cm will peek out. It is necessary to lay a protective plinth at the junction of the table and the apron; it will cover the protruding 2 cm.
The next rows are laid from the level of 870 mm (from the upper edge of the tile protruding above the table) to the level of 1.596 m, thus laying out 5 rows of tiles with 1 mm seams between them, the 6th is the one that goes behind the hanging cabinet. We get a distance of 0.626 m covered by the apron with allowances up and down. As you can see, the height is close to optimal.
Is there a standard: width calculation
After laying the front of the wall, the working surface became narrower. What happened due to what? Tiles 5 mm thick + 10 mm glue.
Let's say the tabletop is made of postforming with a standard width of 0.6 m. A multiple of 120 mm - the size used. But minus the seams, minus 15 mm taken up by the front, we get:
(600 - (1 mm (corner weld) + 15 mm + 4 mm (for 4 wall seams)): 4 = 576 mm
You will have to operate with this number. Part of this value will take up 480 mm - covered with four full tiles. How to cover the remaining 96 mm so that the apron is flush with the edges of the table?
Two ways: cutting tiles with edging with a PVC tile endcap or using manufacturer’s friezes. Stripes of 2 cm, 3 cm or more are inserted mixed with the general structure. They can be transverse or longitudinal.
When the issues with the verticals and horizontals have been resolved, you can prepare for the purchase by calculating the total area of the material: S = 7 rows of tiles x 0.12 x 0.12 x L = ... m2. Let’s say the wall is 3 m long. At this distance, 3000 / 121 mm equals 24.79 squares - a full 25. Then the required number for a tabletop of 60 cm is equal to 7 x 0.12 x 0.12 * 25 = 2.52 m2. At the ends (both sides) 2 x 0.12 x 0.12 * 6 = 1, 201 m2. As you can see, the area of the purchased tiles differs from the area of the space for the apron plus.
The masonry with a “ladder”, teeth, saves you from end cuts. But this approach is acceptable for the Gothic style - one can read the plinth peeking out from the wall. An elongated “hog” facing tile is suitable for such masonry. Most often produced unglazed.
We recommend: How to make a wooden tabletop with your own hands?
Installing an apron under the hood
A continuous flow of heated air, droplets of fat turning into drying oil is a huge load for any finishing material.
It is clear that PVC boards with prints applied to them and a protective layer (several microns of acetate film) can only last for a short time. This print needs to be washed after every cooking.
Polished porcelain tiles are recommended. The new material has all the necessary qualities, including the ability to be polished on the edges after cuts. When laid in a diagonal manner, it is highly decorative. Laying in stripes or in a checkerboard pattern is possible. In the latter case, it looks good interspersed with 2 x 2 cm majolica inserts. Such a strip is decorated with ceramic borders. Porcelain stoneware was invented for floors, so its specific gravity (due to density) is higher than conventional ceramics. Porcelain stoneware should be laid from the floor itself or from the level of the slab, but strengthening the lower edge with a duralumin-aluminum profile.
Indentation from the hob is necessary. It is accepted that fat spreads 15 cm. So, the width of the hood-stove strip is 90 cm. An advantageous width for large hoods.
For mini-hoods with an inclined catching surface, an additional limitation of steam is required - a laminate canopy is hung near the ceiling above the cabinets.
In an apartment with tall people - 185 cm and above - the hood is mounted at the same height (along the lower edge). We calculate the area of the “hood-stove” strip: 185 - 85 (table and stove level) = 100 cm. Result: 0.9 m2 without underlays up and down. But since pads are necessary and are at least 5 cm, the final result is: 0.05 x 0.9 x 2 + 0.9 = 0.99 m2.
At what height from the kitchen floor to install
The tabletop level standard is 850 mm. In furniture stores, bottom drawers are often shown without bottom legs and appear lower. For non-standard sizes of cabinets (made manually or to order), the horizon of the table is determined, which is drawn on the wall under the level.
Often pieces of furniture are rolled under the tabletop, fixed to the 2 outer cabinets. Then the entire wall is covered with tiles. A possible option is to use cheap materials behind the cabinets, and expensive, decorative ones above them.
When laying ceramics on the floor and wall at the same time, it is necessary to take into account the thickness of the floor covering - usually 25 mm. 850 + 25 = 875 mm is the boundary line for the countertop.
Laying below the table is desirable. It's not scary if a gap appears above. This gap is filled with a plinth. But the baseboard can disrupt the rapport (tile pattern). The plinth (usually made of aluminum) is measured and added to 850. Let's say the plinth height is 2 cm. Then the seam of the bottom row of tiles should run at a level of 870 mm from the finished floor.
What to do with sockets?
Issues of power supply cannot be raised for a number of finishing works. Above the line marked at an angle of 850 (or another size - the horizon of the table top), the placement and number of sockets are outlined, taking into account that the decorative rim has its own width. Most sockets have a 2cm rim. Euro-nests have a standard diameter of 4 cm. This means that each nest (or group of nests) should be 4 cm, and when a plinth is provided 4 + 2 cm = 6 cm. ) + 850 mm (pedestal and tabletop) + 60 mm (socket body, its edging, plinth) = 925 mm.
The sockets of the sockets should fall into the crosshairs of the tile seams. It is impossible to make cutouts inside the tiles. In the case of skinali, sockets are made within open shelves, walls adjacent to the apron, even in the bottoms and sides of cabinets.
Video: installation of a kitchen apron
Determining the length of the apron
The length of the backsplash (sometimes called the width) should be at least equal to the length of the countertop. But there are also L-shaped and U-shaped countertops, the length of which reaches quite impressive sizes.
If the ergonomics of such a kitchen provide for the placement of the main work area only along one wall (hob, sink, table for cutting food), there is no need to continue the apron on the adjacent wall. But if, for example, the sink is located along another wall (typical for an L-shaped kitchen), then the apron is transferred to this wall.
The basic rule is that the apron should not break off. It should continue uninterrupted horizontally either to the edge of the countertop or to the adjacent wall. The exception is installed vertical speakers or a refrigerator, behind which an apron is not needed.
If a pipe interferes with the continuous installation of the apron, it is better to move it to another place in advance, or choose the thinnest apron material (so that it can pass behind this pipe).
Allowances and other nuances
The walls and floors in our kitchens are not always perfect; deviations of their surfaces vertically or horizontally can reach up to 1-2 cm. Ideally, before installing the apron, it is necessary to carefully level the floors and walls. In a new building this is easier to do, but in a lived-in apartment it is quite problematic to carry out this labor-intensive process, especially leveling the floors.
To protect yourself from possible visible defects, you should make small allowances (up to 2-3 cm) around the perimeter of the apron so that its borders are partially covered by the countertop and wall cabinets. If a kitchen plinth is installed around the perimeter of the working area, allowances along the lower border of the apron need not be made.
Installing a kitchen plinth along the countertop is a topic for a separate discussion. This simple interior detail not only decorates the work area and gives it a finished look, but also prevents the accumulation of dirt and small crumbs in the area where the table top meets the cladding. He will also be able to close the possible gap between the countertop and the apron.
A narrow aluminum anodized plinth with a stainless steel look looks especially stylish, which will harmonize well with the hob and oven. You should not install cheap plastic skirting boards, which quickly fail and can ruin the appearance of any kitchen.
Another important aspect in determining the lower limit of the apron is that it should be verified solely by level. First, at several points along the wall, using a level, the horizontalness of the floor is checked. If the values differ, a conditional floor level (strictly horizontal line) is drawn along the wall, from which the mark of the lower border of the apron will then be drawn.
Materials for making an apron
The choice of material for the apron is one of the main factors influencing the determination of its size. Let's look at the main types of building materials.
Ceramic tiles and porcelain tiles
This is the most common option. The tiles are easy to clean and have a wide range of colors and textures. The dimensions of a ceramic tile backsplash are determined primarily by its dimensions. Standard tile sizes are 10x10, 15x15, 20x20, 20x30 cm, etc. Large tiles and porcelain tiles have dimensions of 30x30, 25x50, 30x60, 40x60 cm, etc.
Based on the size of the tile you choose, the configuration of the future apron is determined, which will avoid the need to cut the material. That is, if the height of several rows of tiles laid out slightly exceeds the required distance from the countertop to the bottom of the wall cabinets, the top row of tiles is not cut, but left as is. In this case, the wall cabinets will partially cover the upper part of the apron, providing the necessary allowance.
When choosing tiles, it is very important to first draw a drawing of the wall on which the cladding will be done. First, the outlines of the vertical projection of the kitchen unit and hood are drawn on the drawing to scale. Then a grid of the location of the future tile cladding is superimposed on them - it is important to keep the dimensions of each tile to scale.
For convenience, the tiled grid can be drawn on tracing paper (transparent paper) and then, moving it along the main drawing, you can find the optimal configuration for the future apron. It should be borne in mind that you need to start from the central dominant of the entire kitchen - the hob and hood. That is, tracing paper must be applied in such a way that either one of the vertical seams between the tiles runs along the axis (center) of the hood, or this axis coincides with the middle of one of the tiles.
Only in this case the cladding will be geometrically correct in relation to the kitchen set. The smaller the tile size, the easier it is to achieve this. Before buying tiles of a certain size, try making several versions of tracing paper (with tiles of different sizes and shapes) - then you will immediately see the difference, and this will help you choose the most optimal and economical option.
When laying tiles, it is better to make the seams between the tiles minimal (1.5 mm), since they are difficult to wash off from grease. Wall joints that are too thick can spoil the appearance of the entire cladding.
Note : Seams are not applied to tracing paper and are not taken into account when calculating the apron.
Sheet materials
Sheet materials for making kitchen aprons include:
- Laminated MDF.
- PVC panels.
- Strained glass.
- Mosaic canvas.
- Ready-made ABS plastic aprons, etc.
A distinctive feature of all these materials is that the apron is made from them after the kitchen unit has been installed. In this case, the dimensions of the apron are determined directly on site, so no allowances need be made.
Installation of such aprons is the least labor-intensive and can be done in the shortest possible time. Cladding from MDF or PVC panels are the most economical options. An apron made of tempered glass is a more expensive pleasure; most often it is made to order, but every year this type of finishing is becoming increasingly popular. Under the glass apron you can glue any photo wallpaper and even place your photos.
There are also standard ready-made kitchen aprons on sale, for example: a kitchen apron panel 3000x600x6mm, aprons made of ABS plastic measuring 2000x600x1.5 mm or 3000x600x1.5 mm, etc. A variety of prints are applied to them using photo printing, and the top layer is covered with a special protective varnish.
What to consider when determining the height of the skinnel
If you have decided to buy a glass splashback for the kitchen, and you have already selected a suitable design, you can begin to determine the optimal parameters for such a finish. To do this, our company sends surveyors to the site specified by the client. When calculating the most suitable skinnel width, a number of factors are taken into account.
- Dimensions of the floor set. Often, floor-mounted kitchen cabinets have a standard height not exceeding 91 cm. But in some cases, home owners make custom-made furniture, so it is very important to accurately determine their dimensions.
- Placement of hanging furniture. In order for the glass panels for the kitchen to have the size required in a particular case, it is important to measure the height of the wall cabinets. This measurement is made from the floor to the bottom of the furniture. Next, you need to subtract the height of the floor cabinets from the result obtained.
- If the appliances or stove installed in the kitchen have a lower height than the furniture, this should be taken into account when determining the height of the skin so that the wall finish above the work surface has a beautiful appearance. You can use stands under the stove, which will allow you not to depend on its size.
- You need to take into account the presence of a hood. If it is mounted in a cabinet, this will simplify measurements. Otherwise, it is necessary to take into account that the glass apron must cover the wall near which the cone-shaped hood is located.