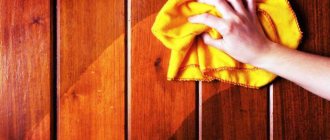
How to get rid of scratches on a wooden table
There are two ways to get rid of scratches that spoil the appearance of a wooden table. The first involves the use of professional products that can be purchased in specialized stores. The second is to use improvised means.
Professional products
To remove scratches on a wooden table, you can use special products:
- spray;
- pencil;
- furniture touch;
- wax.
Their main purpose is to mask the scratch and restore the smoothness of the table surface. Many of them are used not only for furniture, but also for doors, window frames, floors, and other objects made of wood.
Hatch
You can easily choose the product of exactly the shade you need. It is applied directly to scratches in several layers. Next, leave until completely dry and wipe with a slightly damp sponge to polish and remove excess marks.
Wax
Special wax for wood is a professional product that can not only cover scratches, but also get rid of cracks, chips and even dents. Suitable for all types of wood and types of material (veneer, combustion engine, chipboard and others). The wax is also selected by color, applied using a spatula and rubbed with a sponge or other soft cloth to fill all scratches with the substance. The excess is cut off with a knife and then wiped with cotton cloth.
stain
Perhaps everyone knows about the existence of stain. This is a special tool for processing wood to hide minor defects and completely restore furniture. You can prepare it yourself, or buy a ready-made powder that needs to be dissolved in water. The advantage of stain is that it not only masks imperfections, but also completely stains the wood, giving it the appearance of almost new.
Special pencil
A special pencil for wood will quickly paint over any scratches. You just need to choose the right color that matches the painted wood. In fact, this is the easiest and fastest way to remove scratches on a table surface, but it only lasts for a short time. That is why the staining procedure will have to be repeated periodically.
Spray
The spray is applied to the scratched surface and left until completely dry. You need to act very carefully with this product, since excess paint can create an imbalance in the shade and you will end up with different colored areas of the furniture. Alternatively, paint the entire table and then such a problem will not happen, but try to apply the product evenly, in several layers.
Traditional methods
Very often, you can remove scratches on a wooden table using improvised means, some of which are generally surprising, for example, walnuts or cigarette ash:
- Mix one part vinegar with three parts olive oil. Rub the resulting mixture onto the scratches on the table and wipe the surface dry.
- If the wood is dark in color, then take a small brush, soak it in an iodine solution and apply it to scratches and cracks.
- Take a walnut kernel and cut it in half. Using light pressure on the wood, work out any imperfections on the wooden table. Walnut will fill in cracks and scratches, but to seal the result, you will need to coat the area with wood varnish.
- Mix cigarette ash with a small amount of water to form a smooth, thick paste. Rub it into the scratched surface of a wooden table and leave until the mixture dries completely. Then carefully remove the excess and apply wood polish.
- Brew very strong tea so that its color is much darker than what you usually drink. Soak a cotton pad in the liquid and treat the entire problem area. Leave to dry. It is advisable to treat the entire table using this method so that there are no sharp transitions in shade.
Iodine or machine oil
Iodine is used to repair scratches on furniture made of dark wood.
The simplest pharmaceutical remedy – iodine – will help eliminate small scratches on furniture. It is suitable for products made of walnut, oak, and mahogany. When working with iodine, you must not forget to protect your hands. The drug is very colorful. You need to use ordinary medical gloves and a cotton swab. Dissolve a couple of drops of the drug in water, then apply it to the scratch with a stick. Using the same method, you can eliminate coating imperfections using machine oil.
What will help remove deeper scratches?
Well, if pencils and creams did not help or the scratches on the furniture are deeper, use the following methods:
Mastic made with your own hands
Making your own mastic is not such a complicated process, which involves the use of the following ingredients: wax, turpentine, kerosene and alcohol, woolen fabric.
It is necessary to melt 40 grams of wax in an iron bowl, then add 30 grams of turpentine there and mix thoroughly. Let a few minutes pass and only then add alcohol - 20 grams. The contents must be mixed and left to cool.
When the mastic mixture has completely cooled, it is applied to the defective area with a woolen cloth, which is pre-moistened in gasoline. The mastic must be distributed level with the surface, and then rubbed with a cloth until shiny.
Removing defects with steam
The steam method will help remove defects from a wooden piece of furniture. But this method is at risk, because high temperatures can completely ruin your favorite piece of furniture. The best protection in this case is to test the steam exposure in an inconspicuous place. If the test goes well, then you can get to work. To do this, apply a piece of damp gauze or cotton cloth folded several times to the scratched area and place a hot iron on it. You need to wait a little for the steam to penetrate deeper into the wood. Under its influence, the scratch will disappear due to the expansion of the wood.
Elimination of deep defects
If wooden furniture has been very deeply scratched, and you want to completely eradicate the defect and level the surface, and not just mask it, then you need to adhere to the following work scheme:
1. cleaning the area that was damaged;
2. applying putty, which is used specifically for wood;
3. sanding the surface with fine-grained sandpaper (only after the putty layer has dried);
4. applying stain of a suitable color;
5. protection of the applied layers by applying varnish.
You can see how to remove scratches from wooden furniture yourself in the video:
Restoring deep scratches is not a simple and lengthy process. In addition, natural wood absorbs and changes the color of stain. Therefore, if you have expensive furniture and you want to make it perfect, then it is better to seek help from specialists. All other cases involve using traditional methods or purchasing wax crayons, which will save money.
How to remove scratches?
A special furniture marker can help disguise chips and scratches
No matter how careful the care is, scratches on furniture cannot be avoided during long-term use. Bedside tables, cabinets, sideboards are damaged by household items and are worn out. Such damage significantly spoils the appearance of the products, worsening the interior of the entire room.
Paraffin from regular candles is perfect for removing and masking defects in light-colored furniture.
It is difficult to avoid the appearance of chips. But there are real ways to help get rid of them in a matter of minutes. All these methods can be divided into two groups: professional and folk. In the table we will consider the pros and cons of each of them.
| Professional methods | Folk remedies |
| · have a high cost; | · safe, non-toxic; |
| · quite effective; | · practically do not require costs; |
| · cause difficulties in choosing the right shade. | · do not always cope with deep marks. |
For small white scratches on furniture pieces, you can use raw walnut
Advantages and disadvantages
The film allows you to completely renew the facades of furniture, and no special skills are required to work with it. Thanks to a huge selection of textures, colors, images, you can choose the right canvas for any interior of a bedroom, living room, hallway, nursery, office. The material has gained great popularity due to its advantages, among which are:
- Low cost. Decorating will cost several times less than purchasing new things.
- Interior renovation. With the help of the material you can often change the design of any room.
- Easy installation and dismantling. Anyone can carry out the work of applying and removing the canvas, without any additional tools.
- Easy cleaning. The surface can be cleaned using a regular sponge and water.
- Manifold. A large number of shades and textures makes the catalog products universal; they fit into any interior.
- Moisture resistance. The canvas does not allow water to pass through, it can even be used in the kitchen and bathroom, but it cannot withstand prolonged wetness.
- Resistance to household chemicals. For cleaning, you can use regular detergents.
- Resistant to temperature changes. The film is not afraid of either cold or heat, even sudden temperature changes.
Like any other material, self-adhesive products are not without disadvantages:
- Fragility. The service life of even the highest quality models does not exceed five years.
- Discoloration. Over time, under the influence of sunlight, the surface fades and loses its original appearance.
- Surface preparation. The base for pasting must be level, otherwise all defects and irregularities will be visible.
- Poor abrasion resistance. In places of active friction, the protective layer will be rubbed off.
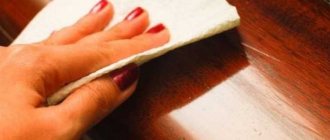
How to use furniture wax to restore wood products?
During the process of moving, repairing or long-term use of wooden furniture, scratches, chips and cracks may form on their surface.
Today, there are several types of specialized preparations that will help both remove scratches from furniture and renew their appearance. These can be professional products, such as furniture wax or touch-up, or natural products.
When choosing the optimal remedy, you need to evaluate the quality and color of the item, the size and type of damage.
Types of furniture wax and rules for its use
Wax is a universal remedy for restoring wooden furniture. It can be used on untreated, laminated and varnished surfaces. There are two types of product, differing in composition and physical properties:
- Soft. Can be used to remove traces of small, shallow scratches. To do this, simply distribute the product over the problem area and remove excess product after a quarter of an hour. Then you need to polish the surface with a cotton cloth. If the damage is significant, then apply the wax with a spatula or knife and leave the product on for a little longer.
- Solid. The professional composition is not so easy to use, but gives a more attractive effect. First, furniture wax needs to be melted, then applied to and around the damage. After a minute, the product will harden, then you need to sand the wood, removing all processing media. High-quality manipulation requires some skill, but the result is worth it.
In addition, there is another touch for processing wooden furniture. This is a liquid product that needs to be shaken thoroughly before use and applied in several layers to the area with cracks or scratches.
Tip: It's best to work slowly and consistently, sanding the surface after each coat has dried. Only in this case will it be possible to achieve the desired result and the restoration will not even leave any traces.
It is worth considering that furniture wax cannot be replaced with ordinary or cosmetic paraffin, even if the preparation is painted in a suitable color. Its texture is noticeably different from similar analogs, so the composition does not wash out or fall out of cracks.
How and what else can you use to remove scratches from the surface of wooden furniture?
If profile wax is unavailable for some reason, you can use improvised means to restore a wooden surface, which are often the most common food products:
- Walnuts. We split the kernel and begin to rub the cut into the area of the chip or scratch, without applying any physical effort. The manipulation should be continued for several minutes, after which we wipe the area with a soft cloth, removing excess oil and pulp. To consolidate the effect, it is recommended to sand the area with a special cloth and cover it with transparent varnish.
- Mayonnaise. Use white sauce to fill the cracks, removing excess product from the surface. Next, you just need to wait until the oil is absorbed into the wood fibers, causing it to swell. Then the crack will close on its own. After a couple of days, remove the remaining mayonnaise that comes to the surface.
- Lemon juice with vegetable oil. Mix the two components, taken in equal proportions, apply the resulting composition to a soft cloth and rub it into the problem area. This method will only help get rid of very small scratches, but will not leave any marks.
- Tea brewing. It must be a fresh, steeply brewed product. Most often it is used to disguise chips. The technique is quite troublesome and risky, because... You may not guess the strength of the brew and leave a dark stain on the surface of the furniture. Just apply the product to the surface and do not wash off. It is better to paint the wood in stages, stopping after achieving the desired color.
- Coffee. Brew a thick slurry from coffee beans ground to a fine powder and warm water. We only apply it to scratches. Entire areas cannot be affected. Remove excess mass with a napkin.
In addition to products, the following products can be used:
- Machine oil or iodine. We choose one of these products and apply it to chips and scratches. After the product has dried, be sure to sand the treated area.
- Shoe polish. You just need to choose the appropriate shade and apply the composition directly to the scratches. There is no need to rinse or peel them off.
- Drawing supplies. A simple and effective option for restoring wooden products. Most often, wax crayons are used for this purpose, but in a pinch, markers will also work.
For those who don’t like to make do with express products, homemade mastic may come in handy. To prepare it, you need to melt 40 g of wax over low heat. Pour 30 g of turpentine into the melted composition, mix and after a minute add a tablespoon of alcohol. Stir the mixture and remove from heat. We wait until the product cools down, after which we distribute the composition over the problem area with a woolen cloth soaked in gasoline and rub until a characteristic shine appears.
Despite the simplicity of these approaches, they are highly effective and allow you to restore wood no worse than professional means.
Source: https://mschistota.ru/sredstva/kak-ubrat-carapiny-s-mebeli.html
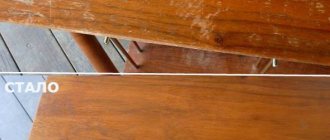
Elimination of abrasions
If abrasions suddenly appear on the countertop, follow these steps to repair the laminated countertop:
- You need a small piece of acrylic plastic as close as possible in color to the color of the table top, glue, fine sandpaper, and a piece of felt.
- Use sandpaper to sand the damaged surface of the tabletop.
- It is necessary to grind the acrylic plastic to a powder state and mix it with glue.
- Apply the mixture to the damaged area.
- Allow to dry.
- Sand with fine sandpaper.
- Polish with felt.
Also, to repair a countertop made of laminated chipboard, there is another interesting option:
- In the store you need to buy mosaic tiles on a paper or mesh backing, tile grout, tile adhesive, a small spatula, fine sandpaper, masking or construction tape, scissors, wood putty, spray paint in a can.
- First, degrease the surface of the countertop with alcohol or acetone.
- Then the wood is cleaned of varnish or paint.
- Afterwards the surface must be cleaned with sandpaper.
- If there are deep scratches or cracks, then these damages must be repaired with wood putty.
- After complete drying, the surface is cleaned with sandpaper.
- The surface is painted with spray paint.
- After the paint has dried, apply tile adhesive to the painted surface with a spatula.
- Prepare the mosaic in advance - to do this, you need to finely cut the mosaic matrices, and then carefully lay it on the glue with a mesh or paper base, press it down a little, and smooth it out.
- Leave until the glue dries completely.
- Afterwards, paste over the edge of the mosaic with tape, following strictly according to the instructions, fill the seams between the tiles using a special grout, and leave until completely dry.
- Using a sponge, remove excess grout from the surface of the mosaic.
In any case, do not despair, because there are no hopeless situations; qualified specialists will try to repair the countertop made of laminated chipboard so that it can last for a long time and avoid the cost of purchasing a new kitchen countertop.
I ordered a kitchen a year ago. During all this time there were no problems. Despite the complexity of the work, everything was done quickly and with very high quality. The fact is that the kitchen space in my house is not very convenient, so the order was, to put it mildly, specific. The materials are simply excellent! Beautiful frosted glass and natural wood look very beautiful in combination. I'm happy with everything. Thank you!
How to paint over a chip on furniture?
Lately, the presence of cabinet furniture in the house is almost mandatory. Cabinet furniture is interior elements made up of massive rigid vertical and horizontal elements.
Connections are made using angles, self-tapping screws, bolted connections and other fasteners. One of the advantages of prefabricated furniture sets is the ease of their transportation and installation.
Cabinet furniture is found in many rooms of ordinary apartments, is subject to stress and, of course, breaks during use. But this doesn’t mean it’s time to go shopping for a new cabinet.
Each person can perform simple repairs to cabinet furniture on their own.
What materials and tools are needed
Before carrying out repair work, you must prepare a set of tools:
- If the surface is damaged, you will have to restore it using improvised means. A wax pencil, an ordinary walnut, vinegar, glue and many other repair items can help in this matter;
- Screwdrivers of suitable size;
- If required, you will have to find the missing elements of the mechanisms;
- Furniture varnish.
Repairing cabinet furniture with your own hands is a creative process; no one can accurately list the entire set of tools, because all breakdowns are unique and require a special approach.
Surface restoration
The most common damage is surface defects.
This is not surprising, because cabinet furniture is often used in not the best conditions and the surface is often subjected to heavy loads.
You can fix minor damage yourself. To do this you will need your skill and some tools depending on the damage.
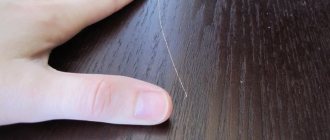
Minor scratches
The appearance of small scratches is a natural process during the use of furniture.
The cause of such a defect can be pets or careless handling of furniture.
Usually scratches appear as if by themselves, the owners simply notice them and begin to choose a repair method:
- Walnut. With its help you can make small scratches on the surface less noticeable. The material covers up scratches. To carry out repairs, it is necessary to divide the whole nut into two halves and lightly rub the damaged area with the inside;
- To correct damage, you can use a pencil of a suitable color. With its help, you just need to paint over the scratch;
- MDF and chipboard panels can be repaired using furniture wax. To do this, the wax pencil is melted using a thin knife heated over an open flame, and the mixture is applied to the scratch. After drying, the remaining wax should be removed with a blade and wiped with a cloth. Under no circumstances should wax be melted over an open fire; the beeswax contained in it is highly flammable.
After completing the work to eliminate scratches, the surface can be varnished; this will not only improve the appearance, but will also help protect the furniture from further damage for a while.
Anti-scratch pencil
Scratches are removed with walnut
Wax for scratches
Major damage
Major damage cannot always be repaired with your own hands; they often require the involvement of specialists. Many companies carry out repairs of cabinet furniture at home, this saves the energy and nerves of the owners.
In this case, the technician will professionally assess the amount of damage and carry out repairs.
If the damage is unusual or non-specific parts need to be replaced, you will have to wait until the specialist returns with a set of everything necessary.
Some major damage can be repaired on your own.
A common defect in furniture is cracking of legs or other parts due to use in unfavorable conditions, with constantly changing humidity. To repair this defect you will need the following tools:
- PVA glue;
- Syringe with needle;
- Rag;
- Varnish;
- Clamp.
The work is carried out in several stages, at which time the operation of the furniture becomes impossible
. To ensure that all work is carried out efficiently, the objects being repaired are advised to be freed from cargo.
- First you need to remove dust and other contaminants from the crack. Do not allow moisture to get on the surface; all work must be carried out with dry parts;
- Carefully draw glue into a syringe without a needle. At this stage, air bubbles should not be allowed to get inside;
- To work, put a needle on the syringe. Through it, the crack is carefully filled with glue. It should protrude somewhat above the surface of the furniture;
- The part is compressed with a clamp and excess glue protruding from the crack is removed;
- After 24 hours, the clamp is removed, the surface is sanded and coated with varnish to protect it from scratches and other damage.
After performing these simple steps, the furniture completely restores its functions.
Crack repairs should be carried out as early as possible, immediately after damage appears.
This is due to the ability of cracks to expand as time passes.
Cleaning the surface
We put glue into the syringe
Filling the crack with glue
We compress furniture with clamps
Sanding the coating
Chips
Cabinet furniture is made from chipboard or MDF - these are sheets of tightly glued sawdust, wrapped in a decorative coating. They are often varnished or laminated.
The top layer of furniture parts is susceptible to chipping.
This unpleasant incident can result in the appearance of noticeable defects, because the unprotected surface is subject to significant damage.
Chips in the paint layer can be easily repaired using furniture repair wax. It is simply applied to the surface, wait until it dries completely and cover with an additional layer of varnish.
The situation is somewhat more complicated with chipped edges of structures. These are noticeable light indentations on the edges and corners of chipboard panels.
Such damage causes further destruction, so they must be “treated” immediately.
To complete the work you will need:
- A felt-tip pen for giving the repaired area an inconspicuous color. The most difficult thing in repairing chips is choosing the required shade;
- Repair wax of a suitable tone;
- Thin knife and lighter;
- Putty knife;
- Felt;
- Fixing varnish spray.
The repair process includes several stages:
- The edges of the chip are given a straight shape. The damage is treated with a knife and sandpaper;
- The chip is sealed with wax. The pencil should not be melted over an open fire, so it is applied using a hot thin knife. It is necessary to leave some wax reserve;
- After the wax has completely cooled and hardened, it needs to be processed with a chisel and the frozen mixture must be given the required shape;
- When the shape of the part is restored, the wax is lightly polished with a felt cloth;
- A pencil is used to repair surfaces with a clear structure. It helps restore texture;
- If the chipped area looks invisible, it means the work was done well and you can coat the repaired part with varnish.
If you cannot find wax of a suitable color in the store, then this problem can be solved by mixing different shades. Purchase two tones that are close to the color of the furniture being repaired.
Wood furniture repair
Wooden furniture in the apartment looks very elegant. Although wood is a durable material, it is impossible to avoid damage to this material. Unfortunately, after some time of use, scratches are visible on wooden furniture. Luckily, you can use home methods to remove scratches from furniture.
There are many simple ways to repair or paint over minor damage. To repair scratches on furniture, you can use ingredients that are always on hand in the kitchen. This:
- coffee grounds;
- tea;
- oil;
- lemon juice;
- iodine;
- petrolatum.
To cover a scratch on dark furniture, you need something that reduces the void and makes it less noticeable. Coffee grounds, for example, have these properties. You need to rub it into the crack with a cotton swab and wait until it dries. If the cavity still exists after this, the treatment should be repeated.
An express tea bag will work the same way. You need to tear it apart and pour in a small amount of water to form a paste, which should be pressed onto the damage with a cotton swab. Then you need to wipe off all the liquid on the surface of the furniture, otherwise a dark stain may appear. Excess should be removed immediately with a paper towel.
A mixture of lemon juice and oil is suitable for removing scratches from light-colored furniture. Scratches on light-colored furniture do not require darkening. Therefore, this mixture copes well with minor damage. To wipe, just mix one teaspoon of these components.
For deeper scratches, you can use Vaseline, which not only covers the scratch, but also fills it. The result is a completely smooth surface. Vaseline should be applied to the gap and left for 1 day. The damaged area is then wiped to remove excess agent.
As for iodine, it is a coloring agent. It is best used for damage to dark furniture. You need to act in stages so that the scratch does not become darker than the surface of the furniture. Iodine should be diluted with alcohol in the following ratio: 1:1.
Eyeliner or lipstick can also be useful. Every woman has these basic makeup tools at home. With their help you can disguise damage to furniture. The condition is the correct choice of cosmetic color. Both pencil and lipstick will fill in the gaps and make them less noticeable.
To paint over scratches on furniture, you can use oil paints, which come in a wide range of colors. In addition, they are more stable and durable. When using oil paint to update furniture, you should choose a shade that is a little darker. After applying the paint, you need to wait until it dries.
For this job, it is best to use a thin brush to avoid painting the surface of the furniture. If the paint does not get into the damaged area, then the excess product must be quickly removed with a suitable solvent. To remove scratches on lacquered furniture, an effective way is to use the following mixture:
- from 4 tablespoons of liquid wax;
- 3 tablespoons of turpentine;
- 2 tablespoons of alcohol.
Scratches on furniture can also be removed with colorless varnish diluted with alcohol. Minor damage to ebony furniture can be repaired with black shoe polish. In turn, brown cream removes scratches on mahogany furniture.
Professional waxes and retouching pencils
These products are available in construction chemical stores.
They are generally designed to cover microdamages on furniture and floors. Furniture sealing waxes are available in hard or soft versions. They can be used according to preference, but hard wax is recommended for damaged floors. In theory, both waxes and touch-up pens come in many colors. However, this is just a theory. Traditional stores usually only stock a few basic and most versatile colors. The desired product can be ordered online (directly from the manufacturer), but even here there are problems with correct color assessment.
Colors viewed on a computer monitor usually deviate from reality. So even though these are professional retouching products, sometimes it's better to use what you have on hand. The alternative, of course, is to have the damaged furniture professionally refurbished by a specialist, that is, sanding the top layer and covering the surface with new protective layers.
Wax
Wax pencils for removing scratches on furniture
This is a professional product. Special wax can be found in some furniture stores and hardware supermarkets.
Special wax for masking scratches on polished furniture, which is sold in stores and comes in different types.
Wax is universal. It can be used on any surface: laminated, wooden, varnish, etc.
The wax is applied to a soft wool or felt cloth and gently rubbed into the surface in a circular motion.
The wax is sold in two different variations:
- Soft. Easy to use. This wax just needs to be rubbed into the desired location. Severe damage requires a large amount of material. It is easier to apply wax to wooden furniture with large cracks with a knife or a construction spatula. You should wait about fifteen minutes before removing the excess.
Soft wax used to repair chips, scratches and cracks on wood and laminated surfaces - Solid. This is an expensive, effective remedy. It is not worth using it without certain skills. Hard wax needs to be melted, applied to the scratches in a thick layer, and the damaged area sanded.
Ultra-hard wax for the restoration of furniture surfaces that are in constant use
Apply melted wax to the damaged area in excess, cool, remove excess, sand the repair area
Special means
You can get rid of defects in a matter of minutes using specialized furniture compounds. Some of them have a fairly high price, but in stores you can always choose an option that suits the cost.
stain
This is a material in the form of a liquid or emulsion that is applied to wood to give it a specific color. Products of this type are very relevant for eliminating various shallow abrasions, especially those that affect only the surface layer of varnish.
Treating a wooden tabletop with stain
It is advisable to apply stain to the entire countertop and door, otherwise the treated area will stand out strongly. You should paint an inconspicuous area of the furniture first to make sure the color matches. Afterwards, you can saturate the product completely, and polish it as it dries.
Regular liquid paint
It is better to completely paint old furniture that has a lot of scuffs. To do this, you can purchase alkyd or acrylic paint in the color you like. After thorough sanding and degreasing, the surface is painted and dried, then coated with a finishing wood varnish.
Painting old furniture
Oil polish
If the furniture had a layer of polymer composition on top, for example, polyurethane, you can cover up the scratches using a special oil polish. First, the area with the defect is cleaned until smooth with fine-grain sandpaper, dipped in mineral oil, and then covered with polish. It forms a smooth, shiny surface, carefully filling cracks.
Watco wood polish
Mastic
Another composition with which scratch restoration is carried out quickly and reliably. Mastic restores gloss on damaged substrates, repairs mechanical defects: chips, cracks, marks from animal claws. You can buy the product ready-made or make it yourself:
- Melt 40 g of beeswax in a water bath.
- Add 30 g of turpentine.
- Combine the mass with 10 g of alcohol.
- Mix everything and remove from the stove.
- Treat the furniture with a warm mixture using rags.
Ingredients for making your own mastic
This mastic is especially suitable for removing white spots and abrasions that have formed on products made of natural wood or MDF.
Pencil
Wax pencils help hide scratches on furniture in one motion. They are sold in all construction stores and come in a variety of shades to match the color of the wood, so choosing the right tool will not be difficult. The damaged surface must be wiped from dust, dried, and then carefully rubbed with a pencil.
Anti-scratch wax pencils in various shades
Some compositions require preliminary melting, which can be done using a water bath or a regular household hair dryer. The device is aimed at a pencil, the wax from which will flow directly onto the defect. After drying, the furniture is thoroughly polished with a dry cloth.
Hatch
A touch-up for restoring chips is considered a professional product and looks like a stationery proofreader. It is used to cover shallow seams, remove tears, scratches, and abrasions. A composition of this type is easily applied to furniture or floors, sets quickly, and is resistant to moisture and temperature changes. The stroke does not leave marks and remains resistant to abrasion for a long time. It is applied to the defect after cleaning the surface, and as it dries, the furniture is coated with varnish.
Furniture touch Master City
Wood wax
Wax can be used to restore bulk items, and not just to fill minor scratches. Such compositions are sold in two forms:
- Soft. Easy to use, easily rubbed into the problem area in a circular motion. After 15 minutes, the unabsorbed excess wax is removed with a rag. This wax is well suited for laminated substrates and natural wood.
- Solid. They are professional products and melt before application. As the base is lubricated, it is polished and the composition is rubbed into the damaged areas.
Hard waxes for furniture restoration
Marker
Some brands of furniture paint (such as MinWax) come in marker form. They are very easy to use. It’s enough just to rub it over the scratch, and then wait for the composition to dry, which happens literally in a minute. To add shine after painting over the defect, use wood polish.
How to remove cracks and other damage to furniture
Small cracks (up to 2 mm) can be filled with epoxy resin and heated with a hair dryer, both the surface and the glue. The resin hardening time is 4-6 hours.
Since it is not at all difficult to remove cracks on small furniture, we will focus on deep damage. If there are very deep cracks in the furniture frame, they require filling with epoxy glue in two or three steps and sanding after two to three weeks.
Filling large depressions and cracks requires puttying. Finding the right color putty is not easy. Using water-based wood putty, you can tint it with acrylic paints to achieve the desired color.
Traditional methods:
- Material costs are virtually eliminated.
- Safe to use.
- It is not always possible to hide deep scratches.
Shoe polish
To achieve the desired effect, choose a high-quality, solid cream. Be sure to try to match its color to the tone of the furniture being repaired. Large cracks cannot be repaired, but small scratches can be hidden for a while. After several cleanings, the flaws appear again. And the procedure is repeated. Before repair, the surface is cleaned. Carefully apply a thin layer of cream onto the scratch. After waiting 5 minutes, the residue is removed, and the treatment area is rubbed with a woolen napkin.
Tea brewing
This method is only suitable for shallow cracks. A bag of strong black tea is brewed and left for 20 minutes. For further actions, use a cotton swab dipped in tea leaves. They wipe the scratch with it. If light-colored furniture is being restored, the composition should not be saturated.
Iodine or machine oil
Iodine is best suited for dark varnished surfaces. A regular cotton swab is soaked in iodine and wiped over the crack. Let it dry and look at the result. As iodine dries, it becomes lighter in color. If the scratch is not completely covered, repeat the process until the desired shade is achieved. When repairing light-colored furniture, iodine is dissolved with water. A similar effect can be obtained using machine oil. The repair process is no different from painting over scratches with iodine.
Walnut
This effective method is suitable not only for deep scratches, but also for fairly large chips. By rubbing a walnut kernel on a damaged surface, you can achieve amazing results. The depressions, cracks, and grooves become clogged with particles and juice from the nut kernel.
Mayonnaise
Experienced housewives advise restoring unpolished wooden products using mayonnaise. Vegetable fats and protein contained in the product perfectly heal cracks. The process is simple but effective. The cavity is filled with sauce and left for several days. Then the surface is sanded.
Vinegar with vegetable oil
Light-colored polished wooden furniture can be removed from shallow scratches using the following mixture:
- Take 6 tsp. olive oil and 1 tsp. vinegar.
- Mix the ingredients and cover up the flaw.
- After a day, the area is wiped with a soft cloth.
Paraffin candle
You can remove or disguise scratches on light-colored furniture with a piece of paraffin, which you rub on the problem area. And after a while they polish with a soft cloth.
Steam
It should be noted right away that the method is not suitable for all surfaces. Possible damage to furniture. Therefore, when deciding to use it, it is worth trying to experiment on the back wall. This method is good for removing small scratches. And to avoid problems, it is not difficult to find alternative options. However, the process is as follows. Use a steam iron and gauze folded in several layers. Steam is released onto the scratch through gauze. The crack swells and gradually heals.
Sandpaper
Wooden furniture, doors and even the walls of a steel-colored refrigerator can be sanded well. Scratches go away forever after use. The procedure itself is simple and can be done at home. Use fine-grained sheets numbered P600 and above. The paper is moistened and passed several times along the scratches along the wood fibers. And at the end, they smooth out the marks around the work area. And polish with a napkin.
Mastic
A good way to remove cracks and scratches on polished furniture is with a mastic you prepare yourself. You need to use wax, turpentine and alcohol. If these components are present in the house, the furniture restoration process will be successful and without errors. To prepare the composition, the following operations are performed:
- Place 40 g of wax in a bowl and melt it on the stove.
- Then add 30 g of turpentine and mix the resulting mass.
- Finally, pour in half a tablespoon of alcohol and mix again.
- Turn off the stove.
Paint over the scratches with warm mastic, spreading it over the surface of the object. Polish with a napkin until shiny. As you can see, all of the above methods are simple and inexpensive. They can be done at home, but are more suitable for removing minor scratches. And for large flaws, professional methods are suitable.
How to glue veneer using an iron
Veneer most often suffers on the edges of countertops, doors, and drawers. If it is impossible to repair the damage or a fragment of veneer is lost, then the old veneer in the damaged area must be replaced with new one.
Replacing the entire surface with damage, that is, veneering large areas, at home, without experience, will not ensure uniform sticking of the veneer, its pressing and drying.
To repair the surface of furniture, choose veneer of a suitable tone; if this is not possible, use the lightest version of veneer, which you can then tint yourself, but when choosing, pay attention to the texture of the wood.
Remove the damaged piece of veneer with a sharp knife. First, mark the cut line, and then quickly cut a piece of veneer. If the wood or chipboard underneath the veneer is damaged, putty it and level the surface.
If chips or losses of veneer are insignificant (1-2 cm) and it is not possible to buy veneer, fill these areas with wood putty, after drying, sand and paint with acrylic paint to match the surface.
Before gluing the veneer, prepare the following tools and materials:
- suitable veneer;
- PVA glue (or “Moment” glue, “Liquid nails”);
- sharp knife;
- iron;
- syringe;
- sandpaper, block;
- cotton fabric or cloth;
- paper;
- flute brush.
When repairing furniture at home, follow these instructions to repair damaged veneer:
Apply a small amount of PVA glue to the prepared underlying surface using a flute brush.
When cutting, try to keep the cut line slightly wavy and the piece cut with a slight allowance. Coat the cut piece of veneer with PVA glue.
Place the veneer in place so that the direction of the grain matches. After this, it is advisable to firmly press the veneer with a wooden block.
To speed up the gluing process, use an iron. To do this, place a cloth or sheet of paper between the veneer and the iron and press the iron against the surface for a couple of minutes.
If the original veneer is not damaged, but swelling has occurred, it can be returned to its place by ironing it with a hot iron through a damp cloth.
Applying wax by rubbing.
Application with a spatula or edge knife.
We cut off the excess with a knife or a piece of plastic, for example a plug for a furniture corner, which is more preferable because plastic eliminates accidental scratching of already damaged material.
And carefully polish with a clean cloth, preferably felt.
If the material being restored has a distinct wood texture or some other texture, then you can finish painting it on the putty area with alcohol-soluble felt-tip pens or markers.
The more colors you have, the more accurately you will be able to seal the surface. They can also be used to sketch not deep scratches.
- If the previous method did not help, it means that the adhesive properties of the glue have been lost. Cut the swollen coating and use a regular syringe to inject PVA glue under it. Press down on top with a weight and leave for a day.
Should you punish your pet?
First of all, what not to do. Do not scold, and especially do not hit your pet. Firstly, the animal will not understand why it is being punished, and secondly, it does this instinctively, since it marks its territory in this way. And thirdly, if this method of dividing the territory into spheres of influence is not allowed to the cat, then he can try other methods of demarcating living space. And at the same time, owners, hide your slippers away! And an even better way to fix it is to just spend a little time and follow our master classes to make a scratching post for a cat from the materials that you have on hand.
Important! Remember that your pet needs proper care. Surely in the spring-summer period you will need information on how to remove fleas from a cat
Repair and restoration of chipboard furniture
Furniture made from laminated chipboard is currently the most popular.
Furniture made from chipboard is very popular because it is inexpensive, high quality and has no problems with repair.
It is inexpensive, and repairing chipboard furniture is not a problem.
The affordable cost of this furniture is explained by the use of relatively cheap materials for repairs: wood, chipboard.
Due to the fact that the surface of the board is laminated, the furniture has a very attractive appearance and harmoniously complements any design, decorating it.
Like other items, furniture is subject to damage during use. More often this happens during transportation or careless handling. There are a number of damages that are particularly common for furniture.
Products made from chipboard can be successfully restored . Typically, when using furniture, it develops scratches of varying depths, cracks, dents, chips of varying depths and abrasions.
Chip removal process
The stage of eliminating furniture chips begins with processing the corners with a chisel.
Current repair and restoration of modern chipboard furniture has its own characteristics. Repairing chips requires several steps.
They begin with preparatory treatment of the defect. In this case, it is processed with a chisel so that the edges are straight. Next, the chip is sealed. For this purpose, hard wax is used, matching in color. It is melted using a lighter or wax melter, after which it is applied to the chip with some reserve.
After the wax has dried, the excess part is removed with a chisel, paying attention to each part. It is imperative to ensure that a clear angle is formed. A felt cloth is used for light sanding.
The next step is to restore the texture. At this stage, lines are drawn along the chip using a retouching felt-tip pen; they should correspond to the overall texture. You constantly need to wipe the surface with a napkin in order to obtain some blurring of the clarity of the boundaries for maximum plausibility.
After this, an opening is carried out with varnish. To fix the result and give the restored surface its typical shine, it is treated with a spray varnish.
These actions do not require special skills or special knowledge - just follow the rules and the work will be done perfectly.
Repairing scratches
To get rid of scratches on furniture, apply wax evenly to the defect using a spatula.
Scratches are especially common defects in chipboard furniture when it comes to children's rooms. To eliminate these shortcomings, you need the same set of tools that are used when repairing chips. But in this case it is better to use soft wax rather than hard.
To get rid of scratches, wax is applied to the defect with a staple, not forgetting to compact and level it. The missing texture should be completed with a retouching felt-tip pen. When applying a fixing varnish, the degree of gloss is leveled and the sealing area is fixed. If you don't have furniture wax, you can seal the cracks with a furniture polish specifically designed for this purpose.
If the surface has abrasions, then they spoil the appearance of the furniture no less than chips and scratches. Such disadvantages arise when there is constant contact of various objects with the surface of the furniture. Most often, furniture located in the kitchen or hallway suffers. The top protective layer may be erased completely or in certain areas.
You can get rid of scuff marks yourself if you do simple manipulations. You can wrap a microfiber cloth around your finger and moisten it with a felt-tip pen of the appropriate color. Now this napkin is used to touch up the abrasion. Rub along the surface. When the steps are completed, a regular fixing varnish is applied in several layers.
Repairing cracks
Bed design made of chipboard.
Moisture settles on objects, causing cracks to appear. No less often, such defects arise if there was careless operation in the door fastening area. To repair cabinet furniture without outside help, with your own hands, you will need to put PVA glue into a syringe. To perform this action faster, the needle is removed from the syringe. Next, the entire crack space is filled with glue.
A clamp is placed on the slab, located on the sides of the crack being treated, and tightened. The furniture should remain in this position for at least 24 hours. When the glue has dried, the product can be used again as usual.
Furniture repair should always be carried out in stages, without haste. When repairing furniture made from chipboard with your own hands, you must be prepared for the fact that you may need a variety of materials. Basically, you need wax, soft and harder, and a set of retouching and tint markers.
You can use a furniture touch, a regular laminating edge, or markers. As for wax, it has its differences. Soft furniture wax is characterized by the possibility of quick use, since it does not need to be melted. At the same time, it can only be used on surfaces that do not have mechanical damage.
Soft wax is more convenient to use, but hard wax is considered more reliable.
Drawing of a bedside table made of chipboard.
The use of a furniture touch is important in case of filling minor damage. For example, when it is necessary to disguise small chips, scratches, or abrasions.
Home furniture repair involves applying a furniture touch to the surface, letting it dry and then sanding it with felt. If the end surface has worn areas, use laminated edges. The old coating is first removed and sanded.
The edge should be placed on the end and held with a hot iron. This action ensures the film adheres.
Every owner can tidy up a product made from chipboard material with his own hands.
Tools, materials
- Hard colored wax, colored soft wax.
- Retouching felt-tip pen (you can use a regular one, in the desired color scheme).
- Wax melter.
- Staple, chisel.
- Fixing varnish spray.
- Any felt fabric, a piece of felt.
- PVA glue.
- Large syringe (with needle).
- Adjustable fasteners.
Having all these simple materials, you can independently carry out repair work, tidy up and repair chipboard furniture.
As you know, chipboards are easily restored, so you can always correct almost any defects, provide repairs, update the interior - and any item will look like it was just purchased.
Source: https://masterpomebeli.ru/spalnya/remont-mebeli-iz-dsp.html
Restoring integrity to a glass tabletop
If chips or other defects appear on glass furniture, then restoration on your own is impossible. To remove even the smallest scratches you will need professional equipment. If there is significant damage, the table cannot be “reanimated” and there is only one way out - replace the product with a new one.
To protect the glass from scratches, it is recommended to use fabric coasters or cover it with a tablecloth.
Damage to the countertops can be associated both with poor-quality material from which they are made, and with improper use. However, regardless of the reason, in most cases, there are ways to fix it.
Subscribe to our website so you don't miss the most interesting things!