0
28384
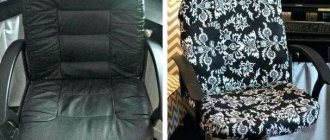
Without upholstered furniture it is impossible to create comfort at home. But over time, its upholstery begins to wear out, lose its appearance, or simply become boring after prolonged use. Therefore, some craftswomen are thinking about how to sew a chair cover with their own hands; step-by-step instructions will help you do it quickly and correctly. If you study the master class in detail, even a novice needlewoman can handle it.
Sewing a chair cover with your own hands: fitting
Step 1: Pin fitting the inside of the chair
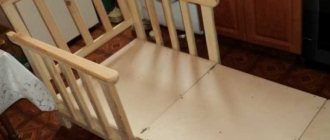
Before sewing a cover for a chair, you need to adjust the inside of the backrest. This is done as follows:
- Place the still uncut fabric on the inside of the back of the chair. The fabric should hang at least 1 inch over the outer back, unless you use a paneling strip. In this case, the fabric should hang down by 10 cm.
- Secure the fabric with a T-needle in the center of the inside back. Straighten the fabric, smoothing it to the sides and then up and down.
- Make sure that the longitudinal thread of the fabric runs perpendicular to the floor. Pin from the center down first and then pin the sides. As you work, continue to smooth and stretch the fabric.
- If you don't want a piping strip, pin the fabric along the top edge of the back.
- Pin a 2.5cm deep fold along the top edge of the inside back piece.
- To sew your own chair cover as neatly as possible, smooth the fabric onto the platform. Start from the center and, working alternately towards one side or the other, pin the fabric along the top edge of the back of the chair.
- In the place where the fabric passes from the inner back of the chair to the seat, an additional 15-30 cm of fabric is required to “tuck” it and fold it. The exact amount of fabric for this depends on the depth of the chair at that point. Using your hands, smooth the fabric between the backrest and the seat.
- Check the direction of the longitudinal threads of the fabric, then smooth and pin the seat platform in the same way as the inside of the backrest. First, pin the fabric evenly in the center, then along the sides, then the front and back edges of the platform.
- Pull the fabric down the front of the chair. Smooth and pin along the center line, then along the sides.
Next, to sew a cover for the chair, you need to make a trim strip. This is a kind of platform for fabric that runs along the top of the chair, connecting the inner and outer (back) part of the back. The easiest way to cover this area is to pin it as an extension of the inside back.
Next, adjust the seat.
The next stage of sewing a chair cover with your own hands is making the front apron.
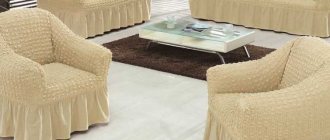
Choosing the right design
The choice options largely depend on the shape of the chair. If owners of standard furniture can still buy a ready-made cover, then for a chair with an original shape, all that remains is to make an individual model. Self-tailoring allows you to create an interesting, creative design even for an ordinary chair. You can choose any fabric, select additional finishing materials and decorations. The main thing is that the finished product fits organically in color and style into the interior of the room.
| Style | Peculiarities |
| Patchwork | Such products are created using patchwork sewing techniques. You can sew very impressive capes from multi-colored pieces of fabric. The choice of colors is individual. For example, bright, contrasting covers with colorful patterns are suitable for boho or country style. They create a light, relaxed, festive atmosphere. For a romantic Scandinavian style with deliberate simplicity, you need to choose a combination of light pastel shades. For beginners, this sewing method may seem difficult due to the fact that many fragments need to be combined and assembled. |
| Loft | For this style, with its laconicism, rough simplicity, upholstered furniture with upholstery or covers made of natural or artificial leather, tapestry, coarse non-woven fabric, a bedspread made of natural or artificial fur is suitable |
| Shabby chic | This style is characterized by a combination of warm, homely, expensive antiques. Satin or silk fabrics are best for covers. They should be muted shades with floral patterns. Bright colors or geometric prints will be out of place. Frills and tassels are used as decoration |
| Baroque | This Italian style is distinguished by luxury and grace. Chair covers are made from expensive bright fabrics and decorated with flounces and frills. |
Advantages and features of Ikea hanging chairs, popular models
Patchwork
Loft
Shabby chic
Baroque
How to sew a chair cover yourself: trimming and finishing with cord
Step 2: Trimming the Fabric
- To sew your own chair cover, trim the fabric 5 cm below the twill tape.
- Trim the fabric along the sides of the seat platform, leaving 6 inches of extra fabric to tuck in where the seat meets the inside of the side armrests.
- Trim all other seam allowances to 2.5 cm. Where you need to straighten and stretch the fabric, cut it.
Note. When you sew, the seam allowances will need to be trimmed to 12mm.
Step 3: Cord Finishing
- Pin the cord in place, around the inside of the back, along any seam line that needs to be trimmed. Cut the cord where you need to fit it into different notches or corners. If you prefer, you can hand baste the cord into place to make it easier to work with.
- If the cover has a trim strip, make a faint line into the fabric along the fold, then pin the cord into place along the seam line of one of the sections.
The cord finishing of a hand-made chair cover is shown in the photo:
How to sew a chair cover with your own hands: basting and fitting
Step 6: Basting with Pins
To make a chair cover the way the correct technology suggests, you need to pin together all the parts, working in the same order as when fitting with pins.
- For seams that include cord, turn the seam allowance up to 1 inch without the cord. Pin, matching the seam lines to align the seam allowances with the cord.
- Pin the other seam allowances together, connecting the front of the armrest and the inside of the armrest to the seat.
- Pin and then hand baste the cord along the seam line where the inside and outside back pieces will meet.
Step 7: Pinning the Back of the Back
- Center and pin the fabric to the outside back of the chair the same way you did the inside back, then pin along the twill tape.
- Trim the fabric 5cm below the twill tape; trim seam allowances to 2.5 cm.
- Split the top edge of the outer back and pin to baste the fabric to the inside of the back. Repeat the procedure with the side seams.
Step 8: Assembling the Case
- Pull out all the T-shaped needles that held the fabric to the chair. To create the zipper opening, split the back side seam (the one to your right if you're facing the back of the chair) 5cm from the top. Carefully remove the cover from the chair.
- Starting from the inside of the back, stitch all the arrows, then stitch the facing strip to the inside of the back.
- Sew the inside of the backrest to the inside of the armrests, cutting the fabric at the corners if necessary and folding the fabric so that the seam lines line up with the folds.
- Next, to sew your own chair cover, stitch the front part of the armrest to the inside of the armrest, cutting the fabric at the curves if necessary.
- Sew the outside of the armrest to the inside of the armrest, then to the front of the armrest.
- Sew the platform to the inside of the armrest along the hem (turn) allowance.
- Sew part of the shoulder area to the inside of the armrest, the inside of the back and the trim strip.
- Sew the outer part of the back to the top and sides of the cover, leaving about 5 cm of the right side seam unsewn at the top. If you. close the opening with a zipper, then fold the seam allowances of the outer back under the bottom and baste. Do not cut the seam allowances along the zipper opening; the final width should be 2.5cm.
- Once the entire cover is sewn, put it back on the chair or sofa. Pin the opening for the zipper. Adjust the parts of the fabric that need to be tucked in so that they are in place. Place pillows on the chair.
All seams will be sewn in the same order as they were pinned. Before you sew the cord seam, pull and trim all the cords so that there is an inch left at the end, this way your fabric will not bunch up. As you sew each seam, trim the seam allowances to 1.2 cm.
This video demonstrates how to assemble a chair cover with your own hands:
How to sew a chair cover with your own hands: installing a zipper (with video)
Step 11: Installing the Zipper
- Place the open zipper, face down, over the right side of the opening so that the zipper teeth just barely cover the edge of the cord, with the zipper tape inside the seam allowance. The end of the zipper should be 1.2 cm from the bottom edge of the skirt, and the end of the tape should be turned up.
- Poke me. Then baste the zipper into place, taking only the cord and the cover's seam allowance.
- Using a zipper foot, stitch the zipper, being careful to stitch as close to the cord as possible.
- Close the zipper. Place the ironed edge of the opening over the zipper so that it reaches the cord. Pin, then baste in place. Also, using a zipper foot, sew a seam across the bottom of the zipper, then stitch down to within 1.5cm of the pressed edge.
Step 12: Attach the cover to the chair
Wrap the twill ribbon around the legs and tie. To prevent the finished cover from slipping during use, stuff the folded areas around the seat platform with scraps of fabric or tightly rolled magazines.
To reinforce the material, watch the video “How to sew a chair cover with your own hands”:
Useful tips
As you can see, sewing a cover for a computer chair with your own hands is not at all difficult. And the advice from experienced craftswomen collected below will make the process even easier and more enjoyable.
- Before transferring the pattern details onto the fabric, the latter must be washed in accordance with the care instructions. This is necessary so that the material shrinks. If the finished cover shrinks, it will be impossible to pull it onto the chair.
- When laying out the pattern pieces, you need to follow the direction of the weft and warp threads. This way the product will look neater and will not warp after washing.
- In order not to get confused during work, it is recommended to sign the parts of the product with chalk from the inside out.
- Symmetrical pattern elements are folded in half to reveal distortions.
- Inexperienced craftswomen are advised to first try sewing a cover from unnecessary fabric, and only then switch to expensive materials.