21859
Corner furniture will help you properly arrange a recreation area in a small living space. It fits perfectly into the geometry of the room, retains maximum usable area, providing enough space for guests. You can save money on buying furniture of a similar configuration if you assemble a corner sofa with your own hands, showing not only the skills of working with various materials, but also the abilities of a designer. The main thing is to be extremely careful in your work, not to rush, and the result will delight you with beauty and durability.
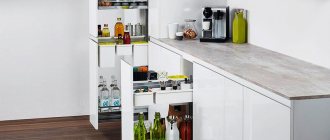
Transformable sofas without frame
A few thick pieces of square or rectangular foam can be turned into cozy upholstered furniture. To do this, you need to sew covers on them from a suitable fabric with zippers for easy washing. One part of the resulting soft modules will become seats, the second – backs.
Frameless modular sofa
If you sew strips of double-sided Velcro on the sides of such modules, you can use them to assemble sofas of different configurations - straight, corner, U-shaped. Or unfold to create a spacious sleeping area.
Corner modular sofa model
Prices for various types of corner modular sofas
Corner modular sofa
If you need a higher sofa, we stack the modules on top of each other. If you want to retire in a chair, we tear one module off the sofa and take it to a quiet corner. In general, there are a lot of options. The only drawback is that you can lean on the back of such a sofa only if it is against the wall.
Frameless modular sofa with decorative leather straps
DIY sofa backrest installation
Sofa assembly: 1—sidewalls; 2—back frame; 3—side panels of the base; 4—base frame; 5—frame of the retractable block; 6—sheathing (hardboard); 7—frame reinforcement corner; 8—bolt with nut; 9—screws; 10—wheel bracket; 11—furniture wheel; 12—wheel axle; 13—piano loop; 14—stopper.
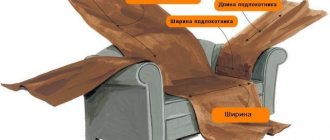
The back of the sofa is assembled with your own hands only after everything is prepared, including a drawing of the future design. This is important to take into account, since without precise dimensions it is impossible to make a beautiful and attractive back.
You need to start by preparing a template and markup. The plywood is placed on a horizontal surface suitable for cutting. According to the prepared diagram, the outline of the future backrest is applied to its surface; it is important to double-check all dimensions.
The outline is drawn with a simple pencil, cutting should be done strictly along the lines, choosing a cutting blade of the required size. Typically, medium-thick plywood is used for such work; there should be no problems with cutting.
Article on the topic: How to glue non-woven wallpaper: meter-long, correct gluing with your own hands, video, pasting walls, wide, how to glue, is it possible to glue, photo
If the backrest is rectangular in shape, then it is important to ensure that its length matches the dimensions of the sofa. It should not be smaller or noticeably larger. It is best to give the back beautiful, smooth contours.
To do this, you can make semicircular cutouts in the upper corners. To do this, it is best to use a template so that all the cutouts are the same shape. After this, the surface of the cuts is treated with sandpaper. All dust must be removed after this, after which you can continue working. At the next stage, you can upholster the backrest; for this, fabric and foam rubber are used.
Diagram of the overall dimensions of the sofa.
You must immediately take into account what the edge will be like, there are 2 options possible:
- In the first case, the edge will also be soft, the foam rubber will be attached close to the end parts.
- In the second case, it is necessary to retreat a small distance from the edge; it will be covered with fabric. Usually a beautiful decorative frame is used for decoration, which hides the edge and gives the sofa more attractiveness. Such frames can be different, ranging from carved wood to fabric overlays.
Foam rubber is attached first; PVA glue is used for this; you can use self-tapping screws for reliability. Then you need to cut the fabric, not forgetting about the allowances that will be wrapped on the wrong side. You need to prepare 2 pieces of fabric. One of them is used for the front lining, and the second for the back, which is adjacent to the wall.
The fabric is fastened with furniture staples; this process must be carried out carefully so that the upholstery is stretched evenly and does not wrinkle . After the back is ready, you need to start attaching it. It all depends on which option is chosen. The backrest can be fixed directly to the bed frame, to the wall, or have a combined fastening method.
Most often it is the latter that is used, as it is more reliable. The backrest is fixed to the frame on the back of the sofa, and it will be attached to the wall using special metal hinges and anchors. This allows heavy and large panels to stand stable and level.
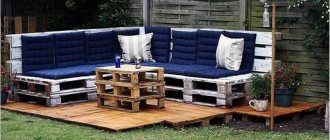
Sofa made from construction pallets
Not everyone is comfortable using too low frameless furniture. The option described above can be improved by using ordinary pallets to create the base of the sofa - wooden construction pallets for transporting bricks and other materials.
Original idea: a sofa made from construction pallets
And here again you will need a little imagination to come up with a convenient design from the available parts. Pallets can be disassembled into individual boards and used, but this is not necessary. It is enough to assemble a sofa frame with a back and armrests from them, fasten all the elements together with nails or self-tapping screws, and then cut out the parts from foam rubber in accordance with the resulting dimensions. As in the previous case, they are covered with fabric. And they are secured in place either with the same Velcro or with rubber bands.
Pallet furniture
Budget option: simple and convenient
The simplest option for the back of a sofa is a regular pillow. This design can be called budgetary, since it does not require significant financial costs. For work, you can select several pieces of pillows; they will be attached to a wooden frame or nailed directly to the wall.
The first option is more preferable, since the fabric can be removed for washing if necessary. A good method is wide loops, to which the pillows can be easily attached with buttons or Velcro. They will look attractive. It is possible to constantly change pillowcases to match the color of the bed linen. An example can be seen in Fig. 3. Instead of pillows, you can use soft squares. They are more attractive, but difficult to implement.
Square plywood structures the size of a small floor are used for work. Such elements are not only covered with fabric, but also framed with foam rubber to make them soft. The blanks themselves are fixed to the wall surface in any order, but most often they come in parallel rows of 3 pieces.
The construction of a backrest for a sofa or bed may be required in various cases. Most often this is the replacement of an old headboard or backrest, or the construction of a new one in the absence of one in the first place. Such a backrest can make a sofa the central element of the interior, give the room a mood, make it more attractive and comfortable.
The best posts
- Scheme of a lilac bush made of beads: master class with photos and videos
- Thick rubber band bracelets on a slingshot with video and photos
- Last bell invitations for teachers with photos
- Colombian mochila: crochet patterns of top models
- Scheffler's houseplant: features of cultivation and care
- How to hide or decorate a battery with your own hands [decoupage, painting, grilles and screens for the radiator]
- How to make a vibrating table for paving slabs with your own hands
- How to drain water from a boiler - step-by-step instructions
Mini sofa made of chairs
Several chairs fastened together are a ready-made frame for a small sofa that can be placed in the kitchen or on the terrace. Of course, it needs some finishing and decoration, and here too you can give free rein to your imagination.
- The chairs can be turned with their seats towards each other, moved apart to the required distance and laid on the seats with boards or durable sheet material cut to width. You will get a banquette for a bedroom or hallway.
Sofa made from old chairs
- A standard-shaped mini-sofa will be made from two or three chairs fastened together at the sides. If they are different shapes or heights, this can be corrected by securing a hard seat across all the chairs at a horizontal level. Then you need to glue foam rubber onto it and sew a cover onto the resulting structure.
Converting chairs into a sofa
Mini sofa
Choosing a pattern for creating a sofa
First you need to decide what model of plywood sofa you will create with your own hands. Below are options for the different devices that may exist. Since the samples have been tested by many masters, you can safely use the indicated parameters.
It is worth remembering that if you are going to change them to suit your desires, then by changing one indicator, you need to do the same in proportion to the others.
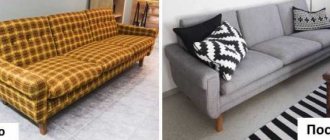
Simple making of a white sofa
See how quickly and easily you can make a sofa with your own hands, which will find a place in the garden, on the veranda and even in a cozy house.
This pleasure will be affordable even for a family with little income. Wooden lumber is quite inexpensive, and soft pillows can be bought ready-made. Or, if you know how to sew, make them yourself from suitable textiles and thick foam rubber. The soft parts that cover the seat have dimensions of 24 x 26.5 x 6 inches (60.96 x 67.31 x 15.24 cm), products with dimensions of 24 x 18 x 6 inches (60.96 x 45.72 x 15.24 cm) are suitable for the backrest.
Preparing for work
The main material of manufacture is wooden planks. Choose good quality boards. The smoother they are, the better the furniture will turn out; you will spend less effort on additional processing. The parts of the sofa for the garden should be made of wood. This work can be done with your own hands, using a tape measure and a circular saw, or at the place where you purchased the planks, you can order them to be cut according to the dimensions provided:
- 4 leg pieces 2 x 2 x 22 inches (5.08 x 5.08 x 55.88 cm);
- 2 pieces-armrests made of timber 2x2x34 inches (5.08x5.08x86.36 cm);
- 2 strips 2x6x31 inches (5.08x15.24x78.74 cm) - side parts of the frame;
- 2 strips 2x6x72 inches (5.08x15.24x182.88 cm) - front and back parts of the frame;
- 2 pieces 2x4x72 inches (5.08x10.16x182.88 cm) - back supports;
- 2 elements 1x2x31 inches (2.54x5.08x78.74 cm) - upper strips of the side parts of the frame;
- 2 elements 1x2x72 inches (2.54x5.08x182.88 cm) - upper strips of the front and rear parts of the frame;
- 1 piece 2x2x72 inches (5.08x5.08x182.88 cm) - rear frame tie;
- 16 planks 1x3x25 inches (2.54x7.62x63.5 cm) for the seat;
- 2 pieces 1 x 2 x 16.25 inches (2.54 x 5.08 x 41.275 cm) - outer backrest strips;
- 12 planks 1 x 3 x 16.25 inches (2.54 x 7.62 x 41.275 cm) for the back;
- 1 piece 1x6x72 inches (2.54x15.24x182.88 cm);
- 1 piece 1 x 4 x 72 inches (2.54 x 10.16 x 182.88 cm).
To work you need to prepare the following tools:
- electric drill with a set of attachments;
- countersink screws, nails, pocket hole screws;
- pocket hole fixture;
- circular saw;
- hammer;
- square;
- roulette;
- pencils;
- spirit level;
- a grinding machine with attachments of different grain sizes;
- glasses and headphones for protection;
- glue;
- primer;
- putty for wood materials;
- white paint;
- brush.
Start assembling the sofa
When working with wood and tools, be sure to wear eye and hearing protection. Perform all operations on a clean, level surface. After each stage, check the angle of attachment of the parts. To make the connections as strong as possible, after preparing the holes, before screwing in the screws, apply a little glue to the surfaces to be connected.
When the screw is already in place, carefully remove any excess glue that has come out. This way, the garden sofa will be stronger, and when painted, the paint will lay down in an even layer.
- Assemble the sides of the sofa. First the legs with the armrest, using 1 pocket screw hole per connection. Then, making sure the angle between the pieces is straight, install the side frame piece at a height of 5¾ inches (12.7 cm) from the bottom. Use 3 screw pocket fasteners and glue for each connection. In your work, follow the diagram below.
- Once the side pieces are assembled, you can attach the front and back pieces of the frame to them. Tighten the parts by screwing 3 self-tapping screws into the prepared pocket holes, using glue. Adjust the design so that the base is a rectangle. Install a bar between the rear edges of the armrests; it will serve as a support for the back of the sofa.
To make the garden sofa stronger, you can initially use thicker timber for the legs.
- Install two base-reinforcing pieces: one 72-inch strip at the front top of the frame, and a second, larger section, spaced about ¾ of the seat width away from the first. Make the connections using a pocket method, placing them on glue. These parts will be the basis for the seat and will increase the rigidity of the structure. They will also serve as additional support if you independently install one or two additional legs on a large screed.
- Place the side and front trim strips on the nails and glue along the top edge of the frame. They will make a wooden sofa for the garden more aesthetically pleasing and will serve as additional strengthening of the base.
- Place the slats evenly across the seat base, from the front edge of the frame to below the installed tie rod. The boards should not reach the end of the frame. Nail them down. Attention! We advise you to position the end strips in such a way that there is free space between them and the side parts for better ventilation and water drainage.
- It's time to make your own backrest. This is the visible part of your outdoor furniture, so it is important for it not only to be a strong supporting part, but also to decorate the sofa. If you wish, you can make the upper part of the back rounded. Draw a cutting line on the part. Use a jigsaw. Then carefully sand the sharp edges.
- Start working on assembling the back by making calculations and marking the places where the slats will be evenly spaced. Mark the holes - 2 on each edge of the plank. Pre-drill the holes for the screws. Treat the contact areas with glue and make screw pocket connections.
- The assembly is almost complete. All you have to do is place the backrest in its place and screw it in several places with countersink screws. They are powerful enough to hold the part in a stable position. Try to use screws, countersinks, and nails with a protective coating. After all, a self-made sofa will be located outdoors in the garden.
Proceed to the most creative stage of creating a sofa - finishing.
- The voids in the pocket holes should be filled with a special filler that is recommended for use on wood. Let it dry.
- Sand the surface with sandpaper or a sander. This will remove excess material and make the surface smoother. Pay special attention to surfaces that people will touch and where pillows will be placed.
- Prime the sofa with primer. It will serve as additional protection for the wood and will extend the life of garden furniture. Leave the product until the product is completely dry.
- Paint the sofa white. After the coating has dried, place beautiful soft pillows on it and enjoy your relaxation.
Preparation of plywood and other materials and tools
For a structure without sharp edges, a product will be required so that it can withstand a certain load. Furniture panels or thick plywood are perfect for this. As for the shaped parts, it is better to choose fiberboard, which in the future must be specially reinforced with boards.
To make a model with an angular shape, it is worth purchasing wooden slabs, plywood, planks, padding polyester and fabric. You also need bars and a fiberboard sheet. As for the tools, these are:
- Self-tapping screws and nails.
- Angle plates.
- Stapler.
- Drill.
- Loops.