0
84435
To ensure high quality assembly and installation of interior elements, furniture fasteners are used. Depending on the location of fixation and method of connection, there are several varieties. These elements not only make the assembly and installation procedure easier, but will also be invisible after the process is completed.
Dowel
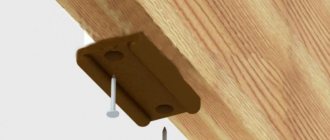
A dowel is a wooden cylinder 8-10 mm thick, 35-50 mm long with axial notches (grooves) on the side surface. The ends of the dowels are chamfered for quick and easy alignment with the counter holes.
Fastening on dowels is considered one of the oldest methods of connecting furniture elements, which has been used for many centuries. Today it is used for both detachable and permanent connections, as well as dowels for self-tapping screws (not all craftsmen believe in the reliability of plastic dowels when hanging heavy objects on the wall).
In detachable connections, the position of the parts is positioned using dowels, and attraction and fastening is carried out by other types of fasteners. When performing this work
a jig or high-precision marking is used so that all the dowels fall into the intended holes, accurately fixing the connection of the furniture elements.
In case of permanent fastening, the dowels are covered with glue (PVA, carpentry, hide, granulated bone) before assembly. The last three types of compositions are heated in a water bath and applied hot. This is how wooden stools and other furniture are assembled.
Dowels are made from hard wood. The grooves are needed to place glue in them in permanent joints.
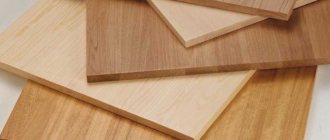
How to cover walls with furniture board?
Furniture board made of pine wood is so beautiful and unique due to the natural properties of pine that it can enhance any surface and decorate the interior. Pine shield is truly universal in its application. We discussed in detail the use of furniture panels for the production of furniture, stairs, doors and other products in one of the previous publications. Also, with the help of furniture panels, you can decorate walls, increase the rigidity of wall structures and interfloor ceilings. We dedicate today’s publication to this very issue; we tell you how to cover walls with furniture boards, show how to fasten wooden panels and, as always, offer colorful photos of wall cladding with furniture boards.
Wall cladding with furniture board
Pine panels can be used for finishing and decorating the interior of residential and commercial premises. Of course, if you have not yet taken care of building a house from timber, in which the walls are initially wooden, and they do not need to be decorated or sheathed with anything. Natural coniferous wood is difficult to beat in terms of freshness of smell and beauty of wood pattern. In addition, pine fills the premises with plant resins and useful substances - phytoncides, so in a house made of wood, or with walls decorated with pine boards, an atmosphere will reign that fills you with health, creating comfort and tranquility. Therefore, we propose to buy Ukrainian-made furniture pine board and start covering the walls at home to make it much more beautiful and healthier.
Methods for attaching wooden panels to the wall
The method of covering walls with furniture panels on a frame involves fastening wooden panels to a pre-prepared frame with self-tapping screws and nails (with staples if the frame is wooden). Because the frame can be made of either a metal profile or a wooden one. When choosing a material for preparing a frame, most people prefer metal. It is lighter in weight and cheaper than a wooden block. In addition, the galvanized metal frame can be used without problems in rooms with constant exposure to moisture. And the tree may be unstable to changes in humidity, fungi and bugs. Therefore, it is necessary to purchase dried wood for the frame and treat it with an antiseptic, which protects against the effects of negative factors. Read on to learn how to prepare a frame for covering walls with pine wood panels.
1) Marking the base. This is done on the basis that the gap between the slats should be 60–70 cm.
2) Making timber strapping. First, holes are drilled in a wooden block, through which places are marked for screwing in self-tapping screws, where holes are drilled a little larger in size than the self-tapping screws. After this, dowels are driven in there, and then the slats are screwed on. A thread is stretched between the contours to determine the bend of the base, and then bars of different thicknesses are planed to level the wall and secured with self-tapping screws. Next, you can sew up the frame with a furniture panel.
1) Marking and fastening of metal elements. The principle of this stage of frame preparation is identical to the previous option in the case of wooden sheathing. The gap between the metal strips is also 60-70 cm. Well, the thicker the furniture panel, the larger the gaps of the frame under it are allowed. The metal profile parts are attached to the wall (a level is used). First of all, the main profile is fixed to the floor and ceiling, because other elements will be attached to it. It is very important to be guided by level readings at all stages of assembling the frame for cladding with wooden panels.
2) Installation of vertical guides. Vertical guides are installed in a pre-fixed main profile, aligned to a vertical level, and screwed to plumb lines with self-tapping screws. This procedure is repeated with all frame segments.
3) Installation of horizontal elements. Horizontal elements are applied to those segments of the sheathing that have already been mounted to mark the locations of future connections. In this case, it is necessary to make marks with a pencil at the attachment points. According to the marks, cuts are made with special metal scissors and profiles are attached.
4) Installing a corner profile means installing accessories, ceiling and floor plinths.
We figured out how to make a frame. Now we will provide some recommendations on how to cover a wall with wooden panels. First of all, you need to calculate how many panels will be needed to cover the wall. If the quantity needs to be adjusted in size, the first and last panels are cut in such a way that they become the same width. This technique will help the cladding look neat and take on a finished look as a result. Installation of the shield, like any wooden panels, starts from the left corner to the right. Or from the opening (window or door) to the corner. Be sure to check each element attached to the frame with a level so as not to miss a single irregularity.
This method is chosen only for a perfectly leveled surface, since wooden panels are glued directly to the wall. Such work can be easily done even without certain repair skills, as well as without the use of complex elements. Gluing a furniture panel to the wall is extremely simple. To do this, the surface is cleaned of dust, and then primed and dried. Glue is applied to the dried and primed surface, and the panels are glued, starting from the corner, one after the other. Cladding with wooden panels and panels made of various types of wood is practically no different from fastening plastic panels in terms of the technology used to perform the work. But only wooden material can create the unique charm of a home.
Natural pine has undeniable advantages and a pronounced antiseptic effect. For those who carefully arrange their living space, the best choice would be spliced pine panels. Synthetic modern materials will never surpass natural wood and will not be able to create the atmosphere of comfort and tranquility that you get thanks to wood.
Advantages of wall cladding with furniture panels
Classic techniques and materials will never go out of style. Wall decoration with wood is a beautiful natural material that is always appropriate in any interior style. Wall cladding with furniture board is a truly universal way to make your home healthier and more attractive. Pine wooden panels for wall cladding are products that have many advantages, to which we draw your attention:
Bolt-nut fastening
This mount is the most durable. It is destroyed only when furniture is broken. Despite the fact that furniture bolt heads are made to look attractive, aesthetes consider them to be elements that are not perfect for high design. For this reason, furniture often becomes less durable due to the replacement of this type of fastener with another, visible only from the inside.
A furniture bolt can be produced either with a hex nut or with a cylindrical element (“barrel”), the side surface of which has a threaded hole. In this case, a blind hole is drilled in the chipboard under the “barrel”, a bolt is screwed into it when connecting two sheet parts at an angle of 90º.
Self-tapping screw
The purpose of this type of furniture fastener is to tighten cabinet elements together, fasten fittings, install corners and other components. Self-tapping screws are among the simplest fasteners. They are available in a large number of designs in diameter, length, and head shape, and therefore serve in many connecting systems. They are made from durable coated steel and can be screwed not only into wood, chipboard and MDF, but also into thin-walled metal parts. Some types have, like a drill, a threaded head in front of the threaded part.
The use of self-tapping screws has its own peculiarities. When screwing them into the end of a chipboard, sometimes preliminary drilling is required with a diameter smaller than the thread size. Otherwise, a long self-tapping screw may split the chipboard surface and it will have to be repaired.
Rules for working with furniture fittings
Having understood the main types and purposes of furniture fasteners, you should also study general recommendations for working with them:
- Tools for assembling furniture are selected taking into account the type of material. For soft (chipboard) rocks you need a wrench and a hex wrench. In hard (solid wood) fasteners can be screwed in with a screwdriver without fear of damaging the furniture panel.
- If the furniture is made independently, before installing the connecting fittings it is necessary to carry out drilling: you cannot immediately screw in a Euroscrew or other fasteners, the chipboard may delaminate and warp. Furniture that is manufactured at the factory already has drilling; it is performed by the manufacturer.
- To install the main types of fastening hardware, you will need special bits for a screwdriver. In addition, you may need wood glue, wood drills of different diameters, a jigsaw and pliers.
A variety of fastening fittings allows you to securely and discreetly fasten furniture parts at any angle. The main thing is to choose the right connecting elements and install them.
https://youtu.be/JvtfWZFdPRo
Did you manage to solve your problem using the recommendations from the article?
Yes!
51.52%
No. More answers required. I'll ask in the comments now.
27.27%
Partially. There are still questions. I'll write in the comments now.
21.21%
Voted: 33
Confirmat
This is a screw of a special design with deep and coarse threads and a wide “secret” head, at the end of which there is a hexagonal recess for a socket wrench. This type of fastening is widely used in furniture manufacturing. It is mainly used when tightening two sheet parts of the case perpendicular to each other, fastening fixed shelves, bottoms, cabinet lids.
The cap can be covered with a plastic plug in the color of the chipboard, which has a protrusion with which it is driven into the hexagonal hole of the confirmat. However, if the plug is installed carelessly or is touched during operation, it often falls out. More reliable in this regard are round flat stickers matching the color of the chipboard.
The confirmat can only be screwed into a specially prepared hole. It is made with a prefabricated drill, the design of which takes into account the length of the confirmat, the diameters of the head, threads, and the shape of the head. Available in several standard sizes.
The main diameter of the confirmat head is 6 mm. Length - 50-70 mm. The disadvantage of this fastener is the impossibility of disassembling the furniture and reassembling it. Although this operation is allowed, it is better not to do it due to the risk of destroying the threads cut during the first tightening.
Furniture panels on the wall - what can replace them?
Hello dear friends!
When making kitchen furniture, customers sometimes want the working wall of the kitchen unit to be covered with some kind of panel. Of course, there are special wall panels for these purposes, the decor of which can exactly match the decor of the selected countertop.
But it costs about the same as the tabletop itself.
And in the kitchen, as a rule, one panel is not enough. So the price of such a set soars dramatically in the kitchen...
Of course, you can get out of this situation (when you need to close the work wall and the kitchen budget is clearly defined).
Instead of furniture board, in this case, they use sheet MDF, 8 mm thick (the so-called PAN, used for assembling facades from frame profiles).
Such sheets can also have a variety of colors and decors, although it most likely will not be possible to match it “one to one” to the tabletop.
But it costs almost half as much.
It is cut in such a way that when mounted on the wall, it is covered from below by the tabletop, and from above by the upper box.
For example, if the distance from the tabletop to the top box is 600mm, then a strip 650-700mm wide is cut out.
On it, you immediately need to mark the places where there should be sockets (if there are any), and carefully cut them out with a cutter.
Also, in the place of the kitchen unit where the hood is located, you need to add another piece of the panel, which will overlap it on top.
If the walls of the room are smooth, and the sheets of the material we are considering are cut on a good machine (have smooth edges), then they can simply be adjusted evenly to each other.
If the walls are curved, or the MDF is cut out with a jigsaw, then the joints need to be covered with a special plastic strip (as shown in the photo).
Such planks are sold in construction stores. Not only do the panels not “play” on a crooked wall, their voids need to be filled with something.
The sheets are attached to the walls using confirmations.
First, the holes through which the fastening points are marked on the wall. Then, according to these markings, holes are drilled with a hammer drill into which plastic “chops” are driven for this fastener.
Thus, MDF is securely attached to the wall with confirmations.
Yes, holes for fastenings need to be marked in places that will be covered by the tabletop (plinth) and upper boxes. In a word, they should not be visible.
Kitchen installation begins with the design of the working wall.
After this, the lower modules, the upper ones, and so on are mounted.
Furniture ties
The simplest tie, consisting of a hollow cylinder with an internal thread and a screw screwed into it, is used when connecting individual furniture units into a single structure, line. If necessary, the screed is easy to disassemble.
Another popular tie design is called an eccentric tie. It performs the same function as the confirmat - it connects two perpendicularly located sheet parts. However, unlike the confirmat, such fastening is not visible from the front side. That's why it became popular. The second advantage is that it can be repeatedly disassembled and reassembled without losing its functional properties.
This type of fastening is called a minifix and consists of a metal rod and a cylindrical body with an eccentric clamp. The rod is screwed into one part, the body into a milled blind hole in another part, then the head of the rod is inserted into the body clamp and the eccentric is turned with a screwdriver until it is firmly pressed.
The disadvantages of screeds are the high price and the need for precise drilling and milling of installation locations, so fastening is used mainly in furniture factories.
Shelf supports
The elements are supports for the shelves. Made from plastic and metal. Plastic ones are driven under slight tension into prepared blind holes, good metal ones are inserted into hollow cylinders installed in blind holes. Metal parts last much longer than plastic ones, which tend to break off after a few years.