A common household item is the chest of drawers. This is a comfortable, functional, practical piece of furniture. Dressers differ in appearance and shape, but have many similar characteristics, including the assembly procedure. The chest of drawers is assembled according to standard rules typical for all types of furniture.
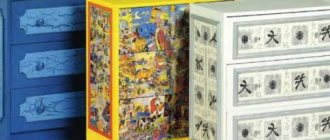
Dressers can be stationary or mobile. Mobile models are equipped with rollers with stoppers; they can be directed to different places in the room. The following groups are also distinguished:
- wall-mounted (stand near the wall);
- wall-mounted (they can be attached to the wall, for example, using a bracket);
- attached (stand next to the furniture);
- island (used as a partition).
The tops of the chests of drawers are also varied: a changing table, a built-in mirror or an ironing board.
Inspect parts for defects
Furniture is usually delivered unassembled in a box. All components of the chest of drawers are unpacked and carefully removed from the packaging. If you are not careful, there is a risk of scratches and damage to the surfaces of the product.
It is important to carefully inspect the parts for defective elements and defects. You can begin the installation process provided that the furniture item is complete.
Required Tools
Before assembling the chest of drawers, you need to stock up on tools. This will help you achieve the result of your work without being distracted by searching at the right time. To assemble such a piece of furniture, you do not need to have special equipment.
The main assistants will be:
- tape measure and pencil;
- screwdriver or screwdriver;
- hammer;
- pliers.
Sometimes you will need a drill. This does not happen often, since most furniture factories sell furniture with holes for fasteners.
What tools are needed to assemble a chest of drawers?
To achieve a quick and good result for assembling the chest of drawers, the instructions suggest stocking up on tools. There are no professional specific devices on this list; everything can be found in every home.
Required tools include:
- Screwdriver - you can also use a screwdriver, but a screwdriver will significantly reduce the time spent at this stage of work;
- Hammer - this tool will be needed to attach the back wall of the chest of drawers;
- Pliers;
- Roulette;
- Pencil.
Required tools for assembly.
These parts are just enough to assemble the furniture.
In some cases, a drill with a set of drills may be useful. This rarely happens, since most furniture companies produce furniture sets with ready-made cutouts for fasteners.
Assembling drawers
Assembling boxes is a more labor-intensive and time-consuming process than connecting body parts. Since there are several boxes at once, it is important not to get confused in the details.
Components of roll-out boxes:
- two sidewalls;
- base;
- front and back walls.
Elements need to be grouped into separate piles to make the installation process easier and to avoid confusion.
The principle of assembling the boxes is the same as the frame: dowels and eccentrics. The sides are fastened to the walls. For wide drawers, a tie strip is added. It is attached between the front and back walls, protecting the base from sagging. A fiberboard base is nailed from below to the walls and tie strip.
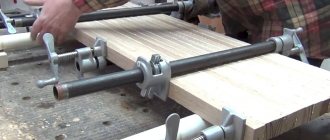
When placing surfaces on dowels, a hammer is used. To avoid dents and chips, use a wooden block as a spacer. Hammer strikes are made not on the elements of the chest of drawers, but on the block.
The last stage is attaching decorative handles and facades. The facades are attached with short self-tapping screws. It is important to choose the correct length of screws so as not to damage the facade.
Assembly steps
After the initial inspection for defects, as well as equipping the workplace with light and tools, you must:
- mentally draw up an action plan guided by the principle “from big to small”;
- we start with the formation of the main body - the frame of the entire structure;
- Next you need to assemble the boxes;
- the next stage will be marking the installation of retractable mechanisms for drawers;
- after which you will need to correctly position all the fasteners;
- now - fronts for drawers and installation of handles;
- The final stage will be the top of the chest of drawers.
Important! The sequence of actions and the number of points in the plan may vary from model to model. Furniture is varied, which means the situation is individual.
Assembling the chest of drawers
Pay attention to how placement on the floor is provided. Sometimes wheels can be used, which must be secured with separate screws. In other cases, legs are installed, or the chest of drawers stands on solid base strips.
Inspect the details of the chest of drawers.
It is with this element that the process should begin in order to immediately give the mechanism stability.
Assembling the chest of drawers
In order for the case to be strong and reliable, it is necessary to fix all the walls with tightening screws. The back of the chest of drawers is usually turned towards the wall of the room, and therefore is often made of thin materials; nails will be enough to fasten it.
First, assemble the chest of drawers.
If your specific design includes cross bars, they should also be installed at this stage. To ensure a flat surface and maximum compliance of the sides with each other, it is recommended to check the installation result with a level.
Before assembling the chest of drawers, it is advisable to read the instructions.
Assembling drawers
The correct assembly of the chest of drawers is determined by both the accuracy of the measurements and the accuracy of the installation of the entire structure. For greater convenience, you should immediately divide all the components into separate piles so as not to get confused.
Assembling the chest of drawers will not take much time.
First, we take short self-tapping screws (25-35mm) and connect the body with them. Then use slightly longer screws (40-50mm) to attach the bottom. It is advisable to complete the installation of the boxes by fastening the facades using self-tapping screws.
Standard assembly of a chest of drawers is a fairly simple matter.
But it is better to carry out this procedure after installing the roller guides along which the box will move. This way you will protect yourself from inaccuracies and errors.
Installation of guides
The key to quiet and smooth movement of all elements of the chest of drawers is the correct installation of the guide elements (ball or roller). Accurate measurements using a tape measure are necessary so that the drawers can be pulled out without touching anything or creating additional noise.
Secure drawers carefully.
Initially, you need to attach the runners to the inside of the chest of drawers, then the guides to the outside of the drawers. For successful fixation, you will need short-length self-tapping screws (no more than 30mm).
If you have drawers, the first thing you need to do is screw the guides to the inner surface of the chest of drawers (cabinet).
If the work done was successful and all the drawers are positioned correctly, all that remains is to attach the fronts and handles to them. You can use nails, screws, or even strong double-sided tape.
Installation of guides
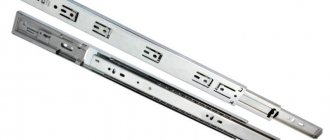
The next stage of work will be the installation of guides. There are two types of retractable mechanisms: roller and ball (telescopic). Each of them has its own characteristics. But these designs are similar in one thing - they are separated before installation. One part fixed on the drawer ensures smooth sliding. The second part is mounted on the inner wall of the frame sidewall. Usually, the places for attaching the guides are already marked on the cabinet. If not, you will have to choose yourself. For this you will need a tape measure and a pencil. On both sides, equal intervals are marked on the walls of the housing. The guides are fixed at such marks with a screwdriver, which screws in the screws.
How to install a roll-out box step by step is shown in the video:
Installation of drawers, completion of assembly
The assembled boxes need to be installed in their places. If the guides are properly secured, the drawers will slide in and out easily. Next, the stability of the structure on a flat surface is checked. The parts should fit tightly, without forming gaps or distortions, and the drawers should slide out smoothly. If necessary, tighten bolts and eccentrics.
The final touch will be the correctly attached plugs to the eccentric caps. This completes the process of assembling the chest of drawers with your own hands.
Making a chest of drawers
Step 1. Prepare the boards for work. They don't have to be new. For example, this project uses boards from an old dismantled structure.
Preparing the boards
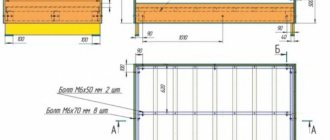
Step 2. Using a jigsaw or a regular hacksaw, cut the boards into the required pieces, the number and dimensions of which must correspond to the project drawing.
The details of the future chest of drawers have been cut
Step 3. Sand the surface of the boards to eliminate even the most minor defects and irregularities. As a result, the boards should be as even and smooth as possible.
Sanding boards
Prices for popular models of eccentric sanders
Random orbital sander
Step 4. Assemble two side frames from the cut boards.
Assembled side frames
Step 5: Start assembling the panels. To do this, install planks in previously made frames. It is advisable to use self-tapping screws as fasteners.
Boards are installed in the frames
Step 6. Select the width of the boards so that they can completely cover the wall without forming any gaps.
There should be no gaps
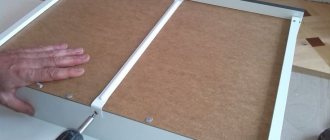
Step 7: Attach the boards to the back of the finished frame, creating the back wall. Here the boards should be used much wider than for the side parts.
The back wall is created
Step 8. This is what the half-finished chest of drawers will look like from the front.
Finished chest of drawers without drawers
Step 9. Start assembling the drawers for the future chest of drawers. First, prepare the boards.
Boards for boxes
Step 10. To assemble the drawers, you must use wood glue, such as PVA. It will be enough.
Drawer assembly
Step 11. After installing the bottom, the surfaces of the boxes must be treated with a special waterproof material that will protect the wood from negative factors.
Processing the finished box
Prices for wood preservatives
Impregnation for wood
Step 12. Repeat all procedures with the remaining drawers. Once all the boxes are ready, sand them down using sandpaper.
Ready-made chest drawers
Step 13. All elements of the wooden chest of drawers are ready. Now you can start assembling.
You can begin the final assembly of the chest of drawers
Step 14. This is what the almost finished structure will look like. All that remains is to add drawer opening mechanisms and handles.
The chest of drawers is ready
Step 15: As a final step, coat the chest of drawers with tung oil. It will make the product attractive.
Product after treatment with tung oil
Step 16. Even though we used old wood for the work, the chest of drawers turned out to be truly beautiful and original. You can now enjoy the fruits of your work every day.
It turned out to be a really attractive chest of drawers
Recommendations
A person who is not a professional can quickly and easily assemble a chest of drawers, following the general recommendations:
- Assembly begins “from largest to smallest”: first, the main body of the structure is assembled, and then the parts are attached.
- To avoid distortions, the chest of drawers is assembled on a horizontal surface.
- The work area is covered with material or film so as not to stain or damage the parts of the chest of drawers.
- Do not tighten the bolts too tightly to avoid cracks in the elements of the product.
To avoid the chest of drawers tipping over, if the structure contains a changing table, it must be attached to the wall using corners or brackets.
If the chest of drawers requires additional parts (mirrors, changing surface), then the assembly instructions will not change, a couple of new points will appear. Additional elements are attached to the finished product using a screwdriver.
How to assemble a chest of drawers - step-by-step recommendations
Each factory product is supplied with detailed instructions from the manufacturer, but the assembly diagram for all types of chests of drawers is the same.
- Frame.
Making the frame of the product is the first stage of work. During this process, the side walls, top cover and stiffening ribs located at the bottom of the frame are fastened together. To perform this work, you will need a screwdriver and suitable sized attachments.
Assembling the chest of drawers.
Fastening the side walls.
The frame is almost ready.
At this stage of assembly it is better not to sit on the chest of drawers, but soon you will be able to.
The back wall is made of 2 halves.
Attaching the back wall to the chest of drawers frame.
- Assembling boxes.
Many people are interested in the question of how to assemble a chest of drawers. The assembly scheme will begin (as in all other cases) with the assembly of the frame. Upon completion of this stage, they move on to working with the boxes. How to assemble a chest of drawers correctly? Fastening is carried out in the following order: first, the side, front and rear walls are fastened together and only after that proceed to installing the bottom. Often the kit includes a separate overlay for the sliding cabinet, which acts as a decorative element. In such cases, fittings are installed on the overlay and the overlay is secured to the finished cabinet.
Assembling boxes.
Fastening with Euro ties.
The bottom of the drawers is covered with plastic with a fabric pattern.
On the sides, the chipboard bottom is secured with guides.
Handles for drawers.
- Installation of guides.
After preparing the frame and all the drawers, many will probably think: how to assemble a chest of drawers with drawers to a finished state? To do this, there is one more stage of work - installation of guides. One part of this system is attached to the bottom of the box (it is this part that will slide and ensure smooth movement). The second part of the system should be mounted on the inner side wall of the frame. The most important thing here is to choose the mounting location. To do this, you need to arm yourself with a tape measure and a pencil. Identical segments are marked on the front and back sides of the frame on both sides (you can make sure the marks are correct using a level). Guides are attached to the marks made using a screwdriver.
The guides with rollers were already screwed onto the side walls.
Roller guides for chest of drawers.
Screws that then do not interfere with pulling out the drawer.
The screws “sink” almost completely and securely fasten.
Ready-made fixed guides on the chest of drawers.
The finished chest of drawers looks very attractive and stylish.
Sometimes, in addition to standard parts, chests of drawers also have additional parts (mirror, changing surface). In this case, another problem arises: how to assemble a changing chest of drawers with drawers? In this case, the instructions will not change, only 1-2 more points will be added. The fastening of additional parts occurs on a completely finished product. A screwdriver can help with this - the holes are made according to the manufacturer's marks.