Furniture made from cardboard is an original, affordable way to transform unnecessary material into an unusual, charming thing. In appearance, it is almost no different from furniture bought in a store, but it will cost much less. If you have cardboard boxes, you will only have to purchase paint and glue. By following certain rules for processing the material, cardboard interior items will be very durable and will not bend under the load of objects.
Furniture made from cardboard is an original, affordable way to transform unnecessary material into an unusual, charming thing.
Pros of DIY cardboard shelves
- Elegant design - you design the item with your own hands, relying on personal preferences.
- Practicality - you will only need to spend money on purchasing the necessary tools.
- Cardboard furniture can be disassembled and reassembled at any time, which is very convenient when moving or during renovations.
- You don’t have to waste time searching for a practical, something you like that will fit perfectly into your interior.
- Cardboard furniture does not contain harmful, toxic or other hazardous substances.
- Durability – the service life of cardboard furniture will be long if it has not been exposed to moisture and has been properly processed during creation.
By following certain rules for processing the material, cardboard interior items will be very durable and will not bend under the load of objects.
On the eve of the first steps of work, you need to decide on the design and construction of the cardboard shelf; it can have a classic shape, be in the form of a rack or some kind of figure (elephant, bear, other animals or images) - it all depends on your imagination and abilities. The simplest option available to everyone is a classic or shelf-rack, since its creation requires a minimum of skills. Unusual, figured shelves are more difficult to manufacture. They require a creative approach, in most cases the ability to draw, and require more time to create.
Elegant design - you design the item with your own hands, relying on personal preferences.
Note! You should not use cardboard racks in places of high humidity (bathroom, street), as they will quickly lose their original appearance and become unusable. It is also necessary to protect furniture from fire, it is very flammable.
Practicality - you will only need to spend money on purchasing the necessary tools.
It is best to fasten cardboard products together with special plastic clips, rather than gluing them together. In this case, it can be easily disassembled.
Cardboard furniture can be disassembled and reassembled at any time, which is very convenient when moving or during renovations.
In order to increase strength, place a second, slightly smaller one in a box made of thick corrugated cardboard. Then the structure will acquire sufficient rigidity and will be able to withstand serious loads.
You don’t have to waste time searching for a practical, something you like that will fit perfectly into your interior.
Useful recommendation: instead of paint, you can use wallpaper or fabric. Thus, your product will suit any unique interior or give it such a look.
Cardboard furniture does not contain harmful, toxic or other hazardous substances.
By showing your imagination and creativity to the fullest, you will create a unique interior masterpiece that will be admired by your family and guests at your home.
Assembling a cardboard shelf
First, you need to glue all the parts and stiffeners with wood glue, since it does not deform the cardboard. Don't forget about the details placed around the perimeter. After careful gluing, place the blanks under the press. At home, they can be books or an overturned stool. When assembling, we connect all the parts in the cut out places, as if hooking them together.
Afterwards, you need to level the entire surface with putty, make the corners even, cover up holes or other manufacturing defects. This is necessary to obtain a flat surface, which will be easier to decorate later. Leave the shelves in a dry place for about 24 hours. After complete drying, make the product original, matching the style of your room.
You can make it out of cardboard with your own hands for a summer house or for a children's room.
In fact, I did not make this shelving unit from scratch, but on the basis of an old bedside table. However, if necessary, it can be made entirely from cardboard from absolute scratch.
In addition to the technique of making furniture from cardboard, I also used the technique of artificial aging and decoupage technique.
As promised, I’m sharing my experience step by step.
So, at the start I had this simple old bedside table from Soviet times:
The bedside table was completely covered with veneer and varnish, which adhered to it very firmly.
In such cases, it is recommended to remove the entire layer of decorative coating, but I must admit that this feat has never been possible for me. Therefore, I ignored this recommendation and simply laid all layers of paint and varnish on top. However, before painting, I cleaned and degreased the surface of the bedside table with white spirit, which can be purchased at any hardware or hardware store.
To make the rest of the rack, I used regular cardboard from regular cardboard boxes:
At first, like probably everyone else, I was tormented by the question, where will I get so many boxes? However, in practice, the mission turned out to be quite feasible.
As it turned out, cardboard boxes in stores are simply thrown away, so there are no obstacles to agreeing on their disposal. Especially good boxes are available in furniture and household appliance stores.
Well, of course, all my relatives and friends began to leave their empty cardboard boxes for me.
There are different technologies for making cardboard furniture walls of the required thickness and strength.
If the product is supposed to have thick walls, then it is best to fill the space between two sheets of cardboard with strips of cardboard of the appropriate width, gluing them perpendicular to the side sheets of cardboard.
However, in this case, I did not intend to make the walls of the rack too thick, so I used another method: simply glue several layers of cardboard together.
It must be said that cardboard comes in 3 and 5 layers. Three-layer cardboard has a wavy strip glued between two cardboard sheets, while five-layer cardboard has two wavy strips and three cardboard sheets.
Thus, if I came across sheets of five-layer cardboard, then I made four layers of cardboard for one part, and if I came across sheets of three-layer cardboard, then I made 6 such layers.
First, you need to cut out and cut out all the necessary parts of the future product in as many copies as will be required for further gluing of the layers in order to obtain the required thickness of each part.
In other words, I cut out six or four copies of each piece based on the thickness of the cardboard I had.
It is best to cut out parts with a sharp knife.
Each part needs to be signed so as not to get confused later, and it’s better to start working after all the parts have been cut out.
The next stage is gluing the parts. It is necessary to glue all layers of parts together to obtain the desired thickness of the product.
At the same time, I want to note that it is rarely possible to cut parts of the required size from a single piece of cardboard, but this is not scary. You can generally glue separate pieces of cardboard into the inner layers and try to make only the outer layers whole.
If this doesn’t work out, then that’s okay too. You can glue them from separate fragments and then prime the seams and cracks for further processing.
It is best to glue the layers with PVA glue.
It is best to lay the glued parts on the floor so that the cardboard does not sag from the glue and the parts are not deformed, and evenly press down on top with a weight and leave to dry for a day.
When I glued the layers of the side walls of the rack, I made only the outer layer solid, and glued the inner layers from separate parts, leaving grooves in place of future shelves:
When the side walls were ready, I drove the shelves into the grooves, securing them in the grooves with glue, and also, putting a weight on them, left them to dry for a day:
To strengthen the shelves in the grooves, it is best to use super PVA glue. He literally tightly glues the parts together:
When the shelves were firmly glued to the side walls, I glued the top of the shelf to the bedside table, also using super PVA glue, and left the structure to dry under a load for a day:
To ensure the strength of the shelves, it is advisable not to make them longer than 60 cm. But since my bedside table was 90 cm wide, I strengthened the shelves by gluing an internal partition into the middle of each:
In order to make the side cuts of the shelves and walls of the rack even and to disguise the cuts of the layers of cardboard inside them, I used strips of cardboard with factory folds.
All boxes have such folds, from toothpaste to cake boxes:
If you paste them over the side sections, they will look even and neat:
I covered all the places where I came across uneven cardboard with thin, even cardboard. Such cardboard can be found on binders, for example.
The fact is that before painting, it is recommended to cover the finished structure with craft paper (thick wrapping paper) or plain paper. I did so.
However, apparently because I use water-based acrylic paints, both craft and plain paper wrinkled and dried out in waves. In addition, even on smooth areas, its joints clearly showed through the paint, and the look turned out to be completely bad.
So next time I will try to avoid this stage, which I captured in the bottom photo. However, this time I did exactly this:
To fix this defect, I had to first paint the entire rack with nitro enamel to isolate the paper covering from subsequent painting.
I then covered the shelving with concrete contact. Concrete contact forms a rough coating and promotes good adhesion of the putty to the glossy surface.
Then I filled in all the unevenness with white gypsum putty and sanded it after drying with sandpaper.
I really liked the result that I got after using gypsum putty. I was unable to sand the surface perfectly evenly, and the resulting potholes created the effect of scratches and gouges that form on furniture during its natural aging.
The result is this:
I needed to get the effect of a cabinet that had been repeatedly painted with different colors, and which had become worn in different places over time.
In addition, I also wanted to get the effect of the Provence style, which is characterized by rough, even clumsy coloring of furniture pieces. This effect is created by painting furniture in two contrasting colors.
First a layer of dark color is applied, and then a layer of light color is applied on top of it, and between the strokes of light color the dark layer of “old” paint begins to show through.
I like to use gold or bronze paint as a dark layer. Firstly, they are suitable for any color of furniture, and secondly, they give the furniture a noble shimmer of antiquity.
So I painted the rack first with a layer of gold paint:
On it I put a layer of acrylic paint the color of baked milk so that a layer of gold paint was visible between the strokes:
Then I carefully painted the shelf one more time with light acrylic paint:
In order to consolidate the aging effect, you need to carefully go over all corners and folds with a sponge dipped in gold paint. Just before doing this, you need to make a few test touches with a sponge on paper or cardboard to remove excess paint.
And you will get aged corners like this:
These are the paints that I used: white acrylic enamel, which I tinted with acrylic paint, gold paint and aqualac:
After painting, I decoupaged the cornice and shelving doors.
At the very end, I installed new hinges and handles on the doors, and the rack is ready.
The photo is slightly distorted in color. In fact, my shelving unit has a very rich warm baked milk color.
When it comes to cardboard furniture, many people are usually interested in its durability. I deliberately put weights with a total weight of 10 kg on the shelf. As you can see, the shelf can withstand it completely calmly:
OK it's all over Now. I wish you all success in your work.
Self-assembled cardboard shelves will be useful in everyday life for those who have a lot of things, but it is difficult to store them compactly due to the lack of a closet with the proper number of shelves. Cardboard shelves can be arranged as you wish and placed in large cabinet niches. The details of making shelves from scrap materials are described in detail in the step-by-step instructions.
Materials
To work you will need to prepare:
- cardboard boxes of the same size;
- level;
- ruler;
- sharp knife;
- brushes;
- water;
- carpentry glue.
Step 1
. You need to carefully disassemble the prepared boxes. In the future, they should be cut to glue together into cardboard cubes. You can see the principle of assembling shelves in the following schematic drawings.
Step 2
. After cutting the boxes into component parts, apply the markings shown in the photo to each of them.
Step 3
. According to the markings, cut out the blanks to create a shelf.
Step 4
. Using glue and a brush, glue the cardboard blanks together. Coat the parts along the outer edge with glue and apply a little adhesive material in the central part of the elements. Please note that if the glue is too thick, it can be diluted a little with water.
Step 5
. After gluing each element, send the resulting material under the press. As a last resort, you can use a thick piece of plywood or foam plastic, on which you will need to stand with your feet. Let the glue set and glue the next layer of cardboard. A total of four to six such layers will be needed, which depends on the initial thickness of the cardboard boxes.
Step 6
. In places where the grooves for fastenings will be located, there is no need to lubricate the cardboard with glue. This will make it much easier for you to cut them out after gluing.
Furniture made from cardboard is an original, affordable way to transform unnecessary material into an unusual, charming thing. In appearance, it is almost no different from furniture bought in a store, but it will cost much less. If you have cardboard boxes, you will only have to purchase paint and glue. By following certain rules for processing the material, cardboard interior items will be very durable and will not bend under the load of objects.
Furniture made from cardboard is an original, affordable way to transform unnecessary material into an unusual, charming thing.
By following certain rules for processing the material, cardboard interior items will be very durable and will not bend under the load of objects.
On the eve of the first steps of work, you need to decide on the design and construction of a cardboard shelf; it can have a classic shape, be in the form of a rack or some kind of figure (elephant, bear, other animals or images) - it all depends on your imagination and abilities. The simplest option available to everyone is a classic or shelf-rack, since its creation requires a minimum of skills. They require a creative approach, in most cases the ability to draw, and require more time to create.
Elegant design - you design the item yourself, relying on personal preferences.
Note!
You should not use cardboard racks in places of high humidity (bathroom, street), as they will quickly lose their original appearance and become unusable. It is also necessary to protect furniture from fire, it is very flammable.
Practicality - you will only need to spend money on purchasing the necessary tools.
It is best to fasten cardboard products together with special plastic clips, rather than gluing them together. In this case, it can be easily disassembled.
Cardboard furniture can be disassembled and reassembled at any time, which is very convenient when moving or during renovations.
In order to increase strength, place a second, slightly smaller one in a box made of thick corrugated cardboard. Then the structure will acquire sufficient rigidity and will be able to withstand serious loads.
You don’t have to waste time searching for a practical, something you like that will fit perfectly into your interior.
Cardboard furniture does not contain harmful, toxic or other hazardous substances.
By showing your imagination and creativity to the fullest, you will create a unique interior masterpiece that will be admired by your family and guests at your home.
Necessary materials and tools
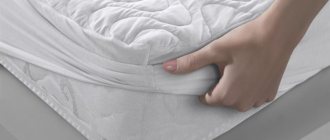
- Cardboard. You should understand that the thicker the material, the stronger the furniture will be. There is an opinion that the dark color of cardboard indicates its high density and vice versa - light cardboard is thinner. However, do not rush to get rid of the thin material; it will be useful for gluing joints. Or glue thin cardboard together, thus obtaining thick cardboard. If you use this method, glue the waves of each subsequent layer perpendicular to the previous one.
- Scotch tape and glue. It is acceptable to use any type, but the best option would be Moment glue. Thanks to its properties, the cardboard does not get wet, all the necessary parts are quickly and securely fixed.
- Kraft paper is used to reinforce the edges of furniture; thin cardboard can be used instead.
- White paper or tracing paper. Stick it on the entire surface for easy decoration. Please note: before applying tracing paper or kraft paper, it must be torn, not cut.
- Materials for decorating the finished product - paints, wallpaper, fabric and everything else your imagination desires.
- Pencil, tape measure for measuring and drawing details.
- Stationery knife or jigsaw. Keep an eye on the sharpness of the tool; the accuracy and quality of cutting depends on it. Replace the cutting parts of the device more often. Using a jigsaw you can cut several layers of cardboard.
- Sandpaper is useful for sanding cuts.
- To dry the glue faster, use a simple or hair dryer.
Durability – the service life of cardboard furniture will be long if it has not been exposed to moisture and has been properly processed during creation.
Features of work
When making cardboard shelves for the wall with your own hands, pay attention to the symmetry of the craft so that it is stable and does not warp to one side.
When assembling a rigid structure, several sheets are positioned perpendicular to one another. So, if one sheet of paper has horizontal wavy lines, then the next layer is attached with vertical waves.
Remember that the more cross members you make, the stiffer the structure will be. Some craftsmen assemble cardboard bookshelves with their own hands, even without glue, but by making slits in the horizontal and transverse parts. All that remains is to assemble the shelf by inserting one sheet of cardboard into another with a simple hand press. This is most often done for portable temporary furniture, as it can be easily disassembled and moved to another location.
It is believed that light cardboard is less durable than dark cardboard. Also, before purchasing, check the thickness of the material and the number of wavy layers that are clearly visible in the cut areas.
Please note that corrugated cardboard has a smoother surface on one side, so it is this that is placed on the front side of the furniture, and the rough one is hidden inside.
Guide to Making Cardboard Shelving
Idea No. 1. Shoe shelf
- You will need sheets of cardboard measuring 21x24 cm. Distribute them into 3 equal strips.
- Using a dull knife, you need to carefully push the strips so that they bend. Then you can glue the long sides of the sheet with colored tape. Next, make triangular oblong shapes from the sheets, secure them with tape.
- Thus, make the number of triangles you need. To fix such shelves, you need to glue the resulting triangles to whole sheets of cardboard with double-sided tape or glue. You choose the required number of rows and sections at your discretion.
- Instead of triangular sections, you can create oval ones by connecting them together as well. Calculate the required diameter for your shoes and glue the rectangular strips of cardboard so that they form an ellipse.
On the eve of the first steps of work, it is necessary to decide on the design and construction of the cardboard shelf; it can have a classic shape, be in the form of a rack or some kind of figure.
The dimensions of the desired shelf and the amount of materials depend on personal wishes.
Idea No. 2. Hanging shoe rack
- You will need several large sheets of cardboard. Based on the size of your shoes, draw the cardboard into equal rectangles and cut them out.
- Divide each of the rectangles into three parts and bend them. Bend the two sides obliquely and connect them together so that you get a pocket that is wide at the top and narrow at the bottom.
- The bottom of each pocket must be attached with glue or double-sided tape to the top of the previous one from the inside, leaving space for shoes.
- Such a shelf can be mounted on the door itself or on the wall near it - in any case, such an original solution takes up little space.
The simplest option available to everyone is a classic or shelf-rack, since its creation requires a minimum of skills.
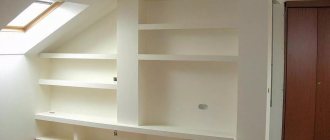
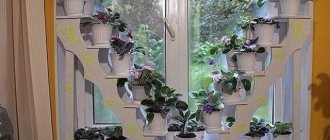
Idea No. 3. Bookshelf
- The dimensions of the desired shelf and the amount of materials depend on personal wishes. The best option is a rack with five sections, 110 centimeters high on the side of three sections and 69 centimeters high on two sections. Each section will be square, the sides will measure 30 centimeters.
- For each part you need two blanks that need to be glued together. In total you should get 4 with three, 8 with two, 2 parts with one section.
- Make all drawings with a ruler, cut parts using a knife and a thick ruler. If you will be cutting on the floor or on a table, first ensure that the surfaces are protected from cuts.
- Before starting assembly, create additional stiffening ribs for the structure; they will create additional volume and strength for the walls. To do this, make strips of cardboard approximately 4 centimeters wide, glue them sideways in a wavy pattern around the perimeter of one part of the part, then attach the second part.
- Next, for good fixation, the workpiece needs to be put under the press. You can use stacks of heavy books or a stool as a press.
- After carefully gluing the parts, you can begin assembling the shelf; to do this, connect all the parts together in the cut out places, interlocking them with each other. Then level the surface with putty, smooth out the corners and hide all other imperfections. It will take a day for the shelves to dry completely. This will allow you to get a perfectly flat surface for easier decoration.
- Design the finished shelving to your liking.
Unusual, figured shelves are more difficult to manufacture.
Sandpaper is useful for sanding cuts.
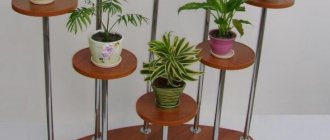
Rack made of metal profile
Metal profile structures are becoming increasingly popular. This material has a number of advantages and is therefore used for assembling home shelving. The positive characteristics of a metal profile are:
- Structural strength.
- Ability to withstand heavy loads.
- Metal doesn't rot.
- Does not burn.
- Not susceptible to fungus.
Scheme of a metal rack from build-with-your-hands.rf
| Frame posts | Metal profile 3.5 cm. It is possible to use profiled pipes 2.5 cm |
| Shelf mount | Metal perforated profile 2.5 cm |
| Shelf | More often, a 2.5 cm board is used. Before installation, the wood must be treated with drying oil. It is possible to install shelves made of sheet metal. |
As for the footage of the materials used, it depends on the overall size of the structure and is established during the development of the project.
Before you begin assembling a metal rack, you need to develop a design for the future structure. And draw a drawing that shows the exact dimensions of the rack parts. When everything is ready, we begin assembly.
- So, let's start with the markup. To do this, use a tape measure with which you need to mark the profile.
- The next stage is cutting the necessary parts from the profile (pipe). A grinder is used for this. If the owner does not have the opportunity to use a grinder. You can purchase pre-cut parts. Typically, this service is provided at the point of sale of the profile.
- All received parts are connected to each other in exact accordance with the drawing. Welding is used for this. If there is no device, then a bolted connection is used.
- As the structure is assembled, it should be periodically checked using a level. This is an important point, because if you allow the frame to become curvature, it will be difficult to correct it in the future.
- When the first (main) part of the frame is assembled, you need to start assembling the frame for the shelves. Moreover, first you need to assemble the lower shelves.
- Before fastening both types of frames, you need to make precise markings and indicate the location where the shelves will be attached.
- After the shelf frame is ready, it is fastened to the main structure. You need to start from the bottom and check the horizon with a level.
- When the overall structure is assembled, it must be treated with special anti-corrosion compounds, then primed and painted.
The frame is ready, now you can start working on making the shelves. They can be made from a variety of materials, from sheet metal to chipboard. The shelf is cut so that it can be installed in the frame. After it has taken its place, it is screwed on with self-tapping screws.
The final stage is decoration
You can decorate cardboard products with your own hands from any materials, it all depends on your wishes and fantasies - there are many options. The simplest ones are wallpaper, film, paint.
Cover the entire surface of the product with old pieces of wallpaper, or just the inside, and paint the outside in your favorite color. You can completely paint the shelves, or use stencils or create unique patterns or designs yourself.
The simplest way is to use self-adhesive film. It has an attractive appearance, quickly and reliably sticks to the surface, unlike wallpaper, it can be washed. If defects appear on the film or you want to change the design, just purchase and stick another one.
Unusual, figured shelves are more difficult to manufacture.
Original furniture option
Fortunately, there is an unexpected alternative to the usual stationary furniture. These are various cardboard shelves. It’s not difficult to make them with your own hands, and the manufacturing process is creative and interesting. If only professional specialists - carpenters and joiners - can work with wood or chipboards, then absolutely everyone can handle paper. You can collect packaging cardboard gradually or purchase new sheets at hardware stores. To connect the parts you will need adhesive tape or glue.
In this article we’ll look at how to make cardboard shelves with your own hands; their variety will surprise even experienced craftsmen. These are large book racks, hanging shelves of various configurations, corner semicircular and even crafts, for storing shoes and small items in the closet, an organizer for stationery and papers, which can be placed both at home and in the office. And what amazing shelves can be made for kids in children's rooms? The main thing is to have imagination and the ability to draw straight or rounded lines, the rest is a matter of technique, which you will learn about in our article.
Master class: decorating a product using pages of glossy magazines
You will need:
- any paper for the base, newspapers can be used;
- glossy magazines;
- universal or PVA glue;
- acrylic lacquer.
It is also necessary to protect furniture from fire, it is very flammable.
Pencil, tape measure for measuring and drawing details.
Cut magazine pages into strips 1-2 centimeters wide, and twist them into tubes using a thin pencil or knitting needle. Glue the resulting glossy straws in a row onto the paper used as a basis. Then cut the canvas from the tubes into a suitable width corresponding to the location of the decoration and place it on glue. When the surface is dry, coat it with acrylic varnish.
The process is very long and tedious, but the effect is amazing.
It is best to fasten cardboard products together with special plastic clips, rather than gluing them together.
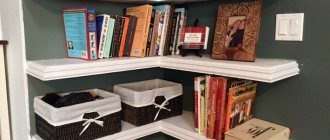
Shelves in the corner of the room
You can easily make a corner shelf made of cardboard with your own hands from a pack of sheets glued together. It turns out to be incredibly durable and quite weighty, so you don’t have to worry that a shelf with books or vases will fall. Triangular shelves are cut to the same size and attached to the posts with glue. Additionally, strengthen them with tape.
It is convenient if the rack has a drawer with a handle. It is made of cardboard in one layer so that it can be easily removed. Racks with semicircular shelves look interesting. You can make them carved, with curls or wavy edges. You need to follow a template cut out separately so that the weight of the shelves is the same.
Master class: surface decoupage
You will need:
- napkins with drawings;
- acrylic paints, acrylic varnish and brushes;
- scissors;
- iron.
In order to increase strength, place a second, slightly smaller one in a box made of thick corrugated cardboard.
Materials for decorating the finished product - paints, wallpaper, fabric and everything else your imagination desires.
Cover the surface of the rack with several layers of paint, let each layer dry, then apply another. Do not dry the very last layer completely; it should remain sticky. Remove the top layer from the napkin, run an iron over it and place it on the surface of the product. Place a clean sheet of paper on top of the napkin and iron it with an iron heated at low power.
Instead of paint, you can use wallpaper or fabric.
The napkin should completely stick to the surface, but if not, add a little paint under it with a brush and let it dry. Do not rush to the next step; the decoupage must dry thoroughly, otherwise the design will be deformed.
You should understand that the thicker the material, the stronger the furniture will be.
Please note: before applying tracing paper or kraft paper, it must be torn, not cut.
When the surface is completely dry, coat it with acrylic varnish.
However, do not rush to get rid of the thin material; it will be useful for gluing joints.
By showing your imagination and creativity to the fullest, you will create a unique interior masterpiece that will be admired by your family and guests at your home. Don’t be afraid to experiment, keep up with the times, because cardboard furniture is not only affordable, but also an original option for creating comfort and a unique atmosphere.
It is acceptable to use any type, but the best option would be Moment glue.
Kraft paper is used to reinforce the edges of furniture; thin cardboard can be used instead.
What you need
Whatever patterns you choose, in any case you will need the same set of consumables and tools.
The main material is standard corrugated cardboard. For maximum strength of the finished product, take only its three-layer variety (usually packaging for large household appliances is made from it). To understand what you're dealing with
deal, just look at the cut line. There should be:
- three smooth sheets;
- two corrugated.
From ordinary two-layer cardboard you can make the maximum - doll furniture or, for example, a playhouse for your little one. More serious products based on it, of course, can be built, but to do this you will have to glue it in half or three times.
How to Design a Shelf
To make a shelf or rack for shoes easy to use, you need to think through and draw up a diagram. One option is a cabinet with three shelves. The upper part can be used for house shoes, the middle part for sneakers and shoes, and the lower part for storing boots and shoes. To prevent shoes from falling, the shelves can be placed at an angle towards the back of the product or made horizontal.
As for the sizes, they can be completely different and chosen at your discretion. It is recommended to indicate all parameters when drawing up the drawing. Those who encounter cardboard for the first time may think that it will be too flimsy for the purposes in question.