Features of a bean bag chair
This design stands out noticeably against the background of other soft corners. This is largely due to the soft base. Initially, such bags looked like a pear. But every day, masters come up with new and varied silhouettes. The entire process of making a bean bag chair is divided into several stages.
- Patterns are being prepared. It is better to initially make them full-size and as accurate as possible.
- The resulting four parts are assembled together.
- The templates are applied to the fabric itself and cut out.
After using such chairs, the back muscles relax and the load on the spine decreases. They are usually stuffed with foam, which, in turn, provides a warming effect. The variety of species is enormous. They differ not only in size, but also in format.
Obvious advantages
- Inside there are loose particles that ensure comfortable use. It takes the shape of the body. They also provide thermal insulation, keeping you warm;
- This furniture product is absolutely safe. There are no corners, sharp elements or small fittings. Very often they are used in a children's room;
- A handmade creation will fit perfectly into the interior of your home. You just have to choose the right color for the top cover that matches the decor of the room;
- All constituent materials are environmentally friendly;
- Frameless furniture made by yourself can be moved in any space of the room. She doesn't need much space. It is quite light;
- The removable cover is washable. This ensures long-term service and ease of operation;
If you get tired of the design, or it doesn’t fit into your new apartment renovation, just change the top upholstery of the pear chair.
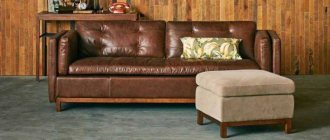
Upholstering your ottoman
If the product is based on a solid material (for example, wood, chipboard), then it must first be covered with something comfortable. Sintepon, batting, foam rubber. Then it’s a good idea to line it with a thin cotton fabric - an extra layer will add strength. Especially if the top upholstery is thin (silk, for example).
As for the material of this upholstery, it is most practical to use special furniture fabric - it’s not for nothing that so many types were invented. It is both beautiful and will last a long time. Tapestry materials look great, as well as velor, jacquard, and velvet.
However, it is also possible to use genuine leather - perhaps you have an old coat or jacket lying around. They can make a wonderful Moroccan-style ottoman made from eight hexagons. No leather - we use leatherette. However, we remember that, unlike leather, it can crack.
Knitted and fluffy fur ottomans look beautiful in the bedroom. The main thing is to carefully select fur that will not leave its lint on you.
You will find a photo of how to make and cover an ottoman with your own hands below.
Photo of a do-it-yourself ottoman
DIY consumables
Before starting a craft, you should make sure that the necessary things are nearby and accessible. This will allow you not to be distracted during the process. To create such a large item you will need many components:
- Fabric for inner and outer cover.
- Quite large zippers.
- Tailor's scissors.
- A spool of thick thread. It is better to buy enhanced types.
- Filler. There will be a separate part about its types.
- A sewing machine will make your work much easier and provide high-quality seams. As a last resort, you can sew everything by hand.
The volume of required materials is selected depending on the size of the future product.
Master class: luxurious ottoman from an old stool
An old stool that is out of fashion, but not out of order, can serve as an excellent basis for a stylish and modern ottoman, which will add fresh notes of charm and originality to the interior.
To make a stylish ottoman you will need:
- Durable stool;
- Thick upholstery fabric;
- Filler (sintepon or foam rubber);
- Super glue;
- Duct tape;
- Decorative jewelry - beads, ribbons, buttons, etc. (optional).
Having prepared all the necessary materials, as well as having stocked up with patience and diligence, you can begin making a stylish accessory.
From the selected filler you need to cut out a circle, the diameter of which should be 50 cm. Stick it on the seat of the stool and let the glue dry completely. This time can be devoted to upholstery. From the prepared fabric you need to cut out the side blanks, starting from the size of the stool. In this case, it is necessary to leave a few centimeters on each side in reserve. You also need to cut a round blank with the same diameter as the filler blank (about 50 cm). It is necessary to make a stitch along its entire edge, tightening it slightly. You need to sew adhesive tape to the narrow edges of the side blanks. Lightly trim the bottom edges. Sew the upper edges of the side blanks to the round base. It is recommended to do this work from the wrong side to avoid unsightly seams. If suddenly they do work out, this problem can be easily decorated with the help of various ribbons or beads, which can be used to cover the unsuccessful seams on the front side. The resulting thick cover remains to be put on the stool. This creates an elegant and stylish ottoman with a soft seat!
Tip: When choosing additional decor, you should take into account the color of the fabric, as well as the overall design of the room in which you plan to place the ottoman.
How to sew a cover for a square ottoman?
Such a household item can serve as a compact seat. Or be a footrest. There are many possible uses. In order to sew a cute cape, you need to prepare thick fabric of the chosen shade.
Next, measure the side of the pouf. We transfer the measurements to paper and draw the element. We apply the resulting pattern to the canvas, make small allowances and cut it out. We sew all the parts together using a sewing machine, finishing the edges with a zigzag.
Iron all seams from the inside out. We sew the top part to the side part and iron it. All that remains is to turn the fabric out and pull it onto the structure. To give rigidity to the ribs, you can strengthen them by attaching canvas around the perimeter.
Note!
Kinusaiga technique for beginners: what is it, a description of creating paintings from threads
How to weave a figurine from rubber bands: how to learn to weave animals, toys and what you can make from rubber bands on a slingshot
How to make flowers with your own hands from paper, fabric and scrap materials. We create bouquets of homemade artificial flowers
How to make a flower-shaped pillow case
Making such a case with your own hands is not difficult. If you have the most basic sewing skills, you have paper to make patterns for, suitable fabric and stuffing, then you can safely get started.
First you need to cut out two circles that fit the size of the room. Then we cut out a long strip, the length of which should be the same length as the circumference of the ottoman. To do this, you can use the same fabric that was taken for two circles or take a different one.
We move on to the seams, which need to be done clearly, but only if the fabric does not fray. The edges of the parts that will serve as petals must be cut out manually or using special scissors. To secure the petals, draw a circle line.
We make green leaves and sew veins into them. We assemble the upper part of the product and stitch the middle. Ready.
How to make a bean bag chair with your own hands?
Patterns with dimensions are the most important component of the whole work. In order for everything to turn out smoothly and clearly, it is important to design the pattern correctly. Examples can be viewed on the Internet. The process is similar for everyone. After creating the necessary measurements, their sewing begins. Let's start the step-by-step master class.
- Two non-voluminous blanks are prepared. Using sewing pins, the elements are fastened at the tops. We baste the side seams on the wedges.
- We connect with a sewing machine. Smooth with a steam iron.
- The side stitching on the outer cover is sewn on the front side.
- We fold the wedges. It's better to baste them first. On the outer layer, leave 40cm for a zipper on any edge. For the inner cover we leave no more than 35 centimeters. We iron all the details.
- Attaching the zipper. The result is a tube-shaped shape.
- Making a pen. We roll the prepared workpiece inside out. We sew it to the long edge. Turns inside out and irons.
- We turn two covers inside out. The top with a handle is attached to the outer layer.
- We assemble the bottom by attaching the resulting circles. The product remains to be turned inside out.
All that remains is to take care of stuffing the soft ottoman. The filler should completely fill it. Just like that, we told you how to sew a beanbag chair with your own hands.
Chipboard product
The simplest option is an ottoman with a cubic base. To create it we will stock:
- wood boards 40 by 40 centimeters (5 pieces);
- square blocks of wood 40 centimeters long (4 pieces);
- metal corners (4 pieces);
- a plywood cover 2-3 centimeters thick (round or square).
Steps:
- We fasten everything with furniture screws.
- We make a box without a bottom from chipboard, placing bars on the inside of the sides, and securing the structure with corners on the outside.
- Then we attach the bottom sheet of chipboard. If there are supposed to be wheels or legs (from scraps of timber), then attach them first.
- The final stage is attaching the lid. By the way, if you need a storage box, then it is made folding, on hinges.
- Then we cover the pouf with something soft and sew a cover.
Making an ottoman with your own hands from chipboard
Choosing a filler
The most popular are polystyrene foam granules. They are small balls. They are characterized by good hygiene. They do not absorb odors. They have excellent thermal insulation qualities.
Another important plus is the affordable price. In addition to them, they also use: wood shavings, fluff, feathers, wool, various cereals, padding polyester.
Tip: to easily fill the ottoman bag, cut off the middle part of the plastic bottle. Insert it into the prepared bag with filling and tie it in the center. Now, by turning it over and inserting it into the hole in the case, you can easily pour the contents in small portions.
Thus, creating such a furniture accessory will not cause much trouble. Think through the patterns and desired sizes in detail. Use only high quality materials. By following these tips, the whole process will be simple and straightforward.
Note!
How to make flowers from cold porcelain: chic floristry and DIY crafts for the New Year step by step
How to make cold porcelain from potato, corn starch, liquid, without soda. Recipes and cooking methods
How to properly make a birdhouse with your own hands from scrap materials: we create an original birdhouse according to sketches
Oval
You can sew such an ottoman from two oval elements. It resembles a bed, as you can take any position.
Note!
How to make candles with your own hands: instructions for making wax, gel, scented, homemade decorative candles with a wick
What you can make from foamiran with your own hands: we create flowers, Christmas tree decorations, snowflakes, three-dimensional paintings (photo + video)
DIY glass crafts: what can be made from glass bottles, liquid glass, broken glass (photo + video)
Soccer ball
Let's take a closer look at this option. In the store, prices for such models reach 5,000 rubles. Therefore, we stock up on all the necessary tools and begin homemade creativity. We find a template on the Internet; it usually consists of polygonal shapes.
Their number depends on the diameter of the finished work. In our version, you should prepare 20 hexagons, 12 pentagons. It is important to follow the exact dimensions according to the template. After treating the seams to prevent fraying, we proceed to assembly. The wedges of the pieces are sewn together.
Don't forget to leave room for the zipper. An important rule: for the drawing to come out correctly, you should connect three parts of the pentagons to one hexagon. If something is unclear, you can look at the video instructions on the Internet.
Sew a soft accessory
- The easiest way to sew such a product is from three parts - two circles and a long strip. Its length is equal to the diameter of the circles. By and large, the product you will get is not round, but cylindrical. It is convenient to make a round pattern by tracing a large plate. We cut out and sew all three parts, leaving a hole on the side along the seam for stuffing.
- A more complex pattern consists of eight hexagonal blanks. When sewing them together, you need to bend the sharp ends of one centimeter by 5. This way we will get a hole for stuffing. Then it needs to be covered with an overlay with a decorative detail (round or octagonal, or you can build some kind of flower). When sewing, the parts are connected in twos, then in fours. At the end, both halves are sewn together. The product is turned inside out and stuffed (sintepon, pieces of foam rubber, holofiber).
- Let’s not forget about such a fashionable option as a bean bag chair filled with foam balls. You can find plenty of patterns on the Internet. It is important to remember here that this model must have two covers, and the inner one must be made of thick fabric. It is better for experienced craftswomen to take on the job.
The most popular soft pouf bag is easy to make with your own hands. How - watch in the following video:
How to properly care
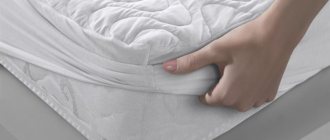
The finished product requires compliance with some operating recommendations. When cleaning fabric base, you need to consider how it is processed.
- Cotton materials need to be washed.
- Eco-leather and suede are treated with a damp cloth.
- Flock can only be cleaned dry.
- The washing temperature must be selected taking into account the selected fabric.
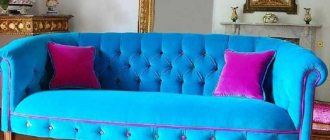
Decoration
For children's models, emblems in the form of letters and numbers are sewn onto the surface. Use different colors and geometric shapes. If you are preparing a pouf for a gift, you can make a photo print with the image of the owner or favorite animal.
The outer fabric can be plush, velvet, decorated with bows, lace, ruffles or other decorative elements.
Secrets of buying a ready-made bean bag chair
You can pre-print a photo you like on the Internet before going to the store. Pay attention to:
- Are there zippers or inserts? They provide comfortable use.
- The seams must be smooth, without defects.
- The inner case is available, helps to last for more than one year.
- A repair kit and filler are a must.
- Granules should be chosen with a dense structure. The diameter is no more than five millimeters.
Factory models are divided by price category into: premium, middle class, budget versions. Cost affects quality and durability. Premium class products are turned with special reinforced threads with a reinforced coating. Professional equipment is used.
What could be better than coming home after a hard day, sitting down in a bean bag chair you created with your own hands, and turning on your favorite TV series? All family members will appreciate your efforts. We have looked at the most important aspects necessary to do quality work.
Sewing such a convenient household item is not at all difficult. Read the instructions carefully, make the patterns well, and you will be successful. The main thing is to do everything thoughtfully and slowly.
Knitted patterns
To build a knitted ottoman with your own hands, you need to stock up on the thickest knitting needles (nine millimeters). Or a big hook. Accordingly, the threads should also be of sufficient thickness (even a clothesline will do).
Knitting does not have to be complicated - for example, an ordinary shawl pattern looks very beautiful on thick yarn.
- For a round product, all you need is to knit a strip about a meter long and half a meter wide - this is quite enough for a medium-sized ottoman. Having connected the strip on the side using a needle or hook, we pull it tightly with a thread on one side, and on the opposite side - so that there is room left to fill the filler. Which can be foam rubber (pieces), padding polyester, or washcloth filler (sold in hardware stores).
- If you want to make a knitted ottoman cube, then the filler is selected in the form of sheets (foam rubber, polyurethane foam, polystyrene foam). In this case, in addition to the strip, you will need two more square parts - top and bottom, according to the size of the product. If desired, you can knit another cover on top - a decorative one, which can be removed and washed.
DIY knitted ottoman