03/22/2019 Maria Ivanovna Needlework
Even with the most careful care, things will wear out over time. A computer chair is no exception. Armrests and seats are especially affected. The upholstery becomes dirty and torn, and now a thing that is still good in functionality becomes unpresentable. However, you shouldn’t immediately run to the store for a new one, because you can hide external imperfections with a cover for a computer chair. Even a novice craftswoman can sew such a cape with her own hands if she uses the step-by-step guide presented below.
Why do you need a cover?
Using a cape will help not only hide defects in the upholstery. The cover will protect the new chair from dirt and damage. This is especially true in homes where there are small children and animals. The cover is easy to remove and wash, unlike the upholstery. In addition, using a cover will help to fit an office chair into almost any interior. A cover for a leather computer chair will make its use more comfortable, especially in the summer.
How to choose and calculate the amount of fabric?
In addition to an attractive appearance, the material for the case must meet a number of criteria:
- density (so that the old upholstery does not show through).
- abrasion resistance (for long-term use).
- ease of cleaning.
The most popular options: flock, chenille, microfiber. They are combined, that is, they combine natural and synthetic fibers. This allows you to achieve high performance characteristics while maintaining the positive properties of natural materials.
The amount of fabric needed to sew a cover for a computer chair depends on the model of the chair and the type of cover: the latter will cover only the upholstery or the entire structure. In the first case, you will need a minimum amount of material, which can be easily calculated by measuring the length, width of the back and seat. To the results you need to add 10 cm for the overlap, 2 cm for the elastic and 1 cm for the hem. That is, the resulting measurements need to be increased in length and width by 26 cm.
If the cover completely covers parts of the computer chair, the amount of fabric will double.
A few tips to help you sew a cover
Before you start working directly on the instructions, take note of a few practical tips that will make the process easier for you and allow you to more carefully make a cover for a computer chair with your own hands.
Tip 1
If this is your first time making a pattern yourself, make sure it is correct. Necessary:
- Transfer the pattern to an old sheet or duvet cover.
- Cut and baste.
- Place the resulting cover on the chair.
Important! Use pins to adjust your pattern, bringing it to perfection.
Tip 2
The fabric for the cover must be washed at the recommended rate, dried, ironed, and it will shrink. There will be no need to add centimeters in the future.
Tip 3
In order not to get confused in the patterns, it is better to immediately sign the individual parts. For example: “inner backrest”.
Tip 4
Material that frays a lot needs to be processed with an overlock or zigzag stitch.
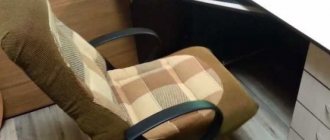
Cover-cape
Sewing a cover for a computer chair of this type is very easy; even a beginner can handle the job. The model is suitable for rectangular office chairs, where the back is connected to the seat. The cape will turn out to be one piece, which greatly simplifies the sewing and processing of the product.
To calculate the amount of fabric, you need to take two back lengths, one and a half seat lengths and add 2 cm for the hem. When measuring the width, it is necessary to take into account the thickness of the chair.
A piece of fabric is laid out inside out on a computer chair, folded over the back of the backrest and under the seat. The material is fixed to the upholstery with pins so that it does not move, and is swept or chipped directly on the chair, taking into account the bends. Next, the cover is removed and the seams are sewn. The edges are processed.
To prevent the fabric on the back of the back and under the seat from puffing up, but lying tightly, an elastic band is sewn along the edge.
The cover for the computer chair is ready. Now you can put it on and admire your handiwork.
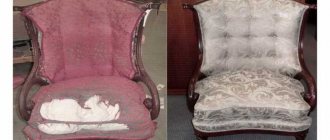
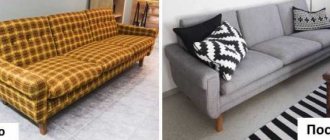
Restoration of a chair: sewing a leather cover
I would like to devote today’s master class to the secrets of sewing a chair cover and reupholstering it.
We will need:
1. Pieces of leather into which you can fit rectangles with the required dimensions - 26 pieces.
2. A sewing machine that can sew leather efficiently and beautifully (you can see a photo of my beauty here).
3. Thread No. 30 Guttermann - 1 spool.
4. Scissors: one large one for cutting leather and one small one for cutting out small pieces.
5. A special tool for removing staples (you can do it without it, but it’s more convenient with it).
6. Furniture stapler.
7. Staples for furniture stapler 10 mm - 1 pack.
9. Pieces of cardboard or plastic for making patterns.
10. Ruler, tape measure, pen.
The previous chair cover consisted of rectangular modules. Therefore, we will carefully measure these rectangles and make accurate patterns according to these dimensions. I got 10 varieties of rectangles.
Please note that on each template I drew a complete layout of the pattern and ticked off which rectangles were cut out, and most importantly, in which places of the case they would be located. Since the pieces of leather from which I made the patterns are not uniform, this must be done. And on the pieces I put the corresponding numbers.
Then you need to lay out all the cut out pieces.
If the previous stage of cutting is carried out correctly, taking into account the quality of the pieces of leather, then the layout will not be difficult.
Then we begin to sew the pieces first into strips...
Then you need to perform one very important operation, without which it will be impossible to properly fit the cover onto the base.
We make stitches for pulling the twine. To do this, you first need to carefully cut above the seam and remove 1.0 - 1.5 cm of allowance.
Then do the stitching.
When each of the stripes is designed in this way, we sew the strips together into a single structure.
Let's cut 56 pieces of twine 35 - 40 cm long.
And we will thread the twine with a special long hook into the stitched lapels.
The cover is ready for reupholstery.
Then we remove the block from the chair that we are going to retighten, and remove the old cover.
Using a long hook, we pull the threaded twine through the chair block.
Then we tighten the strings and “shoot” them from the back side to the base of the chair, making sure to place them in a zigzag pattern so that they do not pull out from under the brackets.
We attach the cover along the edges to the base of the chair.
We put the masking fabric in place.
And we put the seat back in place.
Beauty and durability restored! Hooray!
I will be glad if it is useful to someone!
Sewing a simple cover with elastic bands
This model is suitable for office chairs where the back and seat are separated and have a rounded shape. A stretch cover for a computer chair will fit best if it is made of elastic material.
Work begins by securing a piece of fabric with pins to the seat of the chair. To ensure that the cape lies flat and does not bulge, you need to tighten the material. A piece of chalk is used to trace the perimeter of the part. The workpiece is removed and laid out on a flat surface. The resulting perimeter must be increased by the thickness of the chair seat and added 6 cm for overlap, elastic and processing.
Now all that’s left to do is cut out the blank and make a tunnel for the elastic. If the material crumbles, it is necessary to process the edge with an overlock or zigzag stitch. Next, it is turned up one and a half centimeters and a line is laid. In the part where the seat is attached to the permanent contact, leave 2-3 cm for ease of retracting the elastic. At the final stage, using a safety pin, the elastic band is placed into the formed tunnel, and the edges are tied.
Ready! Now the product can be tried on. The cape on the back is sewn in the same way.
Method 1 - Step-by-step sewing plan
To begin with, we will describe a method that even a novice tailor can handle. You won't spend a lot of time and effort on it. And the result will please not only you, but also your household.
Disassemble the chair into its component parts:
- The back.
- Seat.
- Armrests.
Make a pattern for each part:
- Measure the piece and draw on the wrong side of the fabric or tracing paper.
Important! By making a drawing on tracing paper, you will get a more accurate copy of the cover.
- Cut out and transfer to fabric.
Important! You need to pay attention to the direction of the threads on the fabric to avoid distortions. Don't forget to allow seam allowances.
- Make allowances around the entire circumference of 9 cm.
- Cut out pieces from fabric.
Important! When doing this, take into account the corners and curves of the parts.
Sewing a cover
To make sure your DIY computer chair cover fits perfectly on the base of the chair:
- We process the edges of the parts with an overlock or zigzag stitch.
- From the inside, we bend 1.5 cm inward, pinning with tailor's pins or basting with thread.
- Sew with an even stitch, departing 3-4 mm from the edge of the hem. You still need to leave a gap of 2-3 cm to retract the elastic.
- We pull the required amount of elastic into each part and secure the joints.
- We put ready-made covers on each element of the chair.
- Assembling the chair.
Case with zipper
This model is somewhat more difficult to manufacture, but looks neater due to the darts.
Work begins with creating a pattern for a cover for a computer chair. Unfortunately, there is no universal scheme, because each model of office chair has its own characteristics.
Tracing paper or a piece of unnecessary fabric is fixed on the seat of the chair with pins and traced with a pencil. In the process, folds are formed so that the material lies as tightly and evenly as possible. There will be darts in these places. The resulting perimeter must be increased by 1 cm for seams. The pattern for the upper part of the seat is ready. With the bottom, everything is somewhat more complicated, because you need to provide a hole for attaching the legs, permanent contacts and armrests of the chair.
To do this, copy the pattern of the top of the seat and transfer the location of the parts onto it. The middle of the holes for the armrests is connected with a straight line. They do the same with permanent contact and a chair leg. This created three parts for the bottom of the seat, which will be connected to each other with zippers. The elements need to be divided, leaving a hole for the chair leg, and increased around the perimeter by 1 cm for seams. The pattern for the bottom is ready.
The blank for the backrest is made in a manner similar to the top of the seat. You will need two identical parts.
Now you need to measure the perimeter and thickness of the seat. This will be a stripe running along the edge of the product. It can be made of the same fabric as the main parts, or create contrast. Add 2 cm to the width of the tape for seams. A similar part will be needed for the back of the chair.
So, all the pattern elements are ready. You can proceed to the next stage of work.
DIY chair cover
I took a tape measure and measured my chair, after which I made a drawing of the main parts. I thought about ways to connect them.
According to the project, the cover consists of five parts (top, two bottom and two inserts), cut from thick fabric. The parts are sewn together very simply - you can even do it by hand or on a mini sewing machine.
First, to protect the edges from fraying, they should be serged. Then, along the wrong side, you need to sew both inserts to the upper and lower parts. After turning it inside out, fold the right and left edges of the cover and sew two longitudinal seams. The finished cover, after being put on the chair, is smoothed with body weight.
The home version required a search for free, durable material. The trouser legs from old jeans were very suitable. A cover made from alternating squares 100 * 100 mm. turned out to be quite acceptable.
Our cat was also happy with the innovation - a big plus for him was the ability to lie close to the back without falling out of the gap.
Over time, a slight improvement appeared in the design - wide elastic bands were attached to the sides, with which I tie the cover to the chair so that it (the cover) does not get lost.
So I managed to sew a health-improving device for both myself and my beloved cat!
Step-by-step instruction
The fabric chosen for sewing a cover for a computer chair with your own hands is laid out inside out on a flat surface and the pattern details are fixed on it with pins. The elements are outlined with chalk and then cut out. The edges of the parts are processed with an overlocker or sewn with a zigzag so that the fabric does not fray.
Next, the elements are swept away and tried on a computer chair. The strip of fabric running along the perimeter must be cut to leave holes for the armrests and permanent contact. At this stage, you can adjust the darts so that the cover lies more evenly. There is no need to sew the parts of the lower part of the seat together; zippers will be sewn in there. Having achieved a perfect fit, the seams are sewn on a machine. Part of the side seam on the back is left free for the zipper.
To make the cover look neater, the seams are folded over the strip running around the perimeter of the chair and an additional stitch is laid. Now they will not bend and puff up.
Now you need to sew a zipper: a long one into the cape for the back (from the permanent contact to the middle of the side part) and three short ones, connecting the parts of the bottom of the seat.
Your hand-sewn computer chair cover is ready. It will look great in the interior and will protect the furniture from dirt and damage.
Using the technology described above, you can sew a cover for a computer chair from old jeans. To make parts for the back and seat, you first need to undo the trousers and connect the parts so that you get a fabric that matches the length and width of the elements of the office chair. This is a simple option.
To make a denim case more original, you can use the patchwork technique. In this case, the strength of the cape will increase.
Required materials and tools
Before purchasing materials, it is important to accurately calculate their consumption in advance so as not to spend extra money. To do this, you need to make a sketch - a schematic drawing with all the details and decorations. After this, take measurements of the back, seat, and all other elements of the chair with armrests. Calculate fabric consumption, taking into account seam allowances and finishing the edges of the product. If you plan to make shuttlecocks, then add additional material consumption for assembly.
Usually the flounce is cut 1.5–2 times more along the sewing line than the main part (depending on the design of the model and the density of the fabric).
It is important to choose suitable textiles so that the products retain their presentable appearance longer, keep their shape, are durable, and are easy to clean from dirt. To sew a cover, it is better to choose jacquard, chenille, satin, microfiber and other suitable materials. The most popular options for furniture covers:
- Velours. Beautiful soft fabric with a velvety texture. The products are very attractive in appearance and pleasant to the touch. Wear-resistant varieties of velor are produced especially for furniture, which are easily cleaned of dirt, unlike the same materials for clothing. Such covers can last quite a long time if handled with care.
- Cotton. This natural material is environmentally friendly, does not cause allergies, and is highly breathable. But it is impractical - it wears out quickly and shrinks when washed. These chair covers will have to be updated more often.
- Flock. Most often used for upholstered furniture. It is resistant to deformation, holds its shape perfectly and is at the same time soft and delicate. It is characterized by wear resistance, durability, and ease of maintenance.
One of the best qualities of flock is its resistance to moisture and fading in the sun.
Velours
Cotton
Flock
Jacquard
Chenille
What tools are needed to sew chair covers:
- measuring tape, ruler;
- pencil, chalk;
- scissors;
- hand needle;
- pins;
- paper pattern;
- Velcro, zipper or other fastening accessories;
- sewing machine.
If you wish, you can also sew an original cover for your computer chair with your own hands.
Sewing supplies
Useful tips
As you can see, sewing a cover for a computer chair with your own hands is not at all difficult. And the advice from experienced craftswomen collected below will make the process even easier and more enjoyable.
- Before transferring the pattern details onto the fabric, the latter must be washed in accordance with the care instructions. This is necessary so that the material shrinks. If the finished cover shrinks, it will be impossible to pull it onto the chair.
- When laying out the pattern pieces, you need to follow the direction of the weft and warp threads. This way the product will look neater and will not warp after washing.
- In order not to get confused during work, it is recommended to sign the parts of the product with chalk from the inside out.
- Symmetrical pattern elements are folded in half to reveal distortions.
- Inexperienced craftswomen are advised to first try sewing a cover from unnecessary fabric, and only then switch to expensive materials.
Choosing the right design
The choice options largely depend on the shape of the chair. If owners of standard furniture can still buy a ready-made cover, then for a chair with an original shape, all that remains is to make an individual model. Self-tailoring allows you to create an interesting, creative design even for an ordinary chair. You can choose any fabric, select additional finishing materials and decorations. The main thing is that the finished product fits organically in color and style into the interior of the room.
| Style | Peculiarities |
| Patchwork | Such products are created using patchwork sewing techniques. You can sew very impressive capes from multi-colored pieces of fabric. The choice of colors is individual. For example, bright, contrasting covers with colorful patterns are suitable for boho or country style. They create a light, relaxed, festive atmosphere. For a romantic Scandinavian style with deliberate simplicity, you need to choose a combination of light pastel shades. For beginners, this sewing method may seem difficult due to the fact that many fragments need to be combined and assembled. |
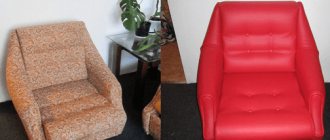
| Loft | For this style, with its laconicism, rough simplicity, upholstered furniture with upholstery or covers made of natural or artificial leather, tapestry, coarse non-woven fabric, a bedspread made of natural or artificial fur is suitable |
| Shabby chic | This style is characterized by a combination of warm, homely, expensive antiques. Satin or silk fabrics are best for covers. They should be muted shades with floral patterns. Bright colors or geometric prints will be out of place. Frills and tassels are used as decoration |
| Baroque | This Italian style is distinguished by luxury and grace. Chair covers are made from expensive bright fabrics and decorated with flounces and frills. |
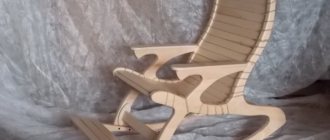
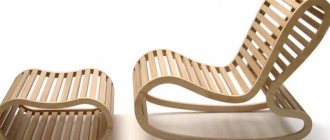
The procedure for making a rocking chair from different materials with your own hands
Patchwork
Loft
Shabby chic
Baroque