12161
You can install a kitchen set or a built-in wardrobe with your own hands. Furniture made from plasterboard fits harmoniously into any interior. Drywall is a very malleable and inexpensive material that can be given any shape and any design ideas can be realized. GCR is widely available and can be purchased at any hardware store, like the other components.
Design and design ideas
As mentioned above, there are a huge number of design options:
- Using spot lighting in a niche, in this case the lamps can be mounted in both the lower and upper parts of the structure. A rather interesting solution would be the direction of lighting from bottom to top.
- LED backlight. Lighting elements are very often combined with a stereo system to create a kind of light and music.
- Sometimes the back side is finished with decorative stone, photo wallpaper, or simply painted with paint that is slightly lighter than the rest of the structure.
Niche design option
- You can also cut out various shapes in the material so that when the backlight is turned on, they cast a shadow.
- Sometimes they make several niches nearby at the same time to install a TV and speakers for it.
- An electric fireplace will look great under the TV; it does not provide heat, but simply acts as a piece of furniture.
- The shelves around the TV can be used to place boxes, figurines, books, some even place a small aquarium.
- For lighting, you should use exclusively LED lamps, since they practically do not emit heat.
In some cases, a niche is used for decorative zoning of premises. Then the TV plays the role of a partition in the room. In this case, it is very important that the size of the niche for the TV matches its pedestal for normal and safe installation of the device. For such a design, a device with a rotating base is perfect - this way you can take turns watching TV in different parts of the room. All elements of the resulting structure should be made in light colors, since dark drywall will create the impression of a hole in the room.
Stages of arranging a niche
Once you have figured out all the details, you should start installing plasterboard niches for the TV with your own hands. This procedure does not require extensive experience in the construction industry or high qualifications, so it is better to do everything yourself and thus save money on calling a specialist.
The main thing is to approach the procedure with full responsibility and follow the installation rules, which we will present below. It should be noted that the size of the TV being installed is absolutely unimportant; it is important to make the correct markings.
Communities › Construction (and everything connected with it) › Blog › DIY children's bed
The community is about renovation, I think furniture is also directly part of the renovation.
For a long time I had the idea of mastering furniture with my own hands, from design to implementation. But at that time I had no idea at all about how to design it and where to find a production facility to order cutting of parts.
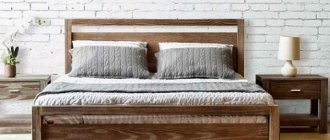
1. I scoured the Internet in search of a suitable photograph. I liked this model. Not all stores have the dimensions of all parts, but this model had online instructions indicating the dimensions of all parts.
2. I bought the mattress before the bed. All that remains is to make a bed for the mattress. Having recalculated the dimensions of the bed for my mattress, and replacing the slats in the design with chipboard, I sketched out a list of parts for the bed.
Color: Shimo ash light, dark. Chipboard thickness 16 mm and 22 mm (sidewalls) Melamine edge, PVC edge on the sidewalls.
3. I visited several factories for cutting chipboard. I chose a manufacturer that satisfied me in terms of price and quality. Because Before ordering the bed, I ordered several parts from them to check the quality of the chipboard and edges.
After waiting a week, the cut is ready. I picked it up, brought it home and started assembling it.
For assembly you will need: - Screwdriver (drill) - Drill for confirmat - Confirmats - Square - Awl - Clamps
Drywall marking
First you need to take measurements of the TV itself, and then make the appropriate markings on the plasterboard wall. The markings should be larger than the dimensions of the device by about 10 centimeters in each direction. This is necessary for more comfortable and quick installation, as well as simple maintenance later.
This free space is also necessary to provide ventilation to the back of the TV, which should not overheat.
Calculations of a niche for a TV
These are the main rules; as for all other issues regarding the dimensions or design of a niche, here you can give free rein to your imagination. The only thing you have to do is purchase a building level. The fact is that this operation requires strict adherence to the horizontality of all lines, so it is impossible to do without this product.
Advantages and disadvantages
The advantages of this finishing material are obvious:
- Affordable price.
- Easy to install (no special glue or sealant is needed for fastening - just use self-tapping screws, and you can paint, plaster or cover the plasterboard surface with wallpaper immediately after installation).
- The ability to make furniture with your own hands if you have proper instructions.
- Minimum dirt during finishing work.
- Large selection of designs and designs.
- Light weight drywall.
- Simple repair of damaged gypsum plasterboard elements.
- Harmonious combination with other finishing materials (glass, metal and wood).
Any shortcomings can be avoided if you approach the installation process responsibly. The only thing that can interfere with the process is crooked walls, because if there are vertical deviations, the cabinet doors can open spontaneously. In this case, use the services of professional craftsmen who will competently carry out all measurements. Also, when producing shelves, keep in mind that gypsum board is not a very durable material, so it is important to calculate the permissible weight when constructing the frame. And it is for this reason that drywall is not recommended for aquariums, televisions or home libraries.
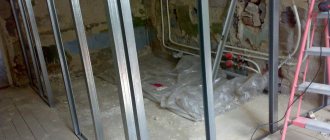
Installation of profiles
After applying the markings, you should begin installing the guide profiles. Self-tapping screws can be used as fastening elements. This means that the list of required tools will be supplemented with a screwdriver and an electric drill. Any structural element can be made from the same profiles.
Cutting profiles of required sizes
It is extremely important to correctly determine the depth of the niche. It is better not to overdo it here, since a niche that is too deep may not be justified in terms of the dimensions of the TV pedestal, and the entire structure will look too bulky.
It is better that the depth of the niche is small - you should not divide more space than the TV could occupy. The main thing to remember is that a niche is not only a decorative, but also a functional element.
Installation of plasterboard sheets
Now you need to start cutting drywall fragments, taking into account the required dimensions. At this stage, it is very important to observe all the necessary dimensions so that two adjacent fragments form an even line. Edges and protrusions are not allowed.
Installation of drywall sheets
After this, the cut pieces of material should be secured to the profiles installed on the wall. To create a three-dimensional effect and to increase the strength of the structure, it is necessary to install additional profiles along the edges of the niche, the size of which must correspond to the size of the guide profiles.
Before installing all the plasterboard fragments, it is better to carry out the necessary communication networks in advance:
- cable for connecting a TV;
- if you plan to install the backlight, then the cable for its power also needs to be laid in advance;
- Particular attention should be paid to sockets, which should be located in convenient places, since you will need to connect several devices at once.
After laying all the cables and wires, you can begin installing fragments of drywall, which need to cover the entire front panel of the structure, after which you can begin cladding.
Finishing
The remaining processes involve finishing surfaces and cladding the installed plasterboard structure. To do this you need:
Puttying a TV niche from GLK
- apply putty to the joints, then stick sickle tape;
- treat all surfaces without exception with a primer;
- level all surfaces with putty;
- sand the surfaces;
- apply the primer a second time;
- application of paints and varnishes as a cladding option.
Design and finishing of a niche for a TV
If you decide to install lighting, you must pre-drill holes for its connection.
TV installation
Now the do-it-yourself plasterboard TV niche is ready, all that remains is the final touch - installing the device itself. For these purposes, it is necessary to install a special fastening element, which is supplied with the device. It must be attached to the wall with several screws or dowels.
Ready niche for TV
The most important thing at this stage is the correct installation of this fastener. It is necessary to focus on the center of the structure when installing fasteners.
Varieties
You can make different models of cabinets from plasterboard. They are equally suitable for a large living room or a small bedroom. The main thing is to correctly calculate the dimensions of the furniture at the project development stage.
| Type of furniture | Internal filling options |
| Wardrobe partition | Toys, light books, stationery |
| Wardrobe wall | Any content |
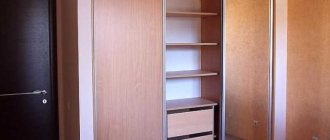
| Coupe with sliding doors | Bed linen, tablecloths, towels |
| Mini dressing room | Clothes, shoes, accessories |
| Open shelving | Landline telephone and household items such as keys, magazines and newspapers, pencils and pens. This furniture will fit well in the hallway |
How to make furniture from plastic bottles with your own hands, instructions
At the bottom of the cabinet you can place several drawers. They can be locked with a key or opened freely. The shelves, if desired, can be glazed to prevent dust from accumulating on them.
Do not place heavy household appliances on plasterboard shelves. Large metal objects (dishes, figurines, souvenirs) also fall under this ban.
Wardrobe partition
Wardrobe wall
Coupe with sliding doors
Mini dressing room
Open shelving
DIY bedside table for the bedroom
Self-assembled furniture will be an excellent decoration for any interior, besides, it will help save money and emphasize the taste of its owner. A DIY bedside table is easy to make, drawings for any chosen model and assembly diagram are available for public access, and materials can be purchased at any hardware store. However, when starting to make furniture, namely a bedside table with your own hands, you need to become familiar with some of the features of the process and technology.
Step-by-step instruction
- Creating a drawing. You can make a drawing using a computer program or a regular piece of paper. To begin with, measurements are taken of the walls, and then the dimensions of the future chest of drawers are recorded. All room and structure data must be immediately transferred to paper. In this case, you should take into account all the points: starting from the outline of the chest of drawers, ending with the number and location of the shelves.
- Marking the work site. If the plan is done correctly, then you can safely make markings on the walls in the room. For marking you will need a regular pencil, a ruler and a square.
- Purchase of goods. At this stage, you need to decide which frame you want to use. A wooden frame is more reliable and can withstand high loads. However, there are several inconveniences when using it. Firstly, wood is not cheap, and secondly, it requires pre-treatment with a high-quality antiseptic. All other materials must be purchased based on the preliminary plan.
- Installation of the base. In order for a plasterboard cabinet to last a long time, special attention should be paid to the process of installing the frame. The base must be strong and reliable. First, profiles are installed on the floor and walls. They are attached to the wall with self-tapping screws. The distance between the profiles should not be more than 40 cm. A damper tape must be laid under each profile. This will help avoid noise when using the chest of drawers. Before installing each profile unit, it is worth checking the structure using a level. The frame must be stable and level. When all adjacent profiles are installed, you can begin installing vertical and horizontal ones. All jumpers are installed from top to bottom.
- Rear wall installation. The need to form the back wall depends on where the drywall cabinet is located. If the wall of the room itself has a good appearance, then additional finishing is not necessary.
- Cutting sheets. When the frame is installed, you can begin to prepare the base material. GCR should be marked and cut into pieces using a construction knife. For the manufacture of furniture, sheets with a thickness of 12 mm are usually used.
- Frame covering. It is enough to sheathe the frame from the outside, but many also sheathe the inside. The sheets are attached with self-tapping screws. The step between them should be two hundred millimeters.
- Padding. For this stage you will need a special tool. It can be found at any hardware store. The entire plasterboard cabinet must be carefully treated with a primer.
- Preparation of corners and plastering. To make the cabinet aesthetically pleasing, every corner should be made smooth. A plaster mesh can help with this. It is attached using plaster while treating the entire surface.
- Door installation. When the base dries after plastering, you can take measurements of the surface of the future door. There is no need to make it yourself. This kind of work should only be done by a professional master. It is better to order the door ready-made along with guides. When it is delivered, you first need to install the controls, and then the canvas itself.
Before building a built-in wardrobe from plasterboard, transfer the dimensions of the future structure to the wall, ceiling and floor.
Anyone, making a product according to their wishes, can create a truly unique design.
How to determine the size of a nightstand
Having decided to make a bedside table with your own hands, you need to decide on its future dimensions. To determine the parameters of a future piece of furniture, it is important to understand in advance what space in the room will be allocated for this element. The standard dimensions are considered to be determined by the height of the bed; the standard width is 50 cm, and the depth varies from 30 to 35 cm. A bedside table of this size can most often be found in a furniture store.
If space in the room allows, you can make furniture of any size yourself. The height may be higher or lower than a standard bed. The dimensions of the bedside tables will depend only on the chosen design, as well as the materials from which it will be made.
Features of design and selection of materials
Having decided on the size of the future bedside table, you can begin the planning stage. To do this, you need to determine in what style the furniture will be made and have a rough idea of its appearance. You can choose a ready-made project presented on the Internet, or you can develop your own.
To do this, just draw a future table or cabinet with your own hands on a piece of paper. Then draw each detail separately and write down their dimensions. A computer can greatly simplify the design process. There are a lot of programs on the Internet that are used to create projects and drawings, many of them are used by furniture designers. For starters, the basic version of the simplest program is quite suitable. It will help you understand exactly how the furniture design process works, in particular how to make bedroom furniture.
The accuracy of the drawings is important not only for planning, but also for the precise fitting of parts during the manufacture of blanks for the future bedside table.
A bedside table for a bedroom is usually made of laminated chipboard. They are quite inexpensive and can be easily purchased at any hardware supermarket. There you can pick up fittings and all the necessary parts. In order to produce parts of the required size, you can contact any local company that does cutting. These services cost very little, and the risk of spoiling the material due to lack of experience is completely eliminated. In addition, even an experienced craftsman is not immune to chips on the edges of the material if he works with ordinary household tools.
However, if you already have certain skills in working with wood, then you can quickly learn how to cut blanks from chipboard using a regular circular saw. There are special techniques and tricks that are designed to avoid spoiling the material.
In order for the shelf to look good and be protected from mechanical damage, it is necessary to edge the ends of the blanks. To save material and time, it is enough to edge only those parts that will be visible using melamine or a special PVC edge. There is no need to edge the internal surfaces, which will be covered by the walls and body of the future bedside table.
After this, you can begin assembling the product, strictly adhering to the instructions and plan. It is very important to strictly follow the assembly sequence and take into account the dimensions of the parts and the drill so as not to damage the workpiece.
The standard material used by manufacturers is chipboard. Having developed your project, you can use almost any material, including wood. It is enough to process solid wood to make it look expensive and elegant. In addition, wood products will last much longer, fit into any interior and are environmentally friendly. This option is a little more expensive and requires more skill from the assembler, but the result will exceed all expectations.
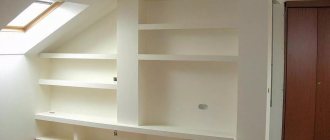
No. 2. Shelves and racks made of plasterboard
Soviet walls and similar more modern pieces of furniture are becoming a thing of the past. Today, storage systems are increasingly organized using spacious wardrobes and shelves. Both of them can be made from plasterboard, but now let’s focus on creating shelves. They can be of different sizes, serve for storing different things: books, decorative items, equipment, and can also be used in the pantry.
Before you start creating plasterboard shelves, it is better to very clearly imagine the end result, or better yet, depict it on paper. Shelves can have not only angular, but also curved shapes, repeating some geometric shapes, the structure of wood, etc. There can be a lot of implementation options, and several interesting examples are presented in the photo.
#gallery-3 margin: auto; > #gallery-3 .gallery-item float: left; margin-top: 10px; text-align: center; width: 33%; > #gallery-3 img border: 2px solid #cfcfcf; > #gallery-3 .gallery-caption margin-left: 0; > /* see gallery_shortcode() in wp-includes/media.php */
Depending on what role the shelves or rack will play, the features of their installation will differ. If you are planning to create a shelf for photos or souvenirs, then a lightweight frame covered with one layer of plasterboard will be sufficient.
If a shelf or rack will be used to place heavy things (plants, equipment, books, an aquarium), it is better to strengthen the frame with additional profiles and cover it with two layers of plasterboard, or even better, use a welded bracket instead of a regular profile.
To ensure that the corners of the shelves are perfectly even, it would be a good idea to reinforce them with a thin steel profile and stick a plaster mesh on top.
The internal cavity of the shelves can be filled with mineral wool or other heat and sound insulating material to avoid the booming sound of hollow structures during their operation.
Shelves and racks are often complemented with LED lighting , which decorates the interior, creates a pleasant atmosphere and fulfills its direct function - illuminating the room. Shelves and racks can be organized anywhere: office, living room, bedroom and even kitchen, but in this case it is better to use moisture-resistant drywall. Shelves made of plasterboard are functional and practical, and require less maintenance than similar structures made of wood.
#gallery-4 margin: auto; > #gallery-4 .gallery-item float: left; margin-top: 10px; text-align: center; width: 33%; > #gallery-4 img border: 2px solid #cfcfcf; > #gallery-4 .gallery-caption margin-left: 0; > /* see gallery_shortcode() in wp-includes/media.php */
Non-standard projects and materials
Many creative nightstand designs that you can easily make yourself were invented to save money on furniture purchases. However, some of them look stylish and original enough to take a place in the room. The designs will help breathe a second life into old things and will organically fit into the bedroom interior.
Making furniture from pallets is becoming increasingly popular. You can buy them at a construction supermarket and paint them in any color. From pallets you can make both a bed and other pieces of furniture. If we talk about a bedside table, then it will be enough to simply combine two pallets to make the shelf the desired height. You can use old boxes using the same principle. They can be equipped with special rollers so that each of them can be pulled out.
A wonderful DIY bedside table can be made from an old suitcase if you attach legs to it. You can also breathe new life into old chests that are simply painted. A stack of old books tied with a leather strap or held together with self-tapping screws would also be a great addition to any bedroom.
Another interesting idea would be a bedside table with tension rope shelves. To make it, you will need to assemble a box of the required size, drill rows of holes at the level of the shelves and thread a strong rope through them.
The ideas for bedside tables don’t end there; it’s enough to use your imagination and a little effort to get a unique, stylish and functional piece of furniture.
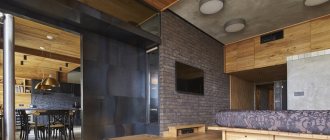
Plasterboard furniture in interior design
Often, with the help of drywall, owners try to correct certain shortcomings in the room: in this case, drywall has a purely decorative and aesthetic function. For example, if the room has low ceilings, then open white structures with shelves will visually increase the space in the room, giving it an airy feel.
And if you have uneven walls, or a room of irregular geometric shape, then using drywall you can create proper zoning.
For example, you can install a partition between the living and dining areas in the living room, or make a bar counter out of plasterboard.
- Cabinets and shelves can be of different sizes and shapes. The peculiarity is that drywall is flexible, so you can make it to any desired size and give the product any desired shape.
- Decorative niches will help make the kitchen interior “not like everyone else’s.” You can put decorative trinkets, souvenirs and photographs in niches and on shelves made of gypsum plasterboard. You can also use niches to decorate radiators, furniture and household appliances.
It is no secret that in the modern world we use cabinet furniture to a minimum so that it does not clutter up the space. But open shelving made of plasterboard or built-in furniture can magically transform the interior, making it as functional as possible. The old-fashioned walls, which “steal so much free space in our apartments,” have been replaced by lightweight and non-standard plasterboard structures. There is no limit to imagination when it comes to arches and partitions made of plasterboard.
You can make any configuration and add original lighting for effect, which can create a special romantic atmosphere where it’s nice to relax after a working day.
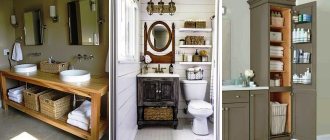
Bathroom furniture
Plasterboard furniture for the bathroom is an excellent alternative to plastic options or expensive finishes made from natural materials. Even the bathroom, which is a special room due to high humidity, can be finished with plasterboard. The main thing is to use a galvanized frame and moisture-resistant drywall (GKLV). You can design and install cabinets with shelves for sinks and cabinets for bathroom accessories. In the manufacture of bathroom furniture, the standard principle of frame assembly with the stages of cladding and finishing is used. To ensure that all bathroom components resist moisture, treat them with protective coatings, and additionally decorate moisture-resistant gypsum board sheets with tiles or decorative plaster.
Drywall, as a universal and easy-to-process material, provides great opportunities for designers to create and will also save the family budget. When purchasing gypsum boards, pay attention to where and from whom you purchase the finishing material. For example, if plasterboard sheets have been lying in a warehouse for a long time, there is no need to talk about any moisture resistance here. If the price is too low or there is a promotion, remember that free cheese is only in the mousetrap. A finishing material such as drywall will help you create a unique interior with your own hands, which will become a continuation of your individuality. How you decorate your home depends solely on your imagination and preferences, and with drywall the financial component should not be a problem.
To learn how to make a plasterboard countertop for a sink, see the following video.
What kind of furniture can be made from plasterboard
There is always high humidity in the kitchen. However, for such an interior it is not necessary to choose raw materials with a moisture-proof coating. As a rule, kitchen units are equipped with an extractor hood, which prevents moisture from penetrating into the material.
High-quality structures can be placed not only in the kitchen. For example, in a bathroom or living room it will look stylish built in. What furniture can be made from plasterboard? A cabinet made of plasterboard or shelves from this material.
After finishing work with the frame, it is recommended to check the level of the plane one last time.
You need to press the structure with a little force. She should not stagger, but stand firmly. This ensures the reliability of the tabletop. Drywall is always finished with paint (paint, tiles, oilcloth, washable wallpaper). Through it, moisture will not reach the base.
The thickness of the panels is selected based on the functions of the product, as well as taking into account the size of the working area and the strength of the frame. Interior items made of cardboard should be as functional as possible (shelves, pencil cases). Load-bearing walls (arches with shelves, shelving, bar counters) can be used as the basis for such structures.
The frame base must be reinforced with double spacers. A pair of spacers are fixed with self-tapping screws at an equal horizontal distance.
This is done by dividing the total height into 3 equal parts.
A niche in a plasterboard wall in the interior – 100 photo ideas
In the same way, almost any room can be divided into zones: a living room - into a relaxation area and an area for receiving guests, a children's room, in which several children live, - into zones with their personal space, decorated in accordance with the tastes of the kids.
As mentioned above, quite often drywall is used to zone rooms. For example, one of the most common options today is to decorate areas in a children's room with partitions that divide it into two parts: one for work and play, and the second for sleeping.
To ensure that the partition does not take away part of the lighting between zones, it can be made with niche shelves in which toys, the child’s favorite books and other accessories will be stored.
The simplest solution would be to decorate a niche with wallpaper. You can choose wallpapers with a similar shade and simple pattern, as well as contrasting or bright ones. The first step is to mark on the wall where exactly the niche is planned to be placed - the plan is best perceived visually. After this, measurements are taken to calculate all the materials.
Any plasterboard construction needs design. It can be ordinary paint or hand-painted - it all depends on the creativity and imagination of the owner. Work on making furniture from plasterboard must be done carefully, constantly checking the installation of parts at the level.
When constructing complex, curved structures, you need to install gypsum board slabs immediately after cutting them, so as not to make a mistake. At this stage, you need to install the electrical wiring if you plan to install backlighting. All communications are hidden under the panels, and holes of the required diameter are drilled to attach the lamps. If you plan to install an LED strip, you need to think about where the heat sink profile will go.
The electrical wire must be corrugated for safety. If you don’t like racks, cabinets, cabinets and other attributes, you can always pay attention to niches. They replace many pieces of furniture and at the same time save space. Zoning using niches is relatively flexible.
This allows you to make shaped partitions, supply electricity, build in a fireplace and select various finishing options. The second option for zoning the living room is done using the ceiling. Plasterboard suspended structure is the most common and modern method of zoning. This method can not only divide a room, but also give it an amazing appearance. To carry out zoning of the premises in this way, multi-level structures are made, the boundaries of the levels of which should be determined by the zones.
This is an important point. An unusual effect should appear in the interior. Very often, the boundaries between levels on the ceiling are decorated and decorated.
To do this, you can use built-in spotlights or LED backlighting.
DIY plasterboard table
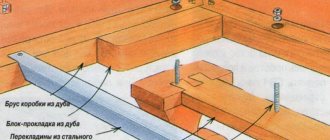
As with other types of work with gypsum sheet material, for its fastening it is necessary to make a strong base structure. The material for this can be wooden blocks of one or another section or a steel profile. From individual parts cut to length, assemble the table frame according to the dimensions most convenient for you.
To connect the steel profile, use small metal screws with a head of sufficient diameter. Remember that the strength of plasterboard sheets is relatively low, so the distance between individual supporting parts should not exceed 30-40 centimeters.
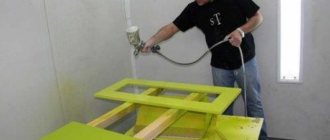
The next stage of assembling this piece of plasterboard furniture is finishing the manufactured frame with flat parts. In order to obtain rectangles of the required size from a large sheet, it is necessary to cut individual strips of equal width along or across. To do this, you can use two separate methods. At first, sawing is carried out using a fine-toothed carpentry hacksaw or an electric jigsaw. Its disadvantage is the release of a large amount of gypsum dust into the surrounding space, which, to put it mildly, is not beneficial for the human body. To prevent gypsum particles from entering the lungs during manual or mechanical sawing, it is necessary to use special respiratory protection. This option is good in cases where curved parts are needed.
For direct cutting of plasterboard sheets, it is better to use the second method. You will need to have a construction knife, such as those used for cutting linoleum, and a fairly long rule (a steel or aluminum corner or a perfectly evenly planed wooden strip). After preliminary marking on one side of the sheet, attach a rule and cut the top cardboard layer along it. After this, break the gypsum core, placing the rule under the sheet at the cut site. After this, all that remains is to cut through the back layer of cardboard with a knife. To obtain even edges, the edges of the resulting parts must be cleaned with sandpaper, securing it to a special block or small wooden block.
Fasten the resulting rectangles to a steel base with self-tapping screws.
Drive the screw heads flush into the drywall. After finishing the entire table, it is necessary to putty not only the seams between the parts, but also the places where the screws are installed. Places of putty are also leveled with sandpaper on a block. After preparing the entire surface of the product, proceed to surface finishing. For these purposes, any dye of your preferred color can be used. It can be applied with a brush, roller or spray.
After the first coat has dried, sand it and apply another coat. Applying an original pattern using a thin brush and a contrasting color dye will help you achieve maximum expressiveness in furniture finishing.
The finished look and shine of your product will be given by applying several layers of varnish and allowing each layer to dry.