Manufacturing instructions with drawings
- Drawing of a roll-out sofa seat
- Reclining drawing
- Drawing of a sofa box
- Pillow
- Drawings of the main back of the sofa
- Assembling the sofa
Introduction: On the furniture forum sdelaimebel.ru, user Eskander shared his experience in making children's sofas, for which many thanks to him.
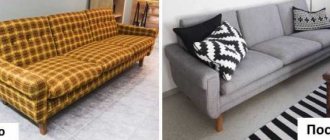
I found this instruction interesting for a wide range of readers and, with the permission of the author, I am posting it here. This is the only material in this section for which I am not the author, but only the editor. This sofa model is mass-produced by the author in production, but it is quite possible to make such a children’s sofa yourself, with your own hands at home. In this particular case, we are considering a sofa based on a roll-out Bonnel spring block with a folding headboard segment. Instead of springs, you can use foam rubber in a children's sofa. This is what a children's sofa you can make yourself looks like:
Options for making a children's sofa
Everyone probably knows how to choose a children's sofa, but few know how to make one themselves, therefore, advice for beginners would be to determine the type of proposed model. It is worth noting that the range of photos is very rich and you can even visually secure one of the options and begin preparing for its creation. In the interior of each apartment, it is important that a folding or regular sofa fits harmoniously and does not take up much space, at least when assembled. How to choose a children's sofa that suits all parameters? It’s almost impossible, but doing it step by step and on your own is easy! But first you need to decide on its type:
- folding sofas are the most popular of their kind, since when disassembled they provide a fairly large sleeping area;
Sofa bed
- transformable sofas - suitable for small rooms, as when folded they form a small chair;
- Book and Eurobook sofas are distinguished by their careful attitude towards the floor covering, since their layout does not require the use of the lower part;
Mechanism book
- a roll-out sofa is light and easy to operate, and even the smallest child can easily prepare his own bed;
Roll-out sofa
- orthopedic sofas - can help in the treatment of some diseases associated with curvature of the spine, but it is unlikely to be possible to make them yourself, even with the help of a diagram; this will require the hand of a professional.
Orthopedic sofa
Having chosen the appropriate option for yourself and getting ready to work, you can be sure that the baby sofa you made with your own hands will be of the highest standard.
Drawing of a roll-out sofa seat
- The support frame (position 15) with plastic supports (14) is attached to the support frame fastening bars (12) using 50 mm SHSGD self-tapping screws.
- The synthetic winterizer (1) is attached to the polyurethane foam point-by-point, using “Tapicer” foam rubber adhesive (if not available, you can use regular “Moment” in tubes or “Titan” type ceiling tile adhesive).
- PPU 30 mm. (2) attached to heat-pressed felt (3) pointwise, using “Tapicer” foam rubber adhesive (you can, again, “Moment” or “Titan”).
- Heat-pressed felt (3) is attached with a fold to the Bonnel spring block by stitching with a needle and nylon thread (fishing gear) with wide ties.
- Spring block “Bonnel” L. x W. x H. = 1330 mm. x 660 mm. x 100 mm. /1 r./ (one frame) (position 4) we fasten along the perimeter of the frame bars with a stapler (staple No. 16) two staples on the right and left of each spring, corner springs - on 6 staples (right, left and corner). In the absence of a stapler, you can use a hammer and 32 mm nails, one nail per spring, corner springs - 2 (we hammer the nails halfway, then bend them).
- Fiberboard 2.5 mm. the rigid base (11) is secured around the perimeter of the frame bars (6) (9) and the span bars (10) with a stapler (bracket No. 16) or 25 mm SHSGD. (at worst - with the same 32 mm nails.).
- Spring-loaded flooring - heat-pressed felt (11) is attached to the fiberboard using glue or staples.
- Frame (6) (9) (10) - pine bars placed on edge, connected with a tenon (possibly without a tenon, with 75 mm SHSGD self-tapping screws. 2 pieces per end with simultaneous gluing of the ends with PVA wood glue).
- PPU 20 mm. (5) glue from the top to 30 mm polyurethane foam. (2) and from below - to the plane of the frame bars along the perimeter (or with a stapler, staple No. 10).
To reduce time costs and the range of materials used, you can:
- use polyurethane foam with a thickness of 100 mm. instead of a Bonnel spring block and heat-pressed felt.
- Do not use tenon joints for frame bars.
- use chipboard or laminated chipboard instead of the support frame (15) and supports (14), which are screwed using a 35 mm SHSGD. to the plane of the frame block (6).
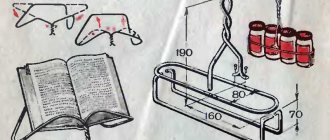
Wheel support No. 493:
Options for attaching the Bonnel spring block to a rigid base (using 32 mm nails and No. 16 staples); option of attaching heat-pressed felt to the Bonnel spring block using nylon thread:
Please note that the photo above shows the mounting of the spring unit not on a children's sofa, but on a sofa of a different model. But the principle is the same: first the batting, then the spring block is nailed, and the top is sheathed with felt. And then the foam rubber is glued.
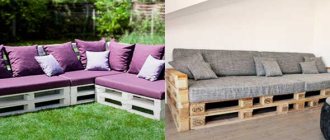
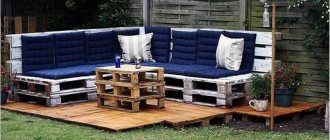
DIY sofa-ottoman
Pull-out model
This type of furniture, such as a do-it-yourself pull-out ottoman bed, is perfect for a family with two children. To do this, you will need two strong frames of a suitable size (by the way, you can use old single beds or sofas. Or make frames from wooden blocks.
The upper ottoman, which will not slide out, has side backs and fairly high legs. Its frame is reinforced with narrow transverse strips 1.4 centimeters thick.
The lower bed, which slides under the first, has only a front side part and two legs. It is equipped with wider cross bars cut from 1.4 centimeter thick plywood. They are fixed so that when moving they fall between the upper bars. In addition, we need transverse bars that limit the movement and are attached to the wide slats.
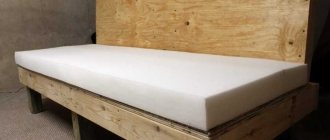
Plywood is placed on the upper bed - the base for the mattress. Mattresses are made from sheet foam rubber and covered with upholstery fabric. You can also use an orthopedic mattress for your sofa or ottoman.
The following video will tell you how to make a stylish sofa-ottoman with your own hands:
Children's version
Making it yourself is very practical. After all, children grow up so quickly - why waste money. Moreover, you can make a cute little thing that the baby will love very much.
So, we decided to build a small sofa 1.5 by 0.8 meters. Here are step-by-step instructions on how to make an ottoman for a nursery with your own hands:
- Let's take slats 4 by 3 centimeters - this will be our frame. We will strengthen it with metal corners. If desired, you can make legs - either from bars or from figured balusters.
- Now we take wood boards and sheathe our frame on all sides except the top. You will get a large box, which we block across with a block. We treat the surface outside and inside - prime and paint.
- We cut out the seat and back (straight or figured) from thick plywood. We glue two layers of foam rubber to them - 10 centimeters and 2 centimeters. After the glue has dried, we cover the parts with batting and on top with upholstery fabric.
- Using corners and screws, we attach the back to the frame. We fasten the seat using furniture hinges - under it we have spacious drawers for the bed.
Next, we will tell you how to make an ottoman out of a bed with your own hands, and also illustrate the note with a bright photo.
DIY ottoman for a teenager
Conversion of a bed
It happens that you want to update the interior, and there is just a fountain of thoughts about this, but one thing stops you - lack of money. But in the house there is an old, but still strong bed, and the owner is with a hammer, saw and screwdriver. In this case, there is every chance of getting a wonderful ottoman that will cost almost nothing. Unless you need to spend money on beautiful upholstery fabric.
Let's describe the process step by step:
- We disassemble the old bed, carefully removing both backs and legs. Well, we remove the mattress first (if there is one). If the bed is very old, then we will disassemble the frame, coat the parts with glue (PVA is best), and then assemble it and let it dry. This will prevent any unpleasant squeaking during operation.
- We will sew a cover from dense material, measuring all the details. You can attach the cover using glue or a furniture stapler. In the latter case, you can attach a separate piece of fabric, cut to size, to each part.
- If there is a mattress, then we put it in place. If it is not there (worn out), then we buy it. Or we use dense polyurethane foam of the required size instead of a mattress. We cover the top of the mattress with a cover made of upholstery fabric, and inside we sew another cover - not necessarily elegant, but dense
- We attach one of the headboards of the bed to the frame and make markings using chalk according to the shape of the future backrest of the ottoman.
- We cut out the backrest with a jigsaw, cover it and the legs of the bed with padding polyester, and sew covers from upholstery fabric for all these parts.
- Turn the frame upside down. We put the legs in covers and screw them, hiding the edges, to the frame.
- We fasten the back, dressed in a cover (hem the edges at the bottom for neatness), with screws in several places.
An excellent example of placing a DIY ottoman
Reclining drawing
The technology is similar to the manufacture of a roll-out seat. Differences:
- In place of 30 mm polyurethane foam. (position 2) 20 mm polyurethane foam is used. in order to compensate for the overall thickness of the pillow and prevent a difference relative to the plane of the roll-out seat during transformation (since fiberboard (11), 10 mm polyurethane foam (12) and padding polyester are added from the bottom).
- The frame bars are covered from the bottom with fiberboard (11), onto which 10 mm polyurethane foam is glued. and padding polyester.
- The furniture fabric cover is not nailed with staples to the frame bars, but is put on and fastened using a “Zipper” lock, after which a card loop No. 538 zinc (2 pcs.) is screwed to the folding backrest using self-tapping screws ШСГД 50 mm. according to pre-made markings (chalk on furniture fabric).
The article belongs to the site NovaMebel74.ru
Card loop No. 538 zinc:
To reduce time costs and the range of materials used - (see ROLL-OUT SEAT) similarly.
Drawing of a sofa box
- The end and side boards (1) (2) are made of pine, connected with a tenon (possibly without a tenon, using self-tapping screws ШСГД 75 mm, 3 pieces per end, while gluing the ends with PVA wood glue). Instead of boards, you can use 16 mm. Chipboard or plywood.
- The fiberboard of the bottom is attached around the perimeter and to the bottom block (6) with bracket No. 16 (can be 25 mm SHSGD or nails). The bottom can be decorated with fabric, or instead of the usual fiberboard, you can use a treated one (laminated or painted). When decorating the bottom with fabric, it is necessary to fix the box boards at an angle of 90 degrees. (checking the equality of the diagonals), upholster with fabric with slight tension around the perimeter and then install and secure the fiberboard bottom.
- The guide bars of the rollers (3) are attached to the planes of the side boards (2) with 50 mm SHSGD self-tapping screws. The bars have cutouts for fixing the rollers and at the same time allow you to remove the load from the rollers (in this case, the rollers work only during transformation; in other cases, the load is taken not by the rollers with guides, but by the box boards and the bars of the roll-out seat frame).
- The support bars (4) are attached to the plane of the side boards (2) with 50 mm SHSGD self-tapping screws. Plastic supports ST 35 ШБ (35mm) (5) are screwed into the support bars (from the bottom).
- PPU 10 mm. (8) is attached to the boards (2) using bracket No. 10 (can be glued point by point with glue)
To reduce time costs you can:
- Do not use tenon joints on workpieces.
- use laminated chipboard or plywood instead of solid wood blanks.
- do not use cutouts in the guide bars of the rollers (3); you can install straight bars, securing on them any clamps that prevent the rollers from rolling back
Pillow
In my case, a cover made of furniture fabric with a “Zipper” lock with a linear Velcro fastener was used. Pillow size (finished) 400 x 600 mm. The filler is Super Pooh balls, which we place in a low-density spunbond case and then stitch it on a sewing machine, cutting off the excess with scissors. You can use other types of tightening - point or using buttons. As a filler, you can use Super Pooh comb (holofiber, as we did when stuffing pillows for the back of a corner sofa). Many (to save money) use a mixture of foam rubber crumbs and padding polyester; in this case, it is better to sheathe a spunbond cover with padding polyester in several layers. The cover for the filler (instead of spunbond) can be sewn from calico fabric.
Lining and cover
The prepared pieces are glued on all sides to the sofa using good glue. At the same time, coat it well with glue and press the edges. The middle must remain untouched, since otherwise the foam will be compressed and will not provide softness. All this looks in general form on two parts of the sofa approximately as in Fig. 2.
Related article: Decorating the dining table for every day
It is also good to attach ordinary fabric to the foam rubber, which will serve as additional protection against rapid wear. You can either grab it with threads or sew covers from it. This doesn't play a big role here. You can also add compressed cotton wool for greater softness, if desired.
The last stage of finishing is the cover. You have two options here. Using pre-prepared dimensions, you can simply sew a cover from upholstery fabric and put it on the sofa. This is more practical, since you can remove it and wash it at any time. Another option, simpler but less practical, is to attach the fabric using a furniture stapler. Everything will hold up well, but if the upholstery gets dirty, it will be impossible to remove it. Cleaning is also problematic, since cardboard does not tolerate moisture.
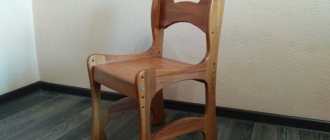
So, the option of how to make a simple sofa or chair for a child with your own hands has been fully considered. As you can understand, making children's furniture is a fairly simple and at the same time interesting activity. The finished upholstered furniture will look something like in Fig. 3. If you wish, you can additionally decorate it with various fun stripes and fabric loops that can serve as handle holders. Just use your imagination and everything will work out!
The best posts
- How to update wooden windows yourself
- Expert advice - which linoleum is better to choose
- Sewing Roman blinds with your own hands: step-by-step instructions
- What paint to paint glass wallpaper: washable latex and acrylic options
- Paper weaving for beginners: step-by-step master class with video
- How to crochet a granny square: simple patterns for beginner needlewomen
- Do-it-yourself baby doll clothes with knitting needles: diagrams with a description of the work
- Club houses from Hutton Development: how they attract their residents
Related article: Which finishing putty is better and how to apply it?
Drawings of the main back of the sofa
The main back is made of 16 mm plywood. We drill holes for the bolts securing the backrest to the frame (d. 8 mm) according to the template. At home, you can do without a template; you must first attach the back to the box and temporarily secure it with nails or clamps, simultaneously drill the back with the box according to the pre-applied markings). The roller that frames the contour of the back from above and from the sides is made of a 30 mm polyurethane foam strip, which we wrap around the edge of the plywood and secure with staples No. 10 (we beat the staple in a line, without gaps). On the front side of the plywood plane we glue 10 mm polyurethane foam, pre-cut to the shape of the back. The foam roller framing the back is upholstered with a strip of furniture fabric. Lastly, we install and nail (staple No. 10 into the line under the edging) an insert of companion furniture fabric made with edging along the contour (you can sew in a clothesline). The edging is needed to hide the staples. The back surface of the back can be covered with spunbond or calico. To simplify the design, you can do without rollers and inserts, just cover the plywood with 10 - 20 mm foam rubber. and upholster with furniture fabric.
Assembling the sofa
— Installation of the reclining backrest – install the reclining backrest in the “sleeping” position, aligning it with the side bars of the box and the end of the roll-out seat, fasten the card loops to the end board of the box with 32 mm SHSGD self-tapping screws. (8 pieces for 2 loops). — Installation of the main backrest - to the frame is carried out with bolts M 8 x 85 (+ washers d. 8 with an increased field, 2 pcs. per bolt). Before installation, it is necessary to install bars 30 x 60 x 200 to the back wall of the box (or to the main back - as it suits you), securing them with self-tapping screws (drill holes for the bolt in the bars along the existing ones). These bars are necessary to distance the main back from the box and the roll-out seat, so as not to have a braking effect with the plane of the back relative to the roll-out seat during transformation.
Popular materials:
- Making decor for the armrest
- Sofa reupholstery in photographs
- How to make a corner sofa with your own hands
You can leave your comments and questions in the Guest Book
Preparing the necessary materials
So, before you start working on furniture, draw a rough sketch of the sofa for yourself on a piece of paper. Remember that the simpler the shape, the easier it will be to make. Therefore, try to simplify the furniture as much as possible, especially if this is your first time dealing with such an activity. In addition to the sketch, you will need:
Figure 2. To ensure that the foam rubber does not lose its softness, you only need to apply glue along the edges of the pattern.
- a simple pencil;
- ruler or tape measure;
- sharp construction knife;
- upholstery fabric;
- foam;
- good glue;
- furniture stapler and needle and thread;
- thick cardboard.
Pay special attention to cardboard and glue. Please note that it is advisable to use pieces of cardboard of equal thickness (at least 1 cm). Then the load on the furniture will be uniform. It is better to use silicate glue or even superglue. You can also use regular PVA, but then you will have to press the parts together for a long time until they set well.
Related article: DIY high chair: step-by-step instructions
Return to contents