Materials
Having prepared a list of necessary materials, I went to a construction supermarket and a lumber warehouse. The shopping list looks like this:
- two longitudinal cuts each measuring 40 x 4 x 200 cm. Total area 1.6 m2;
- steel corner 40 x 40 x 6000 mm – 2 pcs.;
- glass 40 x 1 x 200 cm – 1 pc.;
- tint film for glass 40 x 200 cm;
- screws 40 mm – 20 pcs.;
- metal paint – 1 can;
- furniture varnish PF 170 – 0.5 l;
- emery grinding wheels – 4 pcs.;
- BF 2 glue in a tube – 1 pc.;
- metal cutting circle – 1 pc.;
- electrodes for welding – 6 pcs.;
I placed all the tools and materials in the workshop. I have previously compiled instructions for assembling a table from sawn wood with my own hands.
Step-by-step instructions for assembling a table from sawn wood with your own hands
- I cut the steel angle into pieces using an angle machine:
- 70 cm – 8 pcs.;
- 180 cm – 2 pcs.;
- 100 cm – 2 pcs.
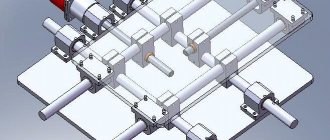
- I folded the 72 cm long corner pieces in pairs to form a box-shaped section.
- Using electric welding in 300 mm increments, I connected the corners into a single structure. The results were table legs.
- I welded a rectangular frame from angles 1800 mm and 1000 mm long.
- I welded legs into the corners of the frame (see below for the assembly diagram of the supporting structure).
- At the ends of the legs I welded thrust bearings from a steel strip 70 x 70 mm.
- All welds were sanded with an abrasive wheel.
- In the horizontal shelf of the frame, I drilled ø 4 mm holes in increments of 300 mm along the entire perimeter of the frame.
- The support structure was painted with gray paint from an aerosol can.
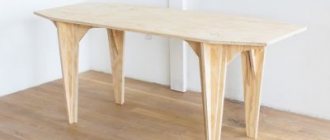
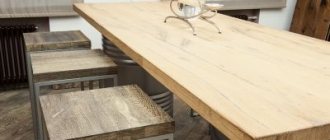
- Having laid the saw cuts on the frame, I secured them with screws through the mounting holes in the frame.
- On a milling machine, I started making grooves 10 mm deep and 10 mm wide in the opposite sides of the cuts for inserting glass.
- Using a chisel I smoothed out the unevenness in the grooves.
- I sawed off all the irregularities along the outer perimeter.
- He turned the table over and placed sheets of paper under it upside down.
- With a pencil, I outlined the boundaries of the opening between the boards of the table top, and received a template for inserting glass, taking into account the margin for inserting into the wood groove.
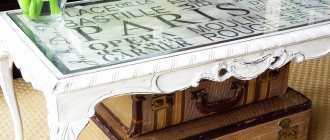
- I entrusted the production of the glass insert to a master glass cutter. Using my template, the craftsman cut out an insert for the table from a strip of glass. I ground off all sharp edges with a special abrasive stone.
- After wetting the back of the glass with water, I pressed the blue tint film. Carefully ironing the insert with a rag, I squeezed out air bubbles from under the film.
- I sanded the cuts on top with an emery wheel of a grinder.
- In order to avoid resin discharge and create a smooth table surface, I covered the cuts with furniture varnish in two layers. I did not fill out small cracks with epoxy material as the varnish reliably covered these flaws.
- Having smeared the edges of the glass and the grooves in the cuts with BF 2 glue, I installed the glass insert into the tabletop.
This example of how to make a table from a slab with your own hands allowed us to get an original table that can decorate almost any interior of the room.
He recorded all monetary expenses and time costs in his notebook. At the end of the work, I summed up the results.
How to make slabs from wood?
To make wood slabs with your own hands, it is important to choose the right raw materials. For these purposes, in the spring and summer, trees with a large number of branches, branches and growths that will look impressive when sawed are selected. After choosing the appropriate option, you need to decide on the cutting method:
- You can take the log to a professional sawmill, where it will be divided into the required number of parts. However, this method involves transporting raw materials, which is not always possible.
- It is quite possible to cut wood into slabs yourself using a manual sawmill. The power of such a unit is significantly lower than industrial, but for occasional use it is quite enough.
When working independently. You will have to choose from two technologies:
- The classic method involves dividing the log into equal parts, excluding the core. The middle segment is left thicker due to its tendency to crack.
- Dissolving for gluing somewhat contradicts the traditional definition of a slab, but is also used by some craftsmen.
How to dry a wooden slab with your own hands?
After the question of how to make a slab from wood with your own hands has been studied, it is necessary to understand the intricacies of drying the raw materials, because most of the success of the entire production depends on it. Technologically, drying can be carried out:
- naturally;
- in specialized drying chambers.
It is much easier to ensure natural drying using your own efforts. To do this you need:
- Choose a suitable location. It should not be too sunny or damp.
- Build a canopy and stack each piece so that there are always air gaps between them.
- Wood dries out by about 2-2.5 cm per year, so to obtain a piece of medium thickness you need to wait at least two years. The degree of humidity is measured with a special device - a wood moisture meter.
Do-it-yourself wood slab processing
When making slabs from wood with your own hands, the finishing treatment depends on the purpose for which the finished product will be used. You can add special strength and wear resistance using:
- polyurethane varnish;
- epoxy resin;
- specialized oil for working surfaces.
If you need to create products from wood slabs while maintaining a unique structure that can be felt, then it is better to use:
- oils with a high percentage of solids;
- furniture wax
Cost of materials
The costs of materials for making a table from wooden saw cuts with your own hands have been compiled as follows.
- two saw cuts with a total area of 1.6 m2 = 1.6 x 6500 rub. = 10400 rub.;
- steel corner 40 x 40 x 6000 mm – 2 pcs. = 12 m x 116 rubles = 1392 rubles;
- glass 400 x 10 x 2000 mm – 1 pc. = 1.6 m2 x 1200 rub. = 1920 rub.;
- figured cutting of glass insert = 500 RUR;
- tint film for glass 500 x 3000 mm = 150 RUR;
- screws 40 mm – 20 pcs. = 10 rub.;
- metal paint – 1 aerosol can, 520 ml. = 200 rub;
- furniture varnish PF 170 – 1 can, 0.5 l. = 50 rub.;
- BF glue 2 – 1 tube = 66 RUR;
- emery grinding wheels – 4 pcs. in stock;
- metal cutting circle – 1 pc. in stock;
- electrodes for welding – 6 pcs. in stock.
Total costs were: 14,538 rubles.
Labor costs
The number of man-hours spent on how to make a table from wood cuts with your own hands is indicated in the following table.
| № | Work stage | Number of hours |
| 1 | Welding the support structure | 8 |
| 2 | Making a countertop | 4 |
| 3 | Varnish coating | 2 |
| 4 | Installing a glass insert | 1 |
| 4 | Total | 15 |
In its appearance, the tabletop resembles the bed of an African river flowing among the desert sands. If you dimly illuminate the table from below, the table will look especially impressive when the room is lit in the evening.
EPOXY RESIN SHOP
An epoxy resin tabletop is a very impressive piece of furniture! Here we will tell you how to make such a tabletop with your own hands.
To work we will need:
– A room with room temperature (optimally not lower than 22-24 °C), a flat, clean floor and sufficient free space.
– Material for making molds or formwork (plywood, chipboard, low-porous plastic or acrylic).
– A separator so that the resin does not stick to the mold and the finished product can be removed (you can buy release wax in this section) and regular silicone sealant so that the resin does not flow out of the mold through the cracks.
– At least two containers for mixing resin and hardener. This is not an error, just two; below we will describe in more detail why. You will also need measuring containers or scales.
– A screwdriver mixer or other mixing device.
– Epoxy resin and hardener (you can buy resin for countertops in this section).
– Additives: dyes, phosphors, marble chips or quartz chips, stones and other decorative elements.
So let's get to work. Correct sequence of actions:
1. First, read the instructions. This link contains instructions for Epoxy River resin, one of the most popular resins for countertops.
2. Make a mold or formwork. To do this, they often use plywood treated with release wax, or covered with thick polyethylene (or even simply covered with thick tape). When making formwork for pouring, pay close attention to its tightness. Even the slightest crack will cause all the resin to leak out. Regular silicone sealant works well for sealing thin cracks. By the way, the video above describes how you can do without making full formwork. It is very comfortable, we recommend it!
3. Place decorative structural elements into the mold (most often slabs or transverse round cuts are used), “try on” them and, if necessary, trim the edges.
4. Carefully level the mold.
5. Prepare the first thin (literally 1-2mm) layer of resin to lay and glue all decorative elements onto it. This is necessary so that the tree does not float (resin is denser and heavier than wood). You can do it differently: press the tree using weights or clamps.
6. After pouring the first thin layer and placing objects on it, let it harden. The break between layers is at least 3-5 hours. Then you can pour the second and subsequent layers with a thickness of 15-50 mm, depending on what resin you have chosen.
7. After the pouring is completed and the resin has completely cured, you need to decide on the finishing treatment. In some cases, if the surface turns out perfect the first time, you can let the resin gain strength and hardness (this takes 2-4 days) and finish the job (unless you still have to process the edges). If the surface requires grinding, then it should be done with a gradual decrease in grain size to 800-1000. After sanding, you can coat the surface with a fresh coat of resin or high-quality varnish (HS), this restores gloss and transparency much easier than polishing the resin to a mirror finish.
Important points:
– Failure to take breaks between layers will affect the quality of your product. During hardening, the resin will heat up, and the greater the mass of the resin, the greater the heating. If overheated, the product may turn yellow or even lose its original shape (“bend”).
– Primary curing of the solution takes 4-7 hours, complete curing – 1-2 days, depending on temperature conditions, the total mass of the mixture and other conditions.
– You can remove the product after 24 hours, grind and polish it after 1-2 days. If the countertop contains a lot of resin itself and few embedded elements (for example, wood), it is better to increase this period to 2 days so that the resin gains sufficient strength and does not sag under its own weight.
And finally!
Since you have read this article to the end, we recommend that you order a free sample from this page. Back to the directory To the “Decorative resins” section To the “Manuals” section