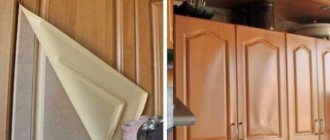
Cabinet hanging mechanisms
Initially, furniture was mounted on the wall using nails or screws. The disadvantage of fasteners is their fragility and fragility. The cabinet could collapse at any moment. This is especially dangerous for glass doors on modern headsets. But such canopies are still used today.
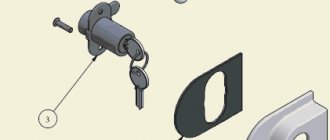
Classic hinges
This is a pendant in the form of metal plates 1.5-2 mm thick. They are attached directly to the wall using a regular or L-shaped self-tapping screw (crutch) screwed into a dowel.
There are several types of loops available:
- Simple pendants differ in the location of the mounting hole: at the top and in the center. The most aesthetically pleasing devices are those with a pear-shaped groove in the middle. They are not visible after installation. But this complicates the installation: when hanging a cabinet, you have to aim for a long time to get onto the suspension. Attached to vertical racks, designed for cabinets with a small load. When the groove is located at the top, it is easier to install furniture. The number of holes for self-tapping screws can reach 5, versus 2 for hinges with central fastening. They can withstand furniture with greater load. Screw to the sides of the cabinet.
- The corner canopy is non-adjustable - bolted to the top shelf of the box and to the wall. There are no installation problems, but the suspension is visible from both sides. The shape allows the cabinet to be hung close to the wall or moved away.
- P-shaped - screwed onto the box with self-tapping screws in 2 places: the upper horizon and the vertical post. This allows you to strengthen the structure through screeding. The time required to draw markings is reduced, since the horizontal position of the cabinet can be adjusted.
It is impossible to combine aesthetics and ease of installation of furniture hinges. Either they attach easily and stick out on the wall, or they are not visible, making them difficult to hang.
Mounting strip
Modern suspensions are easy to attach and easily move in the horizontal and vertical plane. The adjustment block is attached to the side panel of the cabinet through 2 through holes. There are mechanisms designed for different capacities. The maximum load on weak suspensions is 35 kg, on reinforced ones - 130. A fixing hook comes out of the block. To attach it, you need a strip that is mounted directly to the wall.
Advantages of adjustable hangers:
- a single strip on which the cabinet is supported is more reliable than a point fastening with screws;
- Possibility of hanging alone;
- adjusting the cabinet relative to the wall and floor;
- no strict requirements for marking - an error of 1.5 cm is allowed;
- Possibility of attaching to a kitchen apron.
Types of fastenings and their features
After choosing the height for mounting the cabinets, you should decide on the type of fastening. It can be different: corners, pendants and tires.
Corners or pendants
Previously, special metal hangers were used when installing cabinets. They were attached to the rear ends of the module walls. Today, such devices are no longer used, as they have quite a few disadvantages. For example, the inability to adjust the position of cabinets after installation on the wall. And how evenly they will hang depends only on the accuracy of the markings on the wall.
Corners are almost the same as pendants, only they are attached to the roof of the cabinet. When using them, it is important to determine the upper limit at which they will be set. You must strictly adhere to one horizontal line, otherwise the wall cabinets will be installed unevenly.
Installation on corners or pendants is a rather labor-intensive process (compared to a tire) and requires perfect precision. If there is a mistake, you may need to make new holes in the wall.
If the walls were not leveled during the kitchen renovation, then fixing them to the corners will be the best option. An outdated method does not mean it is bad, you just have to spend a little more time on installation than when using other types of fasteners.
Tire (bar)
A mounting rail or strip for hanging cabinets is much more convenient and saves time. This kind of work can be done even alone, which cannot be said about installing it on corners.
The fastening consists of two elements - adjustable canopies and a special strip. The canopy is installed inside the cabinet, in the back wall of which you need to make a hole. A rail is attached to the wall, onto which the module is subsequently hung.
This type of fastening has its advantages:
- Self-installation. You can handle the installation of wall cabinets yourself by first fixing a plank to the wall, and then installing modules on it.
- Possibility of adjusting the position of the cabinet. In this case, there is no need to remove furniture from the wall; all the work can be done under the canopy.
- Reliability. Unlike mounting on corners, the option with a bar is considered more reliable and capable of withstanding high loads. Even if a couple of screws in the structure become loose, the rest will hold the modules well.
Hanging height
Consider the distance from the countertop to the bottom of the cabinet. Minimum – 45 cm, average – 90 cm. At a height of 110 cm, hang only one shelf.
You can also use the formula:
H=h1+h2+h3-45mm, where the letters are the height:
- H – from the lower stop (table top, floor) to the bar;
- h1 – furniture above which the box is hung;
- h2 – kitchen apron;
- h3 – wall cabinets.
Subtract 45 mm from the resulting sum of all heights - this is the standard indicator of suspension shrinkage.
Focus on the height of people who most often use things from the closet. The optimal distance would be when a person reaches with an outstretched arm to the top shelf and takes the item without the risk of dropping it. But also leave enough space above the countertop.
Standard parameters of a kitchen set
Expert opinion
Bashir Rabadanov
Technologist at the furniture company Woodband
If it is necessary to hang over tall equipment, place the lower part of the cabinet in close proximity to their upper limits, almost close to the ceiling. This applies to refrigerators and ovens.
Find out more about hanging heights for kitchen furniture.
Other types of furniture hinges
Card, piano, and hinge hinges are rarely used for installing cabinet doors. They do not have three-level adjustment and do not lock the door in the open and closed position. An additional fastener is needed. Today they are more often used as an additional decorative element. For example, antique.
Mezzanine
For installation of horizontal overhead panels that open upwards.
Mezzanine
Secretaries
Used for hanging downward opening facades.
Secretary room
We have learned in our practice how proper installation and adjustment of hinges affects the operation of the cabinet as a whole. Some time after assembly, the door of the wardrobe or kitchen cabinet stopped closing - the upper part of the door rested on the frame.
To correct the misalignment and use the cabinet normally, I had to readjust all the hinges. Therefore, during installation, it is advisable to prevent any deviations; any gap can lead to deformation of the entire cabinet structure.
Step-by-step installation instructions
Attaching hangers and cabinets requires no preparation. When hanging on furniture hinges, you will have to practice your accuracy. In the case of mounting on a bar, everything happens easier and faster. Below are detailed installation instructions.
Tools
For installation you will need:
- level – preferably for the entire length of the cabinet;
- pencil;
- knife;
- roulette;
- hammer;
- hammer drill or drill - when hanging on a concrete or brick wall;
- screwdriver;
- screwdriver;
- when installing several cabinets, clamps are needed - clamps that allow you to create the appearance of a monolithic structure.
Already at the stage of collecting tools, think about which awnings to purchase. If you purchased a ready-made cabinet and a complete set of fasteners, then there will be no problems. When purchasing spare parts for hidden installation, check the presence of all bolts, screws, mechanisms, and plugs.
Preparatory work
Before installing suspended structures, calculate the height and draw boundaries. Draw a line along the level with a pencil. Installation of the DIN rail and wiring must be completed so that you do not have to remove the cabinet and redo the entire design.
Align the walls as much as possible at the fastening points, even if you plan to install the box on a plank. When installing furniture at an angle, it should be 90 degrees. Paint the walls, wallpaper or install an apron. After installing the cabinet, it is difficult to perform these operations.
Installation of awnings
The process is the following algorithm of actions:
- Markings for system installation. On the inside of the cabinet, measure 1.3 cm from the side panels and 2.5 cm from the top.
- Drilling with a drill or screwdriver with a pen attachment with a diameter of 25 mm.
- Cleaning chipboard from chips.
- Trying on the suspension - the fixing hook should be located in the center of the opening. This makes it possible to adjust the position of the cabinet.
The final stage is screwing the screws. Before attaching the hanger, check the alignment of the holes in the decorative plug and the side walls of the cabinet. First lean and screw, then screw. This is necessary so as not to damage the furniture.
Metal guide fastener
The material of the wall determines what you need to attach the plank to:
- a self-tapping screw screwed into a dowel - onto aerated concrete and into a foam block;
- screws with a diameter of 5-6 mm - into wood;
- anchor bolts – for brick, concrete.
The profile length varies. There are planks around 19 inches or 50 cm, but most manufacturers produce 2 or 3 meter products. Each tire is cut at a certain distance. They can be easily broken by hand without using a hacksaw if the guide is longer than the cabinet.
After choosing the fastening tool, attach the strip to the drawn line. Using a drill, hammer drill or screwdriver with an appropriate attachment, drill holes in the wall through the prepared holes in the profile. It is enough to make indentations at intervals of 10-30 cm. There is no need to attach screws every 1.5-2 cm.
Where to begin
- Assess the correct installation of furniture. If it is skewed (uneven floors, differences in the height of its legs), then adjusting the cabinet doors may not help. Therefore, it is necessary to eliminate this shortcoming. Controlling the position of furniture is best done using a building level or plumb line; It is quite difficult to visually determine deviations from the vertical, especially minor ones.
- Inspect the awnings. This is necessary, firstly, to determine their type (the methodology for further work largely depends on this), and secondly, their condition. If the fasteners are loosened, adjustment will not be necessary; You just need to tighten the fasteners more tightly.
- Determine the type of regulation. It depends on how curved the cabinet facade is, where there are large and small gaps between its doors, in which area the fabric catches, and so on. Then it will become clear how exactly it should be adjusted: in height, depth or width.
Installation of cabinets
Lift the box and hook it onto the guide. Use the adjusting screws to secure the desired position. Use the top bolt to level the cabinet horizontally, and use the bottom bolt to reduce or increase the distance from the wall.
To assemble several cabinets into a monolithic structure, you will need clamps. Drill holes for the tie in the places where the clamps are installed. The chipboard can be damaged during this process, so use a smaller drill bit first. On both sides, expand the holes with a nozzle of the desired size, then make a through hole. Another way to avoid damage is to lean a wooden block against the side opposite the drill and press it as tightly as possible with your hand.
Start installation with a corner cabinet. Connect the boxes in pairs with clamps. To maintain the quality of the surface, place a wooden wedge between the clamp and the wall of the box. All that remains is to hang the doors.
When using a sliding system, we recommend that you read the article: “Adjusting wardrobe doors.”
Installing hinges on glass doors
The installation principle is the same as for wooden doors.
Four-hinged hinges for glass doors are distinguished by the presence of a special tab for attaching the cup and a cover for masking the device from the outside.
If you have no experience working with glass, it is better to turn to specialists to drill holes. Before this, you need to establish preliminary markings of the locations of the loop cups. At the same time, they also take into account the hole where the handle will be hung.
Overhead hinges are also used for glass doors, which can be hung without drilling glass.
You need to place and secure the cup in the drilled holes using a tab, and attach the counter plate to the box with self-tapping screws. Afterwards the door is aligned along three planes.
For glass doors, overhead hinges are also used, which can be hung and fastened without drilling the glass. They are mounted inside the box; accordingly, all shelves in the closet must be recessed inward. Suitable for light sashes only. For example, for the bookcase department.
Features of hanging on drywall
The low strength of gypsum boards often leads to the cabinet falling to the floor. To prevent possible breakage of awnings, professional kitchen assemblers use 3 main fastening methods:
- Self-tapping screws with a large pitch and a wide head, impregnated with phosphates, expansion anchors. Ordinary screws, nails, bolts will immediately begin to put pressure on the drywall, and it may not withstand this load.
- Embedded beam - used at the stage of major repairs (during the installation of plasterboard sheets). The block is installed in a metal profile, which serves as a frame for drywall. The method is highly reliable. The disadvantage is the need to immediately allocate space for cabinets, or to adjust to the beam in the wall.
- Adjustable hangers using a metal strip. The most modern and popular fastening method.
For heavy cabinets, it is better to choose a place with a stronger wall. The maximum load on one self-tapping screw is 25 kg, the anchor is 35 kg.
Read on for other ways to attach cabinets to drywall.
Attaching awnings to upper kitchen drawers
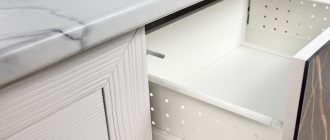
Today we will look at the installation of adjustable awnings in the upper boxes.
After such a box is assembled (before putting the back wall on it), you also need to attach fittings to it for attaching to the wall.
READ How to install multiplayer for euro truck simulator 2 official website
It is attached as follows:
We install the canopy so that there is a gap of 5 millimeters between it and the rear edge of the module (otherwise, problems may arise with pulling the hung module close to the wall).
Usually, I make the dimensions of these openings 50mm in height and 30mm in width.
After the openings are cut, the back wall is installed on the box and attached to it with nails (if desired, you can also secure it with self-tapping screws, although I think this is unnecessary).
Good afternoon. Tell me, how much weight can these mounts support? Wardrobe 1200*300*600(W*D*H). The wall is plasterboard. I secured the mounting strip at 5 points using drywall dowels. The cabinet was hung on 3 hangers. And then I was puzzled - how reliable is this mounting option?
It is necessary to secure the mounting strip with anchors through the drywall to the wall itself. In your case, the mounting option is extremely unreliable.
Unfortunately, it is almost impossible to anchor it to the wall - the house is a country house, frame. From the main frame to the drywall there is about 20 cm of insulation. And the owners of the house will no longer remember where the intermediate racks are located under the drywall. It’s also impossible to tell by the joints of the sheets - everything is plastered and wallpaper is pasted. But thanks anyway, I'll think about it...
Then you need to cut out the plasterboard at the attachment point, and anchor the mortgages to the wall itself - beams of appropriate sizes.
There are devices that find metal in walls, as well as cavities and electrical wiring. I ordered on Aliexpress, they are inexpensive, for example, I have UNI-T UT387B. They can easily find metal profiles and even timber embeds behind drywall (using ultrasound).
Mikhail, the hinges are installed the same way as on regular top boxes - on the sides. You just need to use the hinges at 45 degrees.
Dmitry, you write about hinges, but I asked about awnings. Everything is clear with the hinges, but where to attach the canopies in the corner of the box on the bar, if the rear corner of the module is “cut off” as in your example, that is, the bar is not perpendicular to the walls in the corner?
Mikhail, sorry, I misunderstood... Canopies are also installed on the sides of the corner box. It turns out that two canopies are installed. The corner box itself is aligned in space with the help of adjacent modules to which it is attached. The location of the canopies is shown here: https://www.sdmeb.ru/kuxni/nyuansy-pri-sborke-verxnix-kuxonnyx-korobov.html
Hello! But still. What is the maximum weight that the canopy can support? I’m very interested in this information... I couldn’t find it on the Internet...
Oleg, I wasn’t interested in this particular question, but while installing the kitchen, I conducted an experiment to see whether the upper corner base could withstand my weight (95 kg) - it could!
Hello! I also have a question about the weight that adjustable awnings can support, but I'll phrase it differently. I have no doubt that the canopy itself is designed for a decent load, but I have doubts about the reliability of attaching the canopy itself to the box with two self-tapping screws. If the box is heavy, and the thickness of the side of the box, for example, is only 16 mm, then the side itself may not be able to withstand it (it will tear out the screws under the weight of the box). In this regard, a question: please tell me, based on your practice, what are the maximum dimensions permissible for designing upper kitchen modules? In particular, is a façade height of 900 mm, a width of 800 mm and a depth of 300 mm acceptable?
Alexey, yes, the height of the upper modules is both 900 mm and 1200 mm. Simply, on boxes whose height is greater than 800 mm, you need to attach the facade to three canopies. Naturally, the width of the facade should be comparable to its height, so that there are no loads that are prohibitive for canopies.
READ Afpl ghostscript xnview how to install
When the height of the facade is 900 mm and the width is 800 mm (as in your example), this is not acceptable. Such a facade will not only be too heavy. Due to its width (800 mm), during operation it will create a large torque that will quickly damage any hinges.
Yes, by the way, the hinge from the body of the laminated chipboard (that part of it with which it is attached to the side of the frame by a mounting strip) is most often pulled out not by the weight of the facade, but by incorrect adjustment of the hinge.
In other words, if, after hanging the facade, you do not adjust the hinges in such a way as to remove the residual tension from them, in this case they will definitely tear out. If the façade is adjusted, then with two self-tapping screws (as you write), such hinges work for many years.
Thank you very much. I was mistaken, I did not mean a facade width of 800 mm, but a box width of 800 mm with a facade height of 900 mm. And in order to secure a box more than 800 mm wide on three canopies, you need to make an additional partition in the middle of the box, do I understand correctly? In this case, wouldn’t it be better to make two 400 mm boxes, their rigidity will be higher?
Yes, Alexey, it’s better to make two boxes, but only a little more sheet material will be needed for two boxes...
Dmitry, tell me which hinges are in degrees, how to guess or calculate. I have the same corner module as yours but a slightly non-standard bottom size on one side 300 mm and on the other 200 mm, continuation of the modules in depth 200 and on the other side 300
Denis It is better to immediately design corner modules for standard angles (30, 45, 90). Otherwise, you are simply “complicating your life.” You can find out the value of the required angles using trigonometry.
Dmitry, I understand you, I absolutely agree with you. But I had a nuance and had to do this, and unfortunately the modules have already been assembled. I still can’t figure out how to measure the angle of the loop. If you, Dmitry, could suggest a simple way to do this, I would be very grateful to you.
Denis Hinge angles are not measured; they are already sold with certain values. And to adjust a certain loop to the desired degree, special spacers are used that are installed under the striker.
Source