DIY plasterboard shelves often have an unusual appearance and can accommodate a large number of different items. Thus, even equipment can be installed on a rack with additional metal reinforcement. In order to make a structure with your own hands, you first have to decide on its shape, then purchase all the materials. Of course, such work requires certain skills, so it is better for beginners to choose the simplest shelf option or turn to specialists. Below we will tell you how to do this work yourself.
DIY plasterboard shelves
Advantages and disadvantages of drywall
Drywall is classified as a universal material that has various purposes - ceilings, niches, and all kinds of shaped structures are made from it. This popularity is due to the following advantages:
- GCR is easy to process; structures of any shape can be cut from it.
- Drywall is a lightweight material. Of course, when transporting solid sheets, they may seem too heavy. However, the finished shelves are weightless. In addition, the profile frame will also not weigh down the structure. It turns out that even a large shelf does not overload the load-bearing wall.
- Upon completion of all work, the plasterboard shelves are finished - at this stage you can give them an unusual design, thanks to which they will look harmonious in any interior.
- Even over time, such structures do not deform and retain their original appearance for a long time.
- The cost of such material is significantly lower compared to natural wood, plastic or furniture panels.
- It is not necessary to use solid sheets to make shelves - pieces of gypsum plasterboard that may have remained after installing the floors will also work.
Plasterboard construction can also be durable
Despite the large number of advantages of this material, some of its disadvantages should be highlighted:
- fragility;
- the appearance of deflections under the influence of a large load;
- poor resistance to moisture.
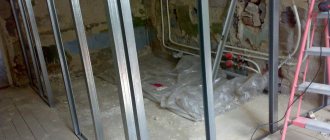
Installation of a steel profile frame
The frame must withstand not only the weight of the finishing material, but also the weight of the objects that will stand on it. This must be taken into account when mounting it on the wall.
Related article: How to wash tulle to make it white
The frame for the shelf in the hall is installed in the following order:
Scheme of assembling the frame by installing a galvanized profile under plasterboard.
- Lines for placing load-bearing profiles are drawn on the wall (floor, ceiling).
- Load-bearing elements of the required length are measured and sawed off. Holes for fastening are drilled in them every 25-35 cm.
- The load-bearing profile is applied to the load-bearing and supporting surfaces, and places for dowels are marked.
- Holes are drilled into which dowels are inserted.
- The supporting profile is attached to the wall (floor, ceiling).
- The frame structure is assembled from the CD profile, side and T-shaped connectors. The parts are fastened to each other using special metal screws.
Upon completion of installation, the strength of the frame is checked by pressing on it from different sides. If the structure meets the strength requirements, then electrical wiring is installed inside it in a special protective box.
Types of plasterboard shelves
There are several main parameters by which such designs differ. Before choosing one option or another, you should familiarize yourself with them.
Table No. 1. Types of gypsum plasterboard shelves
| View | Description |
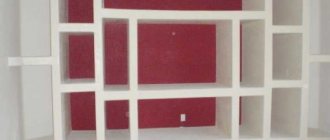
| Open | Such shelves mainly have a decorative appearance; they are placed to display various souvenirs, cups, photographs and other decorations. |
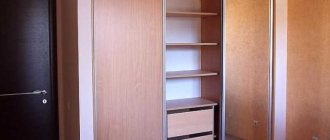
| Closed | These are already more functional shelves, so they are often made deep to accommodate many items. |
Open shelves
Table No. 2. Types of shelves by type of placement
| Accommodation | Description |
| Central | In the center of the room, a large structure consisting of many shelves is most often installed. This option will best fit into the interior of the living room. |
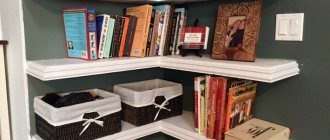
| Angular | Such plasterboard structures will fit perfectly into the interior of a small room. Moreover, they are not only decoration, but also perform a functional task. Quite often, a bookcase is placed in the corner. |
Position of shelves in the corner
In this case, any plasterboard structures can be designed as follows:
- With backlight. Light bulbs are often built into various shelves and niches. Their exact number will depend on the size of the structure. Otherwise, this design allows you to highlight various items on the shelves, which is especially important for dark rooms.
- No backlight. This is a standard design and is quite easy to install.
LED lamps are often used for lighting
Shelves made of gypsum plasterboard are:
- decorative - usually these are very light structures that are not intended for heavy loads;
- functional - such shelves can withstand heavy loads (for example, books can be placed on them in several rows, so this design requires preliminary installation of the frame).
An unusual version of plasterboard shelves
Video - Shelves made of gypsum plasterboard: original ideas
The sequence of making shelves with your own hands
In order to bring interesting ideas to life in the design and organization of space, you need to decide on a sketch, choose the right material and understand the process. There are step-by-step instructions that allow you to make plasterboard shelves with your own hands quickly and efficiently.
Design and sketching
In construction, most projects begin with the formation of a sketch and its design on the surface. The mental representation of the future product and the drawing on paper are often different. By drawing the design, you can eliminate all errors or inconsistencies.
When creating a sketch, take into account the size of the surface to be placed, the purpose and location. In this case, it is necessary to take into account all angles and irregularities. If this is a functional shelf, ways are sought to additionally strengthen the profile, which will bear the entire load, or use 12.5 mm wide plasterboard. For decorative shelving, a ceiling or arched sheet is suitable, which has a width of 9.5 and 6.5 mm, respectively.
Measurements are taken of the parts that are planned to be placed on the structure. For example, they take into account the dimensions of books or a TV so that these items fit easily without leaving too much free space.
Required materials and tools
In order for the installation process to go smoothly and without hitches, it is necessary to decide on the tools and materials that may be needed during work. To do this, you need to take into account the purpose of the homemade shelf and its size.
For the kitchen and bathroom you need to choose moisture-resistant gypsum boards. Missing inventory can be purchased or borrowed.
Basic tools required for fastening:
- screwdriver;
- construction knife;
- pencil;
- level;
- ruler or tape measure;
- hammer, pliers, metal scissors;
- hammer drill
Materials for the product:
- plasterboard sheets;
- metal profile;
- frame hangers;
- dowel-nails, self-tapping screws or liquid nails.
Determining dimensions and connecting points
In order for the final result to take on a harmonious appearance, it is necessary to make preliminary calculations. In accordance with the sketch and the allocated space for the shelf, the parameters of each vertical and horizontal part, as well as the depth of the rack, are calculated.
For convenience, it is worth drawing a sketch in the required dimensions on the wall. This will allow for additional adjustments. In addition, this will simplify the process of cutting the frame.
Creating a wireframe
Creating a frame is the main stage during installation. First, the slats are attached from the metal profile. Then they are covered with plasterboard. Therefore, the appearance of the future structure depends on this stage.
The frame is constructed in two ways. Thanks to the first one, you can make shelves in the wall. The shelving is designed together with the wall before covering it. This way the frame is created internally. The result is niches that look like holes in the wall. The second option is to install the frame separately from the wall. In both cases, the necessary structural strength is taken into account and ensured.
Cutting sheets to size
The gypsum board must be cut to the dimensions indicated in the drawing. This must be done carefully, avoiding unevenness. To prevent the edges from crumbling, the tools need to be sharpened and prepared for work. To save material, it is worth cutting the workpieces as compactly as possible.
Attaching drywall sheets to the frame
After installing the frame, you can begin covering it with existing plasterboard blanks. To fasten the gypsum boards, use 3.5 mm self-tapping screws. The installation step is 15-20 cm.
The recommended length of the self-tapping screw is 25 mm, but for beginners it is better to use 35 mm. This will simplify the work for inexperienced people and prevent creases from occurring. Having decided on the tools, they sheathe the frame first from the top and bottom, and then from the sides.
Finish coating of the finished shelf
The final stage is finishing. To cover the finished structure, various materials and methods are used. You can use wallpaper for decorative shelving. They allow you to hide unevenness, cracks and seams, but after frequent cleaning they lose their appearance.
Before painting, you need to prepare the surface: all joints and screw points are puttied. Thanks to putty, all unevenness is smoothed out. Painting corners are attached to the edges using cement mortar. After complete drying, the surface must be sanded using sandpaper. This will give the shelf a smooth finish and prepare it for painting.
The coating is applied in one layer or in several. You can create stains or beautiful drawings, which will make the interior element unusual and bright.
In what rooms are plasterboard shelves installed?
Universal gypsum plasterboard shelves can be installed in any type of room:
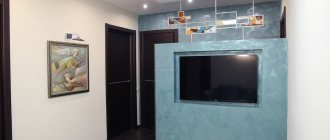
- in the living room - most often, shelving is placed along the entire wall, because in such niches it is very convenient to install various equipment;
- in the nursery - plasterboard shelving in the child’s room is often installed in order to zone the space, which will make it possible to better separate the sleeping area from the play area (this idea should be taken into account by parents who need to equip a room for two children);
- in the kitchen - usually in the kitchen such shelves are left open, because this way it will be more convenient to use them for their intended purpose (such a structure should be well strengthened from the inside, because the dishes are quite heavy);
- in the bathroom - in a room of this type there are always not enough shelves, and so that they do not take up extra space, it is recommended to make them hanging;
You can read about how to make hanging shelves with your own hands in our article.
- in the corridor - here it is better to install closed shelves, which are useful for storing various items; if necessary, mezzanines can be made;
- in the bedroom - in such a room you can install shelves of any type, first of all, it will depend on the dimensions of the room.
Plasterboard niches in a children's room
Prices for drywall and sheet materials
Drywall and sheet materials
Properties of plasterboard sheet
A plasterboard sheet is a product consisting of two strips of thick mounting paper and a solid gypsum-based plasticizer between them. GCR has many unique features.
So, it has the following advantages:
- environmental Safety;
- flexibility allowing the creation of curved structures;
- affordable price;
- ease of processing and installation;
- no thermal expansion;
- water resistance after appropriate treatment;
- non-flammability;
- possibility of equipping with lamps of various types;
- strength to withstand significant loads.
By installing plasterboard shelves in the hall, you can not only decorate it, but also hide some defects and unevenness on the wall.
What materials can it be made from?
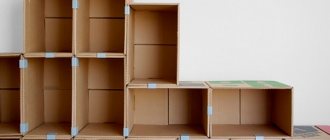
From a large number of different materials, you can choose the one that suits your personal preferences and financial capabilities. Among the materials in demand: profiles, slats, laminate, metal, wood, even cardboard.
Plywood
Plywood is no less popular, from which you can build a convenient and practical bookcase. This type of shelves is attached to the wall, taking up a minimum of space, saving free space in the room. The plywood must be cut into even rectangular pieces, for example, 20x30 cm. The blanks are sanded, and then the assembly of the parts begins. The sheets need to be formed into U-shaped structures and placed inside each other.
In the hallway you can hang any required number of blocks.
The shelf is attached using wooden pins, as well as pre-prepared holes in the plywood. As a result, the product will look approximately like this:
You can make a shoe rack from chipboard. Here it is advisable to make narrow or angular models, with straight or rounded ends.
The process is quite simple and looks like this:
- The side parts are determined and cut out.
- Sharp elements are removed using sandpaper or a grinding machine.
The process of sanding chipboard boards on a homemade machine. The edges are covered with a special tape and burned with a hot iron.
Making the edge of a chipboard board with a hot iron
- Excess parts of the tape are cut off.
- The corners are processed with fine sandpaper.
- Holes are made and the shelf is assembled.
- plane;
- hammer;
- paper (machine) for sanding;
- screwdriver;
- saw;
- pencil or tape measure.
Drilling holes in the chipboard
This is a very economical and simple option for making a shelf, since the cost of chipboard is very low.
Tree
Wood is considered the most convenient to process, does not emit toxic substances and is considered absolutely safe.
Wood is the easiest to work with, as it lends itself to various processing processes, and it is not difficult to find. A variety of tools are used to process the material:
Tools needed for woodworking
Frame assembly
According to the drawn up drawing, it is necessary to make markings. Fastenings of guide profiles are indicated on the walls, ceiling and floor. They start marking from the ceiling, transferring the lines to the floor using a plumb line. This will allow you to maintain the entire niche in a single plane. The dimensions of the future recess are indicated on the wall.
Profiles are mounted:
- The guides are attached with dowels in increments of 35–40 cm. First, damper tape is glued to their back sides adjacent to the ceiling.
- Having installed the guides on the floor, ceiling and walls, install vertical racks. The profiles are cut so that they are slightly smaller than the nominal size, inserted into the guides and secured with “bugs”. The correct installation of each rack is checked using a level.
- Horizontal jumpers are being installed. They form the internal space of the future niche and give rigidity to the entire structure. Drywall fragments will also be joined on the lintels.
If you plan to equip a niche with shelves, then the lintels should be positioned according to the distance between them. The lower plane of the recess, on which household appliances will be installed, should be additionally reinforced with a profile.
A niche may have curved planes. Then to install the frame you will need a special arched profile.
You can also cut the sides on the guide at certain intervals, as shown in the photo. The smaller the bend radius, the more often the cuts are made. The profile processed in this way can be easily bent to the required angle.
USEFUL INFORMATION: Using moisture-resistant drywall in the bathroom
Surface finishing
To ensure that the surface of the shelf is smooth and durable, it is finished.
It consists of the following:
Scheme for filling drywall joints.
- The entire surface is treated with a liquid primer.
- Holes from screw heads and joints between individual parts are sealed with starting putty.
- The edges and corners are covered with plastic or aluminum corners. A reinforcing mesh is glued over the joints between individual gypsum plasterboard fragments.
- Finishing putty is applied to the entire surface. Allow at least a day for it to dry completely.
- Grinding and polishing are carried out using fine-grained sandpaper.
- A liquid primer is applied to the treated surface.
Related article: How to insulate a wooden entrance door with your own hands (photos and videos)
The finishing touches are complete, you can move on to decoration.
Summarizing
If you still have any questions about installing a corner shelf, we recommend taking a look at the video in this article posted on our website. We are confident that it will help you find answers to your questions.
This is especially necessary when the shelf serves as an interior partition or is mounted on a wall behind which noisy neighbors live. If more powerful sound insulation is required, we recommend filling the cavities with cement mortar - in this case, the plasterboard sheet will turn into permanent formwork. If this is not the case, the shelves should be attached to special zippers - “butterflies” (the picture below shows a clear attachment). You may have add-ons installed in your browser that can make automatic search requests.
In this case, we recommend that you disable them. If automatic requests actually come from your computer, and you know about it (for example, your line of work requires you to send similar requests to Yandex), we recommend using the Yandex.XML service, specially developed for these purposes. An ordinary piece of furniture can become a real hallway decoration if you glue a special film or paper with text printed on the back of the shelf. With this design, it is better to choose a neutral color for the shelf itself. True skateboarding fans always have a few old boards that have fallen into disrepair.
As a last resort, you can turn to fellow hobbyists for help. Multi-colored shelves are great for storing sports shoes. Metal shelves have several advantages over wood.
Metal does not absorb odors. And also due to the fact that metal shelves have a slatted or mesh structure, the shoes will be naturally ventilated. A plastic shelf always has an open appearance, and therefore you can only choose the number of shelves in the rack. In addition, such shelves are often not strong enough structures.
Although their indisputable advantage is their ease and ability to wash. To avoid storing clothes on the sofas of your rooms, you should hang a clothes hanger. One of the best options is a wall hanger, which is mainly used for everyday clothes.
The most convenient way to store keys is to use a key holder. This is a specialized locker with hooks where you hang your keys. It can also be hung on the wall.
Types of shoe shelves
This piece of furniture should be characterized by versatility and compactness, because the hallway usually has a small square area. Shelves for shoes in the hallway can be made in various designs. Among the varieties that you can make with your own hands, the following are popular:
- Models for walls. An ideal option in a small hallway where it is impractical to install a cabinet. It is easy to create such a shelf yourself using wood as a material. If you wish, you can find many photos on the Internet and make the product according to the picture;
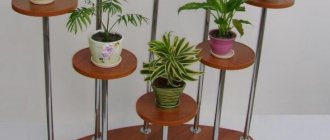
- Shelving. The most successful choice for decorating free space. The upper part of the shelf plays the role of a bench or is used as a stand for various useful items;
- Slim cabinet. Such shelves are practical and convenient, as they hide shoes from prying eyes. To open, the product is turned 45 degrees. You can make any shoe rack in the hallway with your own hands: straight, rounded or angular;
- Stands. The most common type of floor shelves. In production, you can use the usual bottom of a cardboard box, cover it with some material that does not get wet, and add pebbles.
How to make a shoe rack in the hallway, photo collection
The issue of placing shoes in the house remains relevant both in summer and winter. Often the hallway is filled with shoes, especially in the evening, when the whole family has returned home from work or school. To avoid this problem, you can make special shelves for shoes in the hallway, which will help not only decide on the issue of storing things, but also decorate the room. Every housewife knows that such a useful item is necessary in the house, since the durability of shoes depends on both proper care and proper storage, which a well-designed shoe rack in the hallway can provide.