What are the numbers for?
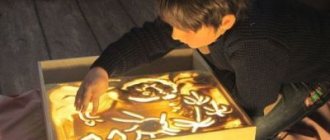
As a rule, figures are made for holidays. They look unusual and cause delight among all guests at home: the baby’s grandparents are especially touched, because the number not only decorates the room, but also eloquently indicates that the baby has become older. The numbers serve as an excellent background for thematic photographs: the baby can pose with numerous relatives or independently.
Numerical figures are made at any event agency , however, parents will save a lot by making such crafts with their own hands. Making them is extremely easy and does not take much time: good imagination and creative skills will help you create paper numbers that will look no worse than store-bought ones. in detail how to do this and what is needed for this in the article.
Felt numbers
The numbers made using this material look very unusual. From felt you can make not only the base, but also decorative elements, for example, animal figures, flowers and other elements.
We will look at numbers from felt using the example of how to make the number 3 with your own hands for a boy’s birthday.
Materials:
- Number pattern;
- Bear template;
- Felt of different colors;
- Thermal gun with rods;
- Needles and threads;
- Thick cardboard.
A number of the required size is cut out of thick cardboard and covered with felt.
Next, decorative elements are made: a teddy bear can be made from felt, but if desired, it can be replaced with a figurine of a cartoon character or any other decorative element.
The decor is attached to the number using hot glue.
Materials for production
If there is a very small baby in the house, and you have not yet got hold of office supplies, we advise you to immediately go to a craft store. Create a note in your phone so you don't forget the tools you need to purchase for a future craft:
- Cardboard The size of the cardboard depends on the size of the figure you are going to make. For a large number of numbers that are planned to be used as props for a photo shoot, it is better to prefer thick A4 cardboard. if you plan to make huge crafts, you will have to be creative and find large boxes of large household appliances. The easiest way to do this is to ask in the store: usually sellers are happy to give away unnecessary product packaging.
- Scissors Take comfortable scissors: when cutting cardboard, they should not rub the areas in contact with the skin.
- Corrugated paper If you don’t yet have a clear idea in your head of what your number should look like, take the colors that most appeal to you in the store. Otherwise, select the material according to your design.
- Twine Buy a couple of skeins of twine if the planned event will be held in a rustic style.
- Construction stapler A stapler will be needed when working with thick cardboard. Without it, creating three-dimensional figures will become almost impossible.
- Glue gun Needed for fastening parts
- Rulers, pencils, erasers Materials are needed for constructing and marking numbers on sheets of cardboard.
- Additional Materials Purchase additional materials as needed. These include: textiles, beads (beads), napkins and colored paper, knitting threads, tinsel.
We make the frame and decorations
Don’t worry, making such a figure is quite simple, quick and beautiful. Here are the materials we will need to create our gift:
- Styrofoam. You need a large polystyrene foam parallelepiped;
- tool for cutting foam with nichrome thread. Without this device, you will not be able to cut the material, but will only ruin it;
- marker or pencil and long ruler;
- glue. Here it is your choice, the main thing is that it firmly glues the foam;
- decorations for numbers.
At this moment we will look at how you can make decorations from napkins and paper. For the decorations, here's what you'll need:
- napkins;
- paper;
- stapler;
- scissors.
People don’t have any particular difficulties on how to make a foam frame. First, set the dimensions. Draw a reduced version of your number on graph paper or in a squared notebook. Then transfer the workpiece to a large scale, increasing it to the intended size. Cut out the number using a foam cutting tool. The photo shows the number 9:
Related article: Leather jacket will be like new
The decoration itself will of course take more time, but beauty is worth the sacrifice. We take napkins. You can choose their color yourself. We take out a napkin and unfold it. The result is a square. Now fold the napkin in half again 2 times.
Please note that the napkins from the package are folded into an imperfect square, but we need to get a neat and even square. For this result, make sure that the corners match the other corners as closely as possible.
Fold the square like an accordion. We secure it in the very center with a stapler or thread. The edges can be folded with scissors to make our flower look more natural. Now we straighten the decoration. The flower is ready! Look how beautiful it turned out:
Now let's look at how you can make jewelry from corrugated paper. However, corrugated paper can be different: there is hard corrugation, and there is also soft one. Let's consider the option with rigid corrugation for now.
We will need strips that are 50 centimeters long and 3.5 centimeters wide. Important: the veins should be along, not across.
Stretch the strip. It stretches thanks to the veins.
Then we twist our ribbon into a flower. We tie it at the base with either thread or wire. It turns out something like this:
If you want more airy flowers, you can make them with soft corrugated paper. We take the same dimensions - 3.5 * 50 centimeters. Don't forget that the veins should be along, not across. We tie it at the end with thread or wire. The result is more delicate and airy flowers:
In the following photos you can see what wonderful figures parents made for their babies:
These parents managed to do something nice for their children. You can do it too, only even better. The main thing is to apply a little patience, effort and lots and lots of love!
Related article: Weaving from rubber bands: clothes for Barbie and Monster High dolls with video
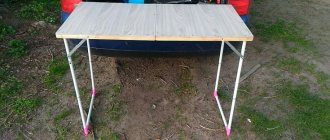
Making a frame of volumetric numbers
There is a big advantage in volumetric figures: a child can play with them and rearrange them to any place in the apartment. At the same time, a high-quality figure will last for more than one year.
Follow the instructions if you want to make a three-dimensional figure:
- Decide on the sizes. Depending on this, choose the material: regular A4 size cardboard or a large refrigerator box.
- On a selected piece of cardboard, draw a number by hand or using a template. Templates are given below.
- Cut out the number . Use scissors or a utility knife for this. If you cut out only one figure, the craft will turn out flat: you can hang it on the wall or make festive skewers as the child ages.
- For a three-dimensional figure, prepare two identical numbers. In addition, cut out strips of cardboard that will serve as a layer between the templates. Determine the width of the stripes depending on the size of the number.
- Attach the two templates and the inner strips using a staple gun, paper tape, or a glue gun.
- Decorate the resulting frame depending on the idea and materials at your disposal.
DIY birthday numbers (updated)
Collection of big numbers for birthday. Verified by Zhenya
I decided to collect all my experience in numbers in this post, as well as the ideas I liked)
Update from 2021)
***
Number 2 for Katyusha ( replenishment of the collection from 06.17.18)
Sewn from felt. Just for variety. I didn’t like sewing numbers from felt. ribbon and cardstock remain my favorites. But Katyusha tormented her as she wanted. and she passed all the tests)). Decorated with roses and beads. You can see how to make roses below. It took time - a couple of evenings for 1.5 hours.
***
Number 6 for Nastya (collection addition from 05/04/18)
I used ribbons again (see detailed description about ribbons below). I also pasted a photo collage onto the figure - 1-2 photos from each year of Nastya’s life. It was a blast! A figure for those who have little time, but a great desire to make a figure) Production time - 1 hour.
***
Number 1 for Katyusha (replenishment of the collection from 06/17/17)
My favorite ribbons and textile flower are minimalism) It’s done quickly! Of course, it could have been a little more careful, but I really wanted to sleep
***
Number 2 made from ribbon and pearls
In order to make such a figure (size approximately 30X40 cm):
1. corrugated cardboard from some box
2. double-sided tape, stapler, scissors
3. about 6-7 meters of satin ribbon 5 cm wide
4. beads of different sizes
5. heat gun or thread with a needle
The whole action took an hour and a half. But due to busyness it was extended for several days. The basis of the figure is cardboard from some old box. I drew a number, cut it out, and made a double one for strength—gluing two cardboard blanks together. Then she covered it with tape, securing the tape with a stapler or double-sided tape - the tape helped a lot in difficult places on the number, where I had to cut the tape and glue it to the base. The ends of the tape were carefully secured with threads.
Then I simply glued on the beads (we sell them in packages (20-30 pieces) - large ones cost 80 rubles, medium ones - 60, small ones 40) using a heat gun. If it’s not there, you can just sew on beads, it won’t take much longer. This is such a beauty) Nastya liked it! Immediately a feeling of celebration appeared)
She also decorated the room with balloons and a garland for the curtains. The garland is also simple - I cut out letters from cardboard and attached them to colored clothespins on a string. I also hung the remains of Nastya’s disassembled metallophone, so that we could also play with our garland). I also cut out the flowers on the curtains by hand from velvet self-adhesive paper - convenient for autumn).
***
Number 3 in a pot
I also decided to make the figure for my third anniversary using tried and tested technology, because I was very busy with the dollhouse
. I just wanted to add a detail - so I “grew” the figure in a flower pot).
So, we need: a flower pot, cardboard, wooden skewers, decorative stones, satin ribbon (I have 0.5 cm and 3.5 cm), a heat gun and about 1 hour of time.
We draw the desired number on the cardboard—in my case it’s 3—and cut it out. For strength, I made 2 parts. We glue wooden skewers to one of them so that later we have something to fix the number in the pot on.
Then we wrap the number with a satin ribbon of the desired color. This year we have both the number and the outfit in soft pastel colors. That's why I chose mint.
We fix the tape in several places using a heat gun, and carefully sew it up at the round ends. Now let's take the pot. I used an old plastic pot. I washed it well and glued the tray to the pot. I fixed a number on the bottom by gluing skewers using a heat gun. Then, for strength, I laid pebbles around the skewers, and on top, for beauty, I placed decorative pebbles from fixed price.
The number itself was decorated with three roses made of satin ribbon. The pot was decorated with a thin white satin ribbon. The result is such a cute little thing)
Roses are also easy to make. Fold the ribbon in half lengthwise.
And then we slowly wrap it and fix it. There are no rules here. I simply laid the ribbon so that it looked like a rose and secured it with thread.
***
Four made of cardboard with daisies
My daughter’s fourth birthday came unexpectedly) More precisely, I kept thinking about what number to make this time, then there was a minimum of time left. And I simply cut out a number from thick cardboard, painted it to match the dress that Nastya’s grandmother very conveniently knitted, and decorated it with daisies and ladybugs. It turned out unexpectedly cute). It took about an hour to do everything.
Fixed price bugs. Daisies made from ordinary office paper. Cut out circles. Each daisy consists of two circles. Fold the circles into eight parts. Cut out hearts.
We straighten the future chamomile.
Bend each petal slightly in the middle.
Take a strip of yellow paper and cut the fringes. We twist it around the pencil so that the yellow color (if the paper is single-sided) remains in the middle. Then we straighten it a little. The result is a core.
We collect daisies using a heat gun. Glue 2 circles on each other and the core. to the center
Decorate the number. Daisies are like real ones))
And here is our duet with the dress)
***
Five made of crepe paper
It took me three nights to prepare this figure. All because I had no experience working with crepe paper. For a figure 50 cm high, I needed 3 rolls of paper, a heat gun and cardboard. Making a volumetric figure 5:
Then I decided to cover the figure with crepe paper roses, but something went wrong. So I papered over the number and filled the front and back with “mints”—crumpled squares of crepe paper. Decorated with mints of a different color. I really enjoyed working with them. I glued them onto a hot-melt gun.
***
I also want to share a selection of ideas for numbers that I liked. In general, a number can be made from anything)). Here I use materials from Babyblog, sites ustroim-prazdnik.info, www.babyroomblog.ru, vk.com/ideas_of_a_holiday, www.stranamam.ru.
So, numbers made from crepe or papyrus paper are very popular. Nice, I’ll do something like this too)
The number panel on fabric made of flowers looks beautiful. It is shown in many places. Same photo.
The number made from paper flowers simply captivated me. I wanted to make one like this, but then the idea with beads was born).
Buttons are also great! You can also take pom-poms or decorative glass instead of buttons.
From the threads I liked this option:
I liked this voluminous figure, probably made from crepe or fabric flowers.
And also a T-shirt with an applique - cool!
Well, that's the whole review! I wish your children the best holidays!