Kitchen walls: how many items can you hide?
There are a large number of kitchen furniture available on the market. But custom assembly remains the preference of the majority in the case of kitchen walls.
It is enough to spend some time to think through the project in advance. You don’t have to limit yourself to traditional options.
Every free centimeter should be aimed at saving and maximum results.
About drawer systems
Furniture underneath and wall cabinets provide additional storage space. They are needed to store food and kitchen utensils.
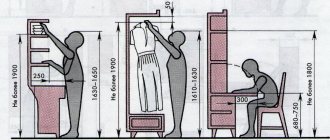
Each owner selects the dimensions independently depending on the following indicators:
- Number of items.
- Approximate weight.
- Volume.
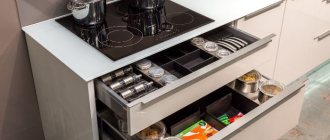
The use of drawers of this class facilitates the economical use of all available space. This also applies to the rear parts. Characteristic is the complete rolling out of drawers from their niches. Existing fasteners remain open.
The boxes are arranged according to the simplest possible principle. You need a minimum of unnecessary movements around the kitchen with maximum free movement.
The following rules must be used:
- The dishes are placed next to the sink.
- Place pots and pans next to stoves.
- Close to work surfaces, sections with cutlery and cutting boards are required.
If we are talking about storing products that do not spoil for a long time, the use of narrow pencil cases, complemented by pull-out shelves, would be relevant.
Note!
- U-shaped kitchen: pros and cons of the U-shaped layout. Methods of arranging furniture, dividing into working and dining areas. Photos and videos of design ideas
- Kitchen facades: TOP 180 photos and video reviews of kitchen facades. Types of frames, criteria for choosing materials and color solutions
- Short curtains for the kitchen - features of using short curtains in small and large kitchens. Advantages and disadvantages of fabric materials (photo + video)
Transparent plastic or mesh are the main manufacturing materials. This is a mini pantry that also saves space and space.
How to choose the right base for a drawer.
Content:
1.Overview of all extension systems.
2.How to choose a base for a drawer.
3.Technical details on dimensions and installation.
Overview of drawer systems.
We list all the extension systems in ascending order from simple to complex. This also roughly corresponds to the sequence of increasing price and time of appearance of the system on the market.
Roller guides.
The simplest and most inexpensive system, with only two plastic rollers per side. Partial extension, light load.
Ball guides.
There are full and incomplete extensions. Four height sizes - 17mm, 27mm, 35mm, and 45mm. Can withstand loads of up to 20 kg per box,
There are modifications with a closer and push-opening. Until recently they were the most common.
Concealed mounting guides.
They are called so because they are attached under the bottom of the drawer and are not visible when opened. Today they are becoming a de facto standard, thanks to the high quality of extension and load capacity of up to 30 kg. Among the advantages is a small gap between the drawer and the side, there are all possible modifications. Blum calls them Tandem or Movento.
All three of the above systems have a completely wooden box (here we do not mean the material, but the fact that there are no ready-made metal parts.
Guides for kitchen drawers with metal sides.
They can be called tandemboxes (this is Blum's brand name) or swimboxes from Boyard.
These systems have many names depending on the manufacturer. The sides are ready-made, metal, painted in various colors. The bottom and back wall of the box are cut to size.
Choosing a base for a box.
We list the factors that influence the choice of base for a drawer.
The first is cost . The most inexpensive are roller guides. The second most expensive are ball guides. Then, in ascending order, there are hidden-mounted guides and drawers with metal sides.
The second is where the box will be located, what load it will carry and how often it will open. For an inexpensive chest of drawers, it would be appropriate to use roller or ball guides. For an elegant, beautiful chest of drawers - hidden mounting guides.
For kitchen drawers, hidden installation and tandembox type guides with metal sides are more suitable, since we open and close these drawers many times a day. At the same time, along with reliability, the comfort factor (soft closing) becomes important. The durability of concealed mounting guides and tandem boxes is facilitated by their location - they are less dirty.
Approximate installation dimensions.
About retractable mesh with facade fastening
This is a modern analogue and replacement for standard pull-out shelves, which in large quantities also clutter up the space.
For storage, plastic or metal mesh is used, attached to one common facade. 30-45 centimeters in width is optimal for pull-out shelves, despite the presence of other options.
The advantages of such designs are obvious and are described as follows:
- A certain style for appearance.
- The dimensions of the items inside affect what the package will be.
- One movement is enough for the retractable module, after which the entire contents are revealed to the eye.
Bottlemakers
Another solution to equip narrow niches that were not enough for full-fledged sections. Inside there are holders with containers of different sizes. These are jars and bottles of different sizes, where all kinds of spices are stored, not just alcoholic beverages.
15-20 centimeters is the standard width for such compartments. The dimensions of the walls become the only height limiters. Such drawers are easy to install in the lower sections of the kitchen.
Inside, 2-3 shelves are used to place items of different sizes. The modification is relevant for those who are interested in extensive minibars.
Calculation of drawers
To avoid confusion and misunderstanding, let’s define the initial data:
The furniture is made of laminated chipboard with a thickness of 16 mm; fibreboard with a thickness of 4 mm is used for the bottom.
- Width of the cabinet/cabinet (external dimensions) = X.
- The height of the niche for installing drawers in the cabinet/cabinet (minus the overhead countertop) = Y.
- Depth of the cabinet/cabinet stand (sidewall) = Z.
Calculation of the drawer front
Whatever one may say, the calculation of the inside of the box largely depends on the front part.
The facade can be internal (rolled over the side walls of the body) or overhead.
As you can see from the drawing, the choice of overlay or internal front can affect the depth of the drawer. In the case of an inset one, it is rolled deeper to the thickness of the facade (-20 mm from the depth of the stand).
The height of the drawer front usually varies between 150-200 mm. It all depends on what will be stored inside. For documents and stationery in office cabinets, smaller drawers are made, 120-150 mm deep, rarely 180 mm. The linen drawers of the chest of drawers are designed deeper, ranging from 180 mm to 250 mm. For toys and bedding, drawers can be even deeper along the height of the facade, but in this case it is necessary to reinforce the bottom with a stiffener or partitions.
The size of the drawer fronts, taking into account the technological gap, is calculated by analogy with other doors; you can read more in detail here. In short, 2-3 mm is subtracted from the dimensions along the outer perimeter; the gap between adjacent facades is also 2-3 mm.
An example of how to calculate the fronts for two drawers relative to our cabinet with dimensions X*Y*Z.
- Internal facade: (X-16*2-3)x((Y-16*2)/2-3)
- Overlay facade: (X-3)x(Y/2-3)
The height and length of the facade can be swapped if there is a texture and the desired direction of the pattern - longitudinal or transverse. When edging PVC facades around the perimeter, it is necessary to take into account the thickness of the edge!
How to calculate the side of a box
Drawer guides are available in 50 pitches, ranging from 250 mm to 550/600 mm. Hardware manufacturers always have a similar layout in their catalogs, which can help you navigate the dimensions and markings for fasteners.
dimensions of roller guidesdimensions of ball guides
Thus, the depth of the sides of the drawers is taken in increments of 50. For the shallowest drawers, 250 mm, and further, correlating the depth of the standing cabinet/cabinet with the length of the suitable guide - 300, 350, 400 mm, etc.
The narrowest side of the cabinet/cabinet for built-in is 260 mm for the overlay facade and 280 mm for the internal facade (for a 250 mm guide). The required clearance at the front edge for installation is usually 2 mm. The gap at the back is arbitrary, from 1-2 cm to 5 cm. If there is more left, it is better to purchase longer guides so as not to waste space behind the drawer. It turns out:
(drawer depth) = length of the guide and less than Z by no more than 50 mm.
How to calculate the front (front and back) of a drawer
If we again turn to the manufacturers' catalogs, we can see that the gap between the sides of the cabinet/cabinet body and drawers is about 12.5-12.7 mm.
In fact, when calculating, these numbers are rounded by subtracting 13 mm. This makes the drawer move more freely and is easier to adjust.
In the drawing, the calculation diagram for the box is clear and understandable. Thus, to calculate the “forehead” of a drawer, you need to subtract the thickness of the chipboard from the dimensions of the cabinet/cabinet 4 times (2 on each side) and a gap of 13 mm, also on both sides. 16*4+13*2=90. It turns out:
(forehead length)=X-90mm.
How to calculate the depth of a drawer
There are no special standards regarding depth. Usually 10-20 mm are left under the facade (Z5), and 30-80 mm above the facade.
Thus, if, for example, the height of the facade is 150 mm, then the depth of the drawer will be about 80-100 mm. I base my calculations on the cut cards. If reducing the depth of the drawers allows you to more compactly place the parts on a sheet of chipboard, then this is worth taking advantage of. There are situations when several parts fit onto a new sheet, but if you “play” with such unprincipled dimensions of the parts, you can save on buying a whole sheet with a huge remainder!
Fiberboard bottom calculation
There are two ways to install the fiberboard bottom - overlapping and in a groove. In the first case, the bottom is nailed to the drawer frame from the back side. In the second, it slides into a special groove.
- When fastening with an overlap, a gap of 2 mm is taken away. That is ((length of forehead)+16*2-2)x((depth of drawer)-2).
- When the groove depth is A, mm on each side is added to the internal dimension (A-2) mm on each side. That is ((length of forehead)+ (A-2)*2)x((depth of drawer)-16*2+(A-2)*2).
About sites that remain unused
There is an area that is not used in any of the functions and remains idle in every kitchen. Usually this place is between the floor surfaces and ovens, under the cooking items.
But even here it is easy to create a space that can be used for storing accessories near the place of main work.
The main thing is to take care of solving the following issues even at the design stage:
- Capacity.
- Separation.
- Height of compartments.
Some difficulties when integrating such elements will arise when working with ready-made types of walls. The retractable corner system for the kitchen will not be an exception to this rule.
Under work tables and stoves, drawers with a shallow depth, 80-120 mm, are placed. Then spoons and forks, various spices will be easy to get at any time you need.
The jars will become stable thanks to special separators. This allows you to clearly delimit the space for each device.
Baskets
Advantages. Baskets can be wicker, plastic or wooden. The first two types are environmentally friendly, suitable for different interior styles (Provence, classic, boho, Scandinavia), and plastic baskets are advantageous in that they are easy to wash, light and very practical.
What are they suitable for? Wooden and wicker baskets are great for storing fruits and vegetables in the kitchen. In the room you can use them as a decorative element and put small things there - flash drives, remote controls, threads, keys. But the biggest contender for baskets is the nursery! It is very convenient to put toys in such baskets, they are pleasant to use and easily fit into the interior of the room.
Creating Functional Corners
The shape of the letter L has become traditional for kitchens with medium or very small dimensions. The corner roomy section is placed right in the middle. But in the standard variation it is not always the most convenient. That's why modern manufacturers offer corner shapes.
Often 2-3 corner shelves per 90-120 centimeters of width are enough. They accommodate bulk packaged products or large utensils.
Sidewalls and high back walls contribute to stability. It is recommended to use special dividers to make storage more convenient.
Systems of this kind have an attractive appearance, although they lead to the loss of some space.
“Magic corners” are systems that increase the efficiency of space use. You can even make sure that only certain sections function. A suitable option for storing small items; large items do not fit inside.
Large dishes and small household appliances fit inside one section, the smallest one. Let’s assume the option of installing mobile sections that slide out along the carousel.
The main fastening element is a spacer pipe. But axleless models are considered much more convenient.
Washing area and use of pull-out structures
And in this case, you can choose special containers whose appearance will please you. Even if they are intended to store garbage and household chemicals.
Designs equipped with electric drives make operation simpler and more convenient. Access to the contents inside opens after one light pressure with your knee.
Cleaning accessories are easily hidden from prying eyes by a drawer that is used to equip the sink.
Pros and cons of drawers
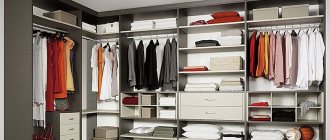
Furniture parts that can be rolled out are one of the most functional and convenient parts of different types of furniture. With their help, you can store various things anywhere, be it a kitchen cabinet, dressing room, desk or cabinet.
A drawer has many advantages.
The advantages of such boxes are obvious:
- To get something you need to put in a minimum of effort.
- You can install partitions in the boxes to allow you to conveniently sort the contents.
- This is an ideal device in which you can organize vertical storage.
- You can make drawers with your own hands; it will not take a lot of resources or time, which is a big advantage of this piece of furniture.
A drawer is a fairly convenient device for storing various things.
The disadvantages of the design include the possibility of rapid clutter, which makes it difficult to find things. But this is not a question of design features, but of user habits.
If you carefully approach all stages of product manufacturing (fastening the bottom, durable fittings, installation of guides), then it will definitely please the owner with its quality, appearance and durability.
If you approach the work responsibly, the box will please the owners for a long time.
Magnetic boards
An alternative to conventional knife storage using drawers or racks. The main thing is to place the tools parallel to each other.
Only in this case will storage look elegant. Any such board is attached to the aprons in front of the work surfaces.
DIY drawer
The assembly of the box is largely determined by the individuality of the craftsman who chooses certain tools. That is why all existing instructions will differ from each other in one way or another. Some craftsmen use templates, some do not, some craftsmen work only with clamps, and some consider them a waste of time.
In this regard, the sooner you develop your own manufacturing style, the better it will affect your work.
Available materials
To install the drawer you will need the following tools:
- laminated chipboard (chipboard);
- drill and screwdriver (you can choose one);
- hexagon;
- drill;
- self-tapping screw;
- guides;
- awl;
- measuring square;
- ruler;
- pencil.
Prices for the range of drills
Drill
Step-by-step instruction
Step 1. The first and one of the most important stages in making a box is the correct marking. In order for the parts to connect, the conformation must be located in two places - below and above.
There should be two holes for future screws, as well as markings
The holes should be equidistant from the edges of the side panel
Step 2: Take a 50mm template and make a mark on the top and bottom of the board. It is not recommended to measure less than 50 millimeters, since the fittings can split the chipboard.
When creating a box, you can work without a template, but it greatly simplifies the work
Step 3. Measure half the thickness of the material from which you are assembling the box. For such purposes, it is also convenient to use a template. Repeat this procedure for the top and bottom marks.
The template performs several useful functions at once when making a box
Step 4. To prevent the drill from going away during work, tap a hole at the intersection of the two marks using a screwdriver or any other sharp object.
The hole will be needed for further drilling with a drill.
Step 5. Align the parts of the future box using a template.
Before using the drill, make sure the sides of the box are not warped.
Step 6. Take the drill and press its tip into the indentations already made to fix the tool. While drilling, try to hold the drill straight so that the hole left by it will help the guides fit correctly.
You need to drill the hole gradually so that it comes out neat.
Step 7. Insert the screwdriver into the conformat bit, then insert the conformat itself and position it in place of the hole, smoothly placing it into the recess. If you find that the box has become skewed while placing the conformat, press it out using a hand hexagon and straighten the sides, then clamp it back. To avoid inconvenience, you can use corner clamps, which will immediately give the box the correct angle of inclination.
Insert conformat into the hole made
Step 8. Turn the box over and do the same procedure with the second hole.
Repeat with the second mark
Step 9. Once all other sides of the box have been drilled using the same method, check the diagonals to make sure they match each other.
The side panels folded together should be perpendicular to each other.
Step 10. Screw the bottom to the box, first leveling it. You can use an MDF board (six) as the bottom. If desired, the plate can be coated with enamel.
Fiberboard is often used as a bottom for drawers
Video - How to assemble a drawer
Railings
The type and dimensions of the dishes do not matter - such structures can accommodate any items. A common place for hanging hangers is the surface of kitchen aprons.
The main thing is that the space does not remain cluttered due to excessive enthusiasm for decorations.
Shelves for spices and other small items
The same roof rails. Simply the surfaces of the shelves are used without hooks. There is a narrow surface where the necessary devices are placed.
But often they create multi-level roof rails, where shelves and hooks are combined with each other.
Right choice
The retractable system will last for years if it is chosen correctly. The main thing is that the cabinets are located depending on the layout of the room. There should be no serious problems when opening them.
The buyer must decide in advance what exactly he will store. The fittings are the weakest point, so it is also better to pay attention to this issue.
How to choose a tool box
Next, we will consider the criteria that must be followed when choosing a tool container.
Drawer size
Box size - this parameter allows you to evaluate in advance the “weight category” and suitability of the product for a tool of a certain length. The dimensions of the boxes are indicated in inches, but the length is used as an indicator of the main size. General dimensions are indicated, as a rule, in millimeters on three sides. To select the size of the box, you need to know in advance the size of the tools that are supposed to be stored in it and their total number. To estimate the size of the future box, you can collect all the tools and make the necessary measurements.
Number of branches
On the one hand, the more compartments, the better: you can sort out a lot of small things. On the other hand, a large number of compartments means their small size (for the same product size). When making a choice based on this indicator, you should take into account the type of container. Traditional drawers usually have up to 20 compartments, but organizers can have 30 or even more.
Tool box compartments.
Sections
The drawer sections are a movable block divided into several compartments. Their purpose is to make the container as compact as possible when folded, and when unfolded to provide convenient access to its contents. Sections can be sliding (located at the top and tilted in different directions) or retractable (pull out from the inside like kitchen drawers). The former are more often found in traditional drawers, the latter - in carts and organizers.
Drawer with sliding sections.
Drawer with pull-out sections.
Drawer Organizer
It is convenient when the box has a built-in organizer; as a rule, it is built into the lid of the box. This allows you to store smaller parts, accessories and fasteners along with large tools. In this case, the lid of the organizer box will contain a set of cells of various sizes. The number of organizer cells varies depending on the number of installed partitions. It is worth remembering the inverse proportion between the number of cells and their volume.
Organizer built into the box lid.
Possibility to change the size of the compartments
Changing the size of compartments is not provided for in all types of containers, but this function is most often found in organizers and cases. By rearranging the partitions, you can change the size and even the configuration of the compartment, which will allow you to make the desired size of each cell for your existing tools.
Drawer with sliding sections.
Removable tray
The presence of a removable tray eliminates the need to dig around inside the box in search of the right thing. You can place your most frequently used tool in the tray and quickly use it while working.
Box with removable tray.
Recessed handle
A recessed handle is useful in boxes and carts - this feature allows you to reduce the dimensions of the container, which is very convenient for storage and transportation. This box is convenient because you can place another box on top, for example with a power tool. In cases, the handle is a structural element and is rigidly fixed to the body.
Wheels
Transport wheels are primarily intended for trolleys, but large boxes can also be equipped with them. The presence of wheels indicates that in front of us is a capacious container designed to move heavy, oversized cargo. There can be one or two pairs of wheels. In the first case, inclined transportation is assumed, in the second - horizontal.
Using a box in a modular system
The meaning of the modular system is that it allows you to place several containers on top of each other, connecting them with special clamps, and thus turn them into one common storage. This feature is not available in all drawers; it is most often found in organizers and trolley drawers. If you need to constantly store and transport a large number of tools, then it would be rational to purchase boxes that can be combined into a common system.
Lock material
The material for making drawer locks is the choice between plastic and metal. The first one is cheaper, but less durable. However, this has little effect on the overall price of the container, and high-quality plastic, although a durable material, is inferior to its metal counterpart.