With the arrival of spring, the summer season begins, the time to prepare seedlings for subsequent planting in the ground. To obtain high-quality seedlings, watering alone is not enough, so you need to think about a comfortable place for plants with sufficient lighting. If the area of an apartment or house allows, gardeners begin to sow seeds in boxes of soil on the windowsill.
But, most often, the dimensions of the living space are limited. Even if all the window sills in the house are planted with seedlings, the plants may not get enough sunlight. Then it is more convenient to make a special rack that will not take up much space and equip it with lighting.
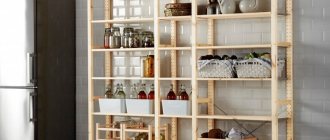
A rack is a structure with shelves and fixed supports holding them together along the entire perimeter. The rack can be made of wood. It will be durable, but may fade over time.
A rack made from plywood is a cheap material to manufacture, but not very resistant to moisture. And plants require constant watering, so chipboard shelves may suffer from moisture due to use. Metal shelves are subject to corrosion, so they must be treated with a special product.
The finished rack can be placed in any room in the apartment; for proper lighting, it is recommended to build in lighting that will be close in spectrum to natural sunlight.
Why do seedlings need light?
In poor lighting, plant seeds germinate sluggishly, seedlings get sick, stems do not grow stronger, become thin and may die. Daylight contains the entire spectrum of light necessary for healthy plant life. Modern technologies make it possible to create a spectrum of lighting that will be as close as possible to natural sunlight.
Important! Artificial light sources cannot affect the growth of seedlings; the process of emergence of seedlings can be started with the help of special lamps for illumination.
When choosing lighting methods using lamps, you should pay attention to:
- luminous flux power;
- possible color spectrum;
- stability of operation throughout the entire operation.
Rack made of metal profile
Metal profile structures are becoming increasingly popular. This material has a number of advantages and is therefore used for assembling home shelving. The positive characteristics of a metal profile are:
- Structural strength.
- Ability to withstand heavy loads.
- Metal doesn't rot.
- Does not burn.
- Not susceptible to fungus.
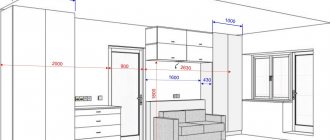
Scheme of a metal rack from build-with-your-hands.rf
| Frame posts | Metal profile 3.5 cm. It is possible to use profiled pipes 2.5 cm |
| Shelf mount | Metal perforated profile 2.5 cm |
| Shelf | More often, a 2.5 cm board is used. Before installation, the wood must be treated with drying oil. It is possible to install shelves made of sheet metal. |
As for the footage of the materials used, it depends on the overall size of the structure and is established during the development of the project.
Before you begin assembling a metal rack, you need to develop a design for the future structure. And draw a drawing that shows the exact dimensions of the rack parts. When everything is ready, we begin assembly.
- So, let's start with the markup. To do this, use a tape measure with which you need to mark the profile.
- The next stage is cutting the necessary parts from the profile (pipe). A grinder is used for this . If the owner does not have the opportunity to use a grinder. You can purchase pre-cut parts. Typically, this service is provided at the point of sale of the profile.
- All received parts are connected to each other in exact accordance with the drawing. Welding is used for this . If there is no device, then a bolted connection is used.
- As the structure is assembled, it should be periodically checked using a level . This is an important point, because if you allow the frame to become curvature, it will be difficult to correct it in the future.
- When the first (main) part of the frame is assembled, you need to start assembling the frame for the shelves. Moreover, first you need to assemble the lower shelves.
- Before fastening both types of frames, you need to make precise markings and indicate the location where the shelves will be attached.
- After the shelf frame is ready, it is fastened to the main structure. You need to start from the bottom and check the horizon with a level.
- When the overall structure is assembled, it must be treated with special anti-corrosion compounds , then treated with a primer and painted.
The frame is ready, now you can start working on making the shelves. They can be made from a variety of materials, from sheet metal to chipboard. The shelf is cut so that it can be installed in the frame. After it has taken its place, it is screwed on with self-tapping screws.
Project of a complex rack based on a metal profile
The video shows only the project, without step-by-step instructions for production. The shelves are designed to be retractable on both sides, illuminated, and have rollers for easy movement—a well-thought-out model for advanced craftsmen.
Movable wooden structure
Making a wooden rack for seedlings is the most affordable way to save time and space in your home for growing plants for your garden. Most often they are made in the form of a collapsible structure, therefore they are mobile and easy to use. Wooden shelving has a number of advantages over other types of structures:
- Firstly, assembling a wooden structure is simple. Wood material is easy to process and install.
- Secondly, such a rack will be cheaper than its metal and plastic counterpart.
To make a durable wooden shelving unit with lighting that will last for many years, you need to perform a number of actions:
- For work, choose beams and boards made of hard wood so that they do not dry out or lose shape due to moisture during use. Otherwise, the rack will have to be coated with a protective varnish and a film placed under the seedling boxes to protect the tree from water.
- Next, create a layout and drawing of the rack. The drawing shows the exact dimensions of the structural elements.
- Cut the beams and cross beams and adjust them to size. Strengthen them together to create a strong structure. The design should be collapsible, for easy transportation to the dacha and back to the city, as well as for storage in the cold season when unfolded. On the mobile structure, install the wheels at the bottom on the support beams. With their help, you can move the rack around the room and rotate it if necessary.
- Install backlight. If the weather is cloudy outside for a long time or the finished rack will be located far from a source of natural light, it is necessary to attach lighting to each shelf. Shelves with lamps will help you get healthy seedlings faster. Lamps are hung above the plants on the ceiling of each shelf.
We invite you to watch a video on how to make a wooden rack with lighting for seedlings:
How to make a rack for seedlings with your own hands
Having chosen the material, a convenient type of shelving. Let's move on to its manufacture.
It’s hard to say how long this takes, since one person is free every day, while others have to work only on weekends. You need to start with measurements and choosing a place to install the shelf.
Wooden structure
A rack made of a material such as wood will require additional processing measures. It is necessary to use not only paint, but also disinfectants.
Natural fabric may have fungal spores on it, which will then spread to the plants. It is advisable to cover it with dense polyethylene. So that when water gets in, the tree does not swell. The fasteners are made of stainless metal.
The structure will be quite weighty, which requires a stable base and rubber pads under the legs.
Metal rack
It is considered the most preferable design for those who are constantly breeding seedlings. Installation is carried out using the “dead” fixation method. Fasteners are installed in different directions. Anti-corrosion treatment is required.
The metal chosen is stainless, but it is better to make shelves from wood. Take into account the rule: “measure ten times, cut once.” Before use, dry the rack well so that the smell of paint disappears.
Window sill design
The second name for whatnot is proofing. Installation takes place on racks, which will additionally expand and hold the rack at the desired level. Spacers run along the entire length of the rack.
The mount is chosen to be strong, but lightweight, so that it can be removed at the right time. The maximum distance between shelves is 50 cm. Preliminary measurements are required.
From plastic pipes
The rack is convenient because plastic pipes do not need to be fastened with metal corners. Everything is done with a special soldering iron. It is important to take correct measurements and cut the pipe, since PVC pipes are sold from 3 meters.
Glass with a thickness of 5 or more millimeters is used as shelves. It is enough to treat with disinfectants before use. Then as needed. At least once a week.
From a pallet
The rack is convenient for small apartments. The design is vertical, narrow. Mounting is sufficient on one wall. In addition to the pallet you will need:
- beams, slats made of wood;
- nails;
- measuring tool;
- wood nails.
Metal shelf for growing plants
You can also make a rack for seedlings with your own hands from metal, a durable and reliable material. This will not be cheap and will require additional costs in the form of expensive equipment for cutting and fastening metal. To simplify the work, pipes and stainless steel profiles are taken to make racks and the shelves are already attached using bolts.
The shelves are constructed from solid sheets of metal or mesh metal fabric. It is possible to adjust the dimensions of the sheets for the shelves and the base of the rack itself with special equipment, but this will complicate the process of creating the shelf structure.
Attention! If you use ordinary metal, it will become corroded from moisture, then it will need to be treated with a special composition against the formation of rust.
You can buy ready-made shelves and equip the shelves with special lamps. The distance from the lamps to the seedlings should be about 50 cm. As the plants grow, the lamps are rebalanced so that their rays do not harm the young seedlings.
Table design for working with seedlings
Most products have the same design: boards are attached to posts at the corners, forming a strong frame. The racks simultaneously act as legs and a support on which the bottom slats are attached.
The rear pillars are extended upward to the desired height and connected with a bar. This design is used for working with seedlings of climbing plants. For greater stability, the table is equipped with side crossbars and the bottom shelf is screwed to the horizontal slats.
Due to its simplicity, the structure is built with one’s own hands in one weekend. Including purchasing materials and painting finished shelves.
Many drawings indicate exact dimensions, but they can be changed at your own discretion. Adjustments are made taking into account the person’s height and the position in which it will be convenient for him to work (sitting or standing). The location of the table itself also matters, that is, whether it will be placed on the floor or on a stand. The reason for changing sizes is also the availability of available materials.
How to make a bookcase out of plastic?
Making a shelf out of plastic has a large number of advantages. Plastic material is convenient to use:
- easy to clean;
- Dirt does not accumulate on the shelves;
- moisture is not absorbed.
Plastic sheets and pipes are used in the manufacture of racks. Also, for the convenience of creating a shelf design, you can purchase plastic containers and use plastic pipes to make the rack base of the shelf.
Plastic containers are fixed at a certain height distance from each other to create a bookcase with shelves. For the necessary illumination, fluorescent or LED lamps are attached to the bottom of each drawer.
Basic requirements for a rack for seedlings
Whatever design the rack for growing seedlings has, it must meet the requirements:
- have strength, reliability;
- be resistant to moisture;
- designed for repeated use;
- provide comfortable conditions for plants;
- quick access (watering, inspection, loosening);
- have an aesthetic appearance.
The number of shelves can vary from 3 to 6. The length of the shelves should be such that standard fluorescent lamps can be installed. The width of the shelves should not be more than 60 cm with a shelf height of 40 - 50 cm.
Options
LED phytolight for greenery
LED lamps, durable and with the correct spectrum, have also proven themselves well. LED phytolight is perfect for additional lighting of seedlings when there is insufficient natural lighting in the room. The lamp's illumination spectrum is effective for growing fresh herbs; it is suspended 40 cm from the plants.
Phytolamps
Phytolamps are the most popular for illuminating seedlings. They are particularly efficient, compact, environmentally friendly and safe.
Important! Phytolamps include light sources that are close in characteristics to natural light. Plants that do not receive enough sunlight become thinner and stretch upward. The seedlings cease to be strong and healthy.
In early spring, the length of daylight is not enough, so the phytolamp will serve as an excellent replacement for sunlight.
Types of racks and materials used for their manufacture
So, a rack for seedlings is a structure consisting of racks and a certain number of shelves. The design of the rack is very versatile, which allows it to be used in any conditions. This structure can be placed in different parts of the apartment, and any flat surfaces can be used for its installation, for example:
- Table or window sill.
- Floor (the rack can be equipped with wheels to be able to move it).
- Attached to the wall.
In order for the apartment owner to maintain the structure, it must meet certain requirements. Here they are:
- Durability and reliability (to withstand boxes of seedlings).
- Resistantly transfer moisture.
- Durable and reusable.
- Comfortable for seedling development.
- Availability of plant maintenance (watering, loosening the soil, inspection).
- Attractive appearance,
- Possibility of installing lighting.
- Compact and maximum efficiency.
- Possibility to move to another location if necessary.
As for the materials used for the manufacture of home shelving, it all depends on the wishes and capabilities of the owners of the premises. However, when choosing, you need to remember that the design should be durable and practical. It is desirable that the material can be easily processed.
For example, for the manufacture of racks they use:
- Wood blocks.
- Metal perforated tubes.
- Plastic pipes.
To create shelves use:
- Metal sheet.
- Wooden lining.
- Glass sheet at least 6 cm thick.
- Plexiglas.
Let's look at each home shelving design separately.
Window sill rack
This type of rack allows you to install boxes with seedlings next to the window. This certainly plays a positive role, especially in terms of lighting. This design does not require the installation of lamps. However, this scheme also has its disadvantages. For example, the size of such a rack is limited by the width of the window sill and window. Therefore, some types of plants may not fit here.
Window sill shelving diagram.
| Side racks | Metal profile, pipe, an option with timber is possible. |
| Fastening under shelves | Metal corner No25 |
| Canvas for shelves | Wooden board, chipboard, glass, sheet metal |
Before starting work, as usual, we prepare the project and draw a drawing. It must indicate the dimensions of all future structural parts. This will prevent confusion during the assembly process.
- First of all, we assemble the side parts of the rack. To do this, two rectangles are made from the profile by welding. Their height is five centimeters below the window opening. In depth they are equal to the width of the slope.
- We fasten both rectangles together with long pieces at the bottom and top.
- The frame for the shelves is welded from corners.
- We make special threaded holes in the side posts (you can simply weld a nut). This will allow you to firmly clamp the structure between the window sill and the upper slope using bolts.
- At the last stage, the structure must be treated with an anti-corrosion agent and painted.
- After this, we cut out and fasten the shelves.
This type of rack is good because it can be removed from the window at any time by unscrewing the bolts and moved to a new location.
Video instructions for making a simple window rack
The video below is perfect for beginners. The design of the rack is very simple, airy, the author successfully chose the necessary camera angles and revealed in detail all the manufacturing aspects.