In the old days, carpets served not only as an attribute of comfort, warmth and coziness, but also as a sign of human well-being. They created a rich and prosperous image for the house.
Today their purpose is the same. They are necessary for a specific purpose: bedside, bathroom, playroom for a child. And the decorative component of the rugs remains at its best. They can become an interior decoration, focus attention on any detail, or separate a certain area. And made with your own hands, such a rug will be distinguished by its originality and special beauty.
These days, anyone can buy carpet in a variety of sizes and specifications. But this is not an option for those who like to do everything with their own hands, because for them the main thing is the joy of creativity. Moreover, even those who are not particularly proficient in any kind of needlework can make a rug on their own. The main thing is to have perseverance and patience. And in terms of costs, this product will be inexpensive, since its weaving requires materials that are available in abundance in every home.
How to knit a round rug: diagram
The basic rule is to adhere to the principle of circular knitting.
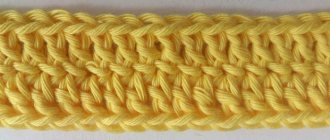
Dial 3 v. etc., connect them into a ring. Knit the first row 6 single crochets. In each subsequent row, 6 columns must be added evenly. When finished, the product will be smooth, without bulges or distortions. Knit the rug to the required size.
For a better understanding of the knitting pattern:
To get a more impressive rug with a convex relief, follow the steps according to the diagram. Only knit stitches by picking up the back wall of the loop
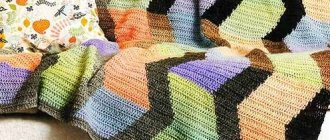
We knit a pentagonal rug according to the pattern
When knitting such a rug, it is better to use soft knitted items . You need to start by knitting a circle of 5 loops. In the 1st row - 3 air loops, 2 double crochets in the first loop of the bottom row, 2 in. p., *3 double crochets, 2 in. p.* Perform the pattern between the stars 5 times. In the 2nd row - the same as in the first row. But after 3 double crochets, knit 1 chain stitch and then follow the pattern below.
Related article: Weaving baubles from floss threads for beginners with photos and videos
Knitting the rug in the round is done to the required size. Each corner of the star is knitted separately.
How to make knitting threads from unnecessary things
To create long strips, cut the T-shirt from the bottom up in a spiral. Immediately wrap it in a ball so that the “threads” do not get tangled.
The short strips are easy to connect. Step back 1.5 centimeters from the edge and cut each strip.
Align the two strips so that their slots line up.
Pass the other end of the top strip from below through the aligned slots and pull out. As a result, you will get a knot.
In this way, you can fasten all the strips when knitting the product.
How to make a rug from threads on a mesh
- First you need to prepare the threads. They will be the main look and decoration of the product. They need to be cut into equal lengths and widths . The larger, or rather, the longer, the thread, the fluffier the pile.
- Now you need to attach the threads to the base. A hook will help here. Using a crochet hook, you need to push the thread through the square of the canvas and tie it on the reverse side . So labor-intensive, slowly but carefully you need to tie each cell with a thread.
Attention! If you wish, you can do everything in one color, or you can do it with a pattern, ornament, pattern.
For other weaving, you will need embroidery patterns, which you can search on the Internet.
- When marking, be sure to leave a few cm for the outline.
- At the end of the work, we “comb” the product to make it neat and fluffy. When tying yarn, the length may vary. To prevent a big difference, you can trim with scissors. Everything is different here; the shorter the haircut, the clearer the drawing.
You can tie a crochet hook with a foot a little differently. The knot is tied, but the thread does not come out completely.
Rug in the form of a path for the corridor
After watching a master class on knitting a rug, you can make a beautiful rug from old things, which is convenient and practical for the corridor.
Cut old T-shirts, T-shirts, and skirts into strips. Roll them into balls. It is better if they are of different colors.
Make a chain of air loops equal to the width of the future rug. Next, knit with single crochet stitches
When one ball ends, connect another. Sew the ends together with thread.
The track is knitted in a rectangular shape, so the fabric will need to be turned over when knitting.
If there are not enough threads, cut more strips of the required width.
The result of creativity will be a beautiful path for a balcony, cottage or corridor.
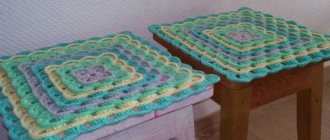
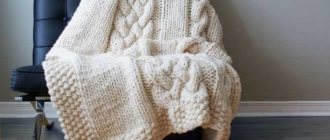
Cozy shaggy rug
To make a soft carpet that can adequately decorate your home, you will need carpet canvas or fillet mesh. This knotless base is traditional. It is better to use canvas, tarpaulin mesh, burlap or matting. Synthetics, wool or silk can become electrified and slide across a smooth floor. Carpet canvas can be bought in a store; as a rule, it is sold in rolls 1 m wide. For the decorative part you will need threads. You can use any leftover yarn; the more shades, the more fun and bright the product will be. A hook with a foot will be useful for this work, but you can also use a simple crochet hook.
Shaggy rugs
[Show slideshow]
To make it more convenient, we will divide the whole process into several stages:
- The first step is to prepare the threads that will become a decorative component of the future carpet product. Cut the yarn into pieces of equal length. The “fluffiness” of the pile will depend on the chosen length of the threads.
- Let's proceed to the most labor-intensive but interesting stage - tying the threads on the warp. Using a hook, we pass the thread through the canvas square and tie a knot. So we “dive” the hook into each cell and fill each one with yarn.
Advice! The rug can be made monochromatic, made into an ornament, or made into a whole picture. For patterned weaving, you can use embroidery patterns or apply the design directly to the base. When marking, you need to leave a couple of centimeters around the perimeter of the product for the canvas.
- At the final stage, we need to “comb” our rug a little so that it looks neat. During the process of tying the threads, their length may differ slightly from each other, so the pile must be trimmed. The principle is as follows: the shorter the pile, the more clearly the pattern is visible.
Tips for beginners. Master class on crocheting a rug.
There are several ways to tie threads to the base. For example, using a special hook with a foot, you can make loops that do not need to be trimmed at the end of the work. In this case, the knot is still tied, but the ends of the threads are not pulled out completely. For this technique, you can also safely use embroidery patterns.
Making a rug with your own hands
Use of weave
Prepare a frame according to the size of the future carpet product, fill the nails on two opposite sides. Set the distance to 2.5-3 centimeters from each other.
The following instructions will help you learn how to weave a rug from old things with your own hands.
Pull the strips of material taut. It is advisable to take it in colorless shades. This will be the basis.
Pull the working strips first above the thread, then under it.
At the end of the row, pull the strip under the warp thread and work in the opposite direction.
Related article: Crochet kitten patterns
When weaving a rug, sometimes move the finished rows towards the starting row. At the end of the work, hide all the knots on the wrong side. Now the finished product can be removed from the frame.
Different options for creating rugs with your own hands from old things: step-by-step recommendations
You can make different rugs from old things with your own hands:
- weave a rug from braids;
- tie a thick thread with a cloth;
- wrap the twine diagonally and then shape it into a rug.
And these are not all the ideas for making a rug from old things. Today we will look at the simplest solution - weaving a rug from braids.
What tools will you need?
For work we will need:
- ribbons of different colors;
- sewing machine;
- threads of a suitable color;
- scissors, clothespins or safety pins.
Before starting work, the tapes must be secured
Master class on simple weaving rugs from old things
Everyone knows how to braid three-strand braids, so the process will not be difficult. The algorithm of actions is as follows.
- Take three threads of suitable colors, secure them with a clip and begin to weave a braid.
- When one ribbon ends, the next one is woven in succession.
- It is more convenient to work on your knees, and to secure the strips that are woven as you work, you can use a regular clothespin.
- At the end of the work, bend the ends and sew them on a typewriter.
- Next you need to decide what shape the rug will be.
- Set the sewing machine to zigzag mode, form 1-2 twists of the braid and stitch them together.
- Apply the next row sequentially and stitch it with the previous one.
Advice! To prevent the finished rug from slipping on the floor, you can attach a special base to the reverse side.
Working with knots
The basis is cut strips from old T-shirts approximately 12-15 centimeters long. You will need quite a lot of strips. Now they need to be rinsed in the washing machine. The result is twisted strips from which the rug is made.
Place the carpet mesh on the table and place a strip of material underneath. Using a thick hook, pull out both ends of the strip and tie them tightly with a knot pull to one side. Now tie the next strip. It is advisable to start from the center of the grid, gradually moving in a circle to its edges.
Knotted rugs can be made in different shapes and colors.
Step-by-step instructions for making an unusual rug with your own hands on a mesh from old things
An interesting idea is to weave a rug from scraps on a painting mesh, which will give the product additional strength and maintain its shape.
You can make a mat on a painting mesh by threading threads through the cells
What you need for work
To work you need to prepare:
- cut the mesh according to the size of the future product;
- scraps of fabric measuring 2 × 12 cm;
- large crochet hook.
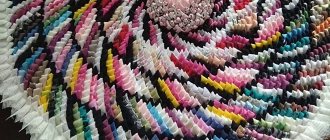
Round rug made from unnecessary things
To better understand how to knit a rug from old things, study the following instructions.
Pre-cut unnecessary knitted items into strips 3 centimeters wide.
To make the rug smooth and beautiful, try to make the strips the same width.
Use different colors of material.
Make a loop and insert your hook into it.
Knit several loops to create a small braid.
The loops are connected in a circle.
Knit a chain stitch.
Thread the hook into the loop of the circle, pick up the thread and pull it through the two loops.
Knit a rug of the required size using this pattern. Make a fringe along the contour of the finished rug.
Tip: while the knitted circle is small, make air loops before each loop.
Simple and complex patterns and recommendations: how to crochet a rug from old things
Creative people who have crocheting skills can knit a rug with their own hands from old things. You should first select the stripes in color, taking into account the general style of the room for which the rug will be intended. Often, as an addition, decorative napkins and pillowcases for sofa cushions are knitted using a similar technique.
What you need to prepare to make your own rug from old things
To make a knitted rug from old things, you should prepare a hook depending on the thickness of the fabric, but no less than No. 7, and it is better to take No. 15. You will also need jersey stripes and a knitting pattern.
The thickness of the hook depends on the density of the fabric
Patterns and tips for crocheting various rugs from old things
For a crocheted rug made from old T-shirts, you can use any pattern, for example, similar to the pattern for napkins. To begin with, you should try to make simple round rugs that start from the center, gradually increasing in diameter as the rows are knitted. More experienced craftsmen can skillfully combine decorative stripes and also use different patterns.
When choosing a scheme, you can use the following tips:
- an openwork product is obtained using air loops;
- for an oval shape, a chain of air loops is collected;
- if you need an oval of small width, you should knit a longer chain;
- adjust the shape of the product using regular stitches, and to increase the size, knit stitches with one or two crochets;
- You can knit a rug in the shape of a square. They begin to knit it from the center in a circle, with increases made along the edges using double crochets.
Step-by-step instructions and recommendations for crocheting a round rug from old things
Using our step-by-step instructions, we will knit a simple round rug from old things that will become a decoration for any room. The algorithm of actions is as follows.
- Cast on a chain of 3-4 chain stitches.
- Connect the last loop with the first into a ring.
- To move to the next row you need to lift from one air loop.
- Tie the rug in a circle, adding the required number of loops so that the edges do not curl inward. Approximately add one additional loop to 2-3 loops.
- To get an openwork product, you should tie the edge with double crochets. For tighter knitting - single crochet.
- Similar actions are performed until the mat reaches the desired diameter.
- If necessary, you can alternate the color of the thread stripes.