Scientists from Britain have noticed that on average a person spends about 60 hours a year washing dishes. It was because of her dislike for this activity that the American inventor J. Cochrane invented the dishwasher in 1887, spending only a couple of months. Today this convenient unit is available to every housewife. But the dishwasher was never able to take pride of place in the sink.
The traditional sink continues to hold the crown among kitchen attributes. Read on to learn how to install it correctly.
Types of kitchen sinks
Just a few decades ago there was no alternative to enameled white cast iron sinks. The sink in the kitchen was considered an exclusively functional attribute, and that was where all the requirements for it ended.
With the development of interior design, sinks have become more diverse. Nowadays, kitchen sinks vary in shape, material and installation method.
By installation type
Types of sinks by installation type:
- The overhead model is installed on top of the cabinet, completely replacing the tabletop. Applicable for modular headsets. In a kitchen with a solid countertop, this model is practically not used.
- The built-in (mortise) sink is the most popular today. It is universal in installation: suitable for both a model kitchen and a set with a solid countertop. A hole is cut in the surface, the shape and size corresponding to the sink, after which the product is mounted.
- Undermount sinks are trending today. The model is installed in such a way that its edge is below the level of the table top. Installation requires certain skills and adherence to certain technology.
- The integrated sink differs from other models in that it is integral with the countertop. Manufactured in a factory.
As for materials, the range of choice is much wider. There are even kitchen sinks made from solid wood. It is difficult for many to imagine this material in such an application. In fact, modern wood processing technologies and paint coatings help make the impossible possible.
By material
Types of kitchen sinks by material:
- Stainless steel is the most practical and frequently used material; 80 out of 100 sinks in our kitchens are made of stainless steel. The products are mechanically strong and resistant to aggressive chemicals and temperature fluctuations. They have an affordable price.
- Acrylic or plastic is one of the most unreliable materials. Afraid of aggressive environments and temperature contrasts. Having an affordable price and low strength, it deserves attention as an option for temporary budget repairs. Requires extremely careful handling.
- Natural and artificial stone . The structures have an original design, created for unique modern interiors. Such sinks are distinguished by their considerable weight, durability, resistance to temperature changes and aggressive influences. In terms of price - one of the most expensive.
- Ceramics is a fragile and heavy material, so recently it has been replaced with high-strength porcelain stoneware. Such sinks are not afraid of temperatures, aggressive environments, and do not form chips or cracks if handled incorrectly. Ceramic sinks are among the most expensive.
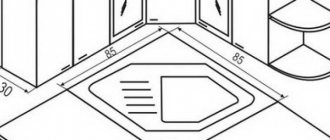
The shapes of kitchen sinks are square, oval, round, rectangular and triangular. Custom-made sinks of non-standard shapes can be made upon request. The choice of sanitary bowl model depends on the configuration of the set and the type of sink and installation method.
The location of the sink in a corner kitchen plays a special role: if you need to install it directly in the corner, choose round or triangular products.
Composite sinks
The material used for the production of this version of sinks is filler. It is held together using a polymer binder. Granite chips, fiberglass, and quartz sand can be used as filler. Thanks to the filler and the dye used, it is possible to achieve the required shade of the overhead sink.
The advantages of this type of sink include the lack of absorption of food dyes, unlike enameled surfaces. Granite sinks are not afraid of the harmful effects of aggressive substances. There are no scratches on their surface, therefore, the appearance will be observed for a long time. If we talk about the disadvantages, composite products are not cheap, but they also have a longer service life.
Read more: Why the gas pipe in the apartment vibrates and hums, causes of noise and ways to eliminate it
Additional equipment for washing
A modern sink with an increased level of comfort has in its design not only a bowl with a siphon and a tap, but also additional accessories:
- Wings for drying dishes . The platforms are equipped in such a way that water draining from wet plates goes directly into the sink, leaving the countertop dry. The wings can be located on one side of the sink, on different sides, or even in the middle (in the case of a double bowl). They can also be used as stands for hot dishes or for food prepared for cutting.
- Mixers and taps are not supplied with the sink, but these are integral attributes. A tall faucet with a pull-out or separate shower is good because it is convenient to draw water into different containers, wash fruits and vegetables, and dishes. An additional tap for drinking water, connected to a separate container or filter, has its advantages: at a minimum, it saves space and money on installing a cooler.
- disposer or grinder is built into the siphon and greatly simplifies the housewife’s work, preventing the formation of blockages in the kitchen drain when food debris gets there. However, if the family has piglets, such a device will be unclaimed.
- A removable cutting board in combination with a disposer greatly simplifies the process of cleaning and cutting vegetables, especially when the work surface is small. In addition, such an accessory can replace part of the tabletop.
- Baskets for fruits and vegetables are installed on the sink. They are convenient for washing and drying food.
All these additional accessories are designed to simplify the cooking process, save time for the owners and expand the work space.
Installation process for an undermount sink
The mortise model is designed for installation into a solid countertop. We cut a hole in the shape according to the shape and install the sink.
Work order:
- On the countertop we outline the outline of the bowl. The distance from the outer edge is 5-10 cm. The cardboard template that comes with the sink will simplify the task. If it is missing, the sink must be turned over and the outer contour drawn. Then measure the distance between the outer and inner contours and draw the latter.
- We make a hole in the surface. First, use an electric drill to drill a small slot in the outline of the internal contour so that the jigsaw blade can then fit there. We insert the jigsaw and, strictly following the markings, cut out the unnecessary element.
- Let's try on the sink. Pay attention to its correct placement. It is important that the product does not “play” in the prepared hole.
- Before attaching the sink to the countertop, we prepare it for installation in advance by screwing the taps and siphon to it.
- Preparing the hole for installing the sink. We clean the cut with sandpaper or a grinder, removing all chips. We treat the area with sealant. We glue the sealing tape that comes with the cut to the tabletop along the edge near the cut, or coat it with the same sealant.
- Place the sink in place, pressing it firmly against the countertop. We remove the sealant protruding from under the edge. We attract the product to the tabletop with “claws” or other fasteners included in the kit. It is better to do this without a screwdriver, so as not to overtighten and damage the threaded channel.
- When the sealant dries (in a few hours), we install the cabinet in place and connect the plumbing to the utility networks.
Upon completion of the work, do not forget to check the taps for signs of leakage and sewerage. Kitchen sink sealant can be replaced with silicone.
Stainless steel sinks
It is worth paying attention to the following characteristics of sinks:
- Functionality. Depends on the nature of the work in the kitchen. Number of bowls and wings for drying - additional compartments allow you to carry out several manipulations at the same time, which is very convenient for bulk cooking.
- Capacity. Depends on the daily number of dishes that need to be washed.
- Combination with the interior. An acrylic white sink does not always fit harmoniously into the kitchen design, so it is important to choose a model that matches the texture so as not to disrupt the integrity of the kitchen space.
Modern models can be equipped with automatic valves for adjusting the drain, as well as outlets for connecting dishwashers and washing machines.
Pay attention to the functionality of the sink. Consider whether you need the additional features that modern plumbing offers
If you install a filter block under the sink, you can pay attention to models with an additional hole for a second tap. Of course, it can also be done using a drill by drilling a through hole in the countertop.
To produce such a product, a copper alloy is used, which prevents washing from corrosion and the effects of food acids. The main advantages of a stainless steel sink include:
- light weight, thanks to which transporting the sink will not be difficult;
- if used correctly, the overhead sink will last a long time;
- hygiene;
- acceptable cost.
This type of washing is not without its drawbacks. These include low levels of sound insulation when in contact with water. But low-quality stainless steel sinks, which are produced using a thin steel sheet, have this disadvantage. To eliminate this problem, you need to buy a sink with an underfloor bowl so that its depth is sufficient.
The sink in the kitchen has a strategically important role, so you need to choose and install it yourself correctly.
Before deciding how to install a sink into a countertop, you need to decide on the choice of product. The best option is to connect a deep sink and a faucet that is not too high - in this case there will be a minimum of splashes when washing dishes. The sink should be deep so that it is convenient to wash large pots or stack plates after a family dinner.
The material also matters - it is easiest to connect a traditional stainless steel sink yourself. Enameled steel would also be a good solution.
Installing a kitchen sink with your own hands requires the following tools and materials:
- Sealant;
- Self-tapping screws and screwdrivers;
- Jigsaw;
- Fasteners (as a rule, they are included with the product).
Advice! Before fixing the kitchen sink, you should carefully treat all seats with sealant. This will ensure high-quality waterproofing and protection of the chipboard from damage due to high humidity.
Installing a kitchen sink with your own hands can be done using various technologies. The installation method is selected depending on the type of sink structure:
- Invoices are considered the most budget-friendly and easiest to install with your own hands. The sink is placed on a separate cabinet. The disadvantage of this option is that there are gaps between the sink and the cabinet.
- Mortise ones are installed directly into the tabletop, for which you need to cut out the corresponding hole.
- Undercounter sinks belong to the more expensive segment; they are mounted below the countertop, thanks to which they provide excellent sealing and appearance.
The affordable overhead (built-in) sink is made of stainless steel. It is mounted on a separate module and covers its entire upper part. The installation is very simple here - special L-shaped elements with an oblique slot are used for fastening. About 4-5 such fasteners are provided for one sink.
Advice! The connection of the mixer is carried out before the stage of installing the sink (the sink is installed with the equipment already installed) - otherwise it will be inconvenient to do all this at subsequent stages.
How to attach an overhead sink with your own hands:
- You need to attach the L-shaped fasteners to the cabinet from the inside and make notes;
- Screw the screws in the marked places. It is important to choose short 15 mm screws and screw them in so that at least 5 mm remains above the mark;
- Cover the end of the drawer with sealant - it will protect the furniture and additionally glue the sink;
- After this, the sink is installed on the screws screwed into the cabinet and moved until it fits completely;
- Then the fasteners are fixed, the excess sealant is wiped off, and you can begin connecting the sink to the water supply and sewerage system.
Of course, it’s easier to install an overhead sink yourself, but a built-in model provides a greater level of tightness and looks very neat on a cabinet with a common countertop. The question of how to embed a sink into a countertop is solved quite simply - you just need to make the right hole for the sink.
Installing a sink into a countertop is carried out according to the following algorithm:
- The location of the sink is found on the countertop and the shape of the future hole is determined. To do this, turn the sink over and trace the contour directly on the countertop or on cardboard. If you have chosen a product of complex shape, then a ready-made template is most likely already included in the kit - this will help you cut out the desired hole;
- The finished template is applied to the tabletop at a distance of about 7 centimeters from the edge and begins to be cut out. To do this, step 1.8 cm deep from the edge of the template, leaving support for the sides of the sink;
- On the cutting line, first make a hole with a drill, and then cut out the outline with a jigsaw. The lower part of the tabletop is secured so that it does not fall out during cutting and damage the edge of the remaining surface;
- Sealant is applied along the contour of the cut. It also covers the lower joints of the sink;
- You can start attaching the sink - it is pressed with the included clamps;
- After the excess sealant has been removed, you can begin connecting the communications.
Read more: Air heating system for a country house for a cottage
An undermount sink can be mounted flush with the countertop - however, this is a labor-intensive process that requires experience, since it involves removing the layer of countertop under the edge. The depth of removal is equal to the height of the side with a layer of sealant.
If you decide to install and connect the sink so that it is below the table level, you will have to resort to the services of specialists. After all, this installation method is chosen for expensive structures - not made of steel, but of natural, artificial stone.
In this case, special tools are required for fastening - for example, a jigsaw and diamond-coated saws. Indeed, in such sinks there may not be a hole for draining water - complete sawing of products is not carried out in industrial conditions.
Sinks made from natural materials are secured with a special mounting adhesive.
As for sinks with unusual shapes, they come with a paper template from which the installation hole can be cut.
Do you want to connect the sink yourself correctly? Don't forget 3 more points:
- It is better to replace rubber seals with silicone sealant. Rubber will not provide a tight fit and does not have a sufficient service life, while the sealant will fill all the gaps and cracks;
- It is better to connect sinks made of natural or artificial stone together to prevent falls and damage;
- Fastening the sink to the countertop or module with self-tapping screws is carried out exclusively by hand. Using a tool may create too much tension, which may damage the structure.
When the installation work is completed, you can connect the sink. To do this, the hoses through which cold and hot water will pass are connected to the general water supply system.
Advice! The connection requires the use of a rubber gasket to better seal the joint.
After the hoses are secured, the connection is made in the following sequence:
- A siphon outlet is inserted into the sink (it is better to use S-shaped designs, since the bottle one gets clogged too quickly);
- A pipe (angular rigid or flexible corrugated) is added to the siphon;
- The pipe from the siphon is discharged into the sewer pipe;
- All connections are checked for leaks.
Read more about installing a siphon here: installing a siphon in the kitchen in 4 steps
It may turn out that the diameters of the pipes from the siphon or sewer are very different. In this case, it is necessary to use an adapter - a sealing collar. At this point, the installation of the kitchen sink is considered complete.
Installation of an overhead sink
In most cases, overhead models are made of stainless steel. They are installed on a cabinet that does not have a tabletop. Before installing the sink in the kitchen, prepare it by securing the taps and siphon. This will greatly simplify its further connection to utility networks.
Algorithm of actions:
- We do not fully tighten four self-tapping screws into the ends of the cabinet from the inside at a distance of 15 mm from the outer cut.
- Before attaching the sink to the cabinet in the kitchen, coat the upper sections with sealant or silicone.
- We place the sink on the cabinet, press it so that the silicone sets.
- We put plastic clamps on the self-tapping screws screwed inside the cabinet, the second side of which should rest on the curved edge of the sink. We move the fasteners along the diagonal slot, thereby pressing the structure to the ends of the cabinet.
The installation of the sink is complete, all that remains is to connect it to the utilities.
Attention! If you are installing a heavy countertop sink, make sure the cabinet is reinforced so that it can support the weight of the product. To do this, attach an additional strip to the back of the module.
Fixing the sink with glue
Installation of an overhead sink is possible using glue. But this method is only suitable if the underframe almost perfectly matches the sink itself. It will be placed on top, and the ribs will “sit” on the cabinet.
Advice! Do not skimp on the sealant on the entire contacting surface. It plays the role of glue and will additionally protect the joints from moisture penetrating into them.
You will have to think about how to attach an overhead sink to wooden blocks if you do not have fastening corners at hand or if defects are found on the surface of the cabinet frame. So what do we need?
- bars of suitable size;
- furniture corners;
- small nails or screws.
The first step is to build a mounting platform in the form of a rectangular frame. It will serve as the top frame of the stand. It is he who will smooth out all the unevenness. The assembled bars are sent to the box of the overhead sink and fixed there with steel corners around the perimeter. And we place the resulting structure directly on the stand. We will secure it using the same corners, but from the inside to the walls.
Installation of an undermount sink
The difficulty of such work lies in the fact that the hole for the sink must be cut perfectly evenly, since it will always be in the visible part of the work surface. If you doubt your abilities, contact a specialist so as not to damage the countertop.
Attention! Only plastic or stone countertops are suitable for under-table installation. Laminated chipboard will not last long, as it will get wet where the cuts are made.
Do not forget to pre-prepare the sink for installation by attaching the siphon and faucets to it.
Instructions:
- Installing an undermount kitchen sink begins with accurately marking the surface for the product. To do this, be sure to use a template and do not forget about the indents (as is the case with a built-in sink).
- We cut out a hole for the bowl in the same way as described above. Use a grinder instead of a jigsaw.
- From the bottom side of the countertop, use a rebate cutter to cut out recesses for the sides of the sink (their depth is equal to the thickness of the edge), and screw in the fasteners.
- We process the cut of the tabletop, removing burrs and other defects.
- We treat the edges of the cut-out recess with sealant, place the sink in the prepared recess and fix it with brackets.
It is better to press the sink manually, and tighten the clamps starting from opposite sides. Next, do not forget to connect the hoses to the water supply and sewerage and be sure to check the twists for leaks.
DIY sink cabinet installation
The mortise and overhead versions of the kitchen sink are installed in the kitchen cabinet. There are doors in front of the cabinet, and an empty opening behind it. The assembly and installation of these headset parts have specific features. There are no partitions inside the cabinet, since they can interfere with the connection of water supply and sewerage - this means that there are no additional stiffeners in the cabinet. If you plan to install an overhead sink model, then in this case there will not even be a countertop, instead of which there is a sink panel made of steel.
Assembling a cabinet for a future sink must be more reliable and durable than other elements of the kitchen set. It should be installed on special pads, since water leaks can still happen despite a good seal. In addition, the material must first be treated with special water-repellent agents. For structural strength, fasteners for tightening jumpers should be installed from the inside. You can make them yourself from flat and thick boards, which will serve as mini-shelves in the cabinet.
How to securely secure a sink to a cabinet and countertop: tips
To ensure reliable fastening of overhead and mortise sinks, use high-quality sealant. It not only protects the MDF sections from moisture, but also glues the sink to the cabinet.
Tips on how to securely secure a sink to a kitchen cabinet:
- For installing overhead sinks, in addition to plastic clamps, other options are provided . For example, an aluminum or steel corner in pieces of 6-8 cm. It is attached with two self-tapping screws, and it fixes the sink using a plumbing gasket pressed to the edge of the product. Thanks to the rubber texture, the sink will be securely clamped in this way.
- For the same models, timber and steel linings are used. Along the perimeter of the sink, under its edges, bars of the required segments are laid. Its thickness should be equal to the height of the curved edge of the sink, so that the beam and the edge of the steel edge end up on the same level. Next, the plates are applied, and through them, the timber located in the grooves of the sink is pulled to the walls of the cabinet using self-tapping screws.
- For a mortise sink, plastic or metal clamps are supplied. If you think that silicone will not hold the plumbing bowl tightly enough, use fasteners. Clamps are attached to the inner sides of the sink, but are not fully secured. The sink is installed in the groove, pressed, checked with a level, and only then fixed with clamps. Pull the bowl correctly, starting from opposite corners or sides.
- For the under-table type, there is the option of gluing a sheet of plywood or chipboard under a fixed sink. A hole is cut out in the material in the shape of a bowl, the sheet is placed on the sink at the bottom of the countertop and fixed with adhesive.
- The second option for attaching an undermount sink is to install it in a cutout on the back side of the countertop, fix it with sealant and brackets, and fill it with polymer resin, which, after drying, will ensure secure fastening and waterproofing.
How to install an undermount sink
Mortise sinks are designed for installation in a countertop, which emphasizes the integrity of the furniture ensemble, covering all its constituent elements with a continuous sheet. To correctly mark the location for cutting the installation opening without disturbing the aesthetics of the kitchen unit, you need to use a marking template. Its functions can be successfully performed by cardboard packaging, in which a built-in kitchen sink is often sold. Followed by:
- Lay out the template on the countertop, temporarily securing it with adhesive tape or tape. Trace the outline of the planned opening with a pencil.
If there is no template, then the body of the sink itself is used for marking. It is turned over, applied to the tabletop and traced. From the resulting line, they retreat inside the contour so much that after cutting it out, the bowl has a slight backlash in the opening. - Drill a hole on the insertion line so that the jigsaw file fits freely into it.
- Smoothly moving the jigsaw along the contour, make a circular cut. To prevent premature loss of the sawn part and jamming of the file, periodically screw the screws into the cut slot. They will perform the function of temporary fastening, wedging the removed fragment of the tabletop.
- Insert the sink into the manufactured opening and check that all elements match each other. Additional pruning may be required.
- Treat the end of the opening around the entire perimeter with a moisture-resistant sealant. This will protect the hydrophilic material of the solid tabletop from swelling if water accidentally gets on it.
- Glue an elastic seal along the bottom edge of the kitchen sink.
It must be included with the product or purchased separately. It is a good idea to additionally cover the seal with sanitary silicone on top. - Now finally insert the sink into the cut opening. Correct its position relative to the outer contour outlined during preliminary marking. Lightly tighten (not completely) the included brackets. Add sealant to possible voids between the edging of the sanitary bowl and the countertop.
- While screwing in the screws of the fasteners from below, carefully press the sink. For better adhesion of the bracket tenons to the tabletop material, you can lightly tap them with a hammer. The operation of putting the sink in place should be performed in stages:
- angles attract, but not completely;
- the middle fasteners are tightened;
- again, starting from the corners, the sink is pressed completely. In this case, the excess squeezed out sealant is carefully removed with a damp cloth.
After completing the compression of the plumbing bowl, connect the mixer to the cold and hot water supply lines, and the siphon to the sewer outlet. As in the case of an overhead sink, it is advisable to install them on it in advance, even before the installation operations begin.
Assembling a free-standing sink
A free-standing module under the sink is installed when installing the kitchen unit. If you need to assemble it yourself, follow a simple algorithm:
- the side parts of the cabinet are connected to each other by upper spacers (everything is attached with self-tapping screws);
- the lower plinth is installed on the façade side;
- the bottom of the cabinet is installed so that it lies clearly on the baseboard;
- the façade strip is attached (on top of the structure);
- if it is necessary to further strengthen the structure, additional strips for rigidity are installed on the back of the cabinet;
- doors are attached.
Advice. To ensure that the cabinet lasts as long as possible, all joints are additionally treated with silicone.
Next, the countertop sink is installed on the cabinet using the method described above.
Replacing a kitchen sink
If you need to change the sink by installing a new sink on an existing cabinet, the process begins by dismantling the old bowl:
- turn off the water supply valves to the kitchen;
- disconnect communications;
- dismantle the sink (unscrew all previously tightened fasteners in the reverse order of the installation process);
- dismantle the taps and siphon from the old sink;
- if necessary, we tidy up the old mixer and drain and install them on the new sink;
- remove the remnants of old sealant from the countertop or end sections of the washing cabinet;
- We apply a new sealant to the furniture structure and the sink being installed and follow the algorithms described above (depending on the type of sink installation).
On a note. To remove the sealant layer, use a stationery or kitchen knife.