Installing a countertop in the kitchen: video tips, photos and selection of materials and tools In any set, the table is an important element that requires competent calculations and proper installation of the countertop in the kitchen. You can do the work yourself using repair skills and instructions. Do-it-yourself assembly saves money and allows you to accurately adjust the furniture to the desired parameters. The work is simplified if a ready-made project is selected or the cutting is ordered to specialists.
Detailed step-by-step instructions for installing a kitchen table
Only a qualified kitchen countertop installer can do this job perfectly. It is important to understand that due to lack of experience, the result may be worse. The quality is higher for those who have already worked with wood, chipboard, MDF. Installing faux stone or glass countertops in your kitchen requires a professional.
Preparatory work
To carry out the preparatory work, you must have an electric jigsaw, a grinder and drills with different diameters.
The mounted cabinets must be put in place and leveled using screw feet. Horizontalness is checked with a level. Then you should drill holes in the walls for the ties. Disputes over the order of installation of countertops and backsplashes in the kitchen continue. However, it is advisable that the wall be finished by the time the furniture is installed.
The base for installing a countertop in the kitchen with your own hands must be perfectly flat; deviations are corrected with vinyl sealing tape. If the wall is tiled from floor to ceiling, it is important to precisely match the joints. It happens that it is necessary to process the ceramics in such a way that the apron completely follows the surface of the wall. The countertops in the kitchen are installed at a distance of 0.6 m from the wall cabinets.
Tabletop installation
Modern countertops can be made of stone, wood, metal and laminated chipboard or MDF. More rarely, concrete countertops are used, which are manufactured directly at the installation site.
Finished countertops are installed in several stages:
- Preparation;
- cutting holes;
- installation.
Let's analyze all the stages in more detail.
Preparing the countertop
After manufacturing, the tabletop, as a rule, differs slightly from the specified dimensions. Therefore, before installation, it is necessary to completely adjust it to other kitchen furniture.
This process can be carried out according to the following scheme:
- all kitchen cabinets on which the countertop will be installed are assembled, mounted and, if necessary, secured;
- the surface of the cabinets is leveled. If the furniture is equipped with adjustable legs, then you can place pieces of furniture on the same level using the adjustment method. If there are no adjustable legs, then for leveling it is necessary to place wedges under certain places;
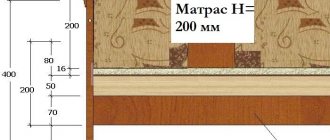
Determining the level of the tabletop position
- We determine the optimal dimensions of the tabletop. Depending on the type of wall covering, the tabletop can be installed close to the wall (smooth apron, wallpaper, textured putty) or with a gap of 5 mm (tiles, uneven decorative finishing);
- mark the cutting lines. The surface of the tabletop in front of the cutting line is covered with masking tape for additional protection;
If the tabletop will be cut with a hacksaw, then it is better to mark and work accordingly on the front side. When using an electric jigsaw, marking and cutting are done on the wrong side. This rule will help avoid the formation of unevenness when performing work.
- The table top is trimmed and holes are prepared for installing kitchen appliances;
Cutting the tabletop to size
- the sections are processed with a file or other tools to remove irregularities.
Removing irregularities and burrs after cutting
Hole preparation
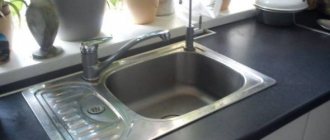
The next stage of installation is preparing the holes for the sink and gas stove. The work is carried out in the following order:
- The location of kitchen appliances is determined. To do this, the tabletop is temporarily installed in place;
- the contours of the sink and stove are indicated on the surface of the countertop;
It will be easier to mark the contours if, when applying markings, you use not the equipment itself, but prepared cardboard (paper) templates.
Determining the location of the kitchen sink
- for ease of cutting, it is recommended to remove the tabletop and install it on a stand;
- the surface of the tabletop around the contour is protected with masking tape;
- in several places (at least 4) holes are drilled around the perimeter of the contour, the diameter of which does not exceed 10 mm;
Preparing to cut a hole
- The hole is cut and the sections are processed.
Cutting out a hole for a sink
Holes for the stove and additional kitchen appliances, if any, are cut in the same way.
Installation
Fastening the tabletop can be done in two ways:
- using self-tapping screws (the most common method);
- into grooves on furniture (used individually by prior order).
To attach the tabletop using the simplest and most common method, you will need:
- self-tapping screws;
- mounting angles;
- screwdriver;
- silicone sealant;
- end edges;
- plinth.
The tabletop is attached to the set according to the following scheme:
- the tabletop is installed in place in compliance with all the provided gaps;
- fastening to kitchen cabinets using self-tapping screws (on the sides) and mounting angles (along the inner perimeter);
Fixing the tabletop with self-tapping screws
- The edges of the tabletop are treated with sealant and covered with end caps. If metal corners are used for protection, then additional fixation is made with self-tapping screws;
Installing strips to protect the edges of the tabletop
- the joint at the junction of the wall and the countertop is treated with sealant and covered with a plinth.
Attaching decorative plinth to the tabletop
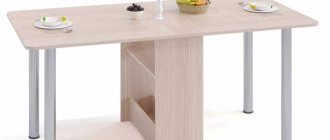
How to attach a table top to a kitchen unit
The installation height of the countertop in the kitchen corresponds to the height of the floor cabinets. Its width should exceed the parameters of other furniture by 3-5 cm in order to protect the facades from splashes. To take measurements, the board must be placed on the cabinets and pressed against the wall. If necessary, it is trimmed, the end is polished, and recesses are made for the pipes.
The complexity of the work increases if the kitchen requires installing a sink in the countertop or under it. Additionally, it is necessary to make holes that correspond to the shape and dimensions of the sink. If the model requires installing a mixer in the kitchen countertop, you need to drill a hole for it.
The sequence of work when installing a sink in a kitchen countertop is better understood by watching the video.
For fastening, you can choose one of 4 types of fasteners:
- tongues;
- corners with self-tapping screws;
- eccentrics;
- Eurobolts.
Experts advise combining mechanical fastenings with adhesive fastenings.
Manufacturing and manufacturers of plastic countertops
There are increased demands placed on kitchen countertops . It must withstand daily stress, be resistant to moisture, temperature and abrasion. The modern market offers a wide range of products of domestic and foreign production.
Standard sizes are 60 x 224 cm and 62 x 305 cm . However, if necessary, you can individually select the size, which varies from 2 to 4 m with a thickness of 28-38 mm. Low-pressure plastic CPL is cheaper than HPL, but is inferior in quality to the second option.
Important. Outwardly, it is difficult to distinguish one option from another. Only a specialist can determine the type of plastic, so when choosing a tabletop, pay special attention to this indicator.
Many Russian manufacturers are engaged in the production of plastic countertops. For example, the Vardek brand offers a large selection of countertops of interesting colors and shapes . They are made from moisture-resistant chipboard with a plastic coating using post-forming technology. Buyers appreciate the quality of the products, noting the design solutions, density and resistance to fading of the coating. In terms of cost, the products of this company belong to the average price range.
offers both countertops and kitchen furniture .
The product has proven itself well in the market thanks to its high-quality chipboard. Buyers note that even after several years the surfaces do not change color, do not deform and look decent. The company offers both ready-made and custom-made products. The Soyuz industrial group has been successfully leading among manufacturers for more than 15 years .
The company specializes in the production of high-quality components for furniture. Products are sold not only in Russia, but also abroad. Thanks to modern technologies, the company manages to make countertops moisture-resistant and resistant to temperature changes. The company also offers a lot of interesting design solutions for its clients. Another participant in the market for high-quality countertops is . It makes components for furniture sets, including plastic tabletops. They produce chipboard-based boards with a durable laminated plastic coating. Among the style options, buyers especially like the stone-look ones, but there are other designs as well. The products are popular among consumers due to their price-quality ratio.
Tools for mounting the table top
To join and secure individual parts you will need:
- standard set of tools (hammer, tape measure, pliers, screwdrivers, marker)
- glue for joining elements;
- silicone for processing ends;
- sealant that fills voids;
- sealing tapes;
- aluminum strips;
- connection profile.
Self-joining of fragments using a metal plate
To install a corner countertop in the kitchen using this method, in addition to a metal or plastic strip and ties, you will need a hacksaw for cutting metal, a router, a drill with a 35 mm drill bit, screwdrivers, and a 10 mm wrench.
Sequencing:
- arrangement of floor cabinets by level;
- cutting out board elements (5 cm margin on each wing);
- trial placement of elements to check compliance with the bar;
- pruning;
- drilling holes for ties;
- sealant treatment of ends;
- fixing the bar;
- contraction of elements;
- placement on pedestals;
- screwing fasteners;
- attaching the corner to floor cabinets.
The video will help you better understand the principle of installing a corner countertop in the kitchen with your own hands.
Choosing a plastic tabletop design
The surfaces of cabinets and tables with plastic countertops largely determine the appearance of the kitchen space, so it is important to choose the current design of these products.
When choosing a suitable color scheme for a plastic countertop, you should start from the overall picture of the kitchen interior. In addition, you can use the following recommendations:
- light colors of kitchen surfaces represent cleanliness, so this design looks quite fresh and stylish;
- rich dark colors look impressive. It should be taken into account that on such countertops stains and stains from water are noticeable and conspicuous;
- Countertops with various original images and patterns are becoming increasingly popular. It is worth considering that such a tabletop pattern may become familiar and become boring over time;
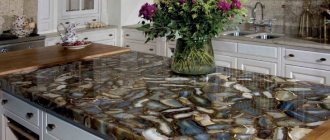
- tabletops with imitation stone surfaces are suitable for furniture of various shades and textures;
- Plastic surfaces with patterns imitating wood of various species look very natural and believable. Such countertops will harmoniously fit into the interior of the room in various styles.
Seamless installation: Euro-sawing using a template
This method is used if the table top is made of chipboard and consists of 2 parts.
You can use one of 3 options:
- letter "G";
- diagonally;
- trapezoidal joint.
The first option using a plank has already been considered. A diagonal connection requires clear marking and sawing at an angle of 45 degrees. The parts are tightened with furniture ties treated with silicone.
A standard trapezoidal screed has 3 joints. If the corner is created at the factory, the depth of the elements is taken into account. When cutting yourself, you must leave a margin, which is cut off during the installation process.
Install kitchen baseboard
Installing a plinth for a kitchen countertop is required at the junction of the table and the wall. In addition to its decorative function, such an element will protect it from moisture.
To install the baseboard on the kitchen countertop with your own hands, use glue or self-tapping screws. A piece of plinth of the required length is cut and processed with abrasive. Silicone is applied to the wall, the baseboard is applied and secured with self-tapping screws. The last thing to attach is the decorative overlay. Glue is used for stone and ceramic products.
What is a plastic tabletop?
If you are looking for an economy class option, then a plastic tabletop is exactly what you need. The material is disguised as granite, quartz, wood, and the final price will be 5-6 times lower than artificial or natural stone.
Plastic countertops for the kitchen are canvases based on layers of MDF or chipboard. They come in different thicknesses. Their protective and decorative layer is CPL or HPL plastic.
Each model of plastic countertop has a different finishing thickness , which affects the strength and durability of the canvas. The quality of the countertop depends on the production technology and the type of plastic used. Thus, products made from CPL are less reliable. They are not resistant to high temperatures and force loads.
But countertops using HPL plastic have proven themselves better . They can withstand temperatures above 200°C and are resistant to mechanical stress.
About countertops made of other materials:
What are the benefits of quartz agglomerate countertops for the kitchen?
Stainless steel kitchen countertops
Wood-look kitchen countertops
Pros and cons of plastic countertops
Plastic surfaces for the kitchen have a number of advantages:
- Low cost. For example, a domestically produced slab measuring 60 x 24.5 cm and 28 mm thick will cost approximately 1.5 thousand rubles, and 38 mm thick and 3 m long - 4 thousand rubles.
- A varied palette of colors, textures and decors will allow you to fit the tabletop into any interior: from classic to minimalist.
- High-quality material is durable, does not fade and is not subject to mechanical stress.
- The surface can withstand high temperatures. If the plastic is of high quality, then even hot dishes will not damage the surface of the countertop.
- The stove does not absorb moisture or odor; it is easy to wash and clean, including with chemicals.
- You can apply any design to the surface or make a photo print.
Plastic countertops also have their disadvantages.:
- Inferior to wood, natural and artificial stone in appearance.
- Under constant exposure to water, chipboard and plastic materials swell and deform.
- The weakest points of such a countertop are the joints, which are recommended to be further processed or seals attached.
- Plastic cannot be restored, unlike natural materials. Thus, scratches on the countertop cannot be sanded out - for this reason, we recommend that you always use cutting boards for cutting food.
Materials for the production of plastic countertops
The basis of the tabletop is chipboard or MDF boards of different thicknesses. The plastic that is applied to them comes in two types. The first and more reliable is High Pressure Laminate (HPL) . It consists of several layers of kraft paper, which are pressed together under high pressure and impregnated with resins. In this case, the material is reliably protected from moisture, mechanical damage and burnout.
The chipboard is then postformed under high pressure with thin but durable HPL plastic. In this case, the edges are carefully folded over the edge and a flat, smooth and damage-resistant surface is obtained.
The second type of plastic is Continuous Pressed Laminates (CPL) . It is processed under low pressure, so its quality is lower than the previous copy. When choosing a countertop, you should consider the brand of plastic, which can affect the price of the finished product.
There are two types of plastic countertops:
- From ready-made laminated boards of standard sizes from a domestic or European manufacturer. In this case, the country of manufacture does not play a determining role, since both Russian and Western companies pay special attention to the quality of their products.
- Custom made slab . This option will cost more, but you can choose the decor, finish, shade or surface texture yourself.
How to edge an edge
If the table top is not factory made, you may need a melamine tape or PVC edge. The second option is preferable, but you need glue and a hair dryer (there is glue on the melamine tape that can be heated with an iron). In any option, the tape is heated (PVC after applying glue), applied to the end and pressed with a roller. Irregularities are removed with sandpaper.
After complete drying, you can install a washing machine under the countertop in the kitchen.
Types of edges
Modern production is simply amazing. There are about a dozen edges alone. This is very convenient, since every consumer will be able to find exactly what he needs, according to his needs and capabilities. The main thing is not to get confused in this choice, so we will give the following classification.
By material
The material is the most important thing in an edge, since it is responsible for quality and durability. When choosing, it is very important to find a middle ground between price, quality and appearance.
Plastic
The plastic edge for edging is comfortable to use, as it has an adhesive layer. In addition, it has excellent wear resistance. These characteristics also ensure enormous popularity among consumers.
Melamine
This is one of the most affordable and common types of edges. Thanks to the adhesive layer, it is convenient to work with, but its performance characteristics are low - it is made of paper and simply impregnated with melamine resins. As an advantage, you can highlight the huge variety of colors, but they also wear out quickly.
PVC
PVC has probably penetrated into all areas of our lives, and the ends of furniture are no exception. There is no adhesive layer, so the attachment process is not as simple as with melamine edges. The front side can be plain, smooth or textured. A “rubber” PVC copy will last much longer - this is the best option in terms of price-quality ratio.
Not only edges are made from PVC, but also end caps (profiles) for lining the ends of chipboards. There are several types of them:
- U-shaped (overlay) - attached with glue, but will hold without it;
- T-shaped (mortise) - a groove is specially milled under it in the tabletop, with the help of which the profile is attached. Additionally, you can use glue.
The material itself may differ - be soft or hard. The soft one is used for an oval or round tabletop - it is easier to install by pre-heating it with a hairdryer.
In any case, the profile is denser than the PVC edge, so it will perfectly hide chips and unevenness of the end of the tabletop and will survive treatment with household chemicals.
Veneer
Not the most popular option, but sometimes very useful. Veneer edge is a thin slice of wood in the shape of a ribbon, painted in the desired color. It is used for veneered furniture.
The downside is that it is difficult to work with this material. Considering that such an edge is not cheap, it is better to immediately entrust its installation to professionals with knowledge, skills and experience.
Aluminum
The edge of the table top can also be treated in a more “substantial” way - by installing aluminum edging.
The profile performs the same protective functions against water and hides the unsightly cut. But there is another useful property - protecting the countertop from strong heat next to the stove or hob.
The choice of such a bar must be approached seriously, since their range on the market is too large. They differ in:
- height (28–38 mm);
- radius of curvature of the overhang (3–6 mm);
- type of coating (matte or gloss);
- intended purpose (on the right or left end, they can also be universal).
All aluminum strips for countertops have similar parameters, not just the end strips, but also the connecting strips and slot pads. But only the end ones are used as edges, so we only consider them.
Acrylic
Acrylic is becoming more and more popular and will soon surpass plastic in distribution in various industries and areas.
For the edge, transparent acrylic is usually used, on the reverse side of which a pattern is applied - thanks to the top layer, it appears three-dimensional.
For this reason, the material received the title “3D edging”. Due to the 3D effect, this type of edge is also called silicone, but this is not true.
Technologically, this is a very complex process, obviously not for home use. Such edges usually come “complete” with the furniture. Moreover, since they are used on acrylic furniture, they are completely invisible and blend into the main surface.
Acrylic edge can be:
- matte;
- glossy;
- semi-gloss;
- imitate different types of wood.
Acrylic is an incredibly resistant material both under temperature changes and under mechanical stress. It will last for several decades and will not lose its presentable appearance.
In the photo you can see what a 3D edge for countertops looks like.
According to tabletop material
Technical characteristics are good, but it is not always possible to choose the ideal edge based on them. If such difficulties arise, you can focus on the material of the tabletop, and based on it, select the appropriate end treatment.
For stone
The ends of the countertops made of natural and artificial stone are processed using cutters. If this is not done, the kitchen will have an unfinished look. It is important to choose the type of edge, focusing on the style of the headset.
Materials for production
The cost of installing countertops in a kitchen largely depends on the material. You don't have to pay anything if you do everything yourself. Be sure to read about the sequence of work, the necessary tools and consumables.
Chipboard and MDF
Chipboards are lightweight, easy to use, and therefore suitable for self-assembly. Experts advise using corners for fastening. The quality improves if there is an assistant pressing the board with force. Most furniture manufacturers offer chipboards.
Tree
Working with wood requires certain skills, especially if you need to install a sink in a kitchen countertop. Cracks and chips form quickly on a wooden board. Self-tapping screws are used for installation. If you don’t have the skills to do this kind of work, it’s better to hire a specialist. If there is the slightest mistake, it may turn out that the cost of labor when installing a countertop in the kitchen will be lower than the cost of repairing the damage.
Stone
Both natural and artificial stone are difficult to work with. These materials are heavy and installation requires special tools: diamond saws are needed to work on quartz agglomerate. Natural stone and quartz agglomerate are polished using special “turtles”. It is impossible for a home craftsman to cut holes in stone. An exception may be a board made of artificial stone or acrylic. It is significantly less hard than quartz. Marble, a natural stone, is quite fragile and working with it is extremely difficult. Granite is a hard and durable material, but it is difficult to cut. It is not recommended to make a kitchen worktop from onyx because it is a sedimentary rock: soft and porous. The process of installing a stone countertop in the kitchen can be seen in the video.
Glass
Glass surfaces are fashionable and impressive. Increased fragility requires careful handling. For fastening, glue or vacuum suction cups are used. To cut holes you need to know how to work with a glass cutter. The process of installing a sink in a glass countertop in the kitchen is clearly visible in the video.
Metal
At home it is difficult to work with metal in the same way. Cutting requires special equipment; before fastening, all surfaces are treated with a rust-preventing agent. Euroscrews and furniture ties are used for fastening.
Metal kitchen countertop
Self-installation saves your budget. The work is serious, it cannot be done without skills and tools. A beginner should not take risks when starting to work with complex material.
Nuances of fastening depending on the material
Depending on the material, the methods of fastening the tabletop may be different. The most difficult materials to work with are glass and acrylic; the average level of difficulty is metal plates. Even a novice craftsman can easily handle the installation of structures made of wood, MDF and chipboard.
MDF and chipboard
To install the tabletop, corner brackets are traditionally used. The materials are light in weight, making them easy to work with. However, during fixation, the plate may slide out of place, so it must be pressed firmly against the surface of the cabinet. For this you will need an assistant.
Acrylic
This is the most difficult material to work with. It is better to entrust the installation of acrylic countertops to a professional. The plate is heavy. Making a cutout for the sink and hob is very difficult. When fixing, apply silicone to the seam between the panel and the sink and remove the radius chamfer.
Tree
This material is highly sensitive to mechanical stress and requires high-quality processing. Also, wood is susceptible to rotting from the inside if there is high air humidity in the kitchen. Therefore, when fixing, all voids must be filled with sealant. The table top is secured with self-tapping screws. The gap between the wall and the panel is covered with a plinth. Plugs are installed on the edges of the planks.
Metal
Working with metal at home is difficult. This material is heavy and not easy to cut. Iron also tends to rust. It is recommended to apply an anti-corrosion coating to the kitchen countertop before installation. For fastening, you can use euroscrews and furniture ties.
Glass
Glass is often used to secure slabs on dining tables. This material looks impressive, but is fragile. Therefore, installation should be carried out very carefully.
A glass stove may not withstand heavy loads, so such panels are practically not used in kitchen sets. Silicone vacuum suction cups can be used for fixation. You can also cut a hole in a mirror workshop using special equipment, install a wooden pin there and attach the slab to the frame.
Before installing a glass tabletop, you need to make sure the strength of the material. You need to carefully examine the part for chips and cracks.