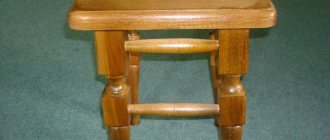
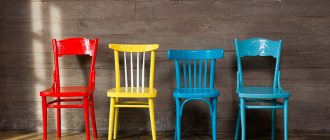
Painting stool legs
If you need to paint the legs of a stool, as in my case, then it is best to do this work without unscrewing the legs from the fastenings. In this case, there will be no need to hold the legs while painting and hang them to dry. To protect the seat of the stool from paint, you can cover it with newspaper, having previously cut holes in it for the legs. If the newspaper is torn in places, these areas can be closed by sealing them with masking tape or a piece of newspaper using glue.
It is best to paint the legs using a roller with waterproof paint. Then the surface of the legs is smooth and without smudges. If you don't have a roller, you can use a brush. When the paint is completely dry, the stool is ready for use.
After restoration with my own hands, the stool changed beyond recognition and became a decoration of the kitchen room.
How to glue a chair leg
1. Carefully remove the leg from the nest, being careful not to split the wood
2.
Remove old glue and apply fresh glue.
3.
Place a weight on the seat. Remove any excess glue that appears.
Old chairs, made of solid wood at the end of the last - beginning of this century, usually have simple connections between the front legs and the seat. They are simply tenoned into the frame under the seat. A chair of this design always becomes loose easily. Even if such a defect has already been eliminated once, a new repair will be required in a few years. After all, the chair is subject to load not only from above: it is moved, tilted, rearranged, which is why simple adhesive seams are destroyed. Here the leg literally becomes a lever, which sooner or later will definitely separate the adhesive seam. To make the whole structure stable again, remove the wobbly leg from the frame and then re-glue it.
At the upper end of the leg, completely remove the old glue with a knife or chisel, being careful not to scratch the wood.
If the trunion (the upper, sometimes tapered end of the leg that is inserted into the seat socket) is slightly damaged, make a “bandage” from a strip of paper that should not be wider than the length of the trunion. For greater stability, coat individual turns of paper with glue. Finally, glue the leg into the cleaned socket on the underside of the seat.
How to glue curved legs
If a chair has curved legs, then it is better to repair it in stages, that is, treat the legs not all at once, but one by one. This makes it easier to determine exactly how to glue the leg so that the chair does not rock.
If the swinging parts cannot be separated, try to spread the chair frame as far as possible and squirt glue into the groove.
However, if it is possible to pull out the parts, be sure to use it, because in this case the connection can be given additional stability by inserting a wedge. At the end of the axle, make a slot with a saw, into which then drive a thin wedge that barely protrudes beyond the end of the axle. It is easy to make from scrap wood. It will expand the trunnion slightly, resulting in a strong connection to the walls of the hole.
A narrow wedge will widen the trunnion and the connection will be stronger.
How to glue a chair leg step by step
Most of the parts of a wooden chair, including the legs, are connected to each other using glue.
Over time, such seams tend to weaken and dry out, which is why very often chairs break. But don't despair about this.
To solve the question of how to properly glue a chair leg, it is enough to acquire the necessary tools, namely:
- A hammer with a rubber tip;
- Sandpaper;
- Durable adhesive intended for furniture;
- Press;
- With a sharp knife or chisel.
When these devices are prepared, you can begin the main process of gluing the chair legs
Furniture with a simple design is not particularly difficult to repair; it is only important to follow the steps in the work:
- First, you need to remove the wobbly leg from the socket, and its upper part, which is inserted into the groove (trunnion), should be cleaned of dried glue. If the previously applied glue is difficult to remove, you can steam it with water steam.
- If there is a thin layer of glue on the chair, it can be removed using sandpaper, and if it is thicker, you must first remove the layer of glue using a chisel or a sharp knife, and then sand the surface itself.
- After this, you need to apply a layer of glue to the pin, and also insert it into the seat socket. If the cord leg does not fit well into the socket, it is recommended to knock on it with a hammer equipped with a rubber nozzle. It is also allowed to apply some kind of press to the part.
- Visible adhesive residues should be removed using a piece of cloth.
- After 24 hours, when the glue is completely dry, you can use the chair.
Only by correctly gluing the chair leg can you count on its reliability and strength in the future. Without following simple rules, some tricks, desire and without resorting to the help of certain tools, it is simply impossible to achieve a positive result.
Review of the best adhesives for wooden chairs and furniture
Glue is the best tool for repairing wooden furniture. By adhering to the instructions written on the packaging and taking into account all the gluing requirements, everyone has the opportunity to achieve the effect with their own hands and make the gluing area more reliable and durable than the wood itself.
The following types of glue are used mainly for repairing furniture and, in particular, wooden chairs:
- PVA. This glue is resistant to temperature changes, easy to use and leaves no marks at all. It must be applied to a degreased surface and pressed at the junction. Complete drying should be expected after 24 hours;
- Casein glue. It often changes the color of the wood and is distinguished by its strength, but in places where it is glued it can leave a noticeable mark. The glue is a light powder that is diluted in water until it becomes thick sour cream, after which it is recommended to mix it with water for about 40 minutes. Dried glue is more resistant to temperature changes;
- Synthetic glue. This type of glue is used even on an uncleaned surface and is characterized by good frost resistance, moisture resistance and strength;
- Wood glue. It differs from other types of glue in its incredible strength and resistance to temperature changes. Almost always, its quality depends on the correct preparation process, which involves maintaining proportions when mixing it with cold water.
And although the modern market is able to offer customers a wide range of companies that produce glue, you must first familiarize yourself with the characteristics of a particular product in order to subsequently make the right purchase.
Chairs made of natural wood look elegant, but over time they dry out and creak. You can restore rickety wooden furniture using high-quality glue.
The question arises, what exactly should I use to glue a wooden chair together so that it is durable and long lasting?
How to glue a wooden chair
Not every glue is used to fasten wood elements.
For furniture repair, substances are selected that meet the following requirements:
- water resistance;
- high adhesive properties - the factor contributes to the formation of a reliable seam;
- transparency - such glue, when dry, will not leave stains on the surface of the chair;
- high drying speed;
- environmentally friendly composition - the presence of toxic substances in the glue makes it undesirable
- use at home.
Many types of glue have these qualities; the most suitable for processing wooden furniture are:
Each of these options has its own characteristics and advantages. PVA glue has an unlimited shelf life and low price. In addition, it is completely non-toxic.
The advantage of the BF composition is that it dries quickly and can be used for items that are located in conditions with high humidity. This could be kitchen or bathroom furniture.
Many craftsmen prefer epoxy glue. What is attractive about this composition is its versatility. In addition to restoring wooden furniture, it can be used for any repair work.
Polyurethane adhesive has a wide range of applications. Its positive qualities are high resistance to temperature changes, moisture, ultraviolet rays and stress.
Syndeticone glue forms very strong connections. This composition is used for structures subject to high loads. This could be children's furniture, which rarely manages to be handled with sufficient care.
When choosing one or another product, you should be guided by the personal preferences and financial capabilities of the home craftsman. Most professional restorers recommend using PVA glue, but when purchasing, you need to pay attention to the country of manufacture and brand of the composition.
“Carpentry” and plasticized dispersions D40P-D53P are considered the most successful for woodworking.
Let's watch a video about adhesives that can be used for carpentry:
Softening old glue with steam
Steam flows from the kettle on the stove through a rubber or plastic hose to the socket in the chair. Hot water will flow down the tenon nest wrapped in a cloth. This way the remaining glue will dissolve faster.
To thoroughly strengthen a loose connection, the individual parts must first be separated. To do this, especially on frames with crossbars, it makes sense to separate the still quite strong adhesive seams.
If the chair wobbles not only because the glue joint has become loose, but also because the legs are different lengths, you should wait until the frame is glued back together. Only after this will it be possible to accurately determine the difference in the length of the legs.
If the glue is very strong, try steaming it. Regular glue dissolves in water. Steam can soften the glue even in tightly closed seams.
For this purpose, use a rubber hose that is used for squeezing juices, or buy a thin gasoline hose with a diameter of 6 or 7 mm at an auto parts store. Attach a suitable metal tube to both ends of the hose, insert one of them into the drilled plug, and it, in turn, into the spout of the kettle. This way you can direct the steam to the right place.
Before you start steaming, move a chair closer to the stove and position it so that you can easily reach the area to be treated. Make sure that the water formed as a result of cooling the steam does not drip onto other places, especially the soft upholstery.
Wear a mitten on the hand with which you will hold the hose, as the hot steam will cause the hose to become very hot.
Direct the steam to the edge of the glue joint and try to move both pieces of wood apart after a while - it is likely that this can be done in a couple of minutes.
This method will help remove old glue on exposed trunnions. Steamed wood must first dry before it can be glued again.
This is what the connection between the drawer and the back (above) and front (below) legs of the chair looks like.
A more labor-intensive method is gluing a chair, in which the drawers located under the seat are inserted and tenoned into the legs, and to increase stability, all corner joints are secured from the inside with triangular or trapezoidal blocks made of solid wood. Here you are faced with a rather complex connection, where it is not enough to separate just one glue seam. In other words, in such a chair it is impossible to separate one part and re-glue it: the entire drawer frame must be separated, or at least one corner of the chair frame must be completely opened.
If you use force, you will break the thorn of the tsar, or even break it off completely. This is where hot steam comes in handy.
Make sure that the frame is subsequently glued at exactly the same angle.
Thin wedges can be inserted into the large tenons on the sides to ensure a tight connection to the chair leg.
How to glue a wooden chair: types of glue, gluing the legs and complete repairs.
Published by kachlife on 10/27/2020 10/27/2020
Wooden furniture, in particular chairs, is an element that complements the interior of probably most residential premises. Many of them are not only functional, but also aesthetically pleasing. Unfortunately, wooden products, unlike those made from artificial materials, consist of a large number of elements and tend to become loose, begin to creak, or may even fall apart. There is no need to rush to get rid of them and send them to a landfill. Often, all you need to fix and continue to use your favorite chair is some glue and a couple of simple tools.
Leg gluing and complete repair
Once you have decided on the choice of glue, you should make sure that you have the necessary tools. It has a significant influence on the strength and durability of the connection. For successful repair you will need:
Sandpaper, sharp knife, chisel. Used to remove old glue residues, remove grease and prepare the joint of a leg or other part. Hammer. Required for reliable and tight driving of the tenon into the groove
It is important that it has a rubber nozzle (to avoid damage to the varnished coating). Clamps. To tighten the parts tightly
Pressing the glued parts of the chair as tightly as possible is not the least important element of a successful repair. In some cases, belt clamps are perfect.
To tighten parts, it is also possible to use improvised means, for example, ropes or a heavy object.
There are several main stages of repair:
- First you need to disassemble the chair. Pull out the loose leg and other parts that will prevent easy access to the damaged connection.
- Using a knife, chisel and sandpaper, clean the surface of the tenon and groove (trunnion).
- Lubricate the joint with pre-prepared (if required) glue according to the instructions. Place the part in its place.
- With light blows of a hammer with a rubber nozzle, hammer the tenon into the groove until it stops.
- Remove the squeezed out excess glue from the product. A piece of ordinary fabric will help with this.
- Press the joint using clamps or improvised means.
- Wait for the glue to dry completely according to its instructions.
So with a few simple operations you can give your furniture a new life.
This is especially important when you need to glue your favorite chair, which you don’t want to replace with a product made of plastic or metal, because high-quality wooden furniture, although it costs much more, is more durable and aesthetically attractive
Repairing a wooden chair: how to glue wood tightly
First of all, loosen nodes are separated. Sometimes you have to completely disassemble the chair to carry out work. This should be done carefully so as not to damage the grooves.
If you only need to glue one leg, complete disassembly is not necessary.
Next, remove the remnants of old glue from the surface of the spikes or dowels. This procedure is performed with a knife or chisel. If the old composition does not come off, the parts can be doused with hot water steam. The desired effect is also achieved using vinegar or solvent.
Then, using sandpaper, the wooden surfaces are cleaned of dried glue. The resulting chips and dust are wiped with a damp piece of cloth.
It is important to consider that the key to reliable bonding is high-quality cleaning of surfaces.
The next step is to apply glue, and the elements of the chair are inserted into the corresponding grooves and hammered in until they stop. If the element cannot be pulled out completely, glue is injected into the groove using a syringe.
First you need to stretch the frame as much as possible. Excess glue is removed using a flap. For reliability, wooden furniture is secured with a clamp, press or tension belts.
The repaired piece of furniture must dry out, which should be ensured before removing the screed. The amount of time required for the glue to harden is indicated on the packaging. For PVA this interval is 24 hours.
You can glue a dried out wooden chair at home.
You don't need any specialized skills to do this. The key to success is a high-quality adhesive composition. If, after carrying out repairs yourself, wooden furniture does not stop creaking, you should seek help from a specialized workshop.
We invite you to watch an interesting video about chair repair:
A brief overview of the types of chairs
"Array"
These models are the most common, and they are also among the easiest to manufacture. There are no curly lines or changes in geometry, which is why these chairs are recommended for assembly by novice furniture makers. They are stable, reliable, durable and fit well into the interior of wooden houses or dwellings that are decorated in a rustic style.
The only drawback of this type of chair is its massiveness. But it is partially leveled out if you use low-density wood. And decorating it like a “heavy” species, such as oak, is not so difficult. Some technologies can be found by following this link.
For living rooms and dining rooms, you should focus on any of the modifications of a massive chair, which differs from the standard options in a soft seat. When assembling such a piece of furniture, it is advisable to combine materials. It is advisable to make the frame from solid wood, and reduce the parameters of all elements somewhat - carved legs, a more elegant back (not solid, but made of slats). For the seat, you should take plywood, which is sheathed.
Another variety is the armchair chair. It is somewhat more difficult to make, but for a living space, a recreation room, or a terrace, these are the most acceptable models. Such comfortable chairs can be additionally upholstered, with shock-absorbing material placed under the covering; here a lot depends on your own imagination.
If a chair is made for a child, then “solid” is the best solution due to its stability. It is guaranteed that a naughty baby will not roll over with the high chair.
"Cot"
These chairs are more suitable for use on the premises or in a country house. In addition to being easy to transport, they are convenient in rooms with a small area. Such a chair can, when folded, stand somewhere against the wall, on the side of the closet, and not take up useful space. If necessary, it is easy to transfer it to the “working position”. It is precisely these models that are most often used in garden plots, loggias, terraces and other places where the low weight of the product, size and mobility play a special role.
If the folding chair is assembled from multi-layer plywood, then additional ease of use will appear; it (given its light weight) can be hung somewhere on the wall or under the ceiling.
A lighter design can also be made. In such a “folding bed” the seat (and sometimes the back) is made of canvas. For example, from tarpaulin. For a summer cottage, going on a picnic or fishing - a good option.
"Transformer"
This is the name for chairs that can easily be turned into a multi-tiered shelving unit, stepladder, or something else (depending on the features of the design). These models are great for apartments. Whether it concerns cleaning, repairs, or attaching something to the wall (ceiling), you won’t have to look for a sliding ladder - it’s always at hand in the form of a “transformable” chair. And for those who like to grow flowers in the house, summer residents, who at the beginning of each year have problems placing containers with seedlings in their rooms, this is simply an irreplaceable thing.
Restoration of a Viennese chair. Part two. Three preliminary gluings of chair elements.
First part:
So, let's move on to the second stage of restoration - preliminary gluing of the chair elements. In principle, this is also one of the preparatory stages of our work. But it is one of the most important, because As a result of the work performed, we should receive elements that are ready, or almost ready, for grinding.
By the way, during restoration, some other points can always “crawl out,” so to speak, that cannot be taken into account at the initial stages. If we have any, we will work on them too.
We start gluing from the seat. Since the color of the chair in the future will be mocha, filler of the same color should be added to the glue (epoxy resin). Mine is fine dust from sanding previous mocha-colored chairs.
We start by gluing the seat. Spread a thick layer of glue on the seat frame,
and clamp the workpiece to be glued with clamps. This unit is very important, so we don’t skimp on the number of clamps.
Next, we glue the upper cracked part of the chair post.
The defect in the outer part of the seat frame is repaired with epoxy putty. Only in this part of the glue you need to add more filler so that our putty does not leak out of the damaged area.
It's the turn of the legging.
In order for the clamps to firmly clamp the unit being glued and not damage the leg, it is necessary to prepare two wooden overlay parts for the profile of the leg, and use them to tighten the gluing area with a clamp.
The last photo turned out not very sharp; it’s still inconvenient to take a photo yourself and hold the workpiece in your hands.
To glue the second post, you need to remove all the nails from it.
The following happened.
Apply glue and attach another broken element to the stand.
It is clear that there is no way to glue such a knot using clamps. Here I am using my own development, which I would not like to put on public display. I think that my readers will not judge me for this... If someone really needs it, I’ll tell you in a personal message.
We send the glued elements to dry for a day, no less.
In the first part of my MK, I mentioned the broken joint between the back and the upper parts of the chair posts. Before gluing can begin, they will have to be made of some strong material. I have pieces of Siberian larch for these purposes. The element itself has a trapezoidal shape.
The recess in the rack should be thoroughly cleaned of any remaining old glue so that the new connection is strong.
The lower size of the future part is 27 mm. Therefore, we make a workpiece with a width of 27 mm and, using an angle grinder, adjust the angles of inclination of the trapezoid to the dimensions we need.
We round off the upper part of the workpiece and also adjust it to the trapezoidal shape we need.
Through careful and painstaking work we achieve good adhesion of the workpiece to the edges of the recess.
And then, using a grinder, we adjust the thickness of the part and cut it to the length we need.
To glue the blank we made, we will have to partially assemble the chair in order to determine where to place it on the stand.
As you can see in the photo, we secured the back posts of the chair to the base of the seat and, using the holes that appeared in the posts after removing the hammered nails and screws, secured the back of the chair to the posts using mounting screws.
After this operation, carefully knock out the back using a mallet.
Next, using a pencil, we outline the contours where our manufactured part will be placed and glue it to the racks using the method known to us using clamps. Since we fit the part to the groove very tightly, the excess glue must be very carefully removed with a rag.
At this stage, it is necessary to secure the previously glued elements using larch dowels with a diameter of 8 mm. To do this, use a drill with a diameter of 8 mm to drill holes in the glued parts (in the rack where the nails were driven, precisely in their locations, so that the holes from the nails would not be noticeable in the future) and use glue to drive the dowels there.
Since the new element we have made is securely secured with clamps, we can immediately drill holes on both sides of the clamp element to secure this element to the rack using two dowels.
And secure the glued nodes with a dowel. In this case, it is best to drill holes at an angle to the plane of connection of the made element with the stand.
This arrangement of the dowel will significantly increase the strength of the joint. It is also necessary to secure the previously glued knot of the cracked top of the rack with a dowel.
Thus, as a result of the second stage of gluing, we got this picture.
As can be seen from the last photo, at the second stage of gluing, in order to strengthen the elements, we installed 9 dowels and glued 2 new elements to the chair posts. We send the glued elements to dry for a day.
After drying, all we have to do is seal the holes in the back of the stand that were created in the process of pulling out the remaining nails and screws from the previous repair of the chair. As you can see in the photo, there were 4 of them.
First, holes are drilled, and then dowels are driven into them using glue. The only thing I had to do in my particular case was to drill holes of different diameters - from 10 mm to 4 mm, depending on the size of the damage to the racks. Accordingly, the dowels had to be made of different diameters. This work is already known to us and I will not dwell on it in detail.
This completes the third pre-gluing stage. After drying, all our elements are ready for the next stage of restoration - polishing the parts.
As you understand correctly, this will be discussed in the next part of the MK.
Thank you for your attention.
With uv. A. Novikov.
How to repair a stool seat
But in addition to the legs, the stool seat may also require repairs. Usually the seat simply wears out over time and becomes ugly. And the side trim that comes out just lags behind, so it can easily injure you
Therefore, it is also important to know how to cope with this type of repair.
If the seat is very old, you need to cut it out and make a new one
It is important to correctly cut out the dimensions that you want to see. You also need to round the corners using an electric jigsaw and sand the seat well
Next, depending on how you want the seat of the stool to look, you need to treat it with varnish (paint) or cover it with thin plywood or special furniture film. Both of these options are good, so here you yourself must clearly decide.
Next, all that remains is to make the edge. There is no need to install it at all. If your stool is already beautiful, you can completely do without it. But if you think the edging will make the chair look better, get to work. Immediately stock up on special furniture edges in the required quantity, the reverse part of which is covered with hot glue, a sharp shoe knife, and an electric iron.
First, turn on the iron and set it to a temperature of at least 150 degrees. At this time, you need to cut off the required amount of edge - about 5-10 cm more than needed for gluing. Then it is convenient to work together. One person applies the edge and holds it, while the other irons it with a heated iron. The hot-melt adhesive heats up and fixes the edge to the seat.
It is important not to create even minimal gaps. And if they are there, you need to iron everything again until they disappear
And if the edge is glued unevenly, it is quite easy to fix: just iron it again, detach it and stick it again. When everything is ready, trim off the remaining edges with a shoe knife.
Repair of stools can be considered fully considered. From all of the above it is easy to understand that this is a completely simple matter. Moreover, it is not at all necessary to completely repair the stool if only certain parts are faulty.
How to glue a chair with your own hands
To glue a chair, you must, in addition to glue, have the following tools and devices:
- hammer with rubber nozzle;
- construction knife or chisel;
- sandpaper;
- clamp, press or tightening belts;
- a clean piece of scrap fabric.
Restoration work on a wooden chair should be carried out in the following sequence:
- disassemble the loose knot by removing it from the groove, even if to do this you have to separate other strong seams;
- remove the remnants of old glue from the tenon or dowel using a knife or chisel (if the glue is difficult to remove, steam it with water steam);
- thoroughly clean the axle of the leg (or other piece of furniture) with sandpaper and remove shavings and dust from it with a cloth;
- apply a thin layer of glue to the axle and, inserting the chair part into the groove, hammer it in until it stops with a hammer with a rubber tip;
- be sure to remove any excess glue with a cloth;
- Depending on the place of gluing, tighten the chair fragments with a clamp, belts or press with a press.
The time for complete hardening of PVA glue is 24 hours. After a day, you need to remove the tightening straps (remove the clamp) - and you can use the repaired chair. If you want your restored wooden chair to last as long as possible, buy only high-quality PVA glue from our store!
How to glue curved legs
.
If you have to glue curved legs, it is better to process one leg first and leave the other in place. This way, it will be easier for you to determine exactly how to glue the leg so that the chair does not rock. To thoroughly strengthen a loose connection
, the individual parts must first be separated. To do this, especially on frames with crossbars, it makes sense to separate even the still fairly strong adhesive seams.
If the chair wobbles not only because the adhesive joint has become loose, but also because the legs are of different lengths
, you must wait until the frame is glued back together. Only after this will it be possible to accurately determine the difference in the length of the legs.
The glue must dry under pressure. Therefore, it is recommended to tighten the newly glued frame using clamps, zwings or cords and keep it that way for about twelve hours. At the same time, you should not create too much pressure, otherwise a lot of glue will leak out of the grooves. After some time, loosen the tension a little. This needs to be done to improve quality. Make sure that when tensioning, the chair frame is at the correct angle and is not distorted. This requirement is easy to fulfill when repairing ordinary chairs. The situation is more complicated with chairs, for example, English Windsor, or with rocking chairs. However, at least the front of the chair can be controlled using a plumb line
In addition, pay attention to the fact that the newly glued parts are connected without excessive tension and with uniform pressure, as well as to ensure that the angles match exactly. Otherwise, the chair may warp under load and the seams will come apart.
Wooden chairs not only have an attractive appearance, comfort, and exquisite design, but are also highly durable and environmentally friendly. Unfortunately, over time, such chairs tend to wear out, dry out, become damaged, or their legs simply become loose.
Unlike plastic products, they consist of many small parts that are connected with special glue and several tools. If your chair is drying out, you've probably asked yourself the following questions: how to glue it yourself at home, what kind of glue to choose for quality, and how to do the job correctly.
To know how to properly glue a wooden chair, experts recommend choosing high-quality glue according to the following characteristics:
- light fastness;
- water resistance;
- absence of traces on the surface;
- connection strength.
Furniture glue
Popular adhesives among craftsmen are PVA, BF, epoxy, syndeticone, polyurethane and others. Each of them has a number of specific advantages for sealing a wooden chair:
- PVA has an unlimited shelf life, acts quickly and is non-toxic.
- Epoxy adhesive has versatility of use and strong adhesion. It is popular due to its strong connection of various materials.
- BF has high moisture resistance and quick drying.
- Syndeticone durable adhesive can withstand high loads, is resistant to liquids and aggressive compounds.
- Polyurethane waterproof adhesive is used for gluing various materials. It is physically and chemically inactive to different temperatures, ultraviolet radiation, moisture, and is resistant to stress.
Choosing glue for wooden chairs
To know how to properly glue a wooden chair, experts recommend choosing high-quality glue according to the following characteristics:
- light fastness;
- water resistance;
- absence of traces on the surface;
- connection strength.
Popular adhesives among craftsmen are PVA, BF, epoxy, syndeticone, polyurethane and others. Each of them has a number of specific advantages for sealing a wooden chair:
- PVA has an unlimited shelf life, acts quickly and is non-toxic.
- Epoxy adhesive has versatility of use and strong adhesion. It is popular due to its strong connection of various materials.
- BF has high moisture resistance and quick drying.
- Syndeticone durable adhesive can withstand high loads, is resistant to liquids and aggressive compounds.
- Polyurethane waterproof adhesive is used for gluing various materials. It is physically and chemically inactive to different temperatures, ultraviolet radiation, moisture, and is resistant to stress.
Which glue is best for gluing wood and structures made from it is a question that depends on the wishes and budget of the craftsmen.
Repair of chairs with fixed corners
Methods for repairing frequently occurring chair destruction: 1 - destruction of the leg; 2 - destruction of the king; 3 - replacement of the destroyed section of the leg; 4 — replacement of the tsar pin; 5 - elastic crack tie with tenon reinforcement with an insert; 6 - sealing a wide crack with a bet.
Repairing chairs in which the drawers at the bottom of the seat are connected to the legs with a tenon joint is quite labor-intensive. Such designs provide additional corner fastening elements - solid wood lumps. They can be in the shape of a trapezoid or triangle.
With such a connection, separating 1 adhesive seam is usually not enough. It is necessary to disassemble at least 1 corner, and in some cases, the entire frame. Do not use force to disconnect such a connection. In this case, the tsar pin can be damaged or completely broken off. You can glue the parts using steam softening of the glue.
When gluing back, it is very important to maintain the angle. Small wedges can be inserted into the tenons on the sides to seal the joint.
This may be necessary if the seat panel is not firmly and securely fastened to the frame. To strengthen such a structure, it is necessary to screw a triangular or trapezoidal chock on the inside of each corner joint. Over time, under high loads on the chair, even such strengthened joints can become loose. In this case, you will need to tighten the screws or replace them with new ones.
Sometimes you need to replace the lumps. This is necessary if they are cracked, splintered, separated or split. New parts must be identical in shape to the old ones
In addition, it is very important to adjust the side surface of the chocks to the frame. If the new chocks do not match the old ones, then the entire frame may be warped
The chocks must first be glued inside the frame, and then additionally secured with screws.
After gluing the frame, it must be secured with clamps. It is not recommended to create very high pressure, so as not to squeeze out too much glue from the seams. It will take about 12 hours to stretch
It is very important to maintain the correct angle for the chair and prevent it from distorting. Tension pressure should be uniform
Thus, repairing chairs with your own hands can be done even by an inexperienced craftsman, who will adhere to accuracy and precision in his work. Do not apply too much force to the frame of the chair, as this may damage its parts. Some adhesive joints may require steaming to release.
If you need repairs to a wooden chair in Moscow, contact contractors registered with Yuda. They can repair the leg, restore the stool by removing all the cracks, and also provide repair services or complete replacement of the seat. Our specialists will complete any work efficiently and quickly. The price will be acceptable compared to the market average. You can place your order on this page, saving your effort, time and money.
Stripping tenon joints
Before you start gluing the chairs, clean all connecting areas of old glue. To make it much easier to scrape off, apply warm vinegar or a small amount of solvent, then remove all residue from the surface.
On some upholstered chairs, the seat panels are not tightly connected to the frame, and as a result, it loses the necessary stability. This defect can be eliminated if triangular or trapezoidal solid wood chocks are tightly screwed to the frames that form the internal corners of the frame. This will strengthen the frame, it will remain stable even if the chair, for example, tips over or begins to be moved.
If the chair is used frequently and is heavily loaded, the reinforcements may also become loose. In this case, replace the old screws with new ones: they should be slightly thicker than before.
Drill holes in the corner chocks and frames so that the heads of the screws sink into them.
For corner chocks, choose screws of such length that they, without going through the frame, provide sufficient strength to the joint.
It is better to cut a new log from well-dried hardwood.
A careful inspection of the old chocks will help you determine whether they need to be replaced or whether it is enough to scrape off the old glue and apply fresh glue, and then screw in new screws. Be sure to replace cracked or split logs with new ones, which must be cut out of hard wood exactly according to the shape of the old ones, then glued into the drawer frame and screwed with screws.
Adhesive joints must be secured with clamps, clamps or cords until the glue has completely dried.
The glue must dry under pressure. Therefore, it is recommended to tighten the newly glued frame using clamps, clamp vices or cords and keep it that way for about 12 hours. At the same time, you should not create too much pressure, otherwise a lot of glue will leak out of the grooves. After some time, loosen the tension a little.
Make sure that when tensioning, the chair frame is at the correct angle and is not distorted. This requirement is easy to fulfill when repairing ordinary chairs. The situation is more complicated, for example, with English chairs or rocking chairs. However, at least the front of the chair can be controlled using a plumb line.
Restoration process: step-by-step instructions
If the “original” bolts connecting the supporting structure become loose, they are strengthened with an additional washer. For greater reliability, you can add a little universal glue to the grooves.
Replace the sea grass and horsehair used in the old days as fillers with foam rubber.
A leaky seat is updated by replacing the base with slats and/or the upholstery is completely restored. The worn surface is freed from old material. The chair is prepared for further restoration:
- cut a piece of plywood to fit the seat;
- glue foam rubber onto the base (width - 3-4 cm);
- fix the plywood around the perimeter;
- stretch the upholstery fabric onto the finished base;
- secure the material with a stapler and staples.
A chair that is updated at home can be designed better than it looked before.
You can completely replace the back with a curly one, if the design allows.
You don't have to place the fabric on the outer sides of the seat. Then the upholstery is folded inward around the perimeter. The seat frame will be visible.
The fabric chosen is resistant to abrasion and mechanical stress, and quite dense.
Replacing holey or worn upholstery is a matter of one hour.
When updating, you can use a variety of materials. With good carpentry skills, a restored chair acquires an individual style. This takes into account the material - wood type, density, texture.
You can independently clean the wooden surface of old furniture and cover it with a transparent or tinted composition, or introduce new elements into the decor.
The chairs included in the set must be decorated in the same style.
If the chair is antique, then it must be restored very carefully. Be sure to give the applied composition time to dry.
For an antique chair, choose decorative material with embroidery.
The costs of restoration at home are minimal.
Round the edges using a jigsaw and sand the edges with sandpaper.
How to glue felt pads to chair legs
Hello, dear readers and DIYers!
Surely many of you use felt pads on the legs of chairs so that they can be moved on tiles, parquet, or laminate without annoying squeaking. In this article, Matthias, author of the YouTube channel “Matthias random stuff,” will tell you how to do it correctly and reliably.
This method is very simple and can be repeated at home.
Materials. — Sheet felt — Sandpaper — Thermoplastic glue.
Tools used by the author. — Construction hair dryer — Stationery knife. Manufacturing process. All such felt pads have a self-adhesive backing, but it does not hold the pads well, and over time they move to the side or are completely lost.
Attempts to glue the prepared squares by simply applying a layer of glue to the leg will be unsuccessful; the glue simply will not stick. Also, do not try to use second or universal glue. Otherwise, replacing worn out linings will take much more time.
The master cleans the ends of the legs with fine sandpaper and begins to heat them using a technical hair dryer at a low temperature, usually about 130°C. There are also different types of glue that have a melting point from 65 to 150°C, and even higher. If you can purchase low-temperature glue in your store, then you can do without a technical hair dryer by using an ordinary household one.
Then he takes a glue stick and applies a layer about 1.5 mm thick. After reaching the required thickness, it is worth heating the glue a little more.
All that remains is to press the cut out pads to the legs. The glue will penetrate into the felt layer and form a reliable connection.
If the legs of your chair are not square, but round or oval, then you can not cut the blanks in advance, but immediately glue the edge of a felt strip of the required width and trim off its excess. You can do this with scissors, or place the leg on a cutting board and cut off the excess using a sharp scalpel or blade. In the second case, the felt will not protrude beyond the edge of the leg.
I thank the author for the easy way to attach furniture pads! Good mood, good luck, and interesting ideas to everyone!
The author's video can be found here.
Source
What to do if the glue does not hold
What to do if all the above manipulations have been done, and the chair is falling apart because the glue does not hold at all. Well, perhaps the reason is the mistakes made during the gluing process. Let's take a closer look at them.
The glue has not dried
The 24 hour time limit may not have expired.
This may be due to increased humidity, which is more common in the summer months. It has been noticed that the glue dries faster in dry air, in the winter months, when the batteries reduce the humidity in the room as much as possible. In addition, the wood can absorb excess moisture into its structure, and then, after drying out in the cold months, the chair can become loose again.
If you sit on a chair before the glue dries, sad consequences cannot be avoided.
Not dry because it was mixed incorrectly before use, this is especially important when handling epoxy glue
The glue was chosen incorrectly
The glue must have all the properties that were indicated earlier, otherwise such glue will not hold the parts being fastened; The parts weren't held together tightly or long enough.
The chair may break again due to incorrectly selected glue.
Another prerequisite for effective gluing is that after coating with glue, you must firmly press the parts to be glued and leave them in this state for a day.
The details were too small
If a breakdown occurs not along the seam, but along the perimeter of the element, gluing difficulties may arise, because the original integrity is broken. Sometimes parts can be so small that sizing will not have a positive effect and you will have to replace the part with another solid one.
If the parts of the chair are small, the glue may not hold them.
In conclusion, we can say that it is quite possible to repair a broken wooden chair and this process is quite simple and accessible to everyone. Keep at it and everything will work out!
Main types of adhesives and their characteristics
- PVA: no toxicity, fast acting, unlimited shelf life.
PVA glue is in demand in the furniture industry, the manufacture of interior items, and, if necessary, to join any wooden parts. - Epoxy: bond strength, versatility of use.
Epoxy glue has become massively popular because it firmly bonds almost all materials and perfectly levels the surface. - BF: quick drying, high moisture resistance.
BF-2 glue is suitable for gluing wood; it has an optimal range of qualities - it is not susceptible to fungus, oils, gasoline, and is waterproof.
- Syndeticone: high adhesive strength, resistance to liquids and aggressive chemical compounds; high ability to withstand increased loads.
Syndeticone glue is excellent for gluing wood and gluing various materials to it. - Polyurethane compositions: physical and chemical inactivity to different temperatures, ultraviolet radiation, humidity, etc.
Polyurethane waterproof wood adhesive is considered the most resistant to stress and vibration.