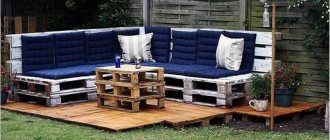
Currently, an indispensable assistant in the kitchen at home and in the pastry shop is a stand with a rotating effect. Many women love to bake cakes themselves, but decorating them is not always convenient. With its help, you can not only decorate and decorate baked goods, but also effectively serve dessert to the holiday table. It is ideal for buffets and special events.
A rotating cake stand is an essential tool for pastry chefs, from beginners to true masters.
Why do you need a rotating cake stand?
Everyone, even a novice pastry chef, should have a rotating cake stand in their arsenal. It is a smooth round or square tray on one or more legs, at the base of which lies a twisting element.
A turntable will help keep the cream decoration level. And the decorating process itself turns into a mesmerizingly beautiful event.
Please note a number of advantages of the stand:
- Easy to use. There is no need to invent anything, it is easy to rotate and wash.
- Convenience. Makes it easy to cut the cake into equal parts and place it on plates.
- Aesthetics. Beautiful presentation, decorative part of the interior.
- Speed. With such a stand, decorating the cake will go much faster.
- Versatility - suitable for holidays and as a kitchen tool.
- Material. Almost all coasters are made from durable, high-quality raw materials.
- Sustainability. When decorating, your cake will not float or fall off the plate.
The design is designed so that the tray (stand) rotates freely around its axis.
In addition, the dish helps:
- make a perfectly smooth creamy coating;
- turn the baked goods in different directions;
- pour confectionery products with an even layer of glaze;
- adds stability to large desserts;
- draw patterns and designs without stopping or bending over the plate;
- Cover the cakes with mastic quickly and effortlessly.
Some options are manufactured with a tilt, so it is possible that the device can be bent at different angles.
Step-by-step manufacturing plan
Preparation
The position of the racks is marked on the floor, wall and ceiling. After this, all the necessary lengths are cut out of the timber. The rest of the process will include the following operations:
- Wall racks should be fixed to the wall, floor and ceiling, while trying to maintain verticality. Everything is attached to the walls with anchors, and metal corners are used for mounting on the ceiling and floor.
- Racks that lag behind the walls are fixed only to the floor and ceilings with corners.
- Between the racks you should measure the distance to the crossbars, and then cut them out of the timber and secure them to the end using self-tapping screws. You can also use corners.
The plywood should be cut according to the dimensions of the spans, and squares should be cut out at the corners for mounting on the frame. Secure everything to the wooden crossbars using self-tapping screws, nails or screws.
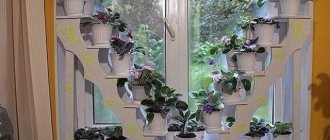
How to choose a location
Shown here is a frame shelf for working tools. In general, making a shelf in a barn with your own hands is the best solution, since this design takes up much less space than shelving. They can be installed in different places where access to hardware, screws and tools is required for work. The height from the workbench or table is chosen so that it is convenient to reach with an outstretched arm. But the shelving is best placed against a free wall or part of it, and the design assumes a height from the ceiling to the floor, and therefore there should be no other pieces of furniture, cabinets or fences in that area of the barn. If the structure of the racks or shelves is located in a darkened part, then lighting should be installed so that all stored tools can always be seen.
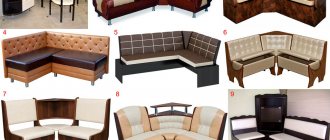
Types of rotating stands
Today, the market for pastry tools offers us a large selection of rotating stands. It resembles a pedestal on a leg, at the base of which a torsion bearing is installed. It can be a round or square plate, oval or rectangular. It all depends on your preferences and the shape of the cake. A round stand is standard. It is based on a dish of different diameters, just like a square one, it has sides of different lengths.
Such a stand allows you to create original decorations and create any decorations with maximum convenience.
Another variety is a shaped table designed for unusual presentations. This includes the popular type of stand - “Rubik cube”. It is a three-tier table with three square shelves, a base, a middle and a lid. Each shelf can rotate around its axis creating not only a cubic shape. In addition, the design is collapsible, making it easy to clean.
The stand is often used to serve colorful cakes – hence the name.
A new product on the culinary market is a turntable with a built-in electric motor; it independently rotates the dish and can tilt in different directions.
Only choosing a high-quality model with a durable assembly makes it possible to quickly manage the decor of cakes of any complexity.
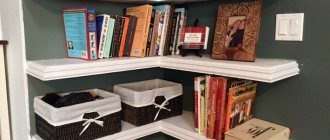
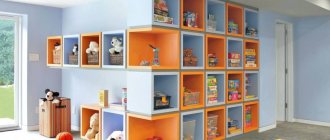
Photos of kitchen shelving
Stores offer many options for kitchen shelving. When purchasing, the purpose is taken into account. It is also important to follow the design rules. Such designs allow you to create a cozy corner in the room for a pleasant pastime.
If the ideal model is not found in stores, you can make the furniture yourself. Many people value non-standard solutions, creativity, and the ability to create beautiful things with their own hands. A shelving unit made from scrap materials sometimes turns out to be an original design find.
Materials of rotary cake stands
It is important that the stand is stable and strong. Manufacturers offer a wide selection of products from various materials, depending on which the price will vary: metal, plastic, wood, glass.
The metal stand is particularly strong and durable. When you buy such a product, there is a chance that you will have it forever.
Metal structures are heavy, but they are designed to last longer.
Plastic trays are lightweight and inexpensive. In addition, such a product quickly breaks, begins to jam, and becomes bent. It is suitable for rare uses and home tea parties. But it offers a wide range of models and colors.
This is the most affordable option. Thanks to the last circumstance, it is also the most common.
Wooden is in demand - a natural and durable product, in addition to its environmental friendliness, will fit into any interior. The downside is that it wears out quickly. Over time, the wooden surface darkens, wears off and softens, chips and scratches appear. This means it becomes an unhygienic environment for the proliferation of microorganisms.
A wooden cake maker made from natural material looks aesthetically pleasing.
Glass is the most common option. Strong, stable, durable, it will last a long time if it does not break.
Transparent with an addition in the form of a lid will become a real highlight in the design of the table.
Hidden pull-out shelf behind the refrigerator. Master Class.
A small kitchen is not one where there are few square meters, but one where storage systems have not been solved.
Remember that weird space between the wall and the refrigerator? I will share with you how to use it and how to make a roll-out shelf to store countless spice jars and bottles with plans and dimensions .
All you have to do is purchase all the parts and boards at a hardware store, order a cut to your measurements there, and assemble the whole house like a construction set.
You've probably already seen similar foreign masterclasses. The difficulty is that the materials used in them cannot always be obtained from us. And on domestic sites there are mainly translations of foreign articles.
All the materials I used can be found at your local hardware store.
The cost of my shelf was about 1200 rubles.
This amount, by the way, was not included in 17,000 - the total cost of updating the kitchen
«>
«>
«>
How to Make a Rotating Cake Decorating Stand
You can buy a stand in a store, or you can make it yourself. First you need to decide on the appearance, size, shape and material. Looking at your sketch, you can easily assemble a rotating cake stand. You will need two bearings, a wooden plate or sheet of plywood, a plastic or metal tube 14-16 cm, a metal circle 30-40 cm, nails, screws.
Before making, decide on the shape of the cake, match it with the appropriate diameter.
Once you have decided on the initial data, start making the tabletop. To do this, you need to draw a diagram. Next, you need to prepare the bearing, assemble one from 2. You need to cut two circles of the same diameter of 15-20 cm from wood. Cut a hole for the bearing in one circle and hammer it into it. Secure the circles together with nails.
The optimal diameter of wooden structures is at least 34 cm.
Install a pipe of the required height of 14-16 cm into the bearing. The pipe must stand firmly and rotate due to the mechanism. The metal circle must be welded to the tube using conventional or cold welding. Cold welding is similar to plasticine; it is convenient to work with without experience. Secure a wooden circle on top of the metal circle. The top can be decorated with self-adhesive film of the appropriate color. The rotating cake tray is ready!
As the film wears out, it can be replaced.
Details
Manufacturing materials
Most often, lumber with a wide variety of cross-sections is used, but welded iron structures can also be used. It is not at all necessary to use new building materials; you can even use improvised racks, used plywood, and uncut boards. In this case, the following requirements are imposed on the materials:
- Easy to assemble and process.
- Ability to withstand low temperatures in winter.
- Integrity and strength.
The materials give pretty good results when combined with each other. Wooden shelves can be located on a metal frame. And the boards on the walls are mounted on metal brackets. Metal and wood are painted with protective compounds, and before installation they are treated with antiseptics, anti-corrosion agents, and also compounds against the rapid combustion of wood (fire retardants).
Wooden shelving
Oddly enough, wooden shelves are the cheapest. Wooden models are distinguished by their low weight and high strength. Wood works well in compression and also resists torsional and bending forces. It is best to make shed shelves from hardwood, although they can be difficult to cut or even drill. These types of material hold screws perfectly, and the fastening in them will not become loose.
The advantages of wood are as follows:
- Long service life subject to regular treatment and timely repairs.
- Ecological cleanliness.
- Aesthetics.
- Ease of maintenance.
- Quick and fairly simple assembly.
- Small price.
A noticeable disadvantage is that the material is susceptible to rotting; the wood can be damaged by bugs, which results in rot. But these difficulties are quite easy to overcome through high-quality pre-processing. The simplest method is to saturate the wood with drying oil heated to +65 degrees in 2 approaches.
Metal shelves
Shelving with a metal frame will last you much longer than wood products. How to make shelves in a barn so that they are reliable? Choose metal, which is an ideal solution for bulky and heavy items. each shelf on supports can withstand from 100 to 125 kg, and the structures reinforced with stiffening ribs can easily withstand up to 255 kg. The material is also inexpensive and you can use old brands, channels and angles. Iron pipes with rectangular and round sections are suitable. Profiled pipes with rectangular walls are much easier to join together.
The advantages of metal are as follows:
- Easy to assemble using welding equipment.
- Stability, durability and high degree of strength.
- Unlimited number of tiers.
- Possibility of conversion, adding height and length if necessary.
If you weld movable rollers to the bottom of the racks, the racks can be moved to another location throughout the barn. At the same time, there should not be too heavy objects on them. The metal should be treated in advance with anti-rust agents, and then painted with acrylic, oil, latex paints and varnished.
What tools are needed for work?
In order to make shelves from chipboard boards on a wood frame, you should take panels with a thickness of at least 2 cm. For cross beams and racks, use timber (lumber) with a cross-section of 6*7 cm. The elements of the racks are connected using self-tapping screws (from 8 to 10 cm, 4 cm shelves), and for stability they use overhead steel corners. You will need the following tools:
- Machine for fixing sandpaper.
- Electric drill, screwdriver, screwdriver, pliers and knife.
- Tape measure, building level, carpenter's square and pencil.
- An electric jigsaw, a circular saw, and also a wood saw.
For painting, latex and acrylic paints and varnishes are chosen, as well as pentaphthalic enamels. They also buy a protective primer against moisture and an antiseptic, sandpaper (should be No. 120 and No. 200).
How to choose a quality cake stand
Before choosing, you need to accurately answer the question for what purpose and how often will the stand be used? If you rarely bake with your family, then it doesn’t make sense to spend money on a professional one. Pay attention to glass or wooden coasters; they will last a long time, maintain stability and appearance.
The glass rotating cake tray looks elegant.
If you are a professional pastry chef or are planning to become one, then your option is a metal stand. It is more expensive than others, but the most durable, it will never fail, break, bend or cut. In addition, it meets all sanitary standards in terms of hygiene.
They can withstand heavy cakes and do not deform over time.
In the case of plastic products, you should be wary. They are more suitable for holidays with one-time use. Such tables quickly warp and begin to jam, which will not allow you to make beautiful and even patterns on the dessert, and in the end it will be impossible to place cakes on it. Distinctive feature: low price.
The model range is quite wide, from shape to color range.
When choosing a stand, pay attention to the following:
- Choose a stand with a larger diameter, so you can decorate products of any size, from small pancakes to large cakes.
A rotating cake maker is often equipped with complementary accessories: it can be supplied “accompanied” by a spatula, a lid, baking dishes, a pastry syringe, etc. - Give preference to tables that are heavy in weight; they are more stable and can support heavier cakes.
The stand must be of high quality, so when choosing it, focus on strength, as well as on the possible service life. - When choosing multi-tier stands, pay attention to the height of each stand; it should be at least 15 cm.
A turntable tray will be useful at banquet events and as a “showcase” for restaurants, cafes, and pastry shops. - Choose a model with a transparent lid, this way you will protect the product from unwanted environmental consequences (winding, insects).
The decisive condition for the purchase for many is the presence of a transparent lid, which is suitable for serving purposes. - Some tables come with a special mesh for cutting the cake into perfectly even pieces.
An additional net, which is often included with the swivel stand, is very popular.
A rotating cake stand is a real find among kitchen utensils and will become the main assistant in your culinary inventions. With its help, you can easily and quickly decorate baked goods, as well as decorate your holiday table. In a wide range, you can always find a stand according to your preferences and price status.
A device for decorating a cake is necessary because it is the most convenient equipment for presenting and decorating cakes today.
Laconic forms, classic and with style accents, will complement the special event. Bright and multi-colored ones will fit perfectly into a children's party, and light-colored porcelain ones will be a wonderful addition to a wedding.
Weigh the pros and cons and feel free to purchase a rotating cake stand!
Attaching a shelf to a wall surface
The successful outcome of actions related to attaching a shelf to the wall surface is greatly influenced by the type of fastener. Therefore, before you begin this operation, you need to familiarize yourself with the types of fasteners.
- Invisible fasteners. When installing a shelf, the fastening elements are hidden in a brick or concrete wall. The result is a design that is refined and lightweight. It should be remembered that invisible fasteners cannot be used when attaching a shelf to plasterboard walls.
- Using brackets. If it is impossible to hide all the fastening parts, the best option would be to purchase corners made of plastic or steel; you can also use a set of decorative fasteners to make the structure attractive. It should be remembered that the brackets are not compatible with any interior.
- The most common fastening method, quick to implement, practical, simple and capable of matching any design, is hinges. The methods of their manufacture have different effects on the installed structure. And not everyone can fix them on their own. Therefore, to secure the product on the hinges, it is better to contact specialists.
- Use of glass holders. The rubber seals found in this fastener can reliably protect the surface of the area at the fastening site. Shelf holders of this type have different designs, one of which is a model with Velcro, secured at the bottom and a support at the top.
Tools and materials
You cannot hang a shelf on the wall without the following tools and materials:
- electric drills;
- screwdrivers;
- level;
- self-tapping screws;
- hammer drill;
- glue;
- anchors;
- electric jigsaw;
- hammer;
- drill;
- set of fasteners;
- wrenches;
- marker.
What should the wall be like?
When choosing a mounting option, you need to think not only about attractiveness, but also about the sequence of attachment to the wall, taking into account the material of its manufacture.
- The concrete wall has good strength. Only because of this it is very difficult to attach a self-tapping screw to it. It takes a long and tedious time to drill the wall with an electric drill to make a hole.
- There are no difficulties when installing a shelf to a wooden wall. You just need to think about where to drill the holes. After this, the structure is brought to the designated points into which the screws are screwed. No additional tools are needed to attach products to wooden surfaces. The self-tapping screw can be inserted freely using a regular screwdriver.
- When attaching the product to the surface of a wall finished with plasterboard, it is better to use a butterfly anchor.