Many owners of small apartments sooner or later face an unpleasant problem, the scale of which increases from year to year. We are talking about all kinds of things, which are becoming more and more common in the home. Preparations, seasonal shoes and clothing, tools or other items that are needed from time to time take up precious space, but it is impossible to lose them “forever”. In this case, many find a way out of the current impasse - they decide to make a wardrobe on the balcony with their own hands. Anyone who knows how to handle carpentry tools can handle the task: the work won’t take much time, but it will save the house from further clutter. This is especially true for balconies, because a lot of “good” is sent there into “exile”.
Requirements for location and design
The first condition for a comfortable “life” of a cabinet on a balcony is its glazing, otherwise the furniture will get wet and become an attractive place for mold. Insulation and heating are also desirable. A level floor is necessary to prevent the future structure from skewing.
For a balcony closet to become a convenient and effective storage space, it must be:
- very roomy, which means that in a narrow room it is logical to make it under the ceiling;
- functional - having many different compartments so that you can hide all objects of different sizes in it;
- made of moisture-resistant material, since even the windows of a glazed balcony are often opened to ventilate the apartment;
- nice and neat, so as not to spoil the appearance of the balcony, which for a long time no longer wants to look like an ugly dump of forgotten things.
Saving space, which is already small, is another requirement for a closet, which should be located on a relatively long but narrow balcony. A typical elongated room allows only one rational option - installing furniture at its ends. In this case, the most suitable models will be built-in wardrobes - compartments or hinged structures.
Some apartments have at their disposal original balconies with not very practical angles. In this case, the owners have to design unusual furniture - corner cabinets, which are more demanding of their creators.
Wide and spacious loggias make it possible to place furniture along a long wall, but in this case it is not made too deep (300-350 mm), since more massive cabinets will hide the volume of the room, which is already unable to boast of square footage.
Balcony designs and their capabilities
The possibility of equipping a balcony with storage systems primarily depends on its design. It’s also useful to think in advance about what you plan to store there.
- Open balcony. It is almost impossible to organize storage systems for things here. But this is a great place for a flower garden and even a small garden in an urban environment.
- Glazed but not insulated balcony. This is a more functional space where frozen semi-finished products can be stored in winter. This is especially convenient if the balcony is adjacent to the kitchen. But in the summer, due to the increased temperature and humidity, it is difficult to store food and fresh vegetables there without special equipment. But skiing and snowboarding will be a great place to spend the summer season there. The choice of furniture materials for such a room is also not great - you cannot use chipboard, MDF or solid wood due to sudden changes in temperature and humidity. The most reliable options are furniture made of metal or plastic.
- Glazed insulated balcony. Here you can safely organize places to store seasonal clothes and shoes, bicycles and car tires - that is, all items and products that can deteriorate or crack due to sudden changes in the environment. The requirements for furniture are the same as for all premises - functionality and aesthetics.
Related article: Is it possible to lay laminate flooring on a balcony?
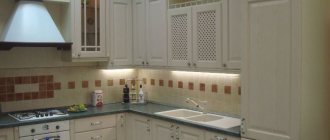
Materials for balcony cabinet
Even on an insulated balcony, the main threat to furniture remains moisture. Therefore, the material for its creation is selected with this factor in mind. The following options are possible:
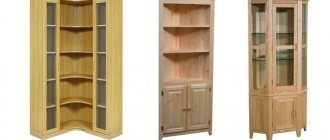
- Wood is the best material for any furniture, as it is aesthetically pleasing, easy to process, and has excellent performance characteristics if the material is properly processed and properly cared for. Contraindication: cold balconies with high humidity. Often, wooden lining is used for this purpose.
- Chipboard (chipboard). The Achilles heel of this material is not very good resistance to moisture and temperature changes, so such furniture will only feel good on glazed balconies and loggias. Laminated chipboard is suitable for heated rooms.
- MDF. This high-quality material is closer in properties to natural wood, but compares favorably with it in price. These panels are not afraid of either humidity or temperature changes. Not the last plus is their environmental friendliness.
- Plastic - PVC panels. The most unpretentious candidate on this list, since it is not at all afraid of moisture, is practical, cheap, and very easy to care for. The disadvantages of plastic are fragility, gradual color change when exposed to sunlight for a long time.
- GKL. Another contender is moisture-resistant drywall, but this material is not the best of the “applicants.” The reason for this is its fragility. Other disadvantages are the large consumption of the profile for the manufacture of a more or less reliable structure, doors, which in any case will have to be made of a different material.
- Metal-plastic. This material is known for its practicality. He is not afraid of either heat or cold. High humidity and mechanical stress are also not too much of a threat. The biggest enemy of the union of metal and plastic is the bright sun, which sooner or later causes it to yellow. Individual elements for the cabinet (doors, shelves) are purchased at hardware stores.
To make a wardrobe on the balcony with your own hands, you can choose not one, but several materials. Combinations of them make it possible to create unusual, original furniture.
Frame
Timber is often chosen for this role; its dimensions are 40x40 or 50x50 mm. This option is traditional, but if the balcony is not heated, wood is not the best choice; its dimensions will change “thanks” to changes in humidity and temperature. Regular treatment with protective impregnations will also be necessary.
The optimal choice for balcony conditions is a metal profile with a galvanized coating. It is not afraid of moisture or temperature changes, and it is quite easy to attach any finishing material to metal. An alternative is guides with holes for brackets; shelves are mounted on them. Plus - easy change of distances between them.
Shelves
These elements are easiest to make from sheet material. It is possible to use thick plywood, chipboard or laminated chipboard, OSB, but shelves for heavy things require the “help” of wood. These elements are often made from scraps of boards left on the farm. Impregnations and paints and varnishes for processing are purchased from those intended for outdoor use. It will protect the elements from ultraviolet radiation. A water-based varnish can protect your apartment from “wonderful aromas.”
The shelves are simply laid on timber or fixed to the frame with self-tapping screws. Another mounting option is to use corners on the balcony wall, but this work will become more complicated and take longer if the walls require the entire set of shelves to be mounted on dowels. The way out of this difficult situation is to assemble the frame and fix the elements to it or guides with brackets.
Doors
There are 3 door options that are usually used when making cabinets for balconies or loggias. This:
- ordinary - swing;
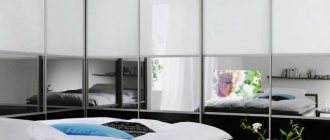
- sliding - coupe type;
- roller shutters
The first ones are the easiest to install yourself; you only need doors, furniture hinges and a screwdriver. Sliding structures allow you to save space if you plan to install a bar counter or any furniture nearby, but they require a set consisting of guides and a roller system for the door leaf. New-fashioned roller shutters are an expensive pleasure, but in this case the cost usually includes the installation of these devices.
All doors can be the same height as the cabinet itself, but it is much more practical to divide the balcony furniture (especially tall ones) into several sections (2-3), and make its own doors for each of them.
If we talk about materials that are convenient for making canvases yourself, then the first place is able to separate wooden boards and lining. These elements are assembled on a wooden frame. Doors made of laminated chipboard are a good enough reason to order the sheet from a workshop, since only a circular saw can cut the sheet without chipping. High-quality lamination of ends at home is a mission that is almost impossible.
Cushioned furniture
The idea of home comfort is inextricably linked with upholstered furniture. If a balcony or loggia is planned as a place to relax, you need to install a sofa, even a tiny one. If the area is small, you should use a soft chair. A small soft ottoman can be placed even in the most modest room.
The upholstery for balcony furniture should be selected so that it can withstand abrasion, dirt and fading. Compliance with such requirements will allow you to maintain its appearance for a long time.
When choosing furniture, you need to focus on the size of the balcony door or opening. This will help avoid unpleasant surprises.
Suitable types of cabinets for balconies
There are several of them. All designs differ in complexity of work, so the choice is up to the owners.
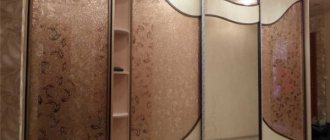
- Built-in wardrobes. This is furniture placed in a natural or artificially created niche. Since most balconies still have a regular rectangular shape, this is the most common option. Often, sliding doors are chosen for them. The disadvantage is the inability to move built-in furniture to another place.
- Structures with swing doors. If we talk about independent work, then this model is the simplest option that does not promise any difficulties for the master. The only relative disadvantage is the need to leave space to open the doors, but it is difficult to imagine a balcony where this operation would be difficult.
- Corner balcony furniture. It is used not only where the room has an unusual configuration, because such cabinets make it possible to create a large container, but at the same time not sacrifice the window opening, maintaining access to light. The narrow side in this case is adjacent to the facade wall, the wide side is adjacent to the side wall of the balcony.
- Compact narrow cabinets. If loggias have blank side walls, then this narrow furniture is made high. With full glazing along the perimeter of the balcony walls, cabinets are located under the windows or at both end sides. The choice of sizes depends only on the things that will be stored there.
- Cabinets. This option can be a salvation for the smallest balconies. Inside such structures there are a large number of shelves or compartments for storing various things. Usually, simple hinged doors are chosen for this narrow furniture, since any other option will simply be inconvenient.
Only after searching and choosing the model you like can you begin further “accomplishments”.
Description of cabinet options on a balcony or loggia
It is preferable to make the furniture on the balcony as functional as possible. It should contain many shelves and compartments. In addition to convenience, the cabinet can be used as a design element and equipped with additional functions. Then the balcony will become not only a storage place for little-used items, but also a place to relax.
Cabinet options:
- With insulation – installed if, in addition to storing items, you plan to store jars of pickles. In this case, insulation of special separate boxes is provided. To preserve vegetables and other preparations, above-zero temperatures are required, so it is advisable to insulate the entire balcony.
- With retractable niches - for storing tools: hammers, screwdrivers, drills, etc.
- Corner option - a solution for arranging an empty corner. The products are characterized by large capacity with minimal space consumption.
- Low floor cabinet - installed on the sides or along the perimeter of the balcony, serves as a seat cabinet.
- Racks with roller shutters are easy to assemble yourself.
Tools, materials
Preparation of tools is always necessary, since it will not be possible to quickly make a cabinet on the balcony with your own hands without the necessary set present at the workplace, because you will have to be distracted by searching for one thing or another. Therefore, it is better to gather such a “warm company” in advance:
- paper, pencil for drawing, marker for marking parts and walls;
- furniture hinges (butterfly hinges are optimal; they do not require insertion);
- hammer, hacksaw, screwdrivers;
- metal (plastic) corners;
- stain, varnish;
- sandpaper;
- tape measure, plumb line, building level;
- screws, dowels;
- drills - for concrete and wood;
- power tools - jigsaw, hammer drill, screwdriver.
Thermal insulation and insulation are desirable, and a flat floor surface is necessary, so first of all, arm yourself with a level and check the horizontalness of the coating. If leveling is necessary, then flooring is done.
Material selection
Tree
Wooden cabinet
Tree
- Unrivaled eco-friendly and breathable material. But it is expensive, so financial possibilities do not always allow you to make a completely wooden cabinet on the balcony.
- In addition, on an open balcony, wood tends not only to swell from moisture, but also to become covered with mold or mildew, and to be attacked by insects.
- Therefore, it is very important to treat wooden parts with varnish or special impregnation. Paint and varnish products and impregnations for balcony cabinets should be taken the same as for exterior work.
- Water-based varnish has the least pungent odor. But there is no need to paint the tree, as this will cause it to lose its natural beauty.
- Quite often, lining and plywood are used to make parts of balcony cabinets.
Chipboard
Chipboard cabinet
Chipboard
- In most cases, shelves for cabinets are made from it.
- Has increased resistance to temperature changes.
- On balconies, more moisture-resistant laminated chipboard is often used. MDF, like OSB, has better moisture-resistant qualities, but is used less frequently due to its high cost.
Drywall
Using drywall for a balcony
Drywall
- Lightweight, easy-to-use material, and inexpensive . But the maximum that can be made from it for a balcony cabinet is doors : cover the door frame with sheets of plasterboard using self-tapping screws, cover the joints with reinforcing tape, putty and sand.
- Prime the dried surface, dry it again and paint it with water-based paint or wallpaper it.
- As a result, if you show a little imagination, you can get an unusually beautiful facade.
- Use plasterboard with caution for the side walls of the cabinet and it is better not to use it at all for shelves ; it may turn out to be more expensive if one day the shelves cannot withstand the weight of the objects and fall apart.
Plastic
Ceiling lockers on the balcony
Plastic
- Thick plastic can withstand temperature changes and precipitation, so on open balconies it is more advisable to mount the cabinet completely, right down to the shelves made of thick plastic, made of this material on a metal frame.
- It is flexible and bends easily, so the back and sides of the cabinet can be made from a single piece of plastic.
- Two-layer thick plastic, for this you just need to cut one layer at the bend.
- The plastic is very light, resistant to aggressive environments, it is very easy to care for and wash. It is ideal for a closet if the balcony walls are made of plastic lining.
Rack
- Quite often, several types of material are used simultaneously for balcony cabinets. Metal profiles and plastic are recommended for open balconies, where the impact of temperature changes, rain and snow will be greater. But chipboard and drywall are best used only for closed and preferably insulated balconies.
- The main goal is to make the cabinet not only functional, but also inexpensive. Therefore, it can accommodate leftovers from other works or parts of old furniture. In skillful hands, all this will play in a new way and it can turn out to be a masterpiece of its kind.
- Wooden blocks are best suited for the frame. Craftsmen recommend using pine bars with a cross section of 4x4 cm, 5x5 cm, 4x6 cm, etc.
- If the cabinet will be located on an open balcony, then it is better to use a galvanized metal profile for the frame.
- For the back wall you will need a sheet of plywood or plastic or a chipboard sheet.
- To make shelves, you should use reliable and durable materials, primarily wood or chipboard. The edges of the cut shelves and door parts should be carefully processed using a hand-held electric router.
- Doors are a complex and variable design element that gives the appearance of the entire facade. They are made of wood, in particular, lining, laminated chipboard, plasterboard or plastic. They can be assembled from leftovers and as a result get a unique, elegant façade.
Manufacturing a balcony built-in wardrobe
The first stage of creating any furniture is drawing up or searching for a drawing that can be easily optimized for your room. Therefore, they take a tape measure, measure the height and width of the balcony, and determine the required depth of the furniture.
The more measurements have been taken, the greater the chance of getting furniture that will fit perfectly into a small space. The racks deserve the most attention, since all 4 elements can differ in height, and quite significantly. If additional stiffeners are planned in the middle, then you will have to carefully check them too.
- First, they draw up a drawing on paper, take into account the dimensions of the shelves, and they depend only on the set of things that will find their “shelter” there. All dimensions are transferred to the materials, the blanks are cut out with a jigsaw or hacksaw. They are sanded and stained (varnished).
- They begin marking the surfaces; the correctness of the guide lines must be checked with a level and plumb line where the frame beams will be installed. The elements are attached using dowels and self-tapping screws directly to the walls of the niche for the built-in wardrobe.
- A beam is applied to the lines, holes are made through it with a thin drill so that marks remain on the surface of the walls or ceiling. Step - 500 mm. The workpiece is removed, and holes for dowels in the walls are drilled with a hammer drill. The fasteners are inserted and the timber is secured with self-tapping screws.
- If the rear racks cannot be mounted on the wall, then they are connected to the ceiling and floor. Metal corners are used for this operation. To compensate for the moisture and temperature expansion of wood, pieces of penofol are placed on top and bottom of the racks.
- Transverse beams are laid on the resulting frame: they are fixed with the same corners. Shelves are mounted on them. Then markings are made on the door blanks for the hinges, and they are attached to the canvas. Lastly, together with an assistant, they do fittings for correct installation on the racks, then the hinges are attached to them.
The last stage after installing the cabinet doors is fixing handles and latches on them.
Step-by-step instructions for assembling and installing the cabinet on the balcony
Self-assembly and installation of storage furniture will not be difficult if you use the diagrams and act in stages, as well as have the desire and a little patience. Consider a simple wooden option.
Step 1: making the frame
| 1 | According to the drawn up diagram, elements are prepared for the basis of the structure - the frame. It is made of boards, timber or profiles. The wood is cut with a jigsaw. The metal-plastic profile is cut with metal scissors. |
| 2 | Next, according to the markings, the frame elements are fixed to the floor and ceiling. The resulting rectangles must be connected with risers set vertically in level. Then attach the risers with self-tapping screws to the wall, with a fastening pitch of 30-40 cm. |
| 3 | Secure the horizontal bars along the marked lines. They are needed for installing shelves, as well as for structural rigidity. |
| 4 | Connect horizontal beams to vertical risers with metal corners using self-tapping screws. It is better to install the corners from the bottom of the beam so that they are not visible. |
| 5 | If there is no long solid board for vertical installation, it is permissible to connect two short sections by overlapping. Then the lower and upper frame parts are installed simultaneously. With prefabricated beams, the structure is attached to the wall. |
Step 2: Installing Shelves
| The next step is to install and secure the shelves. They are made from boards, which are laid flush next to each other on crossbars, or from plywood with a thickness of at least 10 mm. Screwed on with self-tapping screws. |
Step 3: manufacturing and fastening doors
| 1 | Before making doors, you need to find out their size based on the opening, taking into account the hinges. If you plan to install two doors, then you can calculate them immediately and adjust them after fitting them on site. |
| 2 | The doors can be assembled from boards attached to the frame or inserted into it. First you need to prepare the base: make grooves on the supporting bars with a router, and cut tenons on the boards. For cladding it is better to use lining. |
| 3 | The door base is covered with clapboard or plastic panels. If the balcony room is decorated with the same material, then the cabinet will fit perfectly. The base for the doors is made of bars with a thickness of at least 12 mm. |
| 4 | The parts of the base for the doors are attached to each other in the corners with spikes and puzzles. For rigidity, centerpieces are installed. |
| 5 | The sashes are attached to hinges, which need to be deepened at the fastening point to the size of the thickness of the plate. |
| 6 | Another fastening option is furniture hinges, but they require round recesses in the frame. |
| 7 | The last stage is marking and installing handles. Fasten with the screws included in the kit. |
| 8 | It is recommended to fasten walls and shelves to the base with furniture corners using self-tapping screws. |
Basically, the construction of a cabinet from lumber is ordered to specialists. But it's much cheaper to do it yourself.
Expert opinion
Dmitry Laptev
Carpenter with 20 years of experience.
A cabinet with louvered doors looks beautiful and elegant. This door decor allows you to constantly ventilate the inside of the cabinet. Wardrobes come with hinged, folding and sliding doors. To make your own cabinet with louvered doors, follow our tutorial. To do this, you can use ready-made doors that are commercially available, or order them from a specialist.
Making a small cabinet
This option is the simplest, so owners of inch-sized balconies choose it quite willingly. The advantages are the ability to place such compact furniture under the windows, make a table or a comfortable sofa out of it. To “magically” transform an ordinary wardrobe into upholstered furniture, it is enough to “equip” the top and the virtual back-wall with pillows.
The material can be chipboard, chipboard or MDF. Fiberboard is suitable for the back wall, but only where there is no threat of constant humidity, since these boards have a “weakness” for it, which invariably ends in swelling for the material.
In this case, the cabinet, despite its small dimensions, also needs a full drawing. The work will require ordinary tools, and self-tapping screws, furniture nails and metal corners will suffice as fasteners. After making all the parts, they begin to create mini-furniture:
- Using the corners, assemble the bottom and side walls.
- The back wall is covered with fiberboard, the part is secured with nails.
- Screw the corners where the shelves will be, then install them.
- An MDF sheet or table top is mounted on top.
- The method for obtaining a real seat is to cover the cover with foam rubber (sintepon) and then cover it with thick fabric. It is fixed with the same glue; its replacement is a furniture stapler. The finished seat is attached to the side (from the inside) with hinges.
- The last step is to attach the door.
Small and narrow cabinets that are hidden under the window sill are made using a timber frame. If such furniture will be located across the entire width of the window, then additional vertical support bars are installed to ensure the stability of the structure. The facade is usually decorated with unpretentious hinged doors or convenient sliding doors, but without a commercial roller system, which in this case is useless. It is replaced by simple guides made of timber.
Is it difficult to make a wardrobe on the balcony with your own hands? It depends. Independently “creating” small cabinets is an operation that one wouldn’t dare call complicated. The built-in design is already more demanding of the craftsman, but in order to “get” such furniture, you won’t have to make any superhuman efforts either. The main thing in work is attentiveness, accuracy and lack of haste; it is this that often spoils all undertakings, provoking a large number of mistakes.
Before you start thinking about the possibility of making your own balcony furniture, it’s better to look at what “tests” await the craftsman ahead. And in this case, the best tips are informative videos. One of the most viewed is here:
Plastic design options
A plastic cabinet for a balcony can theoretically have any size and configuration. In practice, one of six popular options is most often used.
Built-in wardrobe with three compartments
Plastic cabinets, divided vertically into three sections, are best installed on the loggia. They are not equipped with a back wall. The upper part can be used for flower pots. Sections can have the same or different heights. One of them can be left without shelves, and a bracket for hangers can be strengthened inside - you will get a convenient place for work clothes.
Closet
A product of this design can be installed flush against a balcony door. If the wardrobe is mounted on an insulated loggia, it can be used as a wardrobe, significantly saving space in the apartment.
Wardrobe built into the wall of the balcony
The optimal place to place a built-in cabinet:
- near a window or balcony door - provided that there is sufficient distance between them and the wall;
- under the balcony window: here it can be built in the form of a small bedside table with drawers;
- in the corner: an option most suitable for trapezoidal-shaped balconies. The sloping space will not fit any other furniture, but you can fit a spacious cabinet with shelves here.
Wardrobe divided into two parts
By dividing the cabinet into two parts, the owner has the opportunity to optimize the arrangement of its internal volume:
- in one compartment, fill many shelves for small things (or liter jars of preserves);
- the second is to equip it for storing large items. The shelves here can be made more powerful, and the distance between them greater.
Wardrobe without doors
A cabinet is often installed at the end of a balcony or loggia, the shelves of which are not closed with doors. It looks more like a rack, but differs from the latter in the presence of cladding on the sides and on the side adjacent to the wall. The contents of the shelves can be covered with a curtain.
Corner cupboard
On narrow balconies there is not enough space for a full-fledged locker. In order not to block the glazing, the cabinet façade is placed at an angle: from the balcony window to the border of the outer frame. The shelves in this case will be triangular, but the spaciousness of the structure is noticeable.
Related article: Which blinds are best for a balcony
With the proper arrangement of large and small items, a corner cabinet will help to significantly unload the apartment.
Cabinet Configuration
Wardrobe under the windowsill
Perhaps this is the most responsible decision. Since the cabinet will be fixed in the selected location, moving it in the future will be impossible and subsequently it can only be dismantled.
- Option 1. The easiest way is if there are 3 blank walls on the balcony. Inside you can stuff guide bars under the shelves and hang the doors on vertical posts
- Option 2. Shallow cabinet framing the window. This is an exotic option, but it can be useful for large balconies
- Option 3. If the balcony is glazed, under a wide window sill, you can construct a low and shallow cabinet (the width of the window sill). It looks appropriate and has great functionality
- Option 4. Most often, the cabinet is built into one of the end sides of the balcony. Or they make 2 symmetrical ones, one opposite the other
- Option 5. Corner cabinets are varied. You can simply make it triangular by using two adjacent walls to install crossbars and placing triangular shelves inside. Or you can fill two bars at the top and bottom at an angle to each other and nail the assembled boards to them, which form 2 more walls. Place shelves inside on the guides and hang the door in the resulting opening.
Example of a corner cabinet
Dimensions and markings
Rack with tools
- Using a tape measure, you need to measure the dimensions of the future cabinet - height, depth and width. The laser tape measure that designers use is very convenient in this regard, but a regular one is also quite suitable. If we already remembered about designers, then the first rule for them is to take an extremely responsible approach to taking measurements, because the final result will largely depend on this.
- You need to be prepared in advance for the fact that the angles will not always have the required 90 degrees and the distance from floor to ceiling will have different meanings in different places. But knowing this in advance, you can eliminate some of the flaws.
- In order to maximize the use of usable space , as well as increase the rigidity and stability of the entire structure, most often they make a cabinet that is as high as the ceiling, on which ceiling bars are fixed.
- Its depth is determined by the distance to the window , because the cabinet elements should in no case overlap the window space. It looks untidy and prevents sunlight from entering the room.
- The width of the cabinet is determined by the width of the end part of the balcony.
- Based on the measurements, you need to make a drawing. Yes, it’s still necessary, even if we don’t know how to draw at all, it will come in handy. Because the next step is marking.
- Marking begins from the ceiling. Having drawn a “beam” on it, using a plumb line, you need to transfer the drawing to the floor, and then draw vertical lines on the walls connecting the “beams” of the floor and ceiling into a closed rectangle - this is the place where the future frame frame will be attached.
- To avoid mistakes, the most meticulous ones make a life-size model from cardboard, and then cut out all the details of the future cabinet from it. This is a long and labor-intensive process, but subsequently it pays off by saving materials.
- And yet, you need to be prepared to adjust parts during the work process.