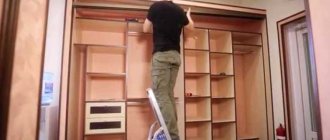
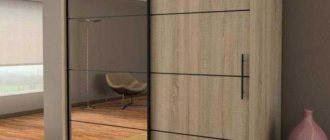
In recent years, a built-in wardrobe can be found in almost every home due to its spaciousness and ease of use. You can customize such a cabinet to suit your needs and not have to worry about trying to choose several cabinets of the same style and size to store various items. If there are niches, sliding wardrobes become an even more profitable option due to the fact that they do not eat up space. Despite the fact that such structures are assembled mainly by professionals, there is also the option of self-assembly. Today we’ll talk about how to assemble a built-in wardrobe with your own hands.
DIY built-in wardrobe
Making a wardrobe with your own hands
Assembling a sliding wardrobe by hand is quite a feasible task, however, people who are encountering such a design for the first time may encounter a number of difficulties. Installing shelves and sections may seem simple enough, but installing guides and installing doors often raises a lot of questions for a beginner.
Installing a wardrobe requires knowledge of the basics of using a drill, screwdrivers and guides
Prices for the range of drills
Drill
Since it is not possible to describe from start to finish the nuances of assembling a wardrobe within the framework of the article, we will focus on the main supporting points that will allow you to get a general idea of the process. At the same time, it is important to remember that each factory produces sliding wardrobes that have their own assembly features, therefore the installation details of the structure should always be clarified with the manufacturer.
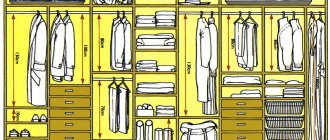
Step 1. Take preliminary measurements of the area where you plan to install the cabinet. Based on the figures obtained, create a sketch of the proposed wardrobe. Already at this stage, it is advisable to finally decide on the internal configuration of the product. In this instruction we are considering a cabinet with three doors and four internal sections (the width of the cabinet is 3 meters). The section structure can be as follows:
- 1st is intended for elongated wardrobe items;
- The 2nd consists of shelves;
- The 3rd is intended for short clothes (jackets, blouses, sweaters, etc.);
- The 4th includes an ironing board and pull-out parts.
The width of both doors is a meter.
Preliminary drawing of a wardrobe
Step 2. Select a factory that produces components for cabinets of this type. It is recommended to entrust the actual production of the elements of the future cabinet to specialists, since without having the appropriate knowledge and experience, it is extremely difficult, if not impossible, to create reliable components.
Shelves, sections and components for sliding doors must be purchased from a trusted manufacturer
Step 3: Take accurate measurements. In this case, we will work with a niche - you will need to take measurements both inside and outside the niche. It is advisable to measure the niche at several points. Measurements are made to the nearest half centimeter, with rounding down to the nearest value. From the calculated measurements, select the smallest one - this is the width of the future structure.
It is most convenient to take measurements using a centimeter
Step 4. In order to determine the dimensions of the doors, measure the height and width of the niche.
Niche measurement
Step 5. After all the numbers have been transferred to the drawing, go to the company you selected to purchase the parts. If necessary, specialists will adjust your plan and recommend specific components that you will need during the work.
Correction of customer drawings is a frequent and necessary procedure
Step 6. Once you have all the necessary elements on hand, start assembling. It is most convenient to start making a cabinet with one of the side sections. In this instruction, a section with drawers and space for an ironing board is assembled.
Installing shelves on the side section
Step 7. Install a reinforcement that will strengthen the cabinet and extend its life.
Amplifier installation
Step 8. Attach special protective caps to the screws in advance, since once the lower shelves are installed, access to them will be difficult.
Screw caps
Step 9. Place shelves.
Shelves must be installed taking into account the height of the things that are intended for them
Step 10. Place the section in its designated place in the corner, without attaching it to the wall.
Finished side section
Step 11. Assemble the second section, which will be located on the opposite edge and also attach it to the wall.
Assembling the second section
Step 12: Start assembling the final center sections. Attach the lower amplifier of the future cabinet immediately and place plugs on those screws that will subsequently be inaccessible.
Installing the Bottom Amplifier
Step 13. If the shelves are at different heights, install those shelves that are lower first, and proceed to the highest ones last.
Installing lower shelves on the second side section
Step 14. Install the mezzanine and secure it to the cabinet partitions.
Securing the mezzanine
Step 15: Install the inner compartment "filler".
Installation of drawers
Step 16. To install the bar, measure 4 centimeters from the top and place a mark in the middle of the partition. Drill the marked places and insert special holders for hangers into them.
Taking measurements for the rod
Attaching the rod
Step 17. Install the side false panels first, and then the top and bottom.
Installation of false panels
Step 18: Screw on the top rails. Attach the bottom guides using double-sided tape.
Installing top rails for sliding doors
Installing the Bottom Rails
Step 19: Install the sliding doors and adjust them.
Door installation
Door adjustment
After we have briefly gone through the main stages of assembling a sliding wardrobe, we will dwell on the feasibility of this operation. In most cases, do-it-yourself assembly is associated with great savings, but in the case of such cabinets this is not entirely true. According to various estimates, the total price for individual parts (made to order in factories) and the price for a finished cabinet in a furniture store are not very different from each other.
Calling workers to install a wardrobe will not significantly affect its cost
At best, you can save up to 20% of the cost of the finished cabinet. However, these savings may turn out to be very dubious if we remember that manual assembly by an inexperienced person may not always go in the right direction. In this regard, most professionals advise ordinary buyers (who have no experience in assembling a coupe) to purchase finished products, since the possible financial savings may not cover the time and physical costs.
Installation of sliding doors
In the previous instructions, we briefly focused on the installation of sliding doors, while this particular operation is one of the most difficult when assembling a wardrobe. Sliding doors are the hallmark of this type of cabinet and they are the easiest to screw up, since working with the guides without the appropriate experience can easily end in warping or jamming.
Step 1. Before ordering sliding doors, you must take accurate measurements of the opening. In this case, you should be guided by the lowest values.
Example of measurements for a wardrobe
Step 2. Start installing the doors with the top track attached with screws to the ceiling of the opening.
Installing the Top Rails
Prices for popular models of screwdrivers
Screwdrivers
Step 3. The bottom guide is placed on the floor (there is no need to attach it). This part should be placed so that it is located opposite the top one.
Bottom Rail Placement
Step 4. Insert the first door leaf into the upper and lower guides.
Inserting the door leaf into the upper guides
Inserting the door leaf into the lower guides
Step 5. Level the canvas on both sides of the opening. Using a pencil, accurately mark the position of the bottom guide. This step is very important, since if there are uneven surfaces, the movement of the sliding doors will be disrupted during further use.
Fixing the position of the guide
Step 6. Remove the door panel. Attach the bottom guide using double-sided tape or screws to the places marked with a pencil.
Securing the guide with double-sided tape
Step 7: Reinstall the door leaf and adjust it to the wall level using the hex key. After you finish with the first blade, install all the remaining ones and adjust them in the same way.
Re-installation of the door leaf
Adjusting the door leaf
Step 8. Attach the self-adhesive dust cover to both sides of the profile handle directly in the center.
Attaching the boot
Upon completion of installation, it is necessary to check the movement of the installed doors. It should be easy, quiet and unobstructed.
Video - Adjusting the doors of the wardrobe
Selection of parts
In order for the sliding system to last as long as possible, it is important to take into account not only the door material itself, but also the material from which the parts that hold the structure together are made. Most factories have parts made from three main materials for wardrobe parts:
- plastic. Guide profiles made of plastic are the most economical and least reliable option. Most designs involve alternating elements made of plastic and elements made of metal (for example, rail supports consist of both a plastic profile and a metal supporting surface). The less plastic is used to create the guides, the longer they will last you;
Plastic fittings fail most quickly
- steel. Steel is far superior to plastic in terms of reliability, but the price of components made from this material can vary significantly depending on pricing at a particular factory. As experience shows, regardless of price, steel shows equally good performance results, therefore it is not advisable to overpay for a certain “brand”;
Steel fittings are the golden mean in terms of reliability
- aluminum. Aluminum is considered the most common material for creating rail supports for a wide variety of sliding systems. The reason for the versatility of aluminum is its high reliability, which allows it to work with both light-weight systems and massive cabinets. Due to its ergonomics and functionality, aluminum is higher in cost than all other materials, but it fully pays for itself.
Aluminum profiles cope well with loads
Frame assembly
When making a wardrobe with your own hands, you can plan local lighting in it. In this case, all work on laying wires is carried out simultaneously with its assembly, and it is better to mark the location of lamps and communications in advance.
Before attaching the profiles, apply sealing tape to their surface adjacent to the wall. It will significantly increase the sound insulation of the structure. The drywall itself also dampens sound waves quite well, so the closet will also serve as additional protection from noisy neighbors.
- The guide profiles are fixed to the walls, ceiling and floor using dowel nails. The recommended distance between vertical posts is 400 mm.
- Vertical profiles that create the outer plane of the cabinet are attached to the guides on the floor and ceiling using small metal screws - “bugs”.
- Horizontal jumpers are attached. The smaller the distance between them, the more stable and reliable the cabinet will be. Particular attention should be paid to those places where shelves are planned to be placed: here the structure must be reinforced in order to be guaranteed to withstand the weight of things placed inside the cabinet.
USEFUL INFORMATION: Drywall belt screwdriver
Craftsmen recommend strengthening the fastening points of the shelves with other materials, for example, using wood or metal in individual cabinet elements. The inclusion of such elements will also allow you to create an exclusive appearance of the created product, if you place them with a certain artistic taste.
- It is quite possible not to do the back wall if the surface of the wall has a decent appearance. In this case, most of the horizontal jumpers on it become unnecessary; only supports under the shelves are mounted.
The process of forming the frame is presented more clearly in the video.
Materials used
After we have decided on the materials for the parts that support the wardrobe, we will move on to the materials from which the wardrobe itself was made. The most popular materials will be listed in the table below.
Table 1. Materials for making a wardrobe
| Material | Description |
Chipboard | Chipboard is widely used in the manufacture of all kinds of furniture, including sliding wardrobes. The main advantage of the material is its versatility - you can easily choose chipboard of any shade and any texture. A higher-quality variation of this material is laminated chipboard, from which sliding wardrobes are made in the above-average price category |
MDF | Like chipboard, MDF consists mainly of sawdust, but compared to the former it stands out for its moisture resistance. The material is easily subject to metamorphosis and can provide a convex or concave design, allowing you to experiment with design |
Fiberboard | Fibreboard is more of a complementary material used to create shelves, drawers and back walls, since it is considered quite fragile. Fiberboard reacts poorly to moisture, which is why most manufacturers do not use it in the manufacture of coupe facades |
Veneer | Veneer consists of two layers - the inner layer consists of chipboard or MDF, and the outer layer is a thin wood layer. This two-layer material outperforms all previous varieties in strength and quality, however it also costs an order of magnitude more. |
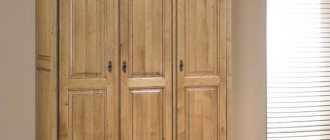
Tree | Natural wood is very rarely used when creating sliding wardrobes, since it significantly affects production, raising its cost several times. Any furniture made from natural materials belongs to the premium segment and is several times higher in price than furniture made from chipboard or veneer. Despite their noble appearance, wood materials are also susceptible to deformation under the influence of moisture. |
Prices for laminated chipboard
Laminated chipboard
General rules
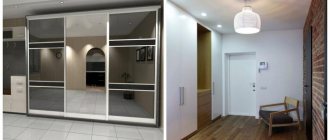
In the photo on the left is built-in furniture, and on the right is wall furniture
First you need to decide what you will collect. All sliding wardrobes can be divided into two main categories:
- Built-in. Such furniture is assembled and installed in a niche or in the gap between two walls located opposite each other. Built-in wardrobes, in turn, can be framed or frameless. Case models along the perimeter have a body consisting of an upper and lower part, and sidewalls. Frameless models are installed in a niche, and therefore do not have a body around the perimeter and do not have a back wall. In essence, frameless models are a door assembly fixed on top of a niche and filling the internal volume.
- Wall-mounted. This is a category of cabinet furniture that is assembled and installed along the wall. There are straight and corner models of wall cabinets.
A built-in cabinet type wardrobe is perhaps the most successful choice for a typical apartment
Have you decided on a suitable modification? So, it’s time to familiarize yourself with the basic installation rules:
- We begin assembly after the mounting surface is prepared. After the homemade built-in wardrobe is assembled, it will not be easy to carry out renovations in the apartment. Therefore, if you plan to renovate the room, it is better to do this before installing the cabinet.
- We completely clear the room of furniture and everything that will interfere with assembly. The elements of the furniture body and door mechanism are massive, and therefore their assembly requires enough space, which must be taken care of in advance.
- Before starting installation work, be sure to read the assembly manual.
- You need to start installation work with a furniture set, a set of fittings and the required number of installation tools.
| Illustrations | Materials and their description |
| Wood and lining . Wooden lining or ready-made furniture panels are a good option for assembling the cabinet body and facade. The disadvantage of the solution is the high cost of wood and the need for experience working with wood. | |
| Laminate, MDF, fiberboard . Particle boards are the most common material when it comes to assembling cabinet furniture. Thus, laminated particle board (chipboard) is used to make the filling, sidewalls, as well as the upper and lower parts of the body. MDF is used for the manufacture of facades. Fibreboard is traditionally used for mounting the back wall. | |
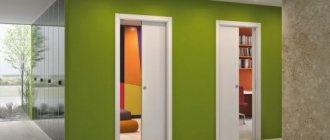
| Drywall . Drywall boards are a universal material that is used for construction and interior decoration. In addition, plasterboard sheet can be used to assemble a built-in wardrobe and to assemble the filling of the internal volume. The door assembly for a plasterboard cabinet will have to be purchased separately. |
What materials to choose? If, when renovating an apartment, the finishing is done using plasterboard, you can make a built-in wardrobe from the same material. I recommend particle boards as a universal material, since, on the one hand, they are not expensive, and on the other hand, they are easy to process. Moreover, at any furniture factory you can order cutting of chipboard and assemble furniture at home, as if from a construction set.
Source: obustroeno.com
Wardrobe design
Due to its massiveness, the wardrobe often appears as an awkward dark or light spot in the context of the room. This effect is only enhanced if the area of the room is small and the closet takes up the lion’s share of the area. In order to somehow hide the bulkiness of this object, designers are coming up with more and more new ways to decorate it, allowing the emphasis to shift away from its impressive size.
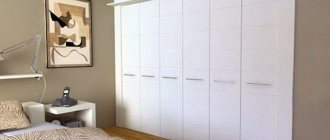
Single-color facades are suitable for apartments in a minimalist style
At the moment, several decoration techniques are considered the most popular:
- installation of mirrors and stained glass;
- use of sandblasting pattern;
- placement of photo facades;
- finishing with leather, bamboo and other non-trivial materials.
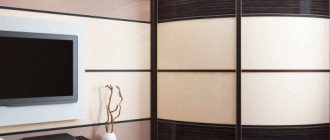
The combination of different types of textures is a characteristic feature of sliding wardrobes
We will talk about each of the above methods of working with the external appearance of a wardrobe in this chapter.
Mirrors
Installing mirrors is the most laconic and effective solution to the problem of massive cabinetry. This is why mirrored wardrobes are so often used when furnishing one-room apartments. Mirrored doors not only allow you to visually enlarge the space, but can also serve utilitarian purposes, since they allow a person to try on clothes without leaving the room.
Mirrored wardrobes work to visually expand the space
If you want to add personality to your wardrobe, then instead of ordinary mirrors, you can order stained glass with a specific pattern that will diversify the monotonous finish. However, such delights are usually made to order and are quite expensive, since they require manual work.
Sliding wardrobe with stained glass
Prices for sliding wardrobes
Closet
Sandblasting drawing
This technique involves applying a design to glass using a jet of air and sand released under very high pressure. The sandblasting pattern leaves a residue on the glass, a bit like frozen frost on windows. Thanks to the use of this processing method, the resulting pattern looks very sophisticated and minimalistic.
Facade made using sandblasting technique
This option is perfect for those people who want to bring something unusual into the interior, and at the same time do not want to experiment with bright colors and large shapes. The cost of this type of work is high, but it can last for many years, so if you like this delicate and unobtrusive ornament, then this option is for you.
Photo facade
Using a photograph on the front of a wardrobe is a very bold and bright solution that instantly attracts attention. The colorful nature of such a product, however, leads to frequent errors in its use. For example, a person takes the photo wallpaper he likes and places it on the closet, while in the context of the interior it looks like a completely inappropriate foreign spot.
Not only photographs, but also paintings can serve as a model for photo facades
Therefore, when selecting photographs, it is important to be guided not by their entertainment value, but by the color features that will allow them to fit into your room. It is also not recommended to select photographs with a lot of bright and small details - they will quickly begin to tire your eyes. To expand the space in small rooms, panoramic landscapes are usually used.
The photo façade motif can complement the overall style of the room