0
80400
Self-assembly of furniture helps to significantly save money. It’s good if a person has simple skills in assembling objects. It will be useful for beginners to learn how to assemble a wardrobe themselves. Step-by-step installation steps for each element of the product will allow for quick installation.
Where to start assembling
The most important thing is to study the instructions. To make it easier to understand the fittings, they should be sorted into separate groups. For small components, an organizer or several plastic containers are suitable. It is better to count all the small parts in advance and check their quantities with those indicated in the manual. Structural elements need to be checked for chips and uniform color.
With a competent approach to assembling the cabinet, it will last at least 10 years.
It is difficult to assemble a wardrobe alone, so it is better to call 1-2 partners.
If everything is in order, there are no missing parts or damage, you can begin assembly.
Instructions for assembling the wardrobe must be included with the purchased piece of furniture.
Nailing the back wall of fiberboard to the wardrobe
Sequence of screwing the back wall when assembling a sliding wardrobe
The fiberboard is screwed around the perimeter of the cabinet, to the intermediate vertical walls and horizontal walls.
Before screwing the fiberboard, it is necessary to align the cabinet diagonally so that diagonal A=B. A maximum of 5 mm of diagonal discrepancy is allowed, otherwise there will be problems when installing drawers and sashes.
Start attaching the fiberboard along the top, check the diagonals. If the diagonals are uneven, level them by lightly pressing on the side wall.
After checking the diagonals, we fix one of the corners and check the diagonals again. If the diagonal has “gone”, then unscrew the corner and set the diagonals again. Next we screw the fiberboard
along the perimeter of the cabinet and the axes of the internal filling parts. Screwing pitch 150 -200mm.
In the lower guide it is enough to make 2-4 holes along the axis.
Attaching the upper and lower guides for compartment doors
First, we attach the top rail so that it does not protrude beyond the side wall of the wardrobe.
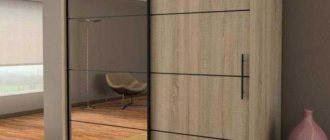
Many of us are faced with the need to buy a wardrobe. The wardrobe model has become very popular. Its door design is extremely convenient and saves free space in the room. They are even used as partitions. There are two ways to solve this issue:
- contact a company that assembles furniture;
- order cabinet parts and assemble it yourself.
The second option, of course, will cost less than the first. But this process will require certain skills and abilities. It is very important to correctly measure all design parameters, think over the dimensions of all compartments and shelves, the height and width of the product. If you are ready to take on this job, then you need to figure out how to do it.
Preparing all materials for assembly
You need to prepare in advance the tools that may be needed. Usually the minimum required is: keys, screwdriver or screwdriver, hammer (rubber and regular), pencil, ruler, tape measure. It is also advisable to use a building level to check how level the cabinet is assembled relative to the floor.
You need to assemble the cabinet on the floor. It is optimal to do this in such a position that lifting a heavy body after assembly requires a minimum of effort and energy.
Advice. Parts should not be immediately removed from their packaging. After inspection, it is better to put them in boxes so as not to accidentally damage them.
Tools and materials
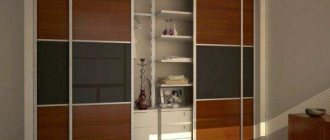
Among all types of clothing storage products, the leading place today is occupied by the wardrobe.
It is multifunctional, spacious, comes in different shapes and sizes, and does not require additional space to open the doors. That is why most people, when choosing between a wardrobe and a sliding wardrobe, prefer the latter option. Assembling a sliding wardrobe with your own hands in the video presented is not at all difficult - all you need to do is have the necessary tools in your apartment and be familiar with the design of the product. Often, when ordering a cabinet without the services of assemblers, the company sends a document that contains a drawing of the product. This also lists all the component parts, which are numbered in order. By looking at the drawing and comparing the elements of the cabinet, you can intuitively assemble the product.
To work according to the sliding wardrobe assembly diagram, you will need the following tools:
- building level - to check the levelness of the installation parallel to the floor;
- corner;
- rubber and regular hammer;
- straight and Phillips screwdriver;
- roulette;
- pencil and ruler;
- screwdriver;
- wood drill - to make holes;
- metal drill – for installing an aluminum base.
Additional tools for assembling furniture yourself include a jigsaw, drill and sandpaper. It is also necessary to prepare all the details of the cabinet, which means checking the diagram to ensure that the number of items matches. Pay attention to the fittings and mechanisms: if there are drawers in the closet, ball guides should be included.
Doors for the product are often supplied ready-made. They are pre-installed with rollers and a strip of soft material. The door must be installed in the final phase.
Tools
Wardrobe assembly procedure
The first step is to install the base. Usually the stove is attached to stands that are located along the long side. It is mounted using Euro screws - fastenings with a recess in the head for a hex key.
It is important to know that a number of cabinet filling elements will also require preliminary marking and installation of fasteners, since this work will then be complicated.
The next step in the order of assembling the wardrobe is mounting the body. These are load-bearing parts.
Next, the back wall is attached. Shelves, hanging rods, that is, all the internal contents, are installed in the finished housing.
Assembling a sliding wardrobe with your own hands requires the master to have a clear understanding of the functions of all structural parts and fittings. Some shelves can be put back in place only after the furniture has been installed in a vertical position.
Lastly, the doors are mounted to the cabinet.
Advice. If the model has mirrors, it is attached to a fully assembled cabinet.
Before installing the side outer wall, we recommend pre-fixing the corner shelves that will be on the outside.
Assembling the cabinet: step-by-step instructions
The instructions for assembling a sliding wardrobe will allow even a novice craftsman to perform high-quality installation work. Before you begin, prepare the necessary accessories:
- toucan shelf holders – 12 pcs.,
- adjustable legs – 6 pcs.,
- sliding door system,
- Fi25 pipe for hangers,
- flanges-rods – 4 pcs.,
- mortise handles – 4 pcs.
For fastening the frame, shelves, doors:
- universal screws (3x16 and 3.5x30),
- plastic corners (20 pcs.),
- confirmations (6.4x50 – 100 pcs.),
- confirmation plugs (50 pcs.),
- stoppers and limiters.
To install the wardrobe yourself, you will need the following tools:
- a set of screwdrivers (phillips and straight);
- imbus key,
- cord plumb,
- level,
- pliers,
- hammer,
- screwdriver,
- roulette,
- stationery knife.
Step one: installing the base
The assembly of the wardrobe begins with the installation of the base, namely the base and legs. We take a part called the base and make drawings on it.
We fasten the base using confirmations. Since this area will not be in the field of view, the cabinet stands on legs and not on a plinth, you can use plastic corners. We fasten the legs with 3.5x30 screws.
We also fasten the 4 parts of the base together with confirmations.
Step two: housing assembly
Having assembled the base of the cabinet at home, proceed to installing the body - sides, partitions, roof.
- We secure the side walls with confirmations.
- We fasten the back wall with screws (no need to nail it).
- We install vertical walls and a roof on the confirmations.
- We attach cross ties in each section separately, at different levels. In this way, it will be possible to ensure the necessary rigidity over the entire height of the structure. We will install one continuous unifying tie in the center.
It is very important to install the stiffeners correctly. Otherwise, the cabinet may sway. The role of stiffeners will be performed by transverse ties together with the rear wall of the cabinet.
Step Three: Installing Shelves
As a rule, even for novice craftsmen, assembling shelves does not cause any difficulties. The shelves are located in separate sections. There are several ways to attach them:
- If the shelves are located axially, a corner furniture tie should be installed. It will connect the horizontal plane of the shelf with the vertical intermediate wall. In order not to break the symmetry, install corner ties on each side of the central axis of the mounting wall.
- Fastening the shelves using a “helicopter” – along the central wall of the cabinet. This method falls into the non-standard category. First you need to take one shelf and fix it in the center on the confirmation, turning it 90° along the axis. Attach the next shelf to 2 confirmata. Then return the previous shelf to its original position and reinforce it with tightening furniture corners.
If you want to have removable shelves, you do not need to secure them with confirmations. Install the “shelf supports” and insert the shelves. In this case, there is one big advantage - the absence of plugs for holes on the visible side of the cabinet.
To install shelf holders, make drawings on the inside, clearly defining the height of the shelves (make sure that the angles are even), and use a 4.5 mm drill to make blind holes. The depth of the holes should not exceed 8 mm. It is recommended to use a drilling depth limiter, if there is none - a plastic dowel for 6 or 8, which is installed on the drill. Hammer the shelf holders into the holes.
Step four is the most important
The most important step in installing a wardrobe is installing the doors. The door leaf must be leveled.
The stages of work are as follows:
- Install a door rail into the top opening of the cabinet. It needs to be secured with screws.
- Drill holes for screws in the lower profile.
- Install a stopper on each end of the guide rail. The stoppers will secure the doorway in the closed position.
- Insert the bottom profile inside the cabinet and screw it to the bottom.
- Replace the sliding wardrobe door. Carefully insert the upper door rollers into the upper profile, and the lower wheels into the recess of the lower guide profile.
- Adjust the doors to each side of the cabinet. This should be done when they are in the closed position. Adjust the wheels located on both sides of the door leaf. Adjust the left one along the left side surface of the cabinet, the right one, accordingly, along the right side.
- After making sure that the door panels are aligned correctly, open and close freely, and do not pull, strengthen the lower guide rail with screws.
To finish assembling the cabinet, apply a rubber gasket to each door to reduce the impact of opening and closing them. If you follow all the recommendations on how to assemble a wardrobe, you can easily and quickly complete all installation work without outside help.
You can assemble Basya's wardrobe yourself. You will have new experience, while you will save money and raise your authority in front of your family.
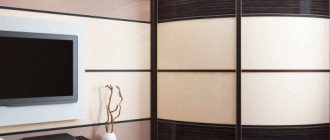
The Basya wardrobe is suitable for a hallway or bedroom. Thanks to its small dimensions, it is spacious, but the main advantage for small apartments is the sliding doors. This article will not talk about its advantages, but about how to properly assemble a cabinet.
Make room on the floor for ease of use during assembly. There are times when this is not possible, then find an assistant and assemble the wardrobe while standing. Understand the instructions, lay out all the components and arrange the racks, shelves, and other components in order.
The internal parts of the external racks have many holes for shelves and other elements. In order not to confuse them during assembly, marks can be placed on the sides - left and right sides.
To assemble Basya you will need:
- hammer,
- rubber mallet,
- roulette,
- metal square,
- screwdriver,
- screwdriver,
- 4 mm hex key.
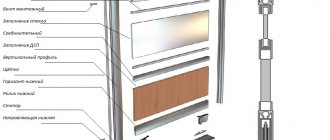
Purpose of materials and panels
During operation, the main load falls on the base or stand. Therefore, it is important to check the strength of the part and install it on the most flat surface possible.
If the perimeter of the built-in structure will be walls, floor and ceiling, it is important that they are as smooth as possible. A level is useful for measuring the angle of inclination and leveling surfaces before installing shelves, walls and doors.
Body parts are necessary to protect things from the external environment, and they also serve as load-bearing elements to which all shelves are attached.
To correctly measure the locations for drilling holes, you need to fold all the shelves.
The back plate is usually made of thin sheet material; the part does not bear body load.
Important! So that smooth movement mechanisms are installed on the drawers.
It is recommended to immediately screw the base of the telescopic guides.
When assembling the plinth, it is necessary to mark the location for attaching the slats or adjustable legs. Long cabinets will require at least 6 supports. The cross strips are attached to the bottom of the cabinet with corners and self-tapping screws.
As for the through holes for confirmation, which are made from the outside, difficulties may arise with this, since the markings are made inside.
Before installing the housing, it is advisable to check the evenness of the floor with a level. If it is uneven, it is better to choose a model with adjustable legs that can be adjusted in height.
Sometimes it happens that in order to eliminate defects of poor quality assembly, you have to disassemble the wardrobe and then reinstall it.
Important! After assembling the main parts of the structure, it is necessary to level it. First, measure one diagonal with a tape measure, then the other. This method is used to check how even the corners are. By calculating the difference in values, you can determine in which direction the top of the furniture needs to be moved.
The distance between opposite corners should be the same. Otherwise, the cabinet will stand crookedly and the doors will not close tightly.
It is necessary to align the geometry of the cabinet so that there are no problems with installing the doors.
Assembling the closet
For furniture to last a long time, it is important not only the quality of the material used, but also the quality of the assembly itself. How to assemble a cabinet correctly? You need to approach the matter responsibly and step by step.
We begin to assemble the base
This is the lower part that holds the entire structure. We find the details of this part of the structure. Using a pencil and tape measure, we make markings and in these places we fasten the base using a screwdriver or screwdriver. Step by step steps:
- At the bottom we make markings for the base.
- If the package includes legs instead of a base, mark them.
- We make holes.
- Using confirmations, self-tapping screws and a screwdriver, we fasten the bottom with the slats.
- We fasten the supporting parts, they are needed to increase stability.
Next, let's move on to the box.
Check out the diagram. Place the plinth in the place where the finished structure will be placed. Use a spirit level to adjust the plinth positions, using shims if necessary. We assemble the box while standing, not forgetting to leave 10 centimeters for the top part. We make holes in the “bottom” into which the anchors will be installed, and the side posts are attached to them.
For convenience, installation of the side walls is carried out by two people. One holds the board in the desired position, the other secures it. The next stage is the installation of the middle part, if there is one. And only after that we install the “roof”. Fastening occurs using metal corners and confirmations.
Assembling the “Maestro” models and other multifunctional cabinets is a little more complicated, but if you do everything gradually and do not rush, everything will turn out no worse than that of specialists.
Back wall
Often the package includes the minimum required for attaching the back sheet of chipboard. If you have small nails, the fasteners will be more reliable and the wall will fall off over time.
We attach nails or screws at a distance of 100-200 millimeters from each other, depending on their number. We start fastening from the bottom up and make sure that the sheet does not extend beyond the edges.
Shelves and guides
Before proceeding with this stage, check the stability of the structure and its level position. If instability is noticeable after assembling the interior, the cabinet will have to be disassembled and reassembled from the very beginning, otherwise it will not last long.
What should you pay attention to when filling?
- Shelves can be installed using corners and screws.
- We start filling from top to bottom.
- When installing the guides, do not forget that the upper lines are attached first, then the lower ones. The correct course of the facade depends on the accuracy of the line, do this with a level and ruler.
- We fasten the flanges opposite each other, measuring the distance in advance, otherwise things along the bar will roll to one side.
- For drawers, we install the mechanisms and only then the elements themselves.
- Before installing the “internals”, check the presence of all fasteners and other fittings.
Facade
Installation of the front part is the final stage in furniture assembly. Correct assembly ensures that the upper rails are mounted flush with the front side panel, and the lower one has an indentation of up to 1.5 centimeters.
We start by installing the door on the rear rail (the one closest to the inside of the cabinet). Then - the outer part. We insert the upper part of the door frame into the upper rail, then “press” the lower part.
And the very last stage - stoppers
Stoppers for wardrobes
They are needed for the sliding system to close smoothly and safely. This is not necessary on a two-door design, but a three-door cabinet without stops will be difficult to close properly.
If you are planning to move, the question is “how to disassemble and assemble a sliding wardrobe?” The most common. After reading the instructions, you will know how to assemble the cabinet, and its disassembly occurs in the reverse order.
Installation of hardware
Responsible furniture manufacturers prepare all holes for hardware during production.
On the bottom bar, you need to pre-drill several holes and insert anchors on which the rack bars will be attached.
The specific set depends on the model and manufacturer, but for most cabinets you need to have hex keys and a set of screwdrivers, including ones for Eurobolts.
The first step is to install the side planks; if there is a middle post, it is installed after.
The top bar is fastened with corners and self-tapping screws or confirmations.
Advice. It is better to assemble the cabinet in a standing position, since fitting the parts while lying down is problematic. To install the roof, a minimum of 10 cm must be left.
Each hardware has its own technical parameters and requires special fixation technology.
General rules for assembling cabinet furniture
To assemble purchased furniture, you must follow the cabinet assembly instructions provided by the manufacturer. There are certain rules. By following them, you will assemble any item with high quality and in a short time.
- You shouldn’t take everything out of the packages at once, much less mix parts from different packs. Maintain the order.
- Read the instructions carefully so that later there are no overlaps and you don’t have to redo it again.
- Make sure the fittings and components are in place. Otherwise, you will not be able to completely assemble the furniture. The handles must match the color scheme. It is necessary that the drawer guides have a soft movement.
- Assemble one section at a time in order. You need to start from the bottom, gradually moving to the sides.
- Open the package, lay out the parts, prepare the tools.
- Mirrors and glass are installed at the final stage. This way you will avoid damage.
For assembly you need a screwdriver, a screwdriver, a hex key, and a tape measure.
If you do the manufacturing yourself, it will be much easier to assemble.
It is very important to follow the assembly sequence, otherwise you will be forced to disassemble and reassemble the cabinet in the correct sequence.
Nailing the back wall
If you choose suitable fastenings for a panel made of fiberboard (the back wall is most often made from this material), then over time it will move away from the structure. It is best to screw it on with self-tapping screws.
The elements should fit into the holes prepared by the manufacturer easily, but at the same time not wobble.
The panel is placed behind the cabinet and then screwed, holding the bulk of the wall. Self-tapping screws are inserted in increments of 10-20 cm.
As soon as the actual loads exceed the maximum values, the thin part of the chipboard is destroyed. The holes will have to be redone, which means additional costs and loss of time.
Advice. If there are several back slats, they are first fastened end-to-end with ties.
Main assembly steps
The wardrobe is assembled strictly according to the diagram, vertically or horizontally. The second option is better, this way you can prevent skewing of the parts being connected. If the height of the ceilings does not allow you to raise the finished cabinet, then it is better to carry out the work in a vertical position.
You can easily assemble a sliding wardrobe with your own hands if you follow the step-by-step instructions.
In such a closet you will place twice as much clothes without the expense of the enormity of the furniture itself.
The first step is to attach the base and adjustable legs to the bottom. They are necessary if the floor is uneven. Next, we begin assembling the body. We connect the sides to the base. To make the structure durable, we attach an intermediate rack and a shelf. This is necessary so that the sidewalls do not tilt. Then we screw the remaining parts and attach the lid. It is advisable not to nail the back wall, but to screw it with self-tapping screws. At this stage we put the cabinet in its place. We install guides for drawers, holders for shelves, and a bar for hangers. Check that the drawers should slide out smoothly.
You need to familiarize yourself with all the details of the product (so as not to confuse anything during the assembly process and not have to start all over again), prepare the tools and the place where the assembly and installation will take place.
This work will take a lot of your time.
Next up is door installation. First we attach the guides, then we fix the rail with screws. We insert the doors, check that they open and close smoothly. Adjust them if necessary. Lastly, glue on the sealing brushes. We attach plugs to the confirmation holes.
Do not warp the cabinet parts, keep the corners straight.
To summarize, we can say that assembling a wardrobe is not such a difficult job. Your desire, skill and ability will allow you to do this without difficulty.
After you do everything, be sure to check how the doors work (do they creak, move freely, etc.), how securely the shelves and other parts are fastened.
Be careful that until the cabinet body is assembled and the back wall is installed, all fasteners can be easily broken.
Installation of additional materials
Usually shelves are fastened with corners and self-tapping screws. Manufacturers pre-drill holes for hardware on these parts. All that remains is to measure and determine the optimal distance between the shelves and screw them to the side and central strips.
During assembly, never tighten fasteners until all parts are in the correct position.
The hanger bar is mounted on the flanges that come with it. If necessary, the pipe can be shortened using a hacksaw.
Work very carefully and hold the elements constantly.
To install drawers, you first need to attach the mechanisms to the rack strips. It is very important to install them parallel to each other at the same height. Then there will be no problems with retractable mechanisms.
The fiberboard boards are fixed with wood screws. Screw them in carefully; the screws should land exactly in the middle of the furniture boards.
What tools are needed
Significant expenses in purchasing the tool will not be required. To assemble a kitchen set, a wardrobe or a hallway, you need to have the usual set of tools: a screwdriver, a hex key for confirmation, a screwdriver, various drills, a bat for confirmation, an awl, a pencil, a tape measure, a square, fine-grained sandpaper, an electric drill, a stationery knife, iron, joint knife, rubber mallet, clamp for parts.
The distance between opposite corners should be the same.
Assembling a wardrobe with your own hands is quite easy and anyone can do it simply by following the instructions.
It is unrealistic to guess what tools will be needed to assemble furniture. It depends on what kind of project it is - difficult or not.
Now you need to install the wardrobe doors.
To open a closet, you don't need to remove chairs or move other furniture.
Door installation
Before installing the doors, it is necessary to install the guides, strictly observing a straight line. First of all, screw on the upper rails, and then the lower ones.
When installing sliding doors, you should always install the inner one first, and then the outer one.
The upper guides are attached flush with the side edge, and the lower ones with an indentation of 8-15 mm. Holes for mounting are drilled in a staggered pattern on both lines.
Once the doors are adjusted, the stoppers should be adjusted correctly. They are needed to ensure that the doors remain stationary in the closed position.
2 doors
Before installing the doors, you need to check and clear the bottom track of any debris. If foreign particles get into the roller mechanism, the door will jam.
The door that will run on the far rail is installed first. The door is first inserted into the top track, and then the end rollers are placed in the bottom channel.
If there is more than one door, the outer latches are adjusted first, and the rest are centered on them.
3 doors
To install 3 doors on a wardrobe, first install two doors that will run on the rear rail. They are also mounted: first in the upper guide, then in the lower. After installing the doors, stoppers are installed to prevent the doors from colliding.
Please note that a mirror door is expensive and will be unpleasant if it falls out due to improper installation.
Lastly, the door is mounted, which will run on the front rail. A mirror is usually attached to it. It is very important that the doors are installed level, otherwise they may fly out of the grooves, which is not safe to use.
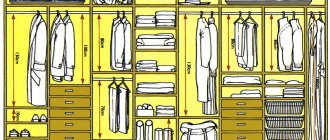
What size should a wardrobe be?
When calculating the dimensions of the future wardrobe, you need to take into account three factors:
- approximate number of items for storage + 20% for “expansion” of the wardrobe;
- the area of the room in which the furniture is planned to be installed;
- designers' recommendations regarding the minimum/maximum dimensions of certain cabinet elements.
Even if the closet is very large, do not make the doors too wide
And if the first two nuances are absolutely individual and are decided privately, then everyone without exception needs to focus on the third.
We will reveal it further.
- Depth. The minimum depth of the closet is 60 cm. This is exactly what is needed to place hangers with outerwear. Don’t forget to add a margin of 10 cm to the depth - they will be “eaten up” by compartment doors with guides.
- Width. The minimum is 50 cm. Making a cabinet even smaller in width makes no sense, since the furniture will simply be non-functional. But the maximum width is not regulated.
- Height. Theoretically, a wardrobe can be of any height, so experts recommend designing furniture almost up to the ceiling in order to achieve maximum capacity.
- Doors. Sliding doors should not be wider than 120 cm, otherwise they will put a large load on the roller system, which can lead to its rapid deformation. The optimal proportions of height and width, which will avoid distortion of the structure, are 1:5.
Advice. Select the width of the doors to match the width of the sections - thanks to this technique, when moving the panels apart, “dead zones” will not form in the closet that are inaccessible on either side, which is often the case with models that are equipped with two common doors.