The originality of flower stands
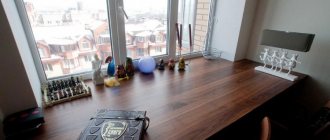
Flower shelves are small stands that allow you to place many beautiful plants on the windowsill. Sometimes they resemble small racks. These are not just functional products, but also decorative elements. Photos of mobile structures prove that they can be easily placed in another place or removed from a window.
The appearance of products made with improvised means can be of different modifications. They will complement the interior design and give the room a special flavor. It is important to place the flowers on the windowsill so that they do not disturb anyone and are nourished by sunlight.
Pros and cons of window shelves
Self-made shelves have the following advantages:
- Originality. Each product can be given its own shape, which will convey the tastes of the inhabitants of the house.
- A chance to create an ensemble of flowers using flower shelves.
- Unique window stands. Suitable for growing seedlings and as an organizer.
- Convenience. No need to adjust pot sizes.
- Plenty of options. There may be a structure with openings or a closed surface.
- Different sizes, shades of models.
- Availability. You can buy a suitable shelf option and build a craft with your own hands.
- Reasonable price.
The disadvantage of the fixtures is that they block the incoming light entering the house. It is better to place them on a window on the south side. Photos of multi-tiered stands show that they make the atmosphere in the apartment heavier. What is functional is not always beautiful.
Varieties and forms
Window sill stands for indoor plants come in different varieties. They can be straight, arched, angular. The most popular are hanging shelves, racks, bookcases, and ladders. One shelf is suitable for tall flowers, orchids for example. The stepped design allows you to grow small plants - violets.
Corner stands can be easily moved to the slopes, which saves window sill space. They look like a small rack. To temporarily place plants on a window, you can use a multi-tiered structure. It is good for storing seedlings.
Types of shelves
There are four main options for optimal placement of flowerpots in the space of window openings:
- Shelf or rack. It actually copies the plane of the window sill within the window. Suitable for any type of flowers.
- Stands. They can be either separate, on legs, or combined, for a group of pots. Mainly used for growing climbing plants.
- Corner. Provides compact distribution of pots into tiers. An ideal solution for creating a micro-greenhouse in the “green garden” format.
- Suspension. An excellent option for empire plants.
Additional Information! You can often find mention of such a method as “zigzag”. However, this is rather an attempt to optimize the space on the windowsill itself, when large pots are located closer to the glass, and smaller ones are brought forward.
By arranging the pots in a zigzag pattern, you can optimize the space on the windowsill.
Material accounting
When building shelves for flowers on a windowsill, you should give preference to the following materials:
- metal rods, gratings, pipes;
- chipboard;
- glass;
- wooden boards;
- plastic;
- plywood sheets.
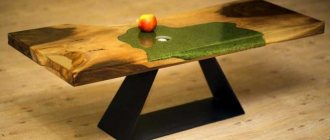
Each of the listed materials has its own volumes. When working, it is important to take into account their width, length, shape, and design. Massiveness is inherent in wooden products. They weigh a lot and have a large volume. It is better to make straight or angular models from wood. Forged stands are made from metal. Because of their openwork, they look beautiful.
The glass shelf will be light and airy. A plastic product will be weightless and comfortable. The disadvantage of such stands is that they quickly fade in the sun. A combination of materials with each other is possible.
Forged stands/stands for flowers
Making a metal stand at home is not easy, but it is possible if you put in enough effort. In addition, it requires forging skills. But, before you start work, you need to make sure that such a thing will be appropriate in relation to the chosen interior style.
Forged structures for plants can be either floor or wall-mounted. Both solutions are quite elegant and convenient. The choice depends on your preferences. But remember that metal stands require more financial investment than wooden ones.
DIY flower stand for windowsill
Those who are thinking about making a window sill shelf themselves should choose a material that can be easily processed. Wood and plywood are suitable for beginner craftsmen. Step-by-step instructions will help you easily make a hanging structure or stand.
Shelf
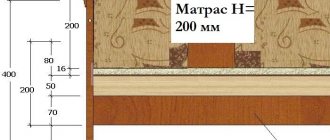
To make a shelf, two wooden rectangular planks of the same size are suitable. Next you need to follow the following instructions:
- Sand the boards and treat them with an antiseptic to prevent destruction.
- Paint with varnish of the desired shade to highlight the texture of the wood.
- Take two identical straps from old bags and fasten them to the boards with nails so that they are equally spaced between the tiers.
- Fasten the straps to the frame.
A similar shelf can be made from tempered glass; it will look more elegant. It is better to insert the glass into the lace forged corners, fixing them on the sides of the window. Instead of belts, strong tapes are suitable. There are many ideas for such designs.
Whatnot
A husband can give his beloved wife a gift in the form of a flower stand made with his own hands. This is a very useful thing. For work you will need plywood, sandpaper, tools, nickel-plated pipes.
At the beginning of work, you need to calculate all the dimensions of the product and take into account its location. Then make a drawing on plywood. Boring straight lines can be replaced with wavy, curved curves for greater effect. Use a jigsaw to cut out each shelf.
Holes for fastening should be drilled on the pipe blanks. Clean the plywood with sandpaper and cover it with varnish or paint in several layers. After drying, fix the finished structure on the side of the window.
Rack
If desired, you can make a wooden rack from several shelves. This is the most convenient and common option. It is better to attach the shelves to a rope. Thick cords will also be a wonderful decoration.
First you need to prepare three or four pieces of wood and two pieces of strong, thick rope. Make holes in the corners of the boards with a drill, with a diameter slightly smaller than the thickness of the rope. Insert pieces of rope in such a way as to tie loops on top to hang the rack from the wall. Also make knots under the bottom shelf. Under each shelf you need to hammer wooden glazing beads into the rope so that the boards do not slide down. To hang such a rack into the wall you need to drive a special hook. Instead of a rope, you can use chains and cords.
Rack
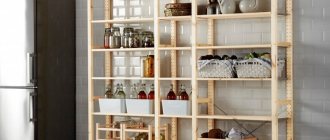
Even the name suggests that such a device is installed on the windowsill. It is suitable if there are a lot of pots. It is better to choose a window on the sunny side for this. The stand should be compact, light, not block the light, and decorate the room. The most popular crafts are wooden racks or made of chipboard. They can understand easily.
It is enough to screw the strips onto the end sides with self-tapping screws along the width of the window. The cut boards should be laid on these planks. Purchased racks made from lattice look great.
Nuances of work
Stands for indoor flowers are most often made of wood - boards and plywood. This is a comfortable natural material that can be processed well. Also, stands can be made of metal, plastic, wire.
You can place the stands in almost any part of the room - on the wall, in the corner, on the window. If light-loving plants do not fit on the window sill, it can be “expanded” with numerous hanging or shelving shelves built into the window walls. If you need to save space and at the same time place numerous flowers with pots, you can fix the shelves on the walls. Also, beautiful stands on the floor will decorate the interior.
In the photo you can see what models of plant stands can be and choose the right model for yourself.
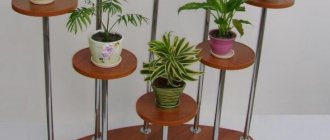
Simple but elegant wooden stands are quite easy to make yourself, especially for those craftsmen who love and know how to work with wood.
As an example, we will give a master class of a wooden stand that can be placed either by the window or on the floor. For this craft you will need the following materials and tools:
- board (preferably pine);
- slats;
- sample;
- stencil for side drawings;
- pencil;
- jigsaw;
- milling cutter;
- screwdriver and thin screws or hammer and nails;
- skin;
- wood paints and brushes or aerosol;
- varnish (parquet).
Related article: Crochet chest pillow: diagrams with description and video
Boards must be selected taking into account the size of all parts. For the craft you need two side walls and three tabletops. The walls can be about a meter long. The diameter of the tabletop is 16-20 cm.
You can draw the template by hand or use a ready-made one. It must be taken into account that the walls are the main support of the stand, so they must touch the surface in at least three places.
How to do:
- Transfer the prepared templates with a pencil onto the boards;
- Using a jigsaw, cut out the parts along the contours and sand them;
- Use a router to decoratively process the edges of all parts;
- Connect the two walls using slats of equal length, cut to the diameter of the table tops or slightly narrower;
- Paint the workpiece with an aerosol or brush;
- Screw the tabletops onto the back side of the stand (it is better to place pre-prepared round pieces of plywood under them);
- Cover the stand with varnish and wait until it dries.
At this point you can complete the craft and start using the stand for its intended purpose. However, to give the stand an aesthetic and interesting look, you can decorate it with artificial roses. For this you will need:
- wire;
- artificial leaves;
- sharpener;
- fresh branches (ash, linden, rowan);
- candle;
- dye.
While the varnish is drying, you can do the following:
- Grind fresh twigs on a sharpener to make round shavings (rose corollas);
- Insert the whisk into the wire bent at one end;
- Melt the candle and dip the flower blank into it;
- Paint the rose, attach artificial leaves to the wire;
- Drill small holes in the slats and insert the resulting roses into them.
Stands made of metal, especially forged ones, also look beautiful. They can stand alone on the floor, decorating the interior, or be suspended, for example, by a window. They are easiest to buy or order from blacksmiths. However, you can try to repeat the forging patterns using thick wire and a soldering iron.
Article on the topic: Openwork crochet jacket without fastener for a girl: diagrams and description
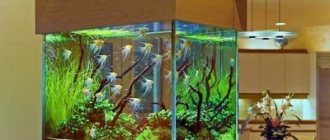
Orchids on the windowsill
The best place for orchids in an apartment is a windowsill. Here everyone will notice their beauty, and an abundance of light will not hurt, especially if it’s autumn or winter outside. They will do best on east and west windows. Some housewives like to set up real orchidariums, so they will have special stands to help them.
Orchids during flowering are quite tall flowers, so low shelves are not always suitable for them. The best option would be a stand made of several cells in the form of an arch. It is easy to buy ready-made or make it yourself.
To make a shelf you will need tools, PVC pipes, self-tapping screws, and plastic flowerpots. First you need to prepare two identical pieces of pipe to make the arch itself. They need to be heated with a hair dryer and bent to a certain size. To connect the structure, you need to prepare 4 straight sections of pipe.
Two spaces should correspond to the distance between the ends of the arch in length, and two more - to the distance in width. Fittings need to be used to connect the ends of the arc to the segments. Drill the planter to the pipe using self-tapping screws. Place the finished stand on the windowsill and place pots of orchids in it.
Rack installation
To make a rack we will need some material that someone may have in their garage or closet:
- Bars 2x2 cm (if the farm has a larger cross-section, you can use them, but the main thing is that the structure does not look bulky)
- Plywood or chipboard for shelves
- Fasteners - euroscrews or self-tapping screws
- Racks can be made in various variations, from plywood, in the form of a cabinet, or an open type using bars for this. The latter option is more rational than the first, light will come from all sides, and you don’t need a lot of material for this design. The production process is no more complicated than assembling shelves and it looks like this:
- The bars for the racks and crossbars are cut, which will be used to fasten the racks together. Each set should have its own dimensions, for example, 4 racks of 2 meters and 4 racks of 40 cm each.
- The next step is to create a frame; you can fasten the bars together with self-tapping screws and a corner or just Euroscrews, but for this you first need to drill a hole with a drill of a smaller diameter. Only then tighten it with Euroscrews.
- Now that two or three frames (depending on the length of the rack) are ready, you can begin to assemble the structure. There are two manufacturing options:
- The first option is if the rack is planned to be no more than a meter long, then the frames can be connected together with shelves. Bars are sewn onto the frames in increments of 45 cm and shelves made of plastic, plywood, slats or fiberboard are installed, after which they are fixed with self-tapping screws. If you need a rack with wheels, then it is worth strengthening the structure and adding more bars to the end of the lower and upper parts of the frames. Then we install wheels on the bottom of the rack. Finally, the completed rack is coated with paint or varnish.
- The second option is that long racks must be reliable. This means it is necessary to assemble a frame on which the shelves are laid. To do this, the frames need to be connected on all sides into a three-dimensional rectangle. A large rack should be assembled using metal corners and screws screwed into all corners. When the frame is completely tied, shelves are laid on the strapping, which also serves as a base, and fixed with self-tapping screws for reliability. Shelves can be made from any available material, the main thing is that they do not sag under the weight.