Choosing the location and purpose of the kitchen cabinet
Before you make kitchen cabinets with your own hands, you need to understand their location in relation to interior items and household utensils, as well as their purpose. In addition, before starting work, you need to know how to correctly draw up a project and drawing of a product depending on the area of the room, the number of shelves and drawers needed, and their functionality.
Each kitchen cabinet has its own functional load:
- modules with open hanging shelves are usually used for crystal glassware, painted coffee and tea sets;
- hidden cabinets - for built-in household appliances (can be built into a hidden niche at the end of the countertop), located in a compartment with sliding doors and wide shelves attached to the back wall of the cabinets;
- drawers with guides - for dishes and plates;
- built-in modules - for vegetables, fruits or kitchen appliances, such as rolling pins, skimmers, brooms;
- floor-type buffet, sideboard, cabinet - for dishes and other cutlery;
- small volume containers - for bulk products.
When designing kitchen furniture, take into account the following recommendations:
- for small rooms or studio kitchens, products with narrow shelves are suitable, for a large kitchen - lower cabinets and floor units;
- upper modules and light drawers under the countertop are installed specifically for storing dishes;
- kitchen products with open doors and shelves are not a very good option; instead of shelves, it is better to make drawers;
- built-in containers for seasonings, spices and sauces should be located in the work area near the stove;
- Deep drawers with high sides and back walls are considered practical; the useful area of the container increases by 1/3;
- the best option is boxes of different heights;
- It’s better to choose 1 wide section than 2 narrow ones, because this will increase the useful space using the additional space obtained as a result of the absence of partitions;
- For silent and easy movement, closers and shock absorbers are installed, heavy boxes with a permissible weight of objects up to 50 kg are equipped with pneumatics, the preferred width is 90-120 cm;
- the size and volume of the sections depends on the household supplies that will be located in the boxes;
- the deeper the box, the closer it is to the floor;
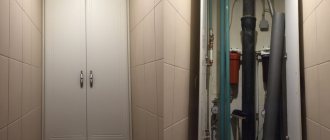
- It is recommended to install top mounted modules to mask meters, boilers, and hoods;
- when making corner canopies, the door must be precisely selected, and its dimensions must match the structures located nearby;
- the depth of the product is determined by the space for placement; the guidelines here are the dimensions of the standing furniture;
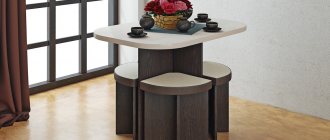
- a kitchen table is usually installed under the window in the kitchen, but instead of it a cabinet called a “Khrushchev refrigerator” is often made (for this, a wooden frame must be installed under the window sill and equipped with shelves and facades).
Experts recommend placing cabinets in the kitchen according to 3 patterns:
- linear - the furniture is on line 1;
- corner - the kitchen module consists of several parts located on both sides of the corner and with a sink;
- U-shaped - the set is suitable only for large rooms; the components here are arranged in the letter P.
Sizing and detailing of cabinets
Each functional component of the headset is assembled from separate components. Creating a detailed drawing of a cabinet showing the dimensions of the components is called detailing.
This document will be needed for correct cutting of chipboard and other sheet materials. Summary data is used when compiling a shopping list. according to the drawing with dimensions .
Kitchen cabinet detailing.
For ease of work, use a tabular form. To eliminate time-consuming manual operations, Excel is used.
For each position write down:
- Name;
- dimensions in mm;
- quantity.
If slabs with laminate are chosen or the texture is visible on a cut of natural wood, drawings of furniture for self-production are created taking into account the direction of the lines of the drawing. When cutting, it is necessary to ensure that the individual elements match.
To correctly calculate the dimensions of a kitchen set, you need to know the thickness of the individual parts. To calculate the depth of the cabinet, sum up the corresponding parameters of the side and rear walls and the facade.
A minimum deviation of a few millimeters is unacceptable; assembly becomes difficult. Clearly visible irregularities form on the front surface. It is necessary to eliminate such errors at the design stage.
Cabinet designs
Depending on their location in the room, kitchen modules are divided into the following types:
- floor;
- mounted;
- pencil case, or column;
- corner.
Floor modules are characterized by massiveness, large dimensions and capacity. They are a series of cabinets with shelves or drawers with closed doors, which are installed in the bottom row on the floor under the tabletop.
Wall mounted products for the kitchen are lightweight and small in size; they are located on the upper level.
Such storage systems are:
- closed;
- open;
- combined.
Pencil cases combine the functional features of the lower and upper levels and occupy the entire height space. Based on the number of sections, column cases are divided into the following subtypes:
- 1-door;
- 2-door.
In such a pencil case, even a refrigerator can be hidden behind the front panel.
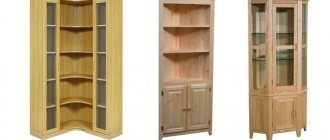
Corner sets are installed in the letter L, which ensures rational use of kitchen corners. There are 3 types of cabinets:
- mounted;
- sink cabinets;
- cabinets.
Based on placement in the room, corner sets are divided into the following types:
- upper;
- lower ones.
The upper corner tier is suitable for drying dishes. It is advisable to install it above the sink. Experts recommend designing a corner wall module measuring 60x60 cm with an optimal shelf depth of 30-35 cm.
In the lower corner kitchen cabinet, the width corresponds to the upper tier, and the height can reach 75 cm. Often a sink with piping is built into the lower part.
Types of suspended structures
Mounted structures can be divided into several groups according to their purpose, design features, and operating conditions:
- Cupboards for dishes. They are used to store various items - from dishes to food, spices. There are shelves inside such structures. Doors can be made of wood, MDF, and other opaque materials.
- Drying cabinets. Such DIY structures are located above or next to the sink, with dish dryers installed inside them.
- End structures. Corner products are the best solution for small-sized kitchens, where it is necessary to rationally use every centimeter. The end structures are suspended in the corner of the room using special hangers.
- Open type products. Cabinets with open shelves are used to store various decorative elements, beautiful dishes, and jars of spices. Such furniture is equipped with hinged, sliding or tilting transparent doors, which ensure the safety of using the cabinet and do not allow objects located on the shelves to fall down.
Before you make a cabinet with your own hands, you need to decide on the type of construction; the choice depends on the dimensions of the room and the needs of the people living in the apartment.
What can you make a kitchen cabinet from?
Each structural element must comply with construction requirements and have its own mechanical features that differ from each other. Therefore, the manufacturing material for cabinet parts is selected based on these characteristics.
It is recommended to make countertops from laminated MDF, chipboard, and sometimes from natural or artificial stone. Countertops made of solid wood are considered traditional, but from wood (if you do everything yourself) it is better to take particle board lined with natural veneer.
Plastic and laminated chipboards (laminated chipboards) are used for the frame; glass, rattan, and wood are used for the facades.
Many craftsmen believe that it is better to make the cabinet body from wood yourself. This material is considered the best. The durability of the structure is higher than that of others. The only drawback of wooden products is their high cost. Therefore, wood is often replaced with plastic or MDF.
A do-it-yourself corner cabinet for the kitchen is made from laminate, multiplex, MDF, laminated chipboard sheets, and natural veneer.
It is worth noting that inexpensive materials are used for the frame, and expensive and more stylish ones for the doors. For the countertop, choose a material that is thick and has a protective treatment.
Measurements, drawing up a plan
In order to make a cabinet yourself, you need to properly plan the kitchen depending on the location of the sink, stove, sockets, hood, and pipes.
Before work, perform the following steps:
- count the number of cabinets, shelves, drawers;
- determined by the type of product;
- calculate the number of doors;
- take accurate measurements;
- determine and separately record the dimensions of the wall, the distance from the corner to the side wall of the product, the height from the floor to the stove, sink, upper level and other parameters;
- determine the parameters of shelves, drawers, doors depending on the type of structure.
When making a built-in wardrobe with your own hands, depending on the modification and design, measurements are taken according to the same principle, and calculations are made for the niche, countertop and other parts.
Buffet finishing
Probably, many will agree that the new furniture looks impeccable, but, alas, the price is not at all pleasing. If you suddenly inherited your grandmother's sideboard, consider yourself lucky! After all, as you know, furniture used to be made for work, with the expectation of long-term use. And you can bring it into the proper, and most importantly, desired, form yourself, without spending a lot of money on it.
Five ideas for decorating old furniture
We offer you several interesting options for remodeling kitchen furniture.
Even at home, a kitchen buffet with your own hands can be transformed from seemingly shabby furniture into a real interior decoration!
- Painting and replacement of kitchen facades. An old wooden or painted surface must be thoroughly cleaned of grease stains and dust, washed with warm water and detergent and dried. Next, a light sanding with fine-grit sandpaper will be required. If there are cracks in the furniture, we fill them with a special wood putty. The already dried surface must be re-treated with sandpaper (only with medium-grain sandpaper). This is followed by a primer with universal paint and light sanding.
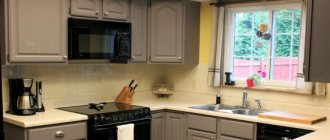
Snow-white cabinets with replaced doors and fittings
Then you need to apply the selected paint in two layers. The cabinets in the photo above are painted white, and some of the doors have been replaced with new glass ones. New metal fittings were also selected. Beautiful dishes complement the overall composition.
Attention! Instead of replacing the doors, you can add a beautiful design to the old doors.
With application of ornament
- Decoupage technique. Here you will only need special napkins or a pre-printed design, scissors, brushes, glue and acrylic. With a little imagination and effort, you will get a truly original and spectacular thing!
Stunning buffet decoupage! And all this with your own hands
- In this version, the cabinets are painted in a delicate light green color, and a colored stencil is applied to the doors. You can experiment with any shades!
With stencil application
- Bright furniture! All with just paint, new fittings and charming curtains. You might like this option.
A kitchen that plays with bright colors is amazing!
- Black and white contrasting furniture. Quite an interesting solution for modern kitchen interiors in high-tech, art deco, minimalism or modern style. And all unnecessary decorations from cabinets in the form of carvings and balustrades can always be removed.
Black and white version
Making a drawing
It is better to make a kitchen project in the form of a drawing. To do this, they use special computer programs, such as Compass, AutoCAD, Blum Dynalog (there is processing of ready-made sketches). A kitchen drawing with the dimensions of all products can be done manually, using a pencil and a ruler. In this case, it is better to choose a simple classic model. Schemes and drawings are designed simply, assembly of the structure is not a problem.
When designing the structure, the standard dimensions of kitchen cabinets are taken as a basis, which correspond to the following parameters:
- depth of mounted modules – 30-43 cm;
- height – 36, 72, 96 cm;
- width of the upper level – 15-80 cm;
- depth of the lower tier – 50-60 cm;
- width – 15, 30, 45, 50, 60 and 80 cm.
When making a floor product, it is better to make sure that the tabletop hangs over the lower cabinets.
Measuring the room for kitchen installation
How to correctly measure rooms for installing kitchen furniture.
1. Draw a kitchen plan on paper.
The following dimensions should be indicated in the figure:
height and length of walls, dimensions of partitions and window sills.
In addition, the drawing should include a communications diagram: where the gas and water pipes are, where the batteries, sockets and wiring are located.
The measurement diagram for our room will look like this:
| Fig.1 | Fig.2 |
As you can see, when measuring the space for kitchen furniture, you must indicate all the existing features of your walls.
Based on the drawing, you determine which kitchen shape will be ideal for you:
| Fig.3 Linear form | Fig.4 L-shape | Fig.5 U-shape |
2. After this, determine where you will place dishes and utensils, where you will store food, where you will place the sink, where you will place the work table, where you will place the stove.
Note: the sink, washing machine and dishwasher should be located closer to the sewer and water pipes, the gas stove should be located near the gas pipe, and the refrigerator should be as far as possible from the stove and close to the outlet. A very important planning point - pay attention to whether the opening window and door will interfere with the work area.
Kitchen furniture consists of only two products: wall-mounted modules and floor-standing modules.
They differ only in size and internal filling.
As a rule, the appearance and material of the facades are first determined.
Many manufacturers of facades, especially for facades made of solid wood, have a dimensional grid for width and height, the so-called step.
Many sizes of kitchen boxes are standardized, that is, they have standard dimensions that can be taken as a basis.
The height of the lower modules is 850 mm (720 mm box + 100 mm kitchen legs + 38 (28) mm table top), depth is from 450-560 mm depending on communications (pipes, sockets, etc.).
The standard dimensions of the upper modules in depth are from 300 to 315 mm, and the height of each facade manufacturer is different, as a rule, the first size is 720 mm, and the second size can be 910 mm, 920 mm, 960 mm; Italian manufacturers have a height of 1035 mm.
3.Now we make a drawing of the future kitchen.
In our example, we will consider a corner option placed along two walls:
| Fig.6 | Fig.7 |
Draw the modules, where and how they will stand, the sizes of cabinets, drawers, cabinets and tables.
We begin arranging the lower elements from the corner where the water and drain inlets are located. As a rule, a sink is located in these sections.
Corner boxes can be of two types:
1) direct-transitional, the width of this element depends on what the façade will be on it, and what depth of the countertop will be adjacent to it on the other side, you also need to take into account the peculiarity of the corner of your kitchen, it may not be ideally 90 degrees, for this your box should not reach the wall by 50mm. It will be covered on top by a tabletop, which can be cut to fit the corner of your kitchen.
| Fig.8 | Fig.9 |
2) The second option for corner lower boxes is a 900x900mm trapezoid table. The peculiarity of this box is that it requires a tabletop with a depth of 900 mm, while the standard depth of tabletops is 600 mm.
| Fig.10 |
3. Next, we begin to arrange straight lower boxes based on the length of your walls and the size of the facades: see the example in Fig. 11 and Fig. 12.
| Fig.11 | Fig.12 |
4. Using the same principle, we place the upper wall cabinets; we must take into account where the stove and sink are located in the lower modules, in order to place the drying and exhaust hood above them. See example in Fig. 13.
| Fig.13 |
The standard distance from floor cabinets to wall cabinets is 600 millimeters. But this size can be changed to suit the height of the housewife and the features of the kitchen space.
5. After we have planned how our modules will be placed and what their purpose is, we proceed to CALCULATE THE SIZES OF THE DETAILS of our kitchen boxes.
This stage of work is the most important, here you need to turn on all your attention. Each drawer, each cabinet, each cabinet is calculated separately. All furniture elements must be detailed, that is, each element must be divided into components. This will include side walls, bottom, roofs, rear panels, shelves. If you plan to install drawers, then they are also detailed, and the installation locations of the fittings must be taken into account.
Let's look at the example of one cabinet.
| Fig.14 | Fig.15 |
Since we use 16mm laminated chipboard, the calculation of our module will be as follows: Part No. 1 - the side panel of the box is equal to the height of the box 720mm -16mm, that is, we subtracted the thickness of the bottom (all lower cabinets are assembled according to the principle of a false bottom, that is, the sidewalls stand on the base ), we get the part size 704x560. Now we need to put an edge on the visible parts of our sidewalls. The edges in kitchen boxes, by default, use 0.4mm PVC, so there is no need to subtract anything from the resulting size of our part, we simply mark those sides where the edge will be, that is, the front edge, the back edge and the top edge.
| Fig.16 |
Part No. 2 - the bottom of the box is equal to the dimensions of our product in width and depth 440x560, and since all sides of the bottom are visible, we place the edge along the perimeter of the part.
| Fig.17 |
Part No. 3 - upper false panels (F.P.) of the box: length of F.P. The width of the box is 440mm-32mm (two side panels are 16mm each), the width of the false panels is 80mm, we get a size of 408x80mm, the edge is also on the visible sides, that is, in two lengths.
| Fig.18 |
Part No. 4 - removable shelf of the box. In kitchen modules, for the convenience of placing kitchen utensils, removable shelves are used that can be adjusted in height. Let's calculate the size of our shelf: width 440-32-2, where the box dimensions are 440mm, the side panels are 32mm (16+16mm), and 2mm is the technological gap used for removable shelves. Shelf depth 560-14-6, where 560 is the depth dimension of the box, 14 mm distance from the back wall, because We don’t have it on an overhead, but in a groove (we’ll talk about this below), and a 6 mm indent from the front edge, we get a size of 404x540 mm. The edge on removable shelves is always placed around the perimeter.
| Fig.19 |
Part No. 5 – back wall of the box. The back walls, both on the lower and upper modules, are made of HDF (hardboard), 3mm thick. They can be overhead or made into a groove. On lower modules, it is not necessary to make the back wall into a groove (if the back wall is overlay, then you don’t have to put an edge on the back of the parts). It is necessary to make a groove on the upper boxes, otherwise when installing the kitchen box on the wall, the back wall will be visible from the end.
How do we make grooves? We retreat 10mm from the edge, make the groove itself 4mm wide and 8mm deep.
In our example, we make the back wall into a groove, calculate its size in height: for a 720 mm box, subtract 32 mm (we calculate the internal opening of the box), and make 7 mm entries into the groove at the top and bottom, that is, 720-32+7+7= 702 mm;
It also calculates the size of the rear wall in width 440-32+7+7=422 mm.
If the back wall is overhead, then the size is calculated as follows: height 720-2 = 718 mm, width 440-2 = 438 mm.
All parts of the remaining boxes are calculated according to the same principle.
For your convenience, on our website you can “Cutting chipboard”
| Table 1 |
The first size indicates the length (along the direction of the fibers of the material), the second the width of the part (across the direction of the fibers). Next we indicate the number of identical parts. Then there is an edge of 0.4 mm (designation in the table - O), we put O on those sides where we have an edge.
Since our back wall is made into a groove, we must indicate this in our table. In the note column, we write the word “groove” and indicate 10 (distance to the groove), 4 (groove width), 8 (groove depth).
| table 2 |
All details of the remaining boxes are calculated and entered into the table according to the same principle.
6. How to pick up a finished order:
The most convenient way is to order the assembly of kitchen boxes from us and their delivery. In this case, you receive assembled boxes, which you just need to unpack and put in place.
If you plan to pick up the order yourself, then it is more convenient to pick up the order unassembled. For ease of assembly, we recommend ordering from us an additive for holes for assembly fasteners. You can purchase the fasteners and accessories from us.
Recommendations for preparing a room for installing kitchen furniture.
Think about what kitchen appliances need to be connected to the power supply system and how you will connect it (through sockets or directly through sockets). What is the power of the equipment and, accordingly, what wires and sockets should be included in the power supply circuit. When placing sockets, it is necessary to consider their ease of use and ensure that they are inaccessible to water even during an accident.
Attention! Electrical sockets must not be located:
- behind built-in kitchen appliances (oven, dishwasher, washing machine); in the area where they are exposed to heat (near the stove) and moisture (sink, taps and pipe connections of water supply and sewerage systems).
Sockets (or a wire outlet of at least 1 meter) for connecting equipment to the electrical network can be located:
- behind the back wall of the adjacent cabinet (a hatch must be cut out in the back wall to provide convenient access to the outlet for quickly turning off the equipment).
— under the furniture behind the plinth (accessible opening 100-150 mm from the floor level, depending on the height of the kitchen plinth) (a washing machine, a dishwasher, a refrigerator, and a separate stove are on the floor, so their connection points can be located under adjacent cabinets).
For a water heater, dishwasher or washing machine located next to the sink, the electrical connection can be arranged on an open wall in the sink cabinet in a place inaccessible to water during a possible leak. The sink bowl and drain pipes should not block access to sockets.
For a free-standing hood with a direct connection to the electrical network, a wire outlet of at least 1 meter is required at a height of 1.8 m–2 m along the axis of the hood; for a built-in hood - the socket for connecting to the electrical network should be located 70 mm above the kitchen cabinets outside the area where the air duct duct passes to the ventilation shaft.
For a non-built-in refrigerator, the electrical connection can be arranged on the side wall (there should be enough space between the refrigerator and the wall to unplug the plug from the socket). Sockets should be located conveniently to quickly disconnect devices from the power supply.
Working sockets (for connecting kitchen electrical appliances)
Think about what household appliances you plan to use on the work surface, what their power is (and, accordingly, what the power of the outlets should be), where the appliances will be located and how many outlets should be on the wall.
The recommended height from the floor level to the center of the working sockets is 1100 mm from the floor level.
Ventilation of kitchen appliances
For kitchen appliances built into furniture, ventilation is required (usually described in the technical data sheet for the appliance).
Proper ventilation of the motor and cooler is very important for a refrigerator, so it cannot be tightly built into a niche.
Water supply
Consider what equipment requires water connection (faucet, drinking water filter, water heater, dishwasher and washing machine, etc.), and where it will be located.
Attention! Water supply pipe outlets cannot be placed behind the washing machine and dishwasher, since most models have a body behind which there is no space for water outlets and sewerage pipes.
Preparing the walls, placing tiles on the walls.
It is advisable to align the walls for placing kitchen furniture, and make the angle between the walls on which the furniture will be placed straight. If there is a deviation in the angle between the walls, then problems will arise when installing furniture.
Deviation of the floor from horizontal by more than 1 cm along the length of the kitchen leads to the formation of visible gaps between the base and the cabinets.
Ceramic tiles in the kitchen can be installed both before and after furniture installation.
Information for reference:
The main dimensions of kitchen furniture that must be taken into account when designing communications:
h1 - height of the plinth from the floor level 100 mm or 150 mm.
h2 - the height of the base cabinets, most often 720 mm.
h3 - tabletop height, most often 28 mm or 38 mm.
h4 - plinth height, from 12 to 40 mm.
h5 = h1+h2+h3 - height from the floor level to the top of the tabletop.
h6 - the distance from the countertop to the wall cabinet, most often from 500 to 600 mm (depending on the height of the housewife and whether the kitchen has a cabinet-column along which the height of the wall cabinet is equal).
h7 = h5+h6 - distance from floor level to the bottom of the wall cabinet.
h8 - height of wall cabinets, most often 720 mm. (can be 360 mm, 460 mm, 910 mm, 960 mm, etc.)
h9 = h5+h6+h8 - distance from the floor to the top of the kitchen, most often 2080 mm (base 100 mm, lower cabinet body 720 mm, countertop 40 mm, distance from the countertop to the wall cabinet 500 mm, base cabinet body 720 mm).
The recommendations provided in this article are nothing more than the opinions of furniture makers and may not comply with building and other codes.
Basic cabinet assembly work
How to make a kitchen cabinet with your own hands - here are step-by-step instructions for assembling the product:
- Make structural details according to measurements: top and bottom parts, sides, backs (if the cabinet is corner), as well as strips and shelves. Number them and put them in the given order.
- Mark the location of the cabinet on the wall with a pencil.
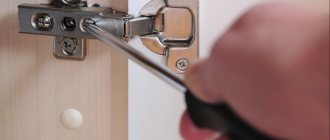
- Places for attaching hinges are marked on the façade and sides and holes are made.
- Place the sides and doors on a flat surface tightly to each other, aligning them with the recesses.
- Screw the hinges, securing them to the side and front. Place a block of suitable size under the façade to level the surfaces. The hinges consist of 2 parts connected with a screw. Remove the screw and set the doors with one part of the hinges aside.
Assembling the frame
The bottom and top of the cabinet must be attached to the side. Assembly is carried out using self-tapping screws or confirmats with a hex head.
Then the structure is turned over, laid on a flat surface and the back wall of the laminated fiberboard cabinets is secured. The sheet is secured with staples or small nails: 1 nail per 10 cm.
Let's collect the boxes
The frame of the drawers is assembled according to the principle of assembling kitchen furniture. The choppers are inserted into the holes, pressed and tightened with screws. Guides are installed on 2 sides, which are secured with an M6x13 Euroscrew.
The sides are connected to the back, then to the front. The bottom is mounted with staples or nails last. Before installing it, check the diagonal parameters. They must match each other.
Attaching the tabletop and doors
The doors are secured with special ties. After the cabinet is assembled and fastened, corners are installed on the walls, thereby fixing the tabletop. At the final stage, fittings are attached, shelves and drawers are installed.
Furniture and interior items
3 votes
+
Vote for!
—
Vote against!
To fully complete any kitchen interior, a wall cabinet is considered a necessary furniture accessory. They are made in furniture factories, small companies, and also at home. To produce wall cabinets with your own hands, you need to know some of the nuances of manufacturing technology, as well as analyze the work process in detail.
Table of contents:
- Types of wall cabinet designs
- What material to choose for a wall cabinet with your own hands
- DIY cabinet design
- Additional elements for making a cabinet with your own hands
- DIY straight wall cabinet
- DIY corner wall cabinet
- DIY plywood wall cabinet
- DIY wall cabinet installation
Types of wall cabinet designs
In order to start working on making a kitchen set with your own hands, you need to understand in more detail what the main types of wall cabinets are and their purpose. Wall cabinets are usually classified in two ways - by purpose, and also by type of construction.
According to their purpose, the types of wall-mounted structures are usually divided into: end cabinets, cabinets with drying, open cabinets and cupboards.
Based on the type of construction, cabinets with horizontal and vertical opening are distinguished. The first option is considered more common, since for the manufacture of a horizontal door only a standard fastening (canopies) is required, and for a vertical door a hydraulic cylinder is required.
Another criterion by which wall cabinets can be distributed is the installation location. This furniture set can be straight or angular (end). Corner wall cabinets, of course, have a more complex design, and their production requires not only more material but time, but they are much more convenient to use and take up less space.
Cabinets with a dryer are a very practical type of cabinets for the kitchen, which in most cases are usually located next to the sink. A dish dryer is placed inside such structures. A very convenient option for any kitchen.
What material to choose for a wall cabinet with your own hands
The materials for making wall cabinets with your own hands can be very different. This includes plywood, plastic, as well as chipboard, chipboard, natural wood, etc.
| Materials for wall cabinets | |
| Plywood | It has durable characteristics, which is complemented by a fairly high price. |
| Plastic | It is widely used and has a reasonable price. Recommended for making bathroom furniture. |
| Chipboard | It has a reasonable price, the material is very popular in use. It is not very reliable for hanging structures, since looseness causes the hinges of the structure to become loose. |
| laminated chipboard | It has a beautiful appearance and an affordable price. Does not require additional finishing work. |
| Natural wood | It is reliable and has a rich appearance. The disadvantage is the high market prices for the material. |
More expensive options are plywood, plastic and natural wood. Chipboard and laminated chipboard have become affordable and very popular among users. These materials have an affordable market price compared to others and are very convenient to use. Chipboard itself requires extensive finishing work in the process, and laminated chipboard is a ready-made laminated material, which is distinguished by its reliable strength and attractive appearance. It is best to use the last option for the manufacture of kitchen units (cabinets), which we will focus on in our article.
For the installation process, we will need the following necessary tools to make a wall cabinet with our own hands:
- roulette;
- Screwdriver Set;
- drill;
- level;
- pencil;
- hacksaw for metal;
- hammer, etc.
But before you begin installation work, first of all you need to draw up a drawing of the future design for the kitchen.
DIY cabinet design
Before directly starting the installation work, and then the actual installation of the wall cabinet, the first thing the master needs to do is decide on the dimensions of the furniture. Making a sketch of a wall cabinet with your own hands involves taking accurate measurements of the future design and depicting them in detail on paper, which will greatly facilitate the work and insure against possible shortcomings with the dimensions of the parts.
Particular attention should be paid to the installation location of the cabinet, to the design of the kitchen itself and its dimensions. If there is not so much space in the room, it would be wise to create a corner cabinet, which will significantly save the used space. For a craftsman who is making furniture with his own hands for the first time, experts recommend starting with a straight, small cabinet size.
Additional elements for making a cabinet with your own hands
When making furniture with your own hands, it is important not only to save your family budget, but also to do the work as accurately as possible so that the products last for many years. Therefore, another point that requires attention in the process of creating designs for the kitchen is the choice of fittings for the wall cabinet. Furniture hinges, locks, handles, supports, shelf holders, cup holders, couplers - all this is the same necessary additional material that neither professional workers nor home craftsmen can do without.
Fittings for wall cabinets also include various types of lifting mechanisms for doors, complete dish dryers, and shelves. All these purposes make the furniture easy to use and significantly save space in the kitchen. When purchasing all these auxiliary parts, it is necessary to take into account the design model, components of the wall cabinet and, of course, the material of the product, which is so important not to be damaged during operation. Some craftsmen separately buy not only handles for their furniture, which should fit harmoniously into the existing interior, but also such details as doors and drawers. For example, a glass door always brings elite, expensive decorative notes to the decor.
DIY straight wall cabinet
The simplest wall cabinet model includes:
- top and bottom parts;
- two sidewalls;
- back wall;
- shelves;
- door in two halves.
This is one of the possible design options; each craftsman has the opportunity, if desired, to complete a wall cabinet of his own production. This process must have a special procedure for making a wall cabinet with your own hands.
According to the given dimensions, it is necessary to measure and cut out the parts of future furniture from a sheet of chipboard. When all the parts are ready, you can proceed to assembly. It is better to carry out this moment in the following sequence:
1. To begin with, drill the places in the side walls that are intended for shelf holders. Next, a place is prepared for attaching hinges under the doors.
2. The sides, top and bottom of the cabinet are connected in sequence. Then the shelf supports are attached.
3. Next, the back side of the structure is attached.
4. Doors are attached to hinged hinges, and shelves are also equipped.
5. The next step is to attach the corner, which will facilitate the installation of the wall cabinet.
DIY corner wall cabinet
The production of various types of hanging structures is based on the simplest option. This also applies to a do-it-yourself corner wall cabinet for the kitchen, made from the common cheap chipboard material. For the future product, you can take standard dimensions as a basis: 600 * 600 mm from the corner, and a furniture height of 720 mm.
The body of this design consists of two side walls of chipboard, and the facade itself is 400 mm wide. A special feature of the product is the internal shelf, which is recommended to be slightly recessed inward for ease of use of any door (so that it closes tightly). When all the parts are sawn and prepared in the required quantity, assembly is carried out similarly to the previous option. You can equip the corner wall cabinet with the necessary fittings if desired.
Since the chipboard material does not have an attractive appearance, it is necessary to carry out a number of finishing works, which will allow the wall cabinet to be adjusted to any decor of the room.
Before starting any finishing work, the assembled furniture must be cleaned of small particles, dirt, etc. Since chipboard does not absorb regular paint well, it is better to use alkyd enamel; it must be applied with a special sponge. You can choose any color, the main thing is that it fits harmoniously into your interior.
Chipboard is also opened with special varnishes, which give the furniture a certain shine. The cut sides are usually covered with construction tape, which allows you to hide all surface roughness and create an expensive look for the product.
DIY plywood wall cabinet
Before you start working with the material, you need to familiarize yourself with its properties and the rules for its use. Plywood is a worthy material for the manufacture of kitchen furniture, which can serve the household for many years. Installation work for making a wall cabinet with your own hands has the same principle as the process of working on the simplest model. The works differ significantly regarding the material itself.
The rules for working with such material as plywood can be depicted in the following diagram.
1. It is advisable to make any holes on a plywood sheet using a special step drill.
2. It is not recommended to use plugs on the face of plywood. To avoid the need for this, it is recommended to use a mount with minifixes.
3. When preparing structural parts, it is important to take into account the thickness of the plywood sheet, since you need to use a special tool to cut it. Thinner material must be cut with a sharpened knife, medium sheets are cut using a hand jigsaw, and thicker material is cut using an electric jigsaw.
4. It is worth considering the fact that plywood sheets cannot be cut across the grain.
5. When joining parts, I recommend using a special silicone sealant.
Professional craftsmen claim that if you follow all operating rules when working with plywood material, the furniture will be of high quality and reliable to use. Another advantage of making wall cabinets from plywood with your own hands is the ease of finishing work.
By using various paints and other finishing materials, a wall cabinet of our own production can not only harmoniously fit into the interior of the kitchen, but also become its real decoration. Plywood products can be supplemented with LED lighting on doors or drawers. A variety of self-adhesives are easily applied to the surface of a plywood sheet, with the help of which you can create any pattern on the design of a wall cabinet. Experts also recommend using varnishes that allow you to preserve the natural appearance of the material.
DIY wall cabinet installation
Installing a wall cabinet with your own hands is a difficult task, but any owner can do it.
In order for the wall cabinet to occupy the most correct place in the kitchen, the following criteria must be taken into account:
- the height of the furniture should be such that all family members can get the necessary things without any problems;
- the wall cabinet should not interfere with the normal functioning of ventilation in the room;
- the fastening used must be guaranteed to insure the suspended structure against possible falls, which can lead to a lot of problems.
When installing wall cabinets, you should use a building level. Most often, hinges and fasteners are used for fastening. So, in order for the structure to be placed evenly and without differences, it is necessary to draw a horizontal line on the wall, which is checked with a level.
Next, a fastening is placed on this line using a hammer drill and screws. The furniture set itself is equipped with the required number of hinges or special brackets. Then all elements are securely connected. This method of fastening has proven itself to be quite reliable. After the wall cabinet is finally attached to the wall, removable shelves are installed. And as a result, a DIY wall kitchen cabinet is ready for use.
For more detailed information on assembling and installing wall cabinets with your own hands, you can watch the video:
Kitchen cabinet decoration
A budget option for decorating kitchen furniture is applying self-adhesive film or photo wallpaper. Some craftsmen paint and paint doors with acrylic paints.
The kitchen cabinet will look original if finished using the decoupage technique. This is an ancient technique of applying ornaments and images using special stencils, 3-layer napkins or magazine cutouts with further varnish coating.
To decorate the facade, you can use glass or a mirror with artistic sandblasting. Such furniture looks exquisite and surpasses all other decors in beauty and characteristics.
Alternative way
There is another way to get new kitchen cabinets in your kitchen. And do it at minimal cost. This method is to restore a kitchen cabinet with your own hands.
Preparation
We present to your attention several original ideas. With their help, you can update your kitchen interior, making it bright and special.
But, as in the previous case, before you start work, you need to carefully think through everything and prepare for it. Cabinets should be cleaned of dust, dirt and old paint. If necessary, strengthen loose connections.
Idea No. 1 - using photo wallpaper
Having been undeservedly forgotten some time ago, photo wallpapers are returning to our everyday life. Currently, images of cities that resemble the view from a window have become especially popular.
It could be some Italian cathedral or the Eiffel Tower in Paris. This option would be quite appropriate in a home kitchen.
Sequence of work:
- We clean the surface of the cabinet with sandpaper;
- Paint the cabinet with white paint;
- Glue photo wallpaper onto the prepared surface.
You can use a simplified version of this idea. Just take and cover our headset with self-adhesive film.
It is important to choose the right color and carefully apply the pasting itself. This is approximately what should happen in the end (see photo).
We use self-adhesive film
Idea No. 2 – giving an antique effect
This trendy effect can be achieved using shaped strips and paint.
Sequence of work:
- We measure the required length and cut off the strips;
- Using glue, we fix them on the cabinet walls;
- After waiting for complete drying, we paint the glued boards.
Antique style kitchen cabinet
Idea No. 3 – mirror paper
The next way to update your kitchen cabinets is to use mirror paper. With its help, an interesting effect is obtained, sometimes giving amazing results.
To process the typeface, in addition to the paper itself, you will also need wallpaper and interesting pens. We will install them on the doors to replace the old ones.
Sequence of work:
- The surface is treated with sandpaper and painted;
- We cover the side walls with wallpaper;
- We glue mirror paper onto the shelves and doors;
- We screw in new handles.
In addition to the above, there are other interesting ways to update your kitchen cabinets. They can be decorated with stickers depicting flowers or coffee beans. The latter will especially please coffee lovers.
Cabinet decorated with a sticker with a pattern
Advice! When restoring, consider the proximity to frying surfaces and water. If necessary, use special waterproof paint. Or avoid using wallpaper, which can deteriorate from exposure to hot air.
We have discussed the issues of creating a new cabinet and restoring an existing set. The price in both cases is much lower than what you would have to pay for new furniture. Moreover, in our case, we managed not only to save money, but also to gain every reason to be proud of the results of our work.
Did you like the article? Subscribe to our Yandex.Zen channel
Great article 0