0
80399
Self-assembly of furniture helps to significantly save money. It’s good if a person has simple skills in assembling objects. It will be useful for beginners to learn how to assemble a wardrobe themselves. Step-by-step installation steps for each element of the product will allow for quick installation.
DIY wardrobe: budget option
You will greatly simplify the assembly process for yourself if you order all the parts and fittings of the cabinet from a furniture workshop, because purchasing the necessary equipment in order to saw and edge several parts is pointless. At the same time, the cabinet itself will cost you little, so to speak, a budget option.
In addition, to assemble the sliding system you will need quite a decent amount of space and an assembly table. Agree, not everyone can allocate a separate room for assembling the doors of a three-door wardrobe, much less assemble a special table for this.
The most common material for making cabinet frames is chipboard, although, of course, you can order parts from MDF board.
You have the opportunity to choose between a rich palette of tree-like colors and bright solid colors. As for sliding doors, there is also a wide selection of fillings. For example, you can order doors with:
- mirror;
- matte mirror;
- sandblasted mirror;
- frosted glass;
- glass with photo printing;
- rattan plate;
- milled MDF board;
- MDF board covered with leatherette (it turns out, by the way, very interesting and unusual).
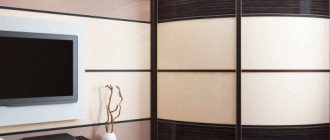
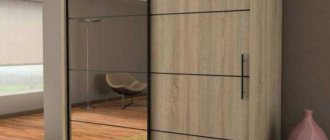
Sliding wardrobe doors in dark colors
I would like to dwell separately on the edging of parts. This is a separate service, which is also provided by furniture shops. Below is a diagram of the edge placement.
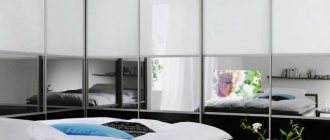
Sandblasted mirror
You can simply print out the diagram, which will be attached at the end of the article in the archive, and when ordering the details, hand it over to the specialists of the furniture company. It will also serve as a list of necessary parts. We advise you to order 0.5 mm thick plastic edging.
Stylish leather wardrobe doors
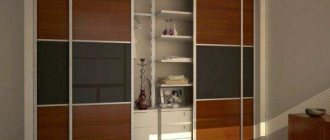
In this article we will look at the process of assembling a three-leaf wardrobe, the dimensions of which are 2300 * 2400 * 600 (width * height * depth), in the color “Natural Alder”, and the sliding doors will have a combined structure consisting of glossy and matte mirror fabric. The system itself is supposed to be a closed type, profile color: champagne.
Cabinet doors can also be ordered from the workshop. They will come to you already assembled, all you have to do is screw the top and bottom rails to the bottom and top of the cabinet.
You can make your own adjustments to the design of the wardrobe proposed in this article, while the main points of assembly and calculations will remain the same.
Required tools and materials
In order for the independent process of assembling a sliding wardrobe to be successful, you should prepare materials, tools and other details in advance:
- Construction level (either a laser or a regular one will do; it will help you measure everything accurately).
- Angle (tool for measuring angles).
- A hammer (it is better to stock up on several at once: a regular one - for driving in nails or dowels, a rubber one - for aligning the walls of the assembled furniture relative to each other).
- A Phillips screwdriver and a regular flat-head screwdriver (for screwing in self-tapping screws).
- Marker.
- Measuring tape.
- Electric drill of wide functionality with different attachments.
- Hex key.
- Jigsaw.
- Iron (for smoothing melamine edges on cabinet corners and ends).
In addition to tools, you will also need to prepare fasteners, the correct set of which may differ depending on the type of coupe structure chosen . To decorate and secure individual parts, they use fittings - they should also be prepared in advance. It won’t hurt to have an installation drawing in front of your eyes during assembly. You will need instructions.
How to choose components for a wardrobe, useful tips
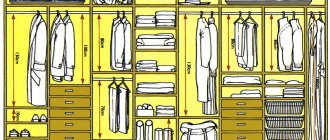
List of parts for a wardrobe with 3 doors
- Sidewalls – 600*2400 – 2 pcs. (chipboard).
- Internal stand – 500*2284 – 2 pcs. (chipboard).
- Top of the cabinet – 1800*600 – 1 pc. (chipboard).
- Bottom – 1768*600 – 1 pc. (chipboard).
- Base strip – 1768*100 – 1 pc. (chipboard).
- Drawers – 578*250 – 5 pcs. (chipboard).
- Shelves – 578*500 – 9 pcs. (chipboard).
- Rear wall – 1800*2400 – 1 pc. (HDF).
- Clothes rod 564 mm – 3 pcs.
- Flanges (bracket for rod) – 6 pcs.
Parts for side console
- Rear wall – 500*2400 – 1 pc. (chipboard).
- Side radius open shelves – 500*600 – 6 pcs. (chipboard). These parts also need to be edged, only in this case T-shaped . You will also find a diagram for processing these parts in the archive at the end of the article.
Calculation of the dimensions of a sliding system for three doors
I would like to dwell in more detail on the calculation of door sizes. This is a very important point, because the design of the wardrobe is designed in such a way that when one door is opened, access to only one section is possible, while the other two remain closed.
Therefore, if you want to make drawers instead of shelves, which are assumed in our three-section wardrobe design, and install a pantograph lift instead of a clothes rail, you need to very carefully calculate the width of each door. In addition, the section in which the drawers or pantograph lift will be mounted will need to be made smaller in width than the door (approximately the width of the profile).
In order to calculate the height and width of the doors, it is necessary to calculate the dimensions of the cabinet opening. So, let's calculate:
- Opening height : from the cabinet height of 2400 mm, subtract the chipboard thickness of 32 mm (top/bottom) and the height of the plinth of 100 mm. We get 2400 – 32 – 100 = 2268 mm.
- The width of the opening is calculated as follows: from 1800 we subtract the chipboard thickness of 32 mm (right and left pillars). We get 1800 – 32 = 1768 mm.
As a result, we get the dimensions of the opening of our three-door cabinet: 2268 * 1768 mm.
These calculations are quite enough, you simply give the overall dimensions of the height and width of each door (in our case, they are the same) and the dimensions of the upper and lower rails, and the furniture workshop specialists themselves will calculate the length of the vertical profiles, the dimensions of the lintels, etc.
The design of our three-door wardrobe suggests the presence of one door with a solid mirror sheet, and two doors with a matte mirror separated by lintels. You will need to inform the furniture makers that the doors should be divided into four equal parts, and they will independently calculate the size of the inserts and the number of lintels.
Cabinet assembly
A set of guides for the sliding system – 1 set. (length of the upper and lower guides – 1768 mm).
So, you have a huge number of parts of different sizes in front of you, and you don’t know where to start?
- Start by drilling confirmation holes on the interior shelves of the cabinet . To make this happen faster, stack all the shelves in one stack, measure the required distance from the edge of the shelves, and draw one vertical line along all ends of the parts.
- After this, mark the future holes with an awl and, armed with a screwdriver and a confirmation bat, make holes on both sides on each shelf.
- The next step will be making holes in the sides of the wardrobe . It's best if you make the markings from the inside of the frames, because this way you won't have to erase pencil marks on the outside of the cabinet. So, according to the drawing, you measure the required distances for the shelves, draw a line to which the part will adjoin, and drill holes for the confirmations. Do this procedure for absolutely all shelves. That is, you will need to make similar holes on the internal racks of the cabinet.
Now you can begin assembling the frame of a wardrobe with 3 doors. Using confirmations, connect the side stands and shelves, internal stands and shelves.
As for the shelves that are located between the internal standing ones, we suggest attaching them to shelf holders 5 mm in diameter. To do this, we make holes on the internal pillars, then insert shelf holders into them and install shelves on them.
Next, you need to screw the drawers, which act as a tie to the cabinet. Do this using the same confirmations, so the structure will be stronger
Adjustable legs 100 mm high must be screwed onto the bottom of the three-section cabinet. It is recommended to take adjustable ones, since the floor may bend. You can easily adjust each leg, while leveling the cabinet.
Screw the bottom of the cabinet onto the confirmations. All you have to do is screw the clips to the base plate, with which it will be attached to the legs.
Now you can bring the three-leaf wardrobe into a vertical position and screw the roof onto the metal corners. We can say that we are approaching the completion of the assembly of the three-door wardrobe.
Using self-tapping screws and a screwdriver, screw the back wall to the cabinet. We would like to draw your attention to the fact that it is best to do this with self-tapping screws, not nails, otherwise there is a risk that, over time, the back wall will fall behind. Make fasteners at a distance of 15-200 mm from each other.
Now you can screw on the tramp rod. It comes in two types: oval and round. Accordingly, the fastenings to them should be different. For an oval one, a special bracket is used, and for a round one, a flange is used.
Stepping back from the shelves 100 mm down and 250 mm from the end of the shelf (that is, you need to ensure that the rod ends up in the middle with respect to the side stand), first screw the flange, and then insert the rod into it, then screw the second fastener . Our closet design involves the use of three trampoline rods for different sizes of clothing.
At this point, you can screw the outer side shelves to the base of the 3-door wardrobe. First, make the appropriate markings on them and on the sides, and then start drilling. We advise you to do this fastening also with the help of confirmations.
Marking
Making a mark with an awl
Drilling
Resulting hole
Installing the shelf support
Let's score
Shelf support installed
All shelf supports are installed
Removable shelf installed
Drilling depth limiter using a dowel and a conventional drill
Dowel 6 or 8 on a drill
Making a drill depth limiter
Screw the back wall to the side open shelves.
Let's get down to the most important part - installing the sliding system. When ordering a system, take into account the dimensions of the opening of the cabinet itself - this should be the length of the rails. Let's start with the top guide. Screw it flush with the side posts. Make sure that there are no gaps and that the rails are not pushed forward.
When installing the bottom rail, the following nuance must be taken into account: it must be mounted with a slight offset into the cabinet. As a rule, this distance is 20-22 mm from the end of the sidewall.
In general, it would be ideal if, after screwing the top rail, just put the bottom one on the bottom, and try to insert one door into them. By adjusting the offset of the bottom rail, you can figure out how far from the edge it needs to be mounted.
Insert a stopper into the bottom rail - it is necessary to ensure that the doors are locked in the closed state in the future. Do as shown in the picture.
Now all that remains is to insert the doors in a checkerboard pattern into the upper and lower rails, and close the confirmation caps with special plugs in the color of the chipboard
Rules for installing various hardware
People often ask how to assemble a wardrobe and whether it is necessary to glue the wooden dowels? Please note that if you glue them, then when moving or repairing, you will not be able to disassemble the cabinet without damaging the fasteners. The glue does not add rigidity or strength to the structure, but is used only in cases where the connection is made only with dowels without the use of screws or minifixes.
How to drive dowels correctly. They are installed only in holes on the plane and in no case are driven into the end of the chipboard, because the board may crack when connected. It is advisable to insert them by hand or using a rubber hammer. You can also use a metal hammer, but be extremely careful, as it is easy to punch through the panel with a dowel.
Minifix rods are screwed in using a Phillips screwdriver. It is not advisable to tighten them with a screwdriver, since you can easily turn it in the hole and the connection will not be securely fixed. The eccentric discs are inserted after the panels are connected and the rods are inserted into the holes. This will make assembly easier, since if the disk is not centered correctly in advance, the minifix rod will not go into the hole all the way.
I recommend: How to make a table with your own hands
The furniture screw (confirm) should be tightened with little force, as it may turn in the hole. If this happens, you can use regular matches (3 pieces) to insert and seal the hole.