In any room there is a free corner in which you can place a shelf. It will not only become a design element, but will also create additional space for storing books, toys, small kitchen utensils, etc.
A suitable option can be selected in the store or ordered. But it’s better not to spend money, since making corner shelves with your own hands is no worse than factory ones.
Shelf materials
Before starting work, you should decide on the material in accordance with the conditions and interior of the room. Corner shelves are made from the following materials:
- Solid wood or boards. Scraps remaining after repairs will do.
- Chipboard and MDF boards. Pieces of suitable size can be purchased inexpensively on the market.
- Multilayer plywood.
- Glass with a thickness of at least 5 mm.
- Plastic.
- Window sill profile.
- Metal.
The first 3 options are the most popular, so every home craftsman will have the necessary tool to work with them.
However, there will be no difficulties with others if special operations (for example, shaped cutting of glass) are ordered in a workshop.
Corner shelves in the interior - 50 photo ideas:
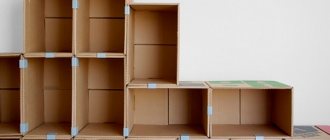
You can make it yourself, let alone the very basic details of room furniture. This master class will show how you can quickly assemble a corner shelf for the kitchen from chipboard scraps, and will also talk about some of the features of assembling cabinet furniture.
Working with cabinet furniture is an activity that anyone who knows how to hold a tool in their hands can do. All you need is desire. To make a shelf for the kitchen, scraps of chipboard sheets were used; it took 5 hours.
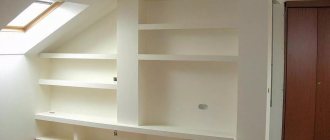
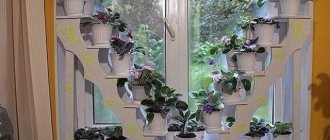
Living room shelves
Wall-mounted corner shelves for this room are usually made of wood or its substitutes (plywood, chipboard, MDF). A circle of the required size is drawn on the material with a compass, then it is divided into 4 equal parts, which are cut out with a hacksaw.
To obtain smooth edges, it is better to use a jigsaw. All 4 sectors can be used to create a multi-tier shelf. You can simply saw off a corner of the desired size from the material, but then the front edge will not be semicircular.
To install in a corner, it is necessary to make slats with grooves. They are fixed to the wall using glue, dowels or self-tapping screws. Then the shelf is inserted into the grooves without additional fastening. Its edges are covered with decorative tape.
A rectangular shelf in the form of a snake looks original, the tiers of which are alternately attached to adjacent walls.
Mounting methods for wall shelves
When planning wall shelves, the type of fixation is decisive. Once you familiarize yourself with the mounting method, you can easily choose the option that suits you.
Using invisible fastening. By choosing this look, you will hide the fasteners, and the wall structure will look light and elegant, no matter what room it is hung in. It is desirable that the wall be concrete or brick. Wall partitions made of plasterboard less than 10 cm are not recommended.
Using brackets. In this case, you cannot hide all the elements; they will always be visible. You can save money by purchasing metal or plastic corners. If you want to add beauty and originality to a piece of furniture, buy decorative fasteners, but always in pairs. It is necessary to take into account an important point - the brackets are not suitable for every interior.
On glass shelf holders. In such fasteners, rubber or silicone gaskets are used to protect the plane at the fastening site. Shelf holders can be of different sizes and shapes; there are options with suction cups. They are attached from below, and the upper surface remains open.
Using loops and corners. This is the most common method - easy, efficient, does not take much time, and will fit into any environment. The format of loops or corners allows for a decrease or increase in the load on the shelf. Attachment to guides or metal posts. Not all types can be put into practice on your own. In some cases, it is worth contacting specialists.
Shelf for iconostasis
According to tradition, such a single-tier shelf is placed in the eastern corner of the house. To make it, a solid wood or wide board is selected.
If the corner shelf for icons is not decorated with carvings, then the process of its manufacture is no different from a shelf for the living room. But unlike it, a cornice in the form of a narrow strip should be installed on the front part. It is often made curly.
The cornice is secured to the shelf with dowels (wooden pins). Holes are drilled under them in a triangle with a depth of 2-3 cm. After installation, they should protrude outward by 1 cm. After drilling holes on the cornice, it is secured to the dowels using glue.
Corner bathroom shelf
The bathroom is a room with high humidity, so a corner shelf made of wood will not last long. But glass and plastic will be just right.
When taking measurements, you need to take into account that the angle may not be right. Therefore, you should make a template from cardboard and cut out a shelf using it.
If you use glass, it is better to go to a workshop where any shape can be quickly cut out of it. For fastening the shelf, special holders are ideal, which are sold complete with dowels and screws. They are mounted on the walls and glass is inserted.
Buying a sofaCeiling curtain rods - review of new products, design photos, combination options
- Modern do-it-yourself book shelf: drawings, diagrams, options and best bookcase designs (140 photos)
Store shelf mounts
A shelf that you bought at a hardware store can be very difficult to attach to the wall. Be sure to read the instructions that came with it. Most likely, it will contain all the necessary recommendations on how to screw the product to the wall.
Next you need to understand what type of fastening the shelf has. Usually, complete with a shelf and instructions, it also includes elements that are used to fasten the product. It is also necessary to select brackets, thanks to which the shelf will be secured.
Bracket options may vary:
- fastenings that do not extend beyond the shelves;
- flat brackets with pear-shaped holes at the end.
To fasten a shelf from a store to the wall, first carry out the careful measurements given above.
Steps to attach the shelf to the wall:
- Based on the possible dimensions of the shelf, you will need to decide on the place where the fastening will be made. Choose the right place so that other furniture in the room does not interfere.
- Using a building level, you need to control the position of the product.
- Nests are first created in the walls so that after this procedure the shelves can be safely attached. These nests are made with a puncher or drill, and then dowels are driven into the resulting holes.
- After this, the shelf is mounted on the wall.
- The final stage is screwing the fastening elements into the holes.
The problem of space is relevant for small and large apartments. It is very difficult to fit everything you need into limited square meters. It is almost impossible to imagine a home, office or apartment without convenient shelves. The element performs an aesthetic, decorative role.
Shelves help free up space and diversify the usual interior of the room.
Shelves are used in absolutely any room and for completely different purposes. Look great in bathrooms, kitchens and living rooms.
Let's consider the features and advantages of building corner shelves yourself.
Previously, handicraft production of any furniture was considered the lot of the poor. Wealthy people preferred to purchase interior elements in stores. But everything there had almost the same design, so thirty years ago the interiors in different houses were almost identical.
Today, original home-made furniture is a source of real pride.
In modern stores there are dozens of different models of furniture, but even among such a variety it is difficult to choose one option that can meet all the preferences of the owner of the house. In this case, there are only two options: order furniture directly from the manufacturer, or build it yourself.
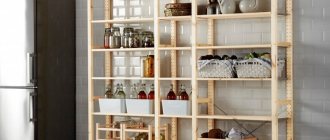
Making shelves on the wall with your own hands is not at all difficult, and you can use a wide variety of materials.
The first option may seem ideal. However, not every master will be able to make furniture of high quality, inexpensively and take into account all your wishes. Finding such a specialist is not easy, and there is no point in searching if you need a simple wall shelf.
This design element is easier to build on your own.
Making your own shelves has many advantages.
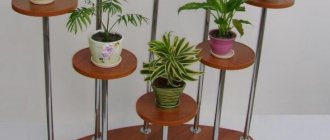
Metal book shelf
An original corner shelf can be made from sections of water pipes with minimal plumbing skills. Its shape is similar to a snake, the curves of which alternately extend onto adjacent walls.
Fragments of pipes of the required length are connected with corner fittings and welded. In the absence of welding, fastening is carried out using screws screwed into the joints of the fittings and pipes. The finished structure is painted and attached at the lower and upper points to dowels driven into the wall.
When making corner shelves from plasterboard and a window sill profile, they must be reinforced with wooden slats, metal profiles, and corners, depending on the expected load. Self-adhesive film is used for finishing.
A frame is required for mounting. You can come up with design and design options yourself. For inspiration, it’s useful to look at photos of do-it-yourself corner shelves on the Internet.
How to attach a shelf to a plasterboard wall
In general, hanging a shelf on drywall is a very difficult task, which becomes possible if you follow the right approach.
A well-organized and carried out work process using appropriate quality materials and correct weight distribution are in this case the key to success. You can attach shelves to a plasterboard wall using special dowels. Such fasteners can be of various types, but one of their advantages is that when screwed into the wall, they begin to open, thereby forming sufficient support and taking on a significant part of the load.
What you need
To hang a shelf on a plasterboard wall you will need:
- tools for manually or mechanically creating holes in the wall;
- dowels;
- screws;
- heavy items will require anchor bolts;
- If necessary, a cementing mixture is used.
Do not forget that during drilling a large amount of dust is generated, especially considering the composition of a material such as drywall. You will need to worry about protecting the room from dust, as well as personal protective equipment when carrying out such work.
How to attach the fixing moment (fastening)
After drilling the holes for the fastenings, dowels are inserted into them, which go against the grain. After this, a screw is inserted into the dowel, for example, with brackets or hooks.
How to hang a heavy shelf on a drywall wall
You can attach a heavy shelf to a plasterboard wall by mounting it to a metal frame using special fasteners. To do this, you will need to perform a whole list of works:
- The locations of the fasteners are marked on the wall.
- Holes are drilled in the designated places, but not only through the drywall, but also directly through the profile.
- Butterfly dowels are inserted into the resulting holes and screws with fasteners mounted on them are tightened.
- The screws should not be overtightened, as long as they are able to withstand the weight of the shelf and the pressure it exerts on the wall.