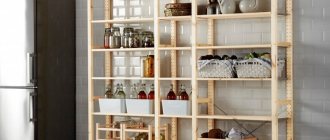
Simple and fast
The easiest and fastest option to implement is a shelf in the form of a ladder. The photo below shows an example.
You will need:
- boards or thick plywood;
- wood screws;
- drill;
- saw;
- pencil;
- ruler;
- special glue for wood products;
- sandpaper;
- paint or glaze on wood. Just make sure that they are intended for interior work.
First, decide what width and height your product will be, how many shelves you want to place. Use a pencil and ruler to mark the required dimensions and cut the required parts.
Now on the racks you need to mark the places where the shelves are attached. Since our shelf-ladder will be placed against the wall, it is necessary to take into account the inclination of the shelves. It will also be necessary to cut at an angle the side of the racks that will stand directly on the floor. This will give greater stability to the structure.
It is better to mark the places for screwing in the screws with a drill. Then coat the surfaces with glue and assemble the bookcase. Now you can start painting.
A couple of painting tips:
- If you want the same product as in the photo, then choose a paint with more covering power. For example, universal enamel. Some craftsmen impregnate the wood with a special oil to create the effect of wood that has not been painted. You can also tint the material, which will even help “change” the type of wood;
- If your shelf will be used in a dry room, then there is no need to prime it.
Related article: How to tie a scarf around your neck: popular options and methods of tying with photos and videos
This shelf is suitable for books and magazines, framed photos, flowers, etc.
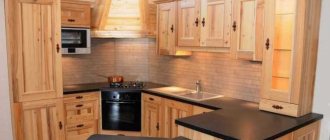
Setting up the kitchen
It happens that in the kitchen there is a narrow space between pieces of furniture, which spoils the appearance and seems to be unsuitable for use. We offer you a master class on how to make a roll-out shelf.
You need to prepare:
- boards, according to the number of shelves you plan to make;
- slats;
- furniture wheels;
- handle for easy rolling out;
- wooden slab;
- screws and dowels;
- glue.
We measure the space that we want to fill with a shelf, and accordingly decide on the width of the shelf. We cut the necessary parts.
We begin to attach the shelves to a wooden slab, which will serve as the back wall of the product. Before assembly, coat the joints of the parts with glue, and only then connect them with screws.
We screwed the shelves, now we fix the sides.
You can press it with a weight for better adhesion of the glue.
The base is ready.
Now we glue the slats that will prevent the contents of the shelf from falling from it.
Screw on the wheels and handle. We install the shelf in the opening.
The roll-out shelf is ready. And the empty space has been filled, and additional storage spaces have appeared.
Materials
Before we consider in detail how to make a bookcase with your own hands, you should figure out which material is better to give preference to. In principle, any more or less durable, workable material is suitable for this. But if this is your first time encountering the process of making furniture, then it is better to avoid excessive variety.
Important! In principle, the same pine has the same individual wood grain, so you can use it.
PVC pipe product
Prepare:
- PVC polymer water pipes;
- sandpaper 220 RUR;
- measuring tape or tape measure;
- plastic or special primer for PVC;
- glue;
- PVC tees and caps;
- for shelves, boards, chipboard or plywood, depending on what you have at your disposal;
- jigsaw;
- drill and bit;
- screwdriver;
- screws;
- spray paint (choose color as desired).
You need to select the parts for the size of the shelf that you are planning. We have this:
- legs 15 cm long - 4 pieces;
- horizontal supports 52 cm each - 9 pieces;
- side supports 15.5 cm each - 14 pieces;
- vertical supports 26 cm each - 20 pieces;
- tops 10 cm - 4 pieces.
Related article: DIY paper palm tree: master class with photos and videos
We glue the parts together, using tees if necessary.
We put caps on the legs.
Now, in the corners of the wooden shelves, we drill holes for the diameter of the pipes.
We will treat the cut areas with sandpaper.
In addition to glue, we duplicate the fastening of the angles with screws for reliability.
Until the shelves are installed, we paint the frame of the shelf with paint. Be sure to lay a backing so as not to stain everything around. And of course, we don’t forget about safety precautions: we work with gloves, in the fresh air, preferably even with a respirator (if you have a sensitive sense of smell or a tendency to allergic reactions).
We assemble the entire structure.
We install it in the desired location and place things.
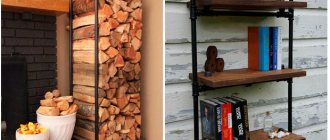
Other options
From scrap materials, such as belts and boards left over after renovation, you can make a hanging bookcase.
And even from bottles.
You can take an old bookcase and paint it using patination. And you end up with a unique piece of antique wood.
If your interior is in Provence style, then you can decorate your bookcase using the decoupage technique.
This unique and useful piece of furniture can be made with your own hands with a minimum of skills. Below is a selection of videos on creating bookcases.
How to make a wooden shelf with your own hands
Drawing of a shelf
The work on making a wooden shelf yourself can be divided into several stages, these are: preparatory, assembly, decoration and installation.
Preparatory stage
At this stage of the work, a drawing (scheme) of the shelf is selected or developed, and the need for its decoration is determined.
Based on these parameters, the required material is selected.
When the drawing has been developed, the material has been selected and prepared, the tools and other materials that will be required to process the assembled structure are prepared.
Installation of whatnot
Using prepared materials and tools, workpieces are manufactured and processed.
The workpieces are sawed in accordance with the existing drawing or sketch, after which the cut points are cleaned in order to remove irregularities in these places. When using boards, they are planed and sanded.
The shelf is being assembled.
Options for fastening workpieces to each other depend on the material used and must provide the required structural rigidity.
Methods and locations for installing fastening elements should be thought out at the stage of developing a product sketch.
Decoration of the structure
The simplest option for finishing an assembled product is to coat it with varnish or paint. This also applies to various types of lumber, as well as plywood and OSB sheets. When using chipboard, only edge processing is required, for which edge material is used that is glued to these areas of the structure.
When using lumber and trying to make a “antique” shelf, several processing methods can be used, these are:
- Brushing is a method when mechanical processing of wooden products with metal brushes is performed, followed by polishing and treatment with wax-containing substances.
- The use of stains that are used to process the manufactured product.
- Patination is a method in which a wooden surface is painted with paints of various tones in several layers.
- Craquelure is a method of treating painted surfaces with a special compound, craquelure, which gives the product an “antique” look.
Product Installation
After the shelf is made and decorated, it is installed at the intended location.
Depending on its purpose, the bookcase can be rigidly fixed to the surface of the wall or floor, and can also be freely positioned in relation to them.
The mounting option depends on the material that was used in the manufacture of the shelf and the structure of the walls and floor in the room where it is installed.
Nowadays, thanks to the Internet, you can always find drawings of any furniture, including shelves of various designs, which can be used to make them yourself. And the variety of materials and technologies allows you to bring any creative ideas to life.