Any plumbing unit, be it a separate bathroom or combined with a toilet, must be equipped with at least a minimum amount of furniture. The most popular furniture products that are used in rooms of this type are considered to be a cabinet, in which a washbasin is often mounted, hanging cabinets or shelves, as well as a closet for storing linen. The range of choice of bath sets in specialized stores and markets is very large, however, creating an interior with your own hands has a number of advantages over buying a ready-made item.
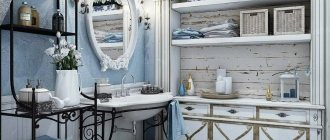
White bathroom furniture in Scandinavian style
The advantages of making furniture yourself
Among the positive aspects of making bathroom furniture with your own hands, the following aspects can be highlighted:
- Saving money. As you know, prices for materials account for at least half the cost of the product. Making your own furniture can save you a significant amount of money.
- Uniqueness of the product. Personal creation of an interior element will allow you to get a piece that can become the highlight of the design work.
- Flight of fancy. There are no restrictions in the appearance and functionality of furniture.
- Possibility to make furniture for non-standard room sizes.
How to design and make bathroom furniture with your own hands, drawings and photos
In fact, furniture for a bathroom, toilet, or combined bathroom means floor cabinets with sinks, cabinets for towels and household equipment, wall cabinets, shelving, mirrors and shelves. All these items are designed for a specific size, and I cannot give any specific drawings. But giving some ideas for storage in the bathroom is fine.
DIY bathroom floor cabinets
If the bathroom is separate, then it is better to implement the cantilever design described above and not to be tricky with making a cabinet under the sink from furniture materials. The proximity of moisture will not lead to anything good.
However, there is an option to complement the tulip sink with shelving or mobile shelves.
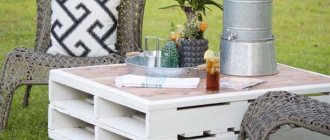
It’s very convenient - while taking a bath, move closer to you such a pull-out table with shelves with everything you need for relaxation. Especially if you like to take a bath and read a book, watch a TV series on your laptop, etc.
If the bathroom is combined, then most likely there will be enough space for a full-fledged floor cabinet with your own hands. Since the room is large, the problem with condensation is not so acute and it is possible to implement fairly large structures with a body made of laminated chipboard and a façade made of MDF.
Varieties of cabinets with a design similar to the kitchen one look good. Simply adapting the depth is enough. And the height can be left the same, it is optimal for the level of the sink and the installation of a washing machine.
The filling of bathroom cabinets can be different, just like kitchens. You can use shelves and drawers, bottle holders and mesh storage systems.
For large items (basins, buckets, laundry baskets), larger storage spaces can be provided.
DIY hanging mirrors and shelves for the bathroom
If free space allows, it is better to hang the mirror as far as possible from the shower - then there is less chance that it will fog up. And you spend time wiping it in the morning to complete all the “procedures” for caring for your face and hair.
Also, a traditional mirror above the washbasin can become additional storage space. If you place it on the door of a flat cabinet. Moreover, the sash may not be hinged. And, for example, a compartment or folding one.
Or a stationary one, hiding retractable racks behind it.
The reverse side of open shelves and the bottoms of wall cabinets can be used to hang hooks for towels, washcloths, and brushes. It turns out that a kitchen rail is also appropriate in the bathroom - you can hang towels on it. Or use it traditionally, with mesh hanging shelves for various small items and hooks.
How to use the space above the toilet
There are a lot of options for add-ons over the toilet. These can be open shelves or closed cabinets. If the toilet is combined with a bathroom, you can make an option with a folding table - I think it will be convenient.
If the space between the wall and the toilet allows, you can build a low cabinet into it.
It is especially convenient for the elderly and people with disabilities - it will serve as a reliable support when standing up.
Storage under the bath
Surely you have repeatedly come across photos of various pull-out and folding storage systems under the bathroom.
Alas, such options are far from Russian realities. Unless, of course, you live in a private house. In a city apartment, in the event of a pipe leak, the space under the bathroom should be easily accessible. Therefore, sliding screens are what you need.
In general, there are quite a lot of ideas for storage in bathrooms, small and large, and absolutely the entire space can be used effectively. Do not neglect free corners and the space above the door - you can also place shelves there for storing household chemicals that are unsafe for children. Also use basic ergonomic rules: everything you need for everyday use should be at arm's length.
And good luck to you in selecting and making bathroom furniture with your own hands!
Source
Selection of furniture design and design
To determine the optimal set of bathroom furniture, as well as its design and construction, it is necessary to take into account several factors, including the size of the room, its general style and the financial capabilities of the home craftsman.
- Cabinet. A nightstand is perfect for conveniently storing detergents and other daily household items. Depending on the area of the plumbing unit, it is possible to install a separate cabinet or combine it with a washbasin. In the first case, the furniture has a large capacity, and in the second it hides the sink siphon and other plumbing communications.
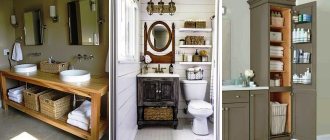
Bathroom cabinets are a good place to store essential items. - Shelves and hanging cabinets. These interior elements can be either an alternative to a bedside table in the bathroom or become “neighbors” in the room. It all depends on the size of the room and the needs of the users. If you choose one of the two, then hanging furniture elements look more rational, since free space on the wall is much easier to find. Hanging cabinets can be equipped with mirrored doors, thus obtaining two useful interior elements in one.
Open shelves and racks for the bathroom allow you to quickly find everything you need, but require orderliness and beautiful decor - Closet. In most standard plumbing installations, it is quite difficult to find adequate space for a linen closet. The solution could be a small floor-mounted corner cabinet, which will not take up much space, and at the same time will allow you to place a fairly large number of items on its shelves.
A green cabinet for the bathroom can accommodate necessary things, hygiene items and household chemicals.
The larger the design and the more complex its desired functionality, the more skill is required from the master when making bathroom furniture with his own hands. Therefore, if the item will be manufactured for the first time, you should not take on complex modular sets.
Choosing material
Let's start with the main thing - with the choice of material for future furniture. Everything here is simple and complex at the same time. Since a bathroom requires an individual approach, you need to choose a moisture-resistant material:
- plastic is the most economical option that will decorate the bathroom. This material is distinguished by a wide range of colors and lightness. True, plastic is a fragile thing and can break with one careless movement. In addition, it cannot be heavily loaded and plastic is not suitable as a sink cabinet, since it simply will not support the heavy weight of the plumbing fixtures;
- stainless steel, steel and aluminum alloy - it is better to immediately abandon these materials. Why? Because it will be extremely difficult to process them with your own hands, and metal furniture will look like the Snow Queen - cold;
- wood is not the cheapest option, and not the most practical for the bathroom. The fact is that solid wood can change shape and color when exposed to moisture. If you choose such a material, then pay attention to solid teak - this is the kind of wood used for finishing ships;
- waterproof chipboard and MDF are the best option for bathroom furniture. You can easily process chipboard with your own hands, although you will have to look for the right color or settle on the classic white version. MDF - the material is more diverse in terms of color options, but does not tolerate water ingress. The best option is to combine chipboard and MDF. Make a furniture body from the first one, and a facade from MDF.
There is another material - stone, which looks noble in any bathroom, but it will be very difficult for you to process it with your own hands. It will be easier to order such furniture for the room. As you can see, chipboard and marine plywood remain the best option. Let's see how to build a vanity cabinet with your own hands from this material.
Making a cabinet in 7 steps
So, let's design a vanity cabinet with glass shelves for your bathroom. To do this you will need:
Chipboard with a thickness of at least 15 mm (plywood can be used);
- furniture corners;
- door hinges;
- door fittings;
- wood screws;
- screws for furniture;
- plastic “plugs” for self-tapping screws;
- primer, putty;
- paint and varnish for wood (or furniture);
- glass for shelves with a thickness of 6 mm;
- Double-sided tape;
- sandpaper.
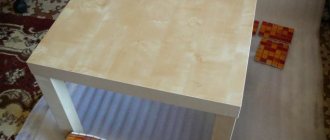
The first thing you need to do is measure the cabinet for the room. Measure the size of the washbasin and make a drawing of all the details of the product accurate to the millimeter. Now you can start marking - this can be done with a regular pencil. On the prepared chipboard sheet you need to mark a recess for the siphon. Next, we move on to preparing all the details with our own hands.
- Cut out three components - two walls and the bottom of the future cabinet.
- Assemble the parts by connecting them with self-tapping screws. Make sure that the heads do not protrude from the chipboard, as you will putty them later.
- Don’t rush to assemble all the furniture and hang doors at once. The first thing you need to do is to combine the three walls with your own hands, and only then install the remaining elements, each time carefully checking the new part.
- You have assembled the structure and can now put it in its proper place. Check that it stands firmly, does not wobble, and that it looks level in relation to the wall. Since you will be installing a siphon, you will not be able to attach the back wall. Here you will need corners for furniture - as a rule, two pieces are enough, which should be secured with self-tapping screws under the tabletop.
- You can begin to putty the structure. Considering that you are using chipboard, you need to putty the future bathroom furniture completely, achieving perfect smoothness.
- Those areas that remain unputtyed must be sanded using sandpaper. You need to remove the glossy layer so that the primer and paint adhere well to the product.
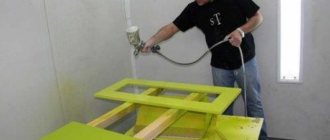
- The last stage is painting. You can apply paint to furniture yourself using a brush or spray. It is better to prime large putty areas and only then paint. When the paint is completely dry, you can hang the doors, securing them with hinges, and place the finished product in its place in the bathroom.
You can use varnish instead of paint. If you apply it with a brush, you will get a stylish result - the furniture will look as if it was made of natural wood.
We put shelves in the cabinet
You have already designed the vanity cabinet with your own hands and you still have some glass left over. You can cut the glass in advance by contacting a workshop, or prepare the glass yourself. To do this, you need to take the necessary measurements and markings, and then cut the material with a glass cutter. You will also need a sharpening wheel so you can give the edges a rounded shape. When the shelf parts are ready, proceed with installation:
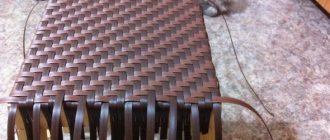
- first you need to make the glass frosted - ordinary wet sand will help you with this. Place it on the surface and rub it with another piece of glass. If necessary, add wet sand. You need to rub the shelf until the entire glass area looks matte and there are no visible scratches left from the sand;
- The glass is ready, you can attach the shelf to the cabinet using special fasteners. The top glass will serve as a tabletop - you can simply secure it with double-sided tape.
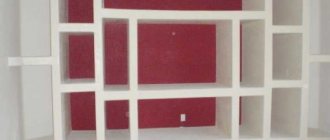
Actually, the bathroom furniture is ready. If you have pieces of chipboard left over or you need to make a few more hanging shelves with your own hands, it’s not difficult. Prepare the shelf parts by marking and cutting them. Next you need to prepare space for hanging shelves:
- Mark a place for the screws and you can drill holes. The latter should be slightly smaller in width than the screws;
- since you will have hinged shelves, screw dowels or screws into the wall;
- now screw the metal hangers to the shelf;
- You can hang the shelves on a prepared place on the wall.
This is how you can make a compact hanging shelf with your own hands.
Instead of chipboard, you can use glass or plastic. If you use plastic, remember that you shouldn’t put two dozen jars on it, because it can break under the weight of them. Convenient and comfortable housing is the key to good rest and well-being of all its inhabitants. But when buying an apartment, especially in older buildings, many people are faced with an inconvenient and impractical bathroom layout.
You can combine a bathroom with a toilet by demolishing the adjacent wall. In a combined room, you must leave one door and one lamp.
Attention: if a pipe runs along an adjacent wall, then its removal should be carried out exclusively by specialists, and only after approval.
An example of combining a toilet and a bathroom - a difficult redevelopment when a pipe needs to be moved
Ways to arrange small bathrooms
Let's consider several layout options for typical bathrooms with an area of up to 5 square meters.
Option 1:
- instead of a sitz bath, a shower cabin is installed;
- The washbasin and toilet are made corner.
An example of the layout of a small bathroom in Khrushchev
Option 2:
- leave a full bath;
- the toilet tank is hidden in the wall;
- a cabinet is installed under the washbasin for storing various accessories;
Tip: You can hang a large mirror above the washbasin to visually expand the space.
Small bathroom with full bath tank
Option 3:
- a corner tank is installed in one of the corners; you can use a mini-bath with a jacuzzi;
- There is a washing machine near the door;
- there is a washbasin on the opposite wall;
- Near the sink there is a toilet, the tank of which is hidden in a niche.
A corner bathtub with an interesting shape will be the highlight of a small bathroom.
Manufacturing procedure
DIY project for making a washbasin cabinet
Cutting chart for the parts of the washbasin cabinet
Drawing of a homemade bathroom cabinet
The first stage of making furniture with your own hands is designing the future set. To do this, you need to take measurements of the room itself and decide on the installation location of the finished product.
Ready-made homemade cabinet in the bathroom interior
Having decided on the dimensions and material, it is necessary to make parts for assembly.
DIY laundry box and cabinet made of spruce planks in the bathroom
The cutting of blanks is carried out strictly according to the drawings, since even the slightest deviation during cutting will lead to a poor appearance of the furniture and will largely spoil the functionality.
A homemade version of a table-cabinet for an overhead sink, which was made of wood and placed on additional legs
The next stage is assembling the parts into a single structure. Modern fastenings (confirmat, euro-ties and dowels) are the most rational option. Then the fittings are installed.
Option for making a cabinet for two built-in sinks with your own hands
There is no need to skimp on the choice of handles and hinges, so it is better to immediately put aside the option with plastic parts (they will very quickly become unusable). The ideal choice is chrome-plated metal fittings, which will not only please the eye with its appearance, but will also serve its users for quite a long time. The final stage of production is cladding and decoration.
Step-by-step photo instructions for assembling a sink cabinet with a countertop
What parts are required for furniture
- Sheets of fiberboard or chipboard, at least 15 mm thick;
- Glass for shelves, 6 mm thick;
- Hinges and fittings for fastening doors and shelves;
- A set of screws and “plugs” for them made of plastic;
- Furniture varnish, paint and putty.
Before you start work, you need to draw a sketch of the future furniture. Decide on the size. If your furniture set will include a vanity unit, then you need to choose a countertop with holes. The distance between furniture and plumbing should not exceed 15-20 mm. In this case, you still need to make recesses for siphons and pipes.
Now you need to make parts according to the sketch. Sand the edges. Use a large drill to make recesses for the screws. Drill holes in the places where future cabinet shelves are attached. Now let's start assembling the cabinet. You need to attach the side walls to the bottom. The last step is to install the top wall and countertop. Shelf and door parts are made individually.
The finished furniture is installed in the bathroom in place. Be sure to check the stability of the finished structure. The back wall is not done because there are pipes and a siphon in the bathroom. In order for the cabinet to be stable, it is attached to the wall using metal corners. Two or four are enough.
In order for furniture made by yourself to retain its beauty for a long time, it must be treated with putty. If the material is boards or chipboards that have a plastic coating, then only the edges and joints of parts are processed. You can decorate finished furniture with a decorative pattern, which is applied to wet putty. Before painting, it must be treated with a primer.
Furniture in the bathroom plays a major role - it adds functionality to the space and emphasizes the style of the interior. In stores, you can get confused when choosing the set necessary for the room - there are hanging cabinets, original cabinets, and glass shelves. But it may happen that in this abundance you will not find the optimal furniture option, for example, because the area of your bathroom is small. In this case, the way out of the situation will be to make furniture yourself. This process is simple and will save your budget.
Decoration and decor
Homemade convenient and functional bathroom cabinet made of waterproof plywood
The final appearance of the finished furniture depends on the imagination of the home craftsman. The simplest option is to cover the products with polyvinyl chloride film.
Self-adhesive film for decorating wood-look furniture
The range of such self-adhesives is very large, so there will be no problems with the choice of color and design. Another positive quality is the resistance of PVC films to moisture, which is important for the conditions of a plumbing facility.
Decorating bathroom furniture using self-adhesive film
If desired, the set can be decorated with handmade items. The main thing is that they do not become sour from moisture over time. An interesting option is to install a backlit mirror, which can be placed on the cabinet door to save space.
Decorating a bathroom shelf using decoupage technique
Required materials and tools
The main requirement for bathroom furniture is resistance to moisture. Today, three main types of materials are most popular.
- Waterproof fibreboards and particle boards (fibreboard and chipboard).
Fiberboard looks more beautiful and has a wide range of patterns. Chipboard is more resistant to water and easier to machine. An option with a combination of these materials is possible (body made of chipboard, facades made of fiberboard). A set of bathroom furniture with a body made of laminated chipboard and facades made of moisture-resistant MDF - Plastic. Plastic products are absolutely not afraid of water and chemical detergents. The material is light and inexpensive, however, it is quite fragile, so it is not suitable for all furniture options. It will make an excellent hanging cabinet, but due to the large weight of the washbasin, the bedside table may simply break.
Plastic is aesthetically pleasing, easy to clean, and completely resistant to moisture.
- Stone and glass. Products made from these materials are of high quality, beautiful and durable, but working with them at home is quite difficult. For high-quality processing of glass (and especially stone), a home craftsman’s arsenal of tools should include a lot of special equipment.
Glass is perfect for a bathroom; it is practical, moisture-resistant, and incredibly attractive.
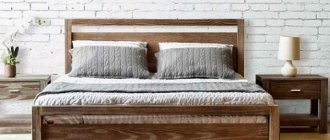
- Natural wood.
Beautiful, but expensive and impractical material. Wooden furniture looks stylish and impressive, but poor resistance to moisture greatly reduces the service life of the finished product; Wooden bathroom furniture looks beautiful and suits most styles, but is not very practical - Metal. Metal furniture options (usually steel or aluminum) are possible, but quite rare. Their unpopularity is due to the difficulty of processing metal at home, as well as the fact that such furniture is always cold.
Metal bathroom rack
In addition to the selected material, to make bathroom furniture at home with your own hands, you will need a variety of consumables (screws, corners), fittings (handles, hinges, closers, etc.), as well as a basic set of tools.
Necessary materials, fastenings and fittings
Basic tools include a drill or screwdriver, a jigsaw, a tape measure or ruler for measurements, and a knife. If, after manufacturing, the finished furniture is planned to be painted, you will additionally need a set of necessary paints and tools (roller, brush or spray).
Detailed installation diagram of the sink cabinet