What you need to make a book shelf on the wall with your own hands
There may be many ideas, but not all will be implemented. This depends on the available material. Most often, bookcases and shelves are assembled from the following raw materials:
- Wood is the most common material. The shelves are durable and can hold a large number of books. The wood is easy to process and environmentally friendly. The attractiveness of the finished structure is given by the natural texture, to emphasize which varnish and stain are used.
- Glass is considered a fragile material, but it is used for bookshelves. This design is especially in demand for rooms decorated in a modern style. Most often the product is a small book stand. You can't put too much load on it. The shelf serves more as an interior decoration. Difficulties will arise if you make it yourself. Glass is difficult to process.
- Plastic is considered a popular material, but usually such bookshelves are factory-made. For self-assembly, only a window sill from a plastic window will be suitable as a base. If you have some other plastic items at home from which you can cut a suitable piece for a bookshelf, then why not take advantage of this opportunity.
- Metal allows you to create durable shelves and entire bookcases. However, the design turns out to be heavy, bulky and not always neat. Metal can be used for the frame of the shelf, but you need to try to decorate it well. Advice! Metal bookshelves are best made for floor installation. Hanging a massive structure on the wall is dangerous.
- Particle boards are the second most popular after wood. Almost all factory-made furniture is made of chipboard. For bookshelves, it is optimal to use laminated boards. An excellent material would be a used disassembled cabinet.
- Plywood, MDF, laminate are also good materials, but inferior to chipboard. Due to its small thickness, it cannot withstand heavy loads. Plywood bends, but MDF and laminate can break.
- Drywall is considered a fragile material, but bookshelves and even large shelving units are made from it. The secret to strength lies in the frame. First, a base is created on the wall from a metal profile, and then it is sheathed with plasterboard.
You can add cardboard to the list of commonly used materials. There are interesting ideas for DIY bookshelves based on the use of packaging boxes. When using separate sheets of cardboard, voluminous stands are glued together to support massive books.
Shoe shelves made from drawers
DIY shoe rack made from wooden boxes
Another option for a shoe rack made from wooden boxes, which you can make yourself.
This shelf is perfect for toys, tools for the garage, shoes, flowers (if you knock out the back wall of the drawers), as well as for other household items.
Below you can find a step-by-step master class on how to make this shelf.
How to make a shelf out of shoe boxes - without nails
This might be the easiest shelf you've ever made. So, you need to find five boxes and a can of paint. Then take a brush and paint the container in the color that best suits your interior. When the paint dries, that's it, the shelf is ready.
You just have to decide how to put them. If there are small children in the house, the structure, of course, must be connected with bolts or screws, or even better, attached to the wall, this will be more reliable and safer. But if there are no children, then there is no need to fasten them; the boxes are strong enough. And the main advantage is that you can change the shape of the structure every day. Imagine, every day you have a new shelf and no nails
So, for example, today you have a pyramid, and tomorrow a ladder, depending on your mood.
Folded into a durable design, it is very convenient to store shoes. For variety, you can take one box and put whatever you want.
Well, what do you think of the idea? Photo source creatingreallyawesomefreethings.com
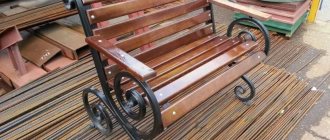
DIY corner shoe rack for the hallway.
Let's see how to make a simple wooden corner shelf with rounded shelves for your apartment. This shelf is suitable for books, magazines, shoes in the hallway, soap accessories in the bathroom, tools in the garage, as well as kitchen utensils in the kitchen.
Drawings of bookshelves with dimensions
When creating an exclusive designer model, the drawing will have to be developed individually. If the goal is to assemble an ordinary book stand or wall shelf, then you can use ready-made diagrams from the Internet.
However, it is important to take into account that assembling a shelf is often not started for the sake of interest. It is easier to buy a ready-made design in a store, but it does not always fit in size or configuration. If the goal is to place a bookshelf in a limited space, in a corner or other difficult area, you will have to develop the drawing yourself.
A spacious bookshelf, divided in the center by a pencil case, will fit into a schoolchild’s room. A stepped bookshelf will look good next to a flight of stairs. On such a shelf you can install books, a TV, or put a DVD player
Types of shelves for books with your own hands
There is a wide variety of shelves. They differ in shape, size, and installation method. There are huge bookshelves that cover the entire wall and small stands for several books.
DIY wall bookshelf
The classic version of the design is designed for hanging on the wall. Usually such shelves are not multi-tiered. Models with 1-3 tiers are more common. A distinctive feature is the presence of strong hinges, which are used to hang the shelf on the brackets.
The hanging bookshelf has loops on the back for hanging.
When assembling a hanging book shelf with your own hands, the hinges are placed no further than 1 m from each other. They are secured not only to the top horizontal panel, but also to the side vertical panel. Otherwise, under the book mass, the horizontal chipboard panel will delaminate and the shelf will break.
DIY table shelf for books
The design is more like a book stand. Install it on your desktop to have quick access to important documents. The shelf should occupy unused countertop space, otherwise it will simply get in the way.
The book stand is suitable for a student’s office or room
DIY floor shelf for books
It would be more correct to call floor-standing models bookshelves. The shelves are usually multi-tiered and high. The width can be the entire wall or narrow in the form of a column. The bookcase is placed on legs or simply on the floor without them. The shelf is usually not attached to the wall, but if the situation requires it, it is secured with brackets to protect it from tipping over.
Floor bookshelves are not always fixed to the wall
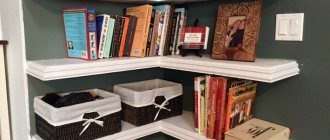
DIY corner shelf for books
Depending on the installation method, the corner bookshelf can be wall-mounted or floor-mounted. Its main difference is its shape. The bookshelf is placed in the corner, not only on the inside, but also on the outside. Book wall models are attached with hinges and brackets to both adjacent walls.
A corner bookshelf is placed in the inner and outer corners
A corner bookshelf saves space. A piece of furniture is used to fill an empty corner where the installation of another attribute is inappropriate.
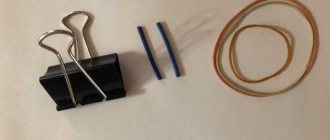
Iron stands
Of course, you can make a real forged work of art, but not everyone has this skill and the necessary tools. Therefore, in this section we will talk about a wire stand. This material bends easily; it is enough to simply give it the desired shape.
The wire thickness should be 4-5 mm. 4 pieces are used for fastening. studs 1.5 mm. The stand is extendable and foldable.
Scheme in the photo:
Related article: Peacock tail pattern with knitting needles: diagram with description and video
In addition to this method of bending wire to obtain a stand, there are others. A selection of interesting ideas in the photo:
More options for iron book stands:
How to make a bookshelf with your own hands
Before you start making a shelf, you need to see what material is available. After this, they begin to develop the project and look for an idea. They immediately decide on the location, since the size and shape of the future structure will depend on this. When all the nuances are clarified, they begin to bring the idea to life.
DIY book shelf made of wood
To assemble the shelf you will need an edged polished board 15-20 mm thick. It is better not to use pine and other coniferous wood. Over time, such boards will begin to release glue. In addition to the obscene appearance of the shelf itself, the book collection will be damaged.
The classic scheme is based on the assembly of a regular rectangular shelf
It is easier to assemble a classic rectangular structure from wood. The process consists of the following steps:
- To assemble the body, 4 blanks are first sawed off. You should get paired elements. In the diagram they are indicated by the letters “A”, “B”. A rectangle is assembled from the boards. Self-tapping screws are used for connections, but it is better to take furniture screws - confirmed ones. With such fasteners the finished product looks better. A hole is drilled for each screw, otherwise the workpiece will crack.
- When the case is assembled, it needs to be given an exact rectangular shape and fixed so that distortion does not occur during operation. There are 2 options here. If the back side is closed, then it is sewn up with a sheet of fiberboard. In the diagram, the element is designated by the letter “C”. When it is intended to create an open bookshelf, the back side is not sewn up. To prevent the body from warping, metal flat corners are attached to each corner at the end of adjacent boards with self-tapping screws. These elements are used on wooden window frames.
- When the case is ready, the locations of the shelves are marked on the inside of the side posts. In the diagram they are indicated by the letters “D”, “H”. The distance between them, as well as their number, is determined individually. It is not necessary to use a diagram here.
- The shelves can be made removable or fixed. In the first option, blind holes are drilled from the inside on the side posts, chips are inserted, and a board is laid on them. In the second option, through holes are drilled. The shelf is fixed to the side posts with self-tapping screws or furniture screws.
The wooden structure is subjected to final sanding. The wood is decorated with varnish, stain, and acrylic paints.
DIY plywood bookshelf
The advantage of plywood is that the sheets are wide compared to the board. There is room for your imagination to run wild here. However, plywood tends to delaminate. Each node will have to be reinforced with overhead metal corners and plates.
For a plywood bookshelf, small cell sizes are acceptable, since the material tends to sag and delaminate under load
You can use plywood to build a book shelf for your children's room with your own hands. To do this, you will first need to draw a pattern on paper. Each element is cut out and transferred to a plywood sheet. After marking, the fragments are cut out with a jigsaw. The ends are carefully polished, since after sawing there will be a lot of burrs.
The easiest way is to cut out the elements for a plywood bookshelf with a classic rectangular shape.
The cut elements are connected using the provided grooves using the designer’s method. On the back side, the nodes at the connection points are reinforced with metal corners or plates. If a back wall is provided, then simply nail a piece of fiberboard with small nails. The plywood is decorated with paints and varnishes or covered with colored self-adhesive film.
Homemade glass book shelf
For glass shelves, it is optimal to use material with a thickness of 5 mm or more. Cutting thick glass is difficult and requires experience. First, markings are applied to the sheet with a marker. The glass is laid on a perfectly flat surface. The glass cutter is pressed firmly against the sheet and one line is drawn. It is not advisable to repeat the action. If you get a few scratches, the edge will crumble or a crack will spread across the entire glass.
Glass cutting begins with markings
The glass is moved so that the scratch cut by the glass cutter is on the edge of the table. From under the bottom, the sheet is first tapped with the handle of a glass cutter. A crack should follow the scratch. When it spreads over its entire length, they try to break the glass with a sharp pressure of the hand. If it fails, the tapping procedure is repeated.
When the element is cut, the edge of the glass is rounded with a grinder. Further actions are aimed at creating fasteners. Special brackets are purchased in the store. They are attached to the wall with dowels. The glass sheet is fixed directly onto the brackets themselves.
Special brackets are used to fix the glass bookshelf.
DIY book shelf made of cardboard
Craftsmen create voluminous shelves of complex shapes from thick sheets of cardboard. To make them, patterns are used, which are often made independently. To go the simple route, you will need several cardboard boxes. They are used to assemble a bookcase in a couple of hours.
Important! The boxes are selected according to size so that a book can fit inside freely.
The boxes are connected to each other with metal clamps
The process of assembling a bookcase is simple. The boxes have opening shelves that act as lids that are cut off. They are installed on top of each other in a pyramid. Each box is a separate cell of the bookcase. The boxes are fastened together with metal clamps. The finished bookcase is painted with acrylic paint. For decoration, you can cover it with fabric, self-adhesive film, or wallpaper. The structure is installed on the floor. You cannot hang it, otherwise such a shelf will break under the weight of books.
DIY book shelf made of chipboard
The technology for assembling a bookshelf is exactly the same as in the version with a board. The difference is the material. It is advisable to use chipboard with a laminated surface. Fragments can be cut from an old disassembled cabinet.
The best material is laminated particle board
After sawing the chipboard, an unsightly edge remains that needs to be decorated. First, the end of the slab is ground. The next step is gluing a special edge tape. To do this, heat the iron by setting the temperature regulator to the middle position. First, they try to glue a piece of edge onto an unnecessary piece of chipboard. The tape is laid on the workpiece, covered with a cotton cloth, and ironed. If the edge has not melted and stuck securely, the temperature has been chosen correctly.
The tape is glued to all front ends of the bookshelf. The protruding edges on both sides are carefully trimmed with a sharp knife. If a visible white streak remains, it can be rubbed off with fine-grained sandpaper. After pasting all the blanks, the shelf is assembled according to the drawing.
DIY invisible book shelf
The invisible book shelf option is an interesting decorative element. Visually, it seems that the books near the wall are hanging in the air. To work from materials you only need a metal corner and dowels.
Important! One of the sides of the metal corner should be long so that it can hold books.
The corners are fixed at the same level
There are two design options. In the first case, two corners are attached with dowels to the wall at the same level. The distance between them is a couple of centimeters less than the width of the books. The long sides of the corners protrude forward. Books are placed on them. The downside of the design is the fact that the shelf is not completely invisible. The protruding planes of the corners are visible from below.
The corner becomes invisible if it is embedded inside a book
The second option allows you to create a completely invisible shelf, but this will require an unnecessary book. The protruding plate of the corner is hidden under the binding. To prevent the book from sliding out, self-tapping screws are driven directly into it over its entire thickness. A stack of desired books is placed on a fixed book stand.
DIY creative bookshelf
You can create a creative hanging shelf in a children's room or on the veranda, but hang it not in the usual way, but with ropes. To make it you will need two boards. You can use chipboard and plywood. Cut out two identical rectangles. The parts are stacked on top of each other, and holes are drilled in the corners.
To ensure that the holes on the two workpieces coincide, the parts are stacked before drilling and clamped with a clamp
The rope is threaded into each hole of the workpiece, and restrictive knots are tied. They will hold the shelves at a certain height. The free ends of the rope are connected into one rope and tied into a large knot. This part is used to hang the shelf on a bracket fixed to the ceiling.
To hang a creative shelf, a bracket is screwed into the ceiling
DIY bookshelf from scrap materials
A beautiful shelf will be made from the laminate sheets left after the renovation. However, due to the weak strength of the material, the design is made for floor or tabletop installation. You cannot drill into the laminate, as it will crumble. The same goes for self-tapping screws. There is only one way out - glue with a hot gun.
Laminate elements are glued with a hot gun
Use a jigsaw to cut the pieces to the required length. Since the laminate is thin, so that the shelves do not sag, spacers are installed in the form of vertical partitions. On the back side, it is also advisable to secure at least one sheet vertically for rigidity. In addition, it will prevent the structure from warping, otherwise it could collapse like a house of cards.
Wooden stand
This stand can be made from boards or plywood. It is suitable for reading books, as well as for tablets and other electronic devices. It is very convenient to use a stand in the kitchen for a recipe book.
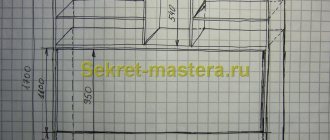
To make a stand, cut a board or sheet of plywood into 5 pieces with dimensions:
- 20x1x2 cm - 2 pcs.;
- 18x3x2 cm - 1 pc.;
- 20x5x2 cm - 1 pc.;
- 34.5x20x2 cm - 1 piece.
Make grooves in the largest part, as in the photo:
The front parts of the workpiece are glued exactly in the center of the largest part where the grooves for the legs are cut. The glued parts should be dried under a press.
Next glue the legs. Press drying is also important here. If there is no special vice for this, then you can glue the parts one by one, placing a load on them.
If desired, you can decorate the stand by carving or burning wood, paint it, or varnish it. The stand is ready!
Very beautiful stands can be carved from wood for reading the Koran:
Cookbook stands made from an old kitchen board look unusual in the kitchen. All that remains is to attach a book holder to the front and a holding bar to the back. For decoration, you can cut out or burn a pattern and paint it with acrylic paints. Then open the product with varnish. This stand is also suitable for an e-reader, tablet, or mobile device.
Related article: Ombre fabric, what is it: composition, properties and application
Options for wooden stands in a selection of photos: