Author: Button
12 September 2021 09:47
Community: DIY!
Tags: DIY shelving do-it-yourself shelving photo
1961
53
2
Competent and convenient organization of items in the house is often a very difficult process. Usually this happens because there is too little space, especially in apartments.
0
See all photos in the gallery
What to do in such a situation? The answer is very simple - use the space at home more wisely. To do this, you will need racks with shelves so that you use not only the area of the apartment, but also its height.
0
You can easily buy a rack in a store, but in this case you need to choose the option that will best fit into your home. On the other hand, you can make your own shelving unit.
0
In our article we will talk about what is required for this, the features of the process and much more.
0
First, you should understand what kind of racks there are. The main differences between the racks are in size, shape and design.
0
By size, they are divided into large ones - reaching to the ceiling, and ordinary ones, which can be less than a meter high. The shape depends on the place where the rack will stand - just near the wall or in a corner.
0
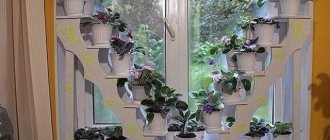
The most interesting thing lies in the design, because you must decide on it before you start working. The best option would be to study photos of DIY shelving. Using real examples, you will be able to see different technical solutions, and, most importantly, in different environments.
0
You can easily assemble a rack of this design for a storage room for conservation, or in a garage for various tools.
0
We will not only make a rack out of wood
Firstly , I will try to determine for myself whether a housewife can make a shelving unit with her own hands. We will not set any super goals. Our product will modestly stand somewhere in a closet or garage. None of the guests and other honored visitors will most likely even see him. If so, we won't make it super perfect. I will show you what materials and tools will be needed, in what order, and what will need to be done.
As an example, let's take my own product that I built the other day. I'm tired, you know, when there are some boxes and bags everywhere. I wish I could put them somewhere out of sight. And shelves for tools would be nice. In a word, as is usually the case, I tested the technology on myself. Having received a completely acceptable result, I decided to spread the experience.
I’ll say right away that I made it in the shape of the letter “L”, but for simplicity we will consider building a straight product with a length of 178 cm, a height of 200 cm, and a depth of 60 cm. I’ll tell you why these particular dimensions are later.
Secondly , we need to check in reality the popular belief that making such a thing yourself can be cheaper than buying a ready-made one. For this purpose, I made a special trip to the IKEA and OBI stores again and photographed samples of finished shelving and materials with prices. Having an idea of what and how much we need, we can easily calculate how much such a rack made with our own hands will cost us. So we'll see what comes out cheaper.
Thirdly , I decided, purely for myself, to find out what would happen to the pieces of wood if they were not treated at all, or covered with impregnation or varnish. I specially selected 8 pieces of wooden lining that remained after the construction of the rack, and treated them with different compounds. Let's see what happens to them over time. Or maybe all these impregnations are a complete scam? We'll talk about this in more detail at the end of the article.
So, we’ve decided on our goals, now let’s go to the store
What kind of racks are sold in stores?
I confess, I didn’t manage to visit all the stores. Therefore, here we will look at examples from the IKEA store (please do not consider this an advertisement, although I really like this store).
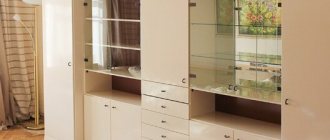
First, let's look at products assembled on the basis of metal guides attached to the wall. For example, like this:
As you can see, the entire structure hangs on the wall. There are 3 guides to which brackets are attached, to which shelves, baskets, etc. are in turn attached. The variety of options for hanging elements is simply amazing:
You yourself select the necessary elements, from which you can then make a wardrobe, shelves for the laundry room, or a workspace with a table. It would seem that this is the solution. Everything looks very neat, openwork, at any time you can move the shelf higher or lower, if something is missing, you can buy more over time.
Of course, this is a very good option. Especially for the pantry. I mean, it’s not always possible to put something like this in a room, but in an auxiliary room it’s just right!
Another big advantage of this option: everything you need can actually be purchased in parts, as funds become available. Moreover, it is over time, during the process of use, that an understanding arises of what exactly needs to be included in the rack. Therefore, you can immediately buy only a few basic parts, and buy the rest later, as needed.
Everything is very great. But when I decided to estimate the total amount of the set I needed, it became somehow uncomfortable:
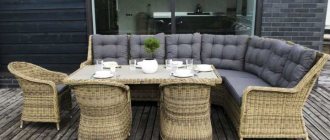
This is exactly what I need - a shelving unit in the shape of the letter “L”:
If you have the opportunity to buy such a thing, then you don’t need to read any further. Buy it - great item.
I move to another department where wooden shelving is sold. There are many of them, so I will show only a couple that caught my eye.
Here is an option for 4550 rubles.
The thing is not bad, but the width is too small. I need the entire wall - 187 cm.
Here's a corner option. Price — 7490 rub.
I don't consider it successful. The shelves are narrow, the side modules are low, and a lot of space above them will remain unused. In addition, the strength of the horizontal corner elements on which the shelves rest is questionable. They do not have a vertical load-bearing support. In my humble opinion, they will collapse if you put something heavier.
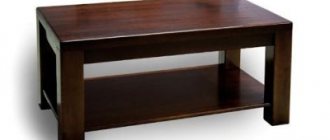
Here's a better option:
Price — 4960 rub. The shelves are deep, the whole structure is high enough to optimally use the entire height of the room - 3 meters. The width is just insufficient, but we are not going to buy it. Let's just take this design as a basis. After all, in essence, there is nothing so complicated here. See for yourself:
There are wooden vertical bars, horizontal bars are attached to them, and shelves lie on them. That's all, actually. Of course, the IKEA product will be more neat and functional. After all, any shelf can be rearranged to a different height over time. Fortunately, each of them is attached to the verticals separately:
It would be possible to do this too, but we will simplify the design a little. Ours will not be as universal, but it will be simpler and cheaper.
Well? The idea is clear, let's go collect materials.
DIY plywood shelving
In this article we will take a detailed look at the process of self-manufacturing such plywood shelving:
Just the other day, home-made master Maxim Kozlov, author of the YouTube channel of the same name (Maxim Kozlov), updated his plywood stocks. This plywood was purchased for the kitchen, but first, the author wanted to, so to speak, test its quality, since even during unloading it was noticeable that some of the sheets had a diagonal bend.
Therefore, at first it was decided to make several bookshelves out of it for the living room. Since there was quite a lot of work to be done, the master did not sort and lift this entire batch of plywood to the top, but decided to unravel the sheets directly from the stack.
Plus, working with solid “tag” sheets on a sawing machine is quite problematic, so it makes more sense to cut everything into preliminary blanks with a plunge-cut saw along the tire.
The racks and shelves of the racks will form a sandwich consisting of crossbars of 15-gauge plywood covered with sheets of "six". Accordingly, to make the bases (frames) for five racks, 2 sheets of 15-gauge plywood were unraveled.
And right on the first sheet the problem was revealed. It consisted of delamination, but since all the posts, as well as all the plywood ends in the structure, would be closed, it was decided to simply glue the delaminated parts together and press several of them directly onto the assembly table.
At first, of course, the author was upset, because he thought that the entire batch of this plywood could be of the same quality as the first copy, and the author’s plans were to make drawers from it for the kitchen, where, as planned, he wanted to just leave the plywood end. But fortunately, the second sheet turned out to be quite suitable even for these purposes.
Of course, it’s too early to draw any conclusions about the quality of the entire batch, but 50/50 is already something. When buying a large batch, it is quite difficult to assess the geometry of the sheet, since they all lie flat in huge stacks, so there are essentially only 2 options, either buy plywood from trusted sellers, or rely on luck.
The integrity of the racks has been restored, now we proceed to sawing the crossbars and shelves. The master carried out this process using a carriage with zero clearance, which minimizes chipping.
For sawing the parts of the racks to the length of the guides, the parallel stop was no longer enough. For this reason, the author had to go to extra trouble and make such a stop, the slider of which is installed in the grooves of the milling table, and then, using the principle of a split nut, it is fixed in it using a self-tapping screw.
The author was quite pleased with the result; it turned out quite convenient. Now it was possible to continue to trim long parts without chipping and at the same time with fairly high accuracy.
The next step
it was necessary to form the necessary parts from 6-mm plywood, which would later be used to cover all the shelves and racks of the racks.
The depth of all shelving in this case is 300mm, and to begin with, all the blanks were sawed based on these parameters, and then according to the width of the shelves and the height of the intershelf racks.
The 80 tooth end disc performed just fine. The author even wondered why all these years this disk has never been used on a sawing machine, although it is almost 5 years old.
Before this, almost all of the author’s plywood projects were accompanied by a long process of sanding the edges, which sometimes had quite decent chips formed during the cutting process of the sheet. This was especially noticeable if the fibers ran across the cut line. But with this 80-tooth disc, the occurrence of unwanted chips was reduced to almost zero, no matter how the sheet was oriented in relation to the disc.
Well, in the end, the last group of necessary elements was formed from the newly obtained scraps. Now imagine how much time it would have taken if there were burrs on this whole mountain of blanks.
Then you can start assembling, but first you need to break this process into several stages. The first step is to make the so-called sandwich. To do this, it is necessary to screw a bench made of aluminum angle to the assembly table, along which you can control the plane of the ribs with fairly high accuracy.
Well, now the long, monotonous assembly process began, which was accompanied by re-gluing all the parts with the obligatory stitching with a pin.
Having fastened several parts in this way, the author decided to slightly optimize the process of applying glue and in the next frame we can see the roller.
As a result of the introduction of this simple device, things went much more fun, and the quality of the adhesive seam, due to its excellent uniformity, increased significantly. Plus, when pulling together, the excess glue in this case did not come out like that.
So, now that we've sorted out the shelves, we can move on to the shelving racks. But first, for this it is necessary to make a new assembly slipway, on which it will be possible to set the parallelism, as well as the required width of the racks.
When we have a lot of identical units, it is always worth introducing some templates and assembly devices to make your life easier and increase repeatability.
All. Now you can start assembling the racks themselves. At this stage, the master used his favorite technology, when the grooves for the shelves are formed by the internal filing of the racks, thereby we get the noble appearance of a completely closed niche and excellent strength. Plus, we completely get rid of any markings during assembly.
The result is a sandwich of “six” and “tag”. Visually, such a part has sufficient thickness and excellent strength, but in reality it would be possible to get by with 4 mm plywood for the hem; that would also be quite sufficient.
All the plywood that the author uses for this project is grade 2/4 or 3/4 and is sanded on one side, which is turned towards our gaze. In this way, you can get durable massive structures quite cheaply, saving on thick plywood, which, no matter how you look at it, on the one hand, will still be of low quality. Well, if we take the double-sided high class, then these are simply astronomical prices. Although, if desired and if you have a press, plywood can always be covered with veneer.
The halves of all five racks are assembled, you can move on to the mating parts. At this stage of assembly we will need an oblique screw; it will serve as an additional fastening, since it was only possible to attach the shelves to the central posts using a pin on one side.
We don’t worry about the holes; there is no need to plug them, since we will subsequently cover all the façade ends and shelving with thermowood slats.
So, the installation issue is almost closed, then we move on to the final assembly of the racks. At this stage we have to add the missing symmetrical part relative to the central pillar.
When twisting the shelves at an angle, it is necessary to tighten this place with a clamp so that when the self-tapping screw enters at an angle, the shelves do not move apart. The rest of the process is classic, using a microhairpin.
If necessary, you can make racks without backing, which in turn provides transverse strength, since twisting all the shelves obliquely will provide excellent strength despite the absence of additional stiffeners.
We move on to the final stage, unrolling new sheets for lining the side pillars. It’s a pleasure to work with the “six” on the sawmill. From one sheet you get almost exactly 5 racks with a width of 300mm. So - a couple of sheets and you're done!
Honestly, a standard square sheet of plywood is quite convenient for shelving of this depth. Thanks to this, we achieve virtually waste-free production.
Next, a little less than one sheet was needed for the stiffeners. It was decided to make them not a continuous hem, but some kind of limiters for the depth of the shelves at 1/3 of the inter-shelf distance. Thanks to this, we get quite sufficient strength, plus some, but saving on material. And it looks pretty good too.
To mount the resulting parts, the racks must be installed on a flat surface. Next, you need to align the diagonals of the resulting structure.
Next stage
– painting of shelving. The author uses an ordinary roller for this purpose.
Regular latex paint, water-based. This composition slightly raises the pile on the plywood, due to which the surface of the product acquires a certain zest.
That's all for today. In the future, the master plans to finalize this project, finishing the ends and countertops for these racks. Thank you for attention. See you again!
Author's video:
Source
This post may contain affiliate links. This means I earn a small commission from links used at no additional cost to you. See my privacy policy for more information.
plywood, rack
What you need to make a shelving unit at home
The very first thing is to decide on the amount of material needed.
In order to build a straight shelving unit (we’ll talk about the L-shape later), we will need:
- 8 vertical supports about two meters long,
- 12 horizontal bars approximately 55 cm long,
- approximately 15 planks 187 cm long (along the length of the wall), which will become shelves (their number depends on the width),
- 16 metal corners with holes,
- 40 screws (you can take more of them, since some will simply get lost during work),
- 60 thin nails for attaching shelf boards,
- a can of wood impregnation (you can get by, but I would recommend),
- can of varnish (optional).
In addition, you will need the following tools:
- hammer,
- screwdriver or screwdriver,
- hacksaw or jigsaw,
- vacuum cleaner,
- brush.
I want to say right away that the material also varies. For example, you can use these beautiful blocks with rounded corners as vertical stands:
If we built our shelving on them, it would turn out even more beautiful than in IKEA. But the cost of each such two-meter rack would immediately knock us out of budget:
After all, we need 8 pieces (and I generally need ten to build an L-shaped rack). This immediately turns out to be 2792 rubles. Consider that you haven’t bought anything much yet, but the “three-thirds” item is no longer there. With some regret I had to abandon this beautiful option.
There are even more beautiful materials. For example, installation logs:
Unfortunately, in the photo they turned out unsightly, but in reality they are immaculate dark brown bars covered with some kind of film. Nice to hold. Alas, the price is appropriate:
It would be a pleasure to work with them. And the rack would turn out to be such that it could even be placed in a room. But the price of the product would be too high.
At the other pole there are ordinary unplaned bars with splinters. If we made verticals from them, then we would spend only 440 rubles for all 8 pieces. For all eight! They cost only 55 rubles apiece. Only our rack will look terrible. In principle, it will do for a barn. But for the home pantry... However, it’s up to you, of course, to decide.
Personally, I settled on these bars:
Their price is 105 rubles per piece. Therefore, for 8 pieces you will have to pay 840 rubles. What did you think? Did you think that if you make a rack with your own hands , it will be completely free ? Alas, this myth has long been in need of serious rethinking. Of course, you can go to the forest, chop logs there, bring them (I wonder what?), cut them into perfectly even bars at home with a rip saw... should I continue? And what? But it will be free. Especially if the forest rangers don’t catch it :).
Another thing is that there is always a place where you can buy the same thing cheaper. But for free... Let's not talk about it.
The main thing is that when you choose bars, you need to carefully check them:
- for the presence of cracks, they are of no use to you,
- for the presence of large knots - this is a place of potential fracture,
- for straightness
Don't be surprised about the latter. Some of the bars in the store were curved like Robin Hood's bow. Well, maybe not so much, but the curvature was visible to the eye. Therefore, when you choose the bars, each one should be placed on the floor (I hope it is level in the store). First on one side, then on the other. The straighter the workpiece, the fewer problems during installation. The task is to collect 8 at least relatively straight bars. And be glad that you don’t need eighty of them.
So, we already have our first purchase in our cart.
Now we need to take care of the horizontal bars on which the shelf planks will rest. First you need to think about how deep your shelving will be. For example, I made it 60 cm deep so that I could put car tires down. Much depends on how much free space is available in the room.
You can try to look for blocks of the right size, or you can buy long ones and cut them yourself. It will be cheaper. Let's say, here's a two-meter block
costs only 55 rubles:
It will make 4 magnificent crossbars... Why four, you ask. After all, the stated depth of the rack is 60 cm. If you divide 2 meters by 4, you get 50 cm. I answer: you calculated correctly. But the whole point is how exactly to attach these crossbars. Their length will indeed be 50 cm. But together with the thickness of the vertical bars, the overall depth of the product turns out to be 4.7 + 50 + 4.7 = 59.4 cm. For good measure - 60!
The only exceptions will be the very top crossbars. They will lie directly on the supports from above, so their length will be longer by the width of the supports = almost 60 cm.
Based on this, and taking into account that we are still discussing a straight rack, we will need 4 of the mentioned two-meter bars with a total cost of 220 rubles.
Now we need to take care of the boards for the shelves. The options here may vary. For example, I bought a regular lining for this:
It is clear that one individual plank does not look very strong. To tell the truth, I myself doubted whether the clapboard shelf would withstand heavy loads. Practice has shown that it holds up well. The fact is that each shelf consists of 5 planks, and the distance between the supports is quite small.
Of course, if you stand on such a shelf with your feet, the result will be obvious. But the boxes, bags and other things fit quite well on my finished product. So, feel free to put two packs of wooden lining on your cart. Our check immediately increases by 832 rubles.
Please note, 216 rubles is per square meter. The cost of packaging is 416 rubles. Try to take a lining of such length that there is as little waste as possible. For example, the length of each shelf in my case was 187 cm. Therefore, a 2 meter long lining was the best choice. Others had a length of 2.5, 3 meters and were more expensive.
Next we need to take care of the fasteners. You will need 16 corners, 40 screws and 60 small nails.
You can take the most common corners:
If you wish, you can buy painted ones:
It may make some sense to buy corners with longer planes. It's not even a matter of greater load-bearing capacity. It will just be more convenient to screw them on. Especially if you are going to do this not with a screwdriver, but with a regular screwdriver.
All of these options are more expensive. Which one to choose is up to you. I bought the cheapest corners for 9 rubles apiece. Later, when I started screwing them in, I was surprised to notice that they, it turns out, had come to my dacha from distant India:
You can’t say anything, this is probably the closest place where they are produced. But now, when one of the guests dares to make some kind of comment about my product, I will stick this label right on his forehead (I didn’t throw them away on purpose) and say that I made the rack from imported components 
As for the screws, these or a little longer will do:
I didn’t dare take shorter ones - they might not hold the shelf. We will use these screws to fasten vertical posts and horizontal shelf holders using corners.
The nails are needed to secure the lining planks, which will become the surfaces of the shelves. Of course, you can also do this with screws, but there are at least three reasons why I would still recommend nails.
- Hammering a nail is faster than driving a screw. There are, of course, exceptions to this rule. It is necessary to make allowances for a crooked hammer and other annoying circumstances.
- If you screw 5 screws in a row into a wooden block, it may simply split lengthwise. Nails are thinner than screws and are much less likely to chip. Although, of course, if you try and bang as hard as you can, saying “I’m the strongest,” then anything can happen.
- Nails are cheaper than screws.
True, when comparing the price tags in the photo, you can easily question the last item on the list. I agree, I just couldn’t find a smaller package of nails, and they really are cheaper.
Now we need wood impregnation. If we do not treat it, then over time our product will darken, some bark beetles may attack it, or even rotting processes will begin. So I personally “impregnated” my pieces of wood. Whether you will do the same is up to you. Just in case, I’ll show you an example of impregnation that would suit us:
I confess honestly. I didn't buy this jar. I still have some impregnation left over from my last big story with painting the floor and stairs. By the way, using impregnation you can paint the pieces of wood a darker color. In the previous photo there are two color options. There are others too.
In addition to impregnation, you will need a brush. There is no need to buy anything particularly expensive here. Anything 4-6 cm wide will do. For example, this one:
I can already hear the cries that the price is too high. That the same brush can be bought three times cheaper. Agree. Just be prepared for the fact that the stubble from a cheaper analogue will come out three times faster :). You know how nice it is: you paint with one hand and remove hairs from the surface with the other! Almost a creative process.
On this optimistic note, we finish collecting the material and roll our cart to the checkout. If we take everything to a minimum, then the purchase price is as follows:
- vertical racks - 840 rub.
- horizontal bars - 220 rub.
- lining - 832 rub.
- corners - 144 rub.
- screws - 79 rub.
- nails - 99 rub.
- impregnation - 399 rub.
- brush — 149 rub.
TOTAL: 2762 rub.
Basically, we bought everything we needed. At the same time, the cost was much less than the cost of the smallest rack from the IKEA store.
Let's see what we could make from white metal structures for this amount. Remember what I showed you at the beginning of the article:
Each vertical 192 cm high costs 400 rubles. We need at least three of them for a shelf width of 187 cm; We no longer have 1200 rubles.
Next, you need brackets on which the shelves will be hung. The 58-centimeter ones that suit us cost 200 rubles per pair. In order to make a rack of the same configuration as ours, you will need 5 pairs of brackets with a total cost of 1000 rubles.
Next we will need shelves, but we don’t have enough money for them. After all, each shelf will cost 950 rubles, and you need six of them!
In total, we would get a check for 7900 rubles. not counting the fasteners to hang it all on the wall.
It is important to consider one more point. Some walls in apartments and country houses are made in such a way that heavy loads cannot be hung on them. They will collapse. And certainly at night, scaring everyone in the household to death. Our rack will stand on the floor. I think this is his big advantage.
Stages of making a rack
To make the work even more conscious, it is worth highlighting its stages:
- installation of the base;
- installation of shelves and boxes;
- finishing.
Each of the above operations must be treated with great responsibility, because inattention will negatively affect the aesthetics, convenience and safety of operation.
Base installation
The wall is being marked. If the kitchen rack takes up the entire space, it is better to secure it both at the bottom and at the top. The best material for support is timber. The reliability of the entire structure depends on its quality , so be as demanding as possible when choosing this part. Fixation is carried out using self-tapping screws about 3 cm long.
Let's start making a rack with our own hands
The first thing to do upon arrival home is to adjust the length of the lining to the length of the future product. In my case, the rack had to stand from wall to wall, therefore, a small extra piece had to be sawed off from each of the 15 planks:
A jigsaw is best for this. In its absence, you can use a regular hacksaw for wood. Of course, you will spend longer with it, but you will become stronger and more resilient, and perhaps lose excess weight due to increased physical activity.
Next, we begin to paint with impregnation all the pieces of wood that will participate in our project:
Of course, you can paint each piece of wood separately, turning it and carefully painting it on all sides, including the ends. But with such an “individual approach” the work can, to put it mildly, take a little longer. Therefore, I suggest doing the following:
Place several pieces of wood in a row at once (lining or verticals with horizontals) and paint them as if you were painting a solid surface. You will see that the speed of work will increase significantly. When one surface is processed, you can turn the pieces of wood over and paint them on the other side, then on the third, etc.
After this, you need to thoroughly dry the soaked parts. It's best to do this outside. Unfortunately, impregnation is a rather fragrant thing. Moreover, its smell is not so pleasant. For example, wood varnish is also not sugar, but it does not cause such disgust.
Therefore, if possible, it is better to dry wood in the yard or on the balcony:
It is important that the products come into contact with other objects as little as possible when drying. For example, it is not advisable to lay them flat on the asphalt. Moreover, you shouldn’t put them on top of each other - you won’t be able to tear them apart later, and they will take a long time to dry.
For example, I put the verticals on a regular trough. Dried perfectly. And fast enough. After about four hours you can pick them up with your hands and start assembling the rack. But to be more sure, it’s better to wait longer. The can of impregnation indicates the time for complete drying. For me it was 24 hours.
The main thing is that it doesn’t rain during this time.
When the impregnation has dried, we begin the final assembly of the product.
We immediately need to decide at what height our shelves will be located. I assumed that 4 winter car tires could be placed under the lowest one. You must decide for yourself at what level each shelf will be. By the way, you can easily make not three, like mine, but four shelves. This will require more material, but such a rack will be more spacious if you do not have too large things.
We fix the corners at the selected levels:
Next, we attach the lower horizontal lines so that we get the following structures:
You need to make four of these “rollers”. Only in the outermost of them can you immediately screw in the second horizontals. For the middle ones, we will do this when the planks of the lower shelf are laid in place and secured. Our design will look terrible at first. You may be struck by the thought that you shouldn’t have gotten involved in this whole story. It was necessary not to cheat, but to go and buy a normal ready-made rack.
Indeed, such a view with vertical sticks constantly trying to fall will make anyone depressed:
Yeah. It’s time to break down all this misunderstanding, and brand the one who encouraged you to take this adventure, that is, me, with disgrace and call him names in every possible way in the comments.
Your will. But I would suggest you keep working. Moreover, we have already done the most important and difficult thing. There are mere trifles left.
By the way, do you know why we didn’t attach all the horizontal beams at once? It would look quite logical, and the structure would be much stronger, and not shake like jelly.
But I'd like to see how you fit the boards that make up the bottom shelf into place. Let me remind you that they are “wall to wall” length. So if you decide to use engineering ingenuity and have already screwed on the upper horizontal bars, unscrew it. You can attach them in place only after you have something similar to the design in the picture above.
The next step is to attach the planks of the first shelf to the horizontals. Let me remind you that this is done using ordinary nails:
As a result, we should get this:
Look: something is starting to emerge, right? And you wanted to break. It’s good that I, I hope, managed to persuade you to wait with the defeat and continue the assembly.
I pay special attention to the stands under the legs of the rack. I made them from laminate scraps. They not only protect the floor from damage, but also serve as a leveling tool if the floor's evenness is in some doubt.
By placing one or two planks here and there, we can give our product a more or less vertical position. Of course, it would be much cooler to use furniture legs with adjustable heights. But they are not cheap, and we will need as many as 8 of them. So I personally used laminate scraps.
Our next task will be to “create” the second shelf. To do this, we screw horizontal bars to pre-installed corners and lay clapboard planks on them. At the same time, you can immediately screw on the upper horizontal lines. Ideally it should look like this:
Alas, in practice, things don’t always work out as smoothly as you would like. Ideally, the clapboard planks should lie on all four horizontal bars. In other words, all these bars must be in the same plane. For example, like this:
This worked for me, but for some reason one horizontal line turned out to be lower than necessary. Look, the boards don’t reach it and hang in the air:
I don’t know how it happened. But, I thought that if it happened to me, it could well happen to you too. Let's see how to get out of this situation.
There are two approaches. On the one hand, you can place a strip of the same laminate under the planks. I had a lot of scraps left, so I just had to cut out a plank of the required size and slip it under the shelf.
But I decided to go a different way. This path is good if you miss the measurement by a significant distance. For example, half a centimeter or more. In this case, you just need to unscrew the horizontal and screw it “higher”. It is advisable not to make a new hole directly above (under) the old one - if you overdo it, the vertical block may crack.
It is better to screw the horizontal with a slight shift in any direction:
After all the planks of the second shelf lie horizontally as they should, you can fasten them with nails.
Well, then, as I hope, everything is already clear. The final touch will be the installation of the third shelf. I don’t think it’s worth describing the whole process in detail. The only thing that can be said is that there may be not five, but six boards on the top shelf. It turned out wider. One extra board will add strength to the entire shelf.
Let's look at the result of our work:
There are two more horizontal lines in this picture because my particular shelving unit will continue along the right wall. If you also want to make an L- or even a U-shaped rack from wood, then you will need additional materials. Which ones and how many, I think, you can decide for yourself by analogy with what has already been done.
Well, you and I have finished our fruitful and multi-useful activities. As a result, we have a ready-made wooden rack made by ourselves. Perhaps for some this will be the first experience of creating furniture from scratch. If everything turned out more or less smoothly, then you can be proud of the result and even outline new projects. For example, you can buy furniture panels and make a simple wardrobe, then an entire wall of furniture, a kitchen set...
I hope I was able to give you step-by-step instructions, starting from the selection of materials to some logical conclusion. In my humble opinion, if you follow it step by step, almost any person, regardless of gender and age (except for very babies), can do something similar.
How to make a kitchen rack with your own hands
There is nothing better than using furniture that you have made yourself. The advantages of homemade kitchen shelving include:
- arbitrary design. Products presented in retail outlets are produced according to a standard design. This reduces the uniqueness of the room and makes it less sophisticated. A homemade shelving allows you to realize all the wildest ideas of the apartment owner and select the highest quality materials at an affordable price;
- affordability. Initially, factory-produced structures are not that expensive. However, once in store showrooms, the cost of such a product increases by an order of magnitude. Therefore, from the point of view of the costs of the family budget, purchasing ready-made shelving is not always justified. Making shelves yourself will not require such investments. Materials can be purchased in construction stores or in open areas at manufacturer prices. In addition, significant savings are achieved due to the absence of the need to pay for the brand, labor costs, and the operation of equipment with high energy consumption;
- the possibility of making a rack taking into account the geometric features of the kitchen. Almost all housing has its own disadvantages in the form of defects, uneven walls, and the presence of ledges with communications hidden inside. An individual approach to the assembly of the structure will not only hide the shortcomings, but also turn them into advantages;
- the ability to remake the bookcase at any time.
In the absence of decent factory options, you should think about taking the assembly of the rack into your own hands. For this you may need:
- wooden pallets;
- perforated sheets;
- ladder.
To make wooden shelves, just find several pallets of the same size. Such containers are often used for storing vegetables and fruits. Then you need to assemble them into a single structure, fastening the elements together with ordinary nails. Thanks to the texture and wear, such a rack will look great in a country-style kitchen. To make the product more original, you can specially age the material.
Metal racks can be assembled as an organizer. To do this you will need metal sheets with perforations. It is noteworthy that this design does not contain a shelf. Objects are hung from metal elements fixed to the wall using strong wire. The indicated option is actively used as arranging a modern kitchen space.
The easiest way to assemble a structure is from an old wooden ladder (step-ladder). It will serve as a frame for attaching walls and shelves. Similar to pallets, the material can be aged or painted in any color suitable for the decoration of the room.
Impregnation and varnish for wood. Are they necessary?
Finally, we just have to find out whether we wasted time and money impregnating our wooden parts. Unfortunately, the result of the experiment will only be ready after some time.
The bottom line: I took 8 small pieces of pine wood of the same type, scraps from the clapboard. I didn’t paint the first two with anything (U/O - without treatment), I just left it as is. The second pair was covered only with impregnation (P). The third - only with varnish (L). The fourth - first with impregnation, then with varnish (P+L).
The result was two sets of prototypes. The first one will be lucky: I will put it somewhere in the interior of the house:
I will place the second one outside in rain, snow and sun.
From time to time I will photograph samples and show them to you. We will have an excellent opportunity to check whether sellers from construction stores are “harassing” us, saying that the wood must be processed .
We will be able to track what happens to each sample in a month, three, six months, a year and beyond. So I don't say goodbye to you. See you!