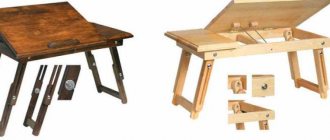
Structural design options
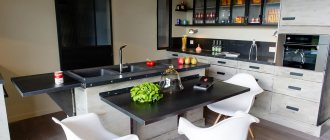
More often, epoxy resin tables are made for kitchens and living rooms. Using resin, they create new, unique furniture or restore old or damaged ones. You can create a table from resin alone, or combine resin with wood or metal. There are no special restrictions on the shape and dimensions of the tables. What is important here is creativity and the desire to create an exclusive piece of furniture.
Epoxy resin does not lose its shape after it hardens. When working with it, there is no need to exclude various decorative elements. These are important features of resin as a material for independent creativity.
Materials
- Epoxy resin for countertops and large pours*.
- -19% Out of stock
Multifunctional epoxy resin “Trasparente” 8 kg
Rating 5.00 out of 5
11440 rub. 9255 rub. More details
- -16% Out of stock
Epoxy resin for countertops “Epoxytable 5-FIVE” 15 kgRating 5.00 out of 5
22765 rub. 19125 rub. More details
- -13%
Epoxy resin for countertops “Epoxytable 5-FIVE” 7.5 kgRating 5.00 out of 5
11760 rub. 10230 rub. Add to cart
- -15% Out of stock
Multifunctional epoxy resin “Trasparente” 16 kgRating 5.00 out of 5
19990 rub. 16990 rub. More details
- Resin dyes (optional).
- Grade 5.00 out of 5
Dye “Colorfun Deluxe” 15 ml 39 colors
165 rub. Choose …
- Alcohol ink “Jacquard Pinata” 15 ml 22 colors
350 rub. Choose …
- Grade 5.00 out of 5
Metallic pigment “Sahara” 10 g 10 colors
170 rub. Choose …
- Transparent dye “Vitrail” from Pebeo 45 ml 20 colors
260 rub. Choose …
- A hand-held gas burner or a technical (construction) hair dryer to remove air bubbles from the surface of the pouring.
- Wooden slab (long slice of wood 2-3 cm thick).
- Plywood/boards for creating formwork (shapes).
- Glossy self-adhesive film (to allow the cured resin to come away from the mold after curing) or other dense film/material to which the resin does not stick after curing.
- Glossy self-adhesive film “Shiny Shield” for creating a base 16 cm
From 120 rub. Choose …
- Glossy self-adhesive film “Shiny Shield” for creating a base 32 cm
From 210 rub. Choose …
- Glossy self-adhesive film “Shiny Shield” for creating a base 96cm x 3m
2150 rub. Add to cart
- Silicone sealant or silicone paste (to eliminate cracks in the formwork).
- Grade 4.67 out of 5
Pasty silicone “iGum” 500 gr
1295 rub. Add to cart
- Pasty silicone “iGum” 1000 gr
2395 rub. Add to cart
- Pasty silicone “iGum” 250 gr
870 rub. Add to cart
* – the type of resin depends on the thickness of the filling layer: up to 2, 3 and 5 cm at a time (relevant only for our resins). If your future table is expected to be thicker, then you can do several fills with an interval of 24-36 hours (depending on the size).
Types of table designs
Support tables
At the finished table, only the upper part of the tabletop is poured. Various elements are used in decoration: branches, leaves, stones. You can fill in whatever you want at the discretion of the master.
Supportless tables
These are monolithic tables made of epoxy resin. Mostly small coffee tables. Monolithic filling does not withstand heavy loads.
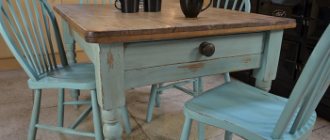
From combined materials
This design uses resin in combination with wood. Old wood is often used. Old furniture is also often restored using this method.
Modifications
When creating a table from epoxy resin, it is important to decide on the modification. When working, you don’t need to limit yourself to just the theme of wood and resin. You can add elements of stones, leaves, beads, sand, and various dyes. With the help of these additions, landscape elements are created: islands, rocks, rock shoals, beaches. Here are some popular modifications:
River
The river table is 2 pieces of wood with epoxy resin poured in the middle. What the table will look like depends on the selected pieces of wood and the imagination of the craftsman. The shape of the tabletop does not matter. In this modification, the tree plays the role of banks, and the resin plays the role of river water. To give the resin a blue or blue color, color is added. This option is suitable for coffee tables and office tables. To make a table with dimensions of 210x15x5 centimeters, you will need up to 14 kilograms of epoxy composition.
The step by step process is very simple:
- First you need to prepare the tree. It must be hard wood: elm or oak. Clean the selected pieces of wood from rot, protruding knots and bark. It can be sanded either to an absolutely equal surface or with a slightly protruding relief. Afterwards the pieces should be left to dry.
- It is necessary to prepare the form for filling. The sides and bottom of the mold must have sealed corners and joints. The walls of the form must be even in height and on the inside. The material must be absolutely smooth and clean.
- Place the finished mold on a flat surface. Place pieces of wood into the mold. Since the model should imitate a river, you need to leave a gap between the 2 pieces. The width is selected based on the intended plot.
- Next is the preparation of the epoxy composition. It should be liquid to fill all the uneven spots. If decorative elements are added to the composition, it is better to glue them in advance. In a liquid composition they may float. Add blue color to the liquid solution. Choose the depth and brightness of the color during the mixing process.
- Slowly pour the prepared mass into the mold with wood. The resin should cover the top of the workpiece. The thickness of the resin should be more than 3 centimeters. Cover the filled form with cellophane and leave to harden.
- While the tabletop hardens, you need to make legs or a base. You can weld it from metal, make it from wood, or use a ready-made structure from an old table.
- After hardening, release the tabletop from the mold and sand it.
- Attach the tabletop to the base using bolts or transparent silicone.
Solid table
To make such a table, no support is used. To fill, you will need the shape of the tabletop and legs. The table shape can be any. The result will be a glass table. Most often magazine or toilet. Such tables should not be subjected to heavy loads. To make a table measuring 100x60x5 centimeters you will need up to 30 kilograms of epoxy resin.
Manufacturing technology:
- The manufacturing technology is almost the same as described above. The differences are that there is no need to make a base of metal or wood.
- You need to make two forms. One under the base and the other under the tabletop. Or fill it all up.
- Before pouring, place decorative elements inside the forms.
- After hardening, the workpiece must be sanded.
Slab
Slabs are solid stone or wood slabs. This material should be extremely light. When making it yourself, you use a cut of a single piece of wood. At the same time, a large number of irregularities and knots is only a plus for the future masterpiece. Oak is well suited for production. In order for the tabletop to be durable, the required thickness of the material should not be less than 5 centimeters. Epoxy resin is used to fill the irregularities of a longitudinally sawn piece of wood. To make a table of medium size, you will need up to 10 kilograms of resin.
The manufacturing technology is the same as in the first described embodiment. The main feature is the slab itself. It must be made from a single piece of wood. Well polished. All other actions are the same as in the first option.
From wood cuts
Using this technology, very unique tables are obtained. Saw cuts of different diameters are used. You can fill either a finished tabletop or a monolithic form. Round cuts of branches and trunks are laid out on the finished tabletop. To give a greater effect, use the trunks of different trees. Next, the resulting “ornament” is filled with resin. For a medium-sized table you will need 7 kilograms of resin. Often such tables are made for the kitchen, garden or veranda.
The most labor-intensive manufacturing method. But also the widest for creativity. The main feature of this method is the possibility of restoring an old table.
- Take an old table or a new one. There is not much difference here.
- We cover the edges of its tabletop with slats, creating a shape. First, clean and sand the countertop well.
- We lay tree cuts on the bottom of the tabletop mold. We choose interesting ones, with beautiful patterns, different in shape. You can put starfish, shells, stones and much more on the bottom. The main thing is to create a beautiful, unique plot.
- Fill the resulting blank with epoxy resin. After pouring, warm up the entire mass with a hairdryer. This will help get rid of air bubbles. Cover the tabletop with cellophane until completely dry.
Huge epoxy bar counter
Greetings, Samodelkins!
In this article we will analyze in detail the process of making a huge bar counter. To create it you will need several buckets of epoxy, hundreds of hours of work and several artifacts of a bygone era.
Further instructions are taken from the YouTube channel “Dashing Topor”. The base of the bar counter will be made of ash bars.
The task is as follows: it is necessary to obtain from these scraps more than 300 bars of the same cross-section, but of different lengths. Let's start with this.
At the next stage, it is necessary to lay out an approximate composition from the previously sawn blanks.
After several unsuccessful experiments, the ideal solution was finally found.
This bar counter is custom-made by the author specifically for a specific bar, which has its own name and logo. Therefore, it was decided to make a logo that would be laid out from bars. The master tried to get as close to the original as possible, taking into account the format and proportions.
As a result, a sketch was made and a drawing was drawn, based on real proportions and dimensions. This solution made it possible to more accurately calculate all the details, which in the future will make up one composition. Glue the elements together.
After a couple of days, the glue dried, and these are the final details:
These will be design elements, since the bar counter itself will be quite large, more than 3 meters, in the future we will also glue the parts together. It was decided to carry out the final gluing directly in the place where the tabletop will be filled with epoxy resin.
Previously and prudently, slightly longer bars were left at the joints. This is necessary in order to tighten the elements with clamps, like this:
A day has passed, the glue has set, you can remove the clamps and now you can cut off the bars protruding from the outside.
The next step
is preparing the formwork. We place thin transparent plastic into the base; after drying, the epoxy resin comes off easily. Actually, for this reason it lies at the base.
Then you can assemble the entire composition on this plastic.
In order to evenly press all the shields, we load them with everything that comes to hand.
As you can see, this time the master came across canisters of epoxy. Now we build a simple formwork, coat the perimeter with silicone sealant, and then press it in a circle, or, well, in a rectangle, as in this case.
The formwork is ready, you can mix the resin. The proportions are indicated on the packaging, there should not be any difficulties here.
The first layer is a primer and test layer. This fill layer will be small. For these purposes, the master uses a composition called Crystal Epoxy from Artline. This resin completely polymerizes within a day, which is excellent for this purpose.
All end parts of the bars must be thoroughly coated with resin. This is done in order to minimize the formation of air bubbles in the filling. We arm ourselves with a brush and cover all the ends with the composition.
The next day, when the resin has set, fill another bucket of the same composition.
Next, we proceed to fill the empty space in the center of the tabletop. As a filler and main theme, it was decided to use elements of a bygone era. That is why there will be eight-bit consoles, floppy disks, audio cassettes, joysticks, cartridges and other thematic attributes.
When all the filler has been laid out and the second layer of resin has already set, mix the third portion. There will already be quite a decent volume here. Looking ahead, it is worth noting that in the end the entire project took more than 40 liters of resin. For such volumetric pourings, the author recommends using a special composition, for example, Monolith 10. From such a composition, even if such a large volume is poured, all air bubbles come out perfectly, and this happens without any additional manipulations, since the composition polymerizes for quite a long period of time — 7 days. The first kneading must be done until all the streaks disappear; this is clearly visible in the image below.
Actually, this is one of the components that has not yet mixed with the second. And when such stains completely disappear, the resin can be poured into a second bucket and mixed again. This is exactly how it is necessary to mix the resin correctly, and correctly mixed resin can be safely poured directly into the formwork, which is what we will do.
After 7 days we return to pouring and remove the formwork.
At this stage, the surface must be leveled and given the exact size. This cutter will do the job perfectly:
We will use a hand router.
This is a fairly powerful router, which is very important, since not every router can handle such a router. Often, simpler milling cutters cannot even hold such a cutter in a collet, which is not at all safe. Since the size of the surface being processed is non-standard, a carriage and guides were made specifically for these purposes.
Only this way, pass after pass and hour after hour. Yes, it’s difficult, and it takes a long time, but it’s worth it. Just look at the result:
At this stage you have to cut the workpiece to size. And since the guide and carriage were made specifically for this project, it would be a sin not to use them to their fullest. The first step is to use a spiral cutter to give the tabletop clear dimensions. First we make a small groove and, starting from it, we work further.
Then, using a jigsaw, we roughly cut off the excess mass.
The next step is to remove the remainder using a copy cutter.
As you can see, chips fly from the cutter, not dust and fragments. This is an indicator of the correct cutter, and we must take into account that we are processing the end part. Then, after milling, we process the ends with this tricky machine:
Now all that remains is to sand the surface and varnish it. We grind the upper part with an eccentric machine. This is a fairly long process that will definitely take you many, many hours. We should start with coarse sandpaper and finish with fine sandpaper until we reach the 400th number.
Then we remove dust from the surface and degrease it.
Then we apply a transparent glossy varnish in a couple of layers. In this example, the author uses car varnish.
In order not to spoil the appearance of the tabletop, the lower part must be covered with a thin layer of white paint. She will be the diffuser.
After this, we put on a backlit shield and you can evaluate the result of the work done.
Author's video:
Source
Become the author of the site, publish your own articles, descriptions of homemade products and pay for the text. Read more here.
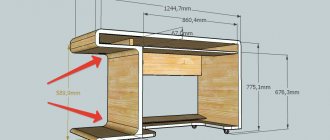
Table base
To make a table with a support, 2 types of bases are used:
- A wooden base is often used to add a special style. Such bases are environmentally friendly, easy to process and very stable. Oak, beech or larch are often used in such structures. Often you can take a ready-made wooden table or its legs as the base.
- Metal supports. They can be made in a workshop by welding. No need to paint or sand. Almost any thing can be used as a basis, and the older and more vintage, the better. The main advantage is strength and stability. The main materials are: steel, aluminum and cast iron. The form chosen is different. There may be ready-made or homemade legs, frames or stands. You can choose ready-made designs: an old tricycle, a car engine, rims.
Technological nuances
In order to make your own table from epoxy resin, you must follow all the nuances:
- The resin must be of the best quality. The brand CHS Epoxy 520 is very suitable. Lower quality resin quickly turns yellow and becomes cloudy.
- Mix the resin and hardener mixture according to the instructions.
- The liquid composition is good for filling all the unevenness.
- The semi-liquid composition is excellent for filling round tables and creating decorative elements.
- The thick composition is used to create jewelry and restore oak furniture.
- With a mold thickness of 1 millimeter, the resin consumption is 1 liter 100 grams per square meter of area.
- Avoid exposing the curing material to direct sunlight.
- Remove any air bubbles that have formed using hot air or by piercing with a needle.
- Cover the curing product with polyethylene. This will prevent dust and foreign objects from entering.
- When adding paints and colors, the composition must be heated to 30 degrees.
- The wood must be thoroughly cleaned and polished before pouring.
- It is not allowed to polish hardened resin with coarse abrasive materials.
Do not forget that epoxy resin is a toxic composition. You need to work with it in protective clothing and a respirator.
Thin layer pouring
The approximate consumption of epoxy resin when pouring a floor, with a layer thickness of only 1 mm, is approximately 1 liter per 1-1.5 m2 of flooring. Let's assume the total pouring area is 20 square meters. meters - the usual, average size of a living room. Although there are more. Therefore, to cover such a floor in such a room at one time, and this is precisely how it is desirable to cover the entire area, you need to dilute from 15 to 20 liters of resin at once.
To mix such an amount of resin with a hardener, you need to use a wide and low container, the more compact its volume, that is, the larger the shape of the container is close to a cube or ball, the greater the self-heating of the mixture, up to boiling and even smoke with spontaneous combustion. Therefore, to dilute resin of such a volume, take a flat and wide vessel with a very large heat exchange area. In this case, it is advisable to have a second one with an even larger area in order to fill it with ice water or ice in order to put the first one in it in time and effectively cool it in the event of self-heating. It is quite possible even when using the cold method with cold components; this is a feature of the epoxy mixture that has begun polymerization.
The process of starting curing itself is an exothermic reaction, that is, a reaction that occurs with the release of heat, and the exothermic reaction, in turn, contributes to the rapid hardening of the resin.
But we don’t need resin that has frozen in the container in which it is prepared, so we need to pour the resin onto the coating that is being processed with it as quickly as possible, and just as quickly level it over the entire floor area, which will require a certain skill.
Useful to know > How to fill a picture or photograph with epoxy resin, available examples
Typically, such a procedure can take no more than 20 minutes. If you take too long, there is a risk of not being on time. Although when the resin is poured into a thin layer, with a 1-3 mm layer, the polymerization rate drops sharply, due to an increase in the heat exchange area and the resulting general drop in temperature of the mixture.
It must be remembered that epoxy mixed with a hardener is a thermoset, that is, a substance in which the reaction proceeds according to an irreversible principle. It can only be slowed down by a sharp drop in temperature, but it is already impossible to stop, much less reverse, no matter what solvents or other substances are introduced into this mixture.
Disadvantages of epoxy that may occur due to improper preparation technology:
- Insufficient amount of hardener added to the compound. There is no need to rack your brains to calculate this amount; it is always indicated on the packaging of epoxy components. If there is a deficiency, many molecules of the compound will be uninvolved in the reaction, and the resin, even if it fully hardens, albeit more slowly than usual, will still remain sticky. After which you will be tortured to wash off this stickiness with solvents like alcohol or acetone.
- If there is an excess of it, the surface will also stick, but this time due to the squeezing out of excess polymer from the total mass of hardened resin. This stickiness comes off a little easier.
It turns out that it will not be possible to speed up or slow down the polymerization reaction by introducing more or less hardener, unlike the norm. The final result will only get worse.
Epoxy resins with cold-type hardeners are still less critical to mixing technology than hot ones; this is where filigree, milliliter precision is needed when preparing portions for mixing.
When preparing the surface for pouring the epoxy layer, you need to:
- Wash it if its condition and composition allows it. Wood, for example, should not be washed; water will be absorbed into the wood and cause the resin to become cloudy where it touches a wet surface. It will look like a cloudy film in the thickness of the frozen resin layer, hidden deep, near the very surface of the tree.
- Degrease, this must be done, to increase adhesion, that is, reliable, monolithic adhesion of the epoxy layer to the base being poured.
- In cases with a smooth, polished surface (stone, tile, metal), it is advisable to rub them a little with coarse sandpaper, thereby providing an additional fractal area of adhesion between the epoxy and the floor.
Useful to know > What is the thermal conductivity and electrical conductivity of epoxy resin