To make spending time in the kitchen enjoyable and preparing meals convenient, you need to carefully consider the choice of furniture items, of which there are quite a few. In this article we will discuss how to properly make a cabinet with your own hands under the sink.
Varieties
In the kitchen you can install sink cabinets of different configurations. They can be made from various materials, have all sorts of colors, shapes and designs. According to the types of sink cabinets, they are divided into:
Angular. Allows you to save free space in the room .
The piece of furniture is placed perpendicular to two walls in the kitchen. The shape of the cabinet can be: rectangular, L-shaped or triangular. The only drawback of the furniture is the difficulty in planning the interior space.Here you will need to carefully consider the placement of shelves and drawers.
- Direct. This is a classic option that is most often found in the kitchen. Making such a cabinet yourself is easy and quick, having a certain set of materials and tools, and a little experience in carpentry. A straight cabinet is located near the wall in any convenient place. Depending on the size, the cabinets can be equipped with shelves and even a small drawer at the bottom. Some people build washing machines or dishwashers into such furniture pieces.
Trapezoidal. These models are quite roomy, aesthetic and functional. They are equipped with one or more doors and have a wide tabletop. Sinks of any shape are built into them .
Inside there is a large number of shelves with dishes. A round, square, oval, rectangular or asymmetrical sink measuring 80 cm is installed in a trapezoidal cabinet.Most housewives prefer a model in the form of a wide rectangle. Since it will fit both baking sheets and large pans.
Advice : if you are just starting a career as a carpenter, stick to the direct option.
Storage system
It is very important to think about storage in a corner cabinet, since it is not always possible to reach the most hidden corners, but you really want to put as much there as possible. To achieve this, manufacturers are developing more and more interesting ideas, for example:
- swivel baskets and carousels - suitable for storing small items and large dishes, they are maximally functional;
- drawers - in corner cabinets they are made U-shaped so as not to damage communications. Useful for storing small items and textiles;
- various shelves and holders - conveniently divide the space into several zones. For example, household chemicals - separately, and a bag of bags - separately.
But do not forget that it is necessary to place wiring to the sink, possibly communication between the filter and the chopper. Even the location of the trash can is worth considering.
What can be stored under the sink besides the trash can?
- Various items such as potatoes, animal food or large pots with baking sheets.
- If the washing machine is located in the kitchen, then the space under the sink will be an excellent warehouse for powders, conditioners and other household chemicals. In this case, you can take a closer look at IKEA storage systems - they allow you to fold a large number of things as compactly as possible.
- Equipment - vacuum cleaner, iron.
- You can also hide more complex things - a waste shredder, filters, a water heater. This way, such systems will be maximally optimized and also easily accessible for replacement or repair.
If you want to simplify your life as much as possible, you can think about roll-out systems. Mesh baskets that can be rolled out by pulling a handle are incredibly popular. The reason is simple - it’s very convenient, because you no longer have to climb inside the closet, dropping all your other things.
The space under the sink can be left free or appliances can be built in there. For example, a small dishwasher or washing machine. The first option is not entirely practical, since it will be inconvenient to rinse the dishes and then immediately put them in the machine, but if the kitchen is very small, you can consider this option.
Corner connection in the kitchen. Efficient use of space under the sink
Material
As for manufacturing materials, kitchen cabinets can be made from almost any lumber. The main requirements for this piece of furniture are:
- moisture resistance;
- practicality;
- wear resistance;
- durability;
- aesthetics.
You can make a stainless steel sink cabinet measuring 80 cm wide from:
Chipboard. This is the most budget-friendly DIY option .
The peculiarity of laminated chipboard is: a wide range of materials, ease of processing, practicality, resistance to negative factors and attractive appearance.Almost all home furniture makers prefer this material. The presence of a melamine film on the surface of the chipboard protects the material from high humidity and prevents its deformation. But poor-quality edge processing or damage to the protective layer of the material can lead to the evaporation of harmful resins, which negatively affects human health.
When choosing laminated chipboard, you should be very careful about its manufacturer. It is advisable to check the quality certificate and read consumer reviews before purchasing.
- MDF. Excellent material, in the ratio of affordable cost and high quality. It is made from wood, therefore it is safe and environmentally friendly. The appearance of MDF pleases with a wide range. The material differs in texture, texture and color schemes. It is easy to process and is resistant to scratches, chips and negative factors.
Array.
This is an ideal option for classic interiors. When choosing wood, you should consider its type. Some varieties are more difficult to process. For example, making a cabinet from solid oak at home will be quite difficult . But as a result, such a piece of furniture will have the highest technical characteristics.Listing the positive aspects of natural wood, one cannot fail to note it: attractiveness, nobility, presence of a pleasant aroma, long service life. Such furniture always looks luxurious and aristocratic. The only thing is that when using the cabinet in a humid environment, the wood must be treated with antiseptics.
In addition to the materials for making the sink cabinet, you should also carefully consider the purchase of the sink itself. It can be made from:
- of stainless steel;
- artificial stone;
- ceramics.
Consider the option of a stainless steel sink. Because it is of high quality and reasonable cost. In addition, stainless steel is a classic material and is most often found in kitchens. The advantages of the material include:
- hygiene;
- practicality;
- durability;
- strength.
Stainless steel sinks are divided into economy and premium options. The difference lies in the thickness and quality of the metal sheet, as well as in the design of the product. The most practical are sinks with a thickness of at least 0.9 mm .
Attention : when choosing a stainless steel sink, preference is given to products where the seams are not visible. Experts also recommend choosing a matte finish, as it does not show water stains or scratches.
Materials for production
The materials from which any kitchen furniture is made must be resistant to moisture and mechanical damage. When choosing a cabinet, you should be guided by the general concept of the kitchen interior: take into account the layout, color, material from which the remaining furniture elements are made. Since the main criterion for purchasing is cost, manufacturers present furniture made from both expensive materials and affordable budget options:
- Wood is considered the most expensive and durable material, but when used it swells under the influence of moisture.
- Laminated chipboard is one of the cheapest budget options with the ability to choose any color you like, and most importantly, high-quality moisture-resistant boards are used for production.
- MDF is distinguished by its good quality and inexpensive cost. The material is made from wood chips, stronger than chipboard, so it holds fastenings securely. It is resistant to various types of damage, does not absorb moisture, and has a wide variety of colors.
Many housewives are accustomed to using a classic single sink. More often there are options with two sections, but the number of bowls can reach up to five.
When choosing a cabinet, you should be guided by the general concept of the kitchen interior.
A good addition to the sink will be special wings - corrugated side planes for drying dishes. The following materials are used for manufacturing:
- Stainless steel. Sinks made from this material are durable and durable. They can be of different price categories, depending on the quality of the sheet steel and thickness, but they are susceptible to mechanical damage, scratches and have a uniform design.
- The ceramic bowl has a stylish appearance and can be easily treated with any cleaning products. Its types are distinguished by a variety of designs, different shapes, but have the main drawback - fragility. If dishes are dropped into a ceramic sink container, a crack will appear.
- Artificial stone is made from mineral chips and acrylic. Typically, a cabinet version with such a sink is available for customization. The products are durable, quiet when washing dishes, and have an impressive appearance.
The form is chosen at your discretion. However, based on practice, the most comfortable bowls turned out to be rectangular and square-shaped bowls, which have smoothed rather than sharp corners for convenient removal of dirt.
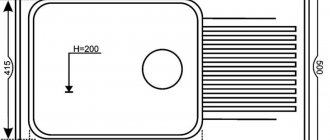
Drawing for a stainless steel kitchen sink 80 cm
Before you start making a sink cabinet, you need to decide on its materials, design and dimensions. The dimensions of a piece of furniture are determined depending on the availability of free space in the room. For small kitchens, compact and small corner or straight models are made. If the kitchen is spacious and roomy, a massive trapezoidal sink with a wide countertop will fit perfectly in it.
The standard sizes of a sink cabinet are:
- width 50 cm;
- depth – 60 cm.
But, as practice shows, housewives prefer sinks with a width of 80 cm . These are exactly what we will talk about in our article.
Help : when choosing a sink for the kitchen, you should consider its depth. It is inconvenient to wash dishes in a shallow bowl. And with a very deep bowl, you will need to constantly stand in a half-bent position. Therefore, experts recommend choosing a stainless steel bowl for the sink of medium depth (from 16 to 20 cm) and a width of at least 80 cm.
Tools
The materials you will need to make a sink cabinet are:
lumber (MDF, chipboard, chipboard, plywood);- overhead or mortise sink made of stainless steel;
- sandpaper;
- antiseptic for processing lumber;
- screws, self-tapping screws;
- putty and primer (when working with natural wood);
- accessories (hinges, handles, guides).
The following tools are prepared:
- electric jigsaw;
- drill;
- screwdriver;
- tape measure, ruler and simple pencil;
- various screwdrivers.
Design selection
The first thing the master needs to do is choose the type of frame. The choice of cabinet type depends on its location, the type of sink (over-mounted, mortise) and its shape, as well as the material from which it is made. For independent implementation, you can take as a basis one of three main design options: floor-mounted, suspended, corner. Next, we will consider the main advantages and disadvantages of each solution.
Floor stands
The easiest to manufacture and most functional options for the kitchen, which perform several tasks at once:
- Hide pipes from prying eyes
- Can be continued in the form of a countertop
- Acts as a sink stand
- Can be used as a place to install a miniature washing machine, place a trash can, a place to store household chemicals or other small things necessary for everyday life.
The disadvantage is the massiveness and relatively large dimensions of floor solutions.
Suspended structures
Creating a hanging nightstand is rightfully considered the best option for saving space in bathrooms.
The main advantage of this type of cabinets is their visual lightness and the availability of free space on the floor, which is necessary when laying communications in the box.
Creating a hanging bedside table under the bathroom sink with your own hands is quite simple, especially since it does not require a large amount of materials, although it does require a competent approach to the installation work and subsequent operation of the product.
Corner cabinets
Corner cabinets can have both floor-mounted and suspended solutions. As a rule, corners in rooms are used extremely poorly, so corner structures are considered an excellent option for installation in small-sized kitchens, especially if the frame is to be installed under the kitchen countertop.
For the most part, the corner design creates a lot of free space under the sink, which a thrifty housewife can always use to store things needed in everyday life.
Washbasin type
Having chosen the location of the product, you should not think that the choice of the type of structure has already been completed. Before you make a cabinet under the sink with your own hands, you need to pay attention to the type of sink, which (as noted above) may have an overhead or mortise mounting method.
Cabinets with an overhead sink are made as simply as possible, since the surface of the sink is mounted on top of the frame. If you plan to use a sink with a mortise mounting method, then a hole should be provided in the countertop of the cabinet that corresponds to the size and shape of the bowl.
How to make and assemble it with your own hands?
The work process will look like this:
According to the existing diagram, we prepare the necessary parts. They are cut from lumber with a jigsaw or saw. If laminated chipboard was chosen as consumables, all edges are trimmed with PVC film .
This will prevent the material from swelling during operation.- The assembly of the cabinet begins with the manufacture of the sidewalls. In our case, their dimensions will be 87 by 60 cm. Small rectangles measuring 6 by 11 cm are cut out at the front at the bottom of the parts.
- Now the cross members are attached to the sidewalls. They are made of plywood, 8 mm thick. The width of the crossbars must be at least 12cm. Since these details will not be visible, there is no need to over-process and refine the details. But for long-term use, it is better to treat the plywood with an antiseptic.
- The cross members are attached to the sidewalls in different ways. They can be fixed with steel furniture corners or screws.
- Next we proceed to install the bottom. Its dimensions will be 70 by 50 cm. The bottom is attached with screws to the crossbars.
- Now you can attach the upper crossbars on which the sink will be installed. The first crossbar is positioned vertically and is fastened so that it does not protrude beyond the cabinet. The rear wall of the cabinet will be attached to this crossbar in the future . We place the second upper cross member horizontally.
- The next step in making a sink cabinet with your own hands will be fixing the back wall. There will be no load on it, therefore, it can be made from thin plywood or pressed cardboard. It will be much easier to cut holes for communications in these materials than in thick chipboard.
- Now you can begin assembling the front frame. When making shelves and doors, the dimensions indicated in the drawing are taken.
- The next step is to install the mortise shelf on casters.
- Next we attach the cabinet doors. Here special attention is paid to the loops. They must be of high quality and able to withstand loads. A good choice would be hinges with closers .
- The final stage of assembling a cabinet for a sink is installing handles.
Overhead mounting option
As for how to install a sink on a cabinet, there are only two options:
overhead;- mortise
Installing a sink using an overhead method is a fairly simple option. Here you just need to place the sink on top of the cabinet. Installation of an overhead sink is divided into:
- ordinary;
- retractable
With the usual method, all joints are carefully treated with sealant . And a waterproof compound is applied to the top of the cabinet. The sliding method involves installing curved slides on the side and front side of a piece of furniture. Since such a cabinet has special grooves. After assembling the cabinet, the sink is inserted into these grooves and pushed against the wall. Next, you can safely begin connecting the sewerage and water.
Attention : if the weight of the sink is large, then it will not stick to the sealant alone. To prevent a flood, you will need to equip the cabinet inside with auxiliary bars.
The mortise method is more labor-intensive. They are installed directly into the countertop. Therefore, the preparatory step will be to make a corresponding hole in the tabletop. Mortise sinks are secured with special clamps and brackets. They are distinguished by their noble appearance and ease of use.
How to install in the kitchen? Instructions
To install an overhead stainless steel sink you will need:
- sealant;
- the cabinet itself;
- brackets;
- metal corners;
- wooden beam.
The installation procedure will look like this:
Markings are carried out at the required height from the floor.
After the first marking, a second marking is made, which should correspond to the thickness of the rear walls of the sink. This way you will calculate the line for attaching the brackets.- Now we measure the distance between the brackets and draw lines.
- We drill holes in the wall and attach the brackets.
- Now we install the sink on the brackets.
The easiest way is to install an overhead sink on the pipe . Then you only need to install a sink on the sides of the pipes, pre-treated with sealant. This way you will completely hide the fins of the pipes. Once the sealant has dried, the sink will be locked in position and ready for use.
If you think that the brackets alone are not reliable, you can additionally secure the sink with furniture corners and wooden blocks. Wooden bars are placed in the sink box, and metal corners are attached along the entire perimeter to the bars.
Tip : it is also worth making a table and a sofa for the kitchen. And if you are ready to experiment, then try making a tabletop from epoxy resin and a comfortable bean bag chair.
Nuances of choosing a cabinet
If you still have doubts about what to choose, it’s worth figuring out what is expected from the furniture:
- if you need a lot of storage space, go for trapezoidal cabinets;
- the doors can be made hinged and even tilting;
- if you need free access to distant corners, then this is definitely not about a single door;
- if you need to hide the water heater in a cabinet, then small rotating shelves are suitable for storage;
- if there is a trash can there, then you should choose a model with a lid or a pull-out one;
- if there are no shelves, then it is better to buy baskets or take a closer look at drawers;
- The shape of the sink and the cabinet as a whole should be combined with the kitchen.