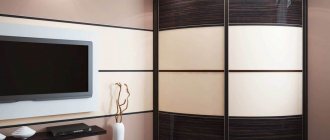
The advantages of homemade furniture include individuality, originality and uniqueness. You can make your own: a bed, a wardrobe, a table, an armchair and other furniture items.
Let's take a closer look at how to make a table from plywood.
Material selection
Reference .
Plywood is considered an ideal option for making furniture. They are distinguished by reasonable cost, high technical characteristics and ease of use. The main advantages of this material include:
ease of processing;- strength and reliability;
- resistance to loads;
- elegant and noble appearance.
In order for the furniture to be of high quality, practical and attractive, it is necessary to choose the right consumables. Plywood is made from birch and softwood. When choosing it, pay attention to:
- variety;
- grinding;
- brand.
As for the grade of material, it determines the resistance to moisture and the area of application. The brands most often found in stores are:
FC . Used for making furniture and for interior renovation work in the house;- FSB . This material is moisture resistant. It contains harmful substances. And it is not used for making furniture;
- FBA . This brand is not moisture resistant. Furniture can be made from material only for dry rooms;
- FKM . It is a universal material and has a wide range of applications;
- FOF . It has a protective film that can be of any shade.
Reference . As for the grade, the E marking indicates the highest quality.
Unsanded plywood is marked НШ , and the designation Ш1 indicates sanding on one side, and Ш2 indicates sanding on both sides.
Basic principles of working with a plywood table
In order for a product to be functional and durable, you need not only to select high-quality material, but also to assemble it correctly. If the product is assembled from pieces, then the assembly process begins only when the pieces are thoroughly dry; excess glue must be removed immediately after application so that the appearance of the product does not deteriorate in the end.
An important point is the correct drawing of the table. The distinctive feature of a plywood product should be its perfect symmetry. If you are going to cut plywood into pieces, then consider whether your jigsaw is suitable for such work. Don't forget that you will need to leave gaps for sanding and getting rid of sharp corners. When you process the material, sand it so that the surface is smooth. An important point is that, in addition to high-quality processing of the material, it is necessary to firmly fasten the parts together. To prevent cracks when screwing in the screws, drill the holes for them a couple of millimeters narrower.
To ensure that the parts are held in place as securely as possible, you can use wood glue. When you have sanded all the parts, clean them from dust, lubricate them with glue, press the parts tightly together, secure them with clamps and leave them in this position for several days until the glue has completely dried.
Drawing
Before you start making the table yourself. You need to make a preliminary template. For small furniture products it is not necessary to make a drawing, but having one will greatly simplify the work process.
As for the exact dimensions, it depends on the personal wishes and preferences of the owners. Such furniture can be made in standard sizes. Or you can come up with your own personal dimensions. The main thing is that you feel comfortable and comfortable using the furniture.
Required Tools
After choosing the appropriate material for making a desk with your own hands, you need to assemble a complete set of carpentry equipment. In addition to general tools, you may need specific accessories that help you process a particular type of slab. The list includes:
- screwdriver;
- screwdrivers;
- hammer;
- drill;
- jigsaw;
- level;
- roulette;
- corner;
- pencil.
How to assemble a simple coordinate table with your own hands, tips for craftsmen
When preparing tools, you should take into account the specifics of carpentry. So, for the work you will need a certain type of hammer - a rubber mallet. The drill should have a set of drills of different diameters. A construction tape can be replaced with a measuring tape. If the table is made of natural wood, then two machines must be added to the equipment set: for grinding and milling. Installation will also require a variety of connecting parts, fittings, means for gluing and finishing coating. These include fasteners, wooden dowels, plugs for masking fasteners, wood glue, varnish, and paint.
Advantages of silicone transparent table pads, their manufacturers
How to do it?
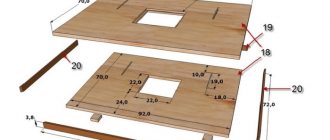
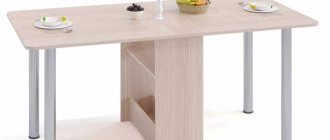
The production of a piece of furniture begins with a sketch. For this:
We come up with the shape of the tabletop . It can be rectangular, square, oval or any other fancy shape.- We come up with the shape and height of the legs . They can be straight or curved.
- Let's draw it all on paper.
- We calculate the sizes.
- We draw the legs on cardboard in full size.
- Cut out the legs according to the template. If their shape is complex, we use an electric jigsaw. For a simple shape, a hand tool will also work.
- If the plywood is not too thick, we make the legs from two layers.
- Glue the legs together , remove excess glue and let the workpiece dry completely.
Important . When making a model attached to the wall, you only need to make two legs.
As for the tabletop, it is made of durable plywood. According to the template, we cut out the shape of the tabletop with a jigsaw. Next we do the following:
We sand the surfaces of the legs.- We make markings on the underside of the tabletop for screws.
- We fasten the legs using furniture corners.
- If the model is attached to the wall, make markings on it for fastening.
- We attach the product to the corners and metal profile.
That's the whole simple process. Next, the product can be treated with stain. To give it a noble appearance and varnish it.
Preparation of material
Don't worry if you don't know how to make a plywood table. The site has a large number of tips on how to do everything right, as well as photo and video instructions.
You can make a folding table for the living room, kitchen table or any other model. The main thing is to draw up drawings in advance and follow preliminary sketches throughout the entire work process.
If you decide to make a table from plywood with your own hands, then take care of a sufficient amount of material. There must be several bars, which will later become the legs of the product. In order for the final work to turn out decent, every detail needs to be prepared and in this case you will need:
- jigsaw;
- building level and tape measure;
- drill;
- pencil;
- Sander;
- construction adhesive.
By making a table with your own hands, you can be sure that it will serve you for many years. Each manufactured part is subjected to a thorough inspection, and unevenness, splinters and other defects must be removed. Before assembly, to increase service life and appearance, all parts can be varnished.
A plywood tabletop can have absolutely any shape. It all depends on your imagination.
For a sample, you can take photos from the site and add to them. Plywood is very easy to transform, so you can easily even make a round table.
Remember that when choosing a material for a countertop, you should pay attention to its thickness. The most optimal option is considered to be 20 mm, since such a thickness can withstand quite a lot of weight.
Decoration
The final stage of making a plywood table is its decorative finishing.
Important. You cannot paint such a piece of furniture.
But you can decorate it with:
- varnish;
- wax;
- stains;
- self-adhesive film.
Advice .
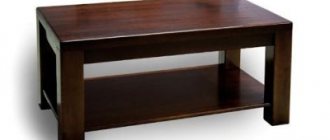
If the material has been mastered, then it’s time to move on to tables made of chipboard, glass, pallets, solid wood or boards.
Features and Limitations
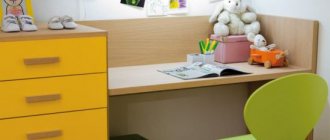
Working with plywood is easy because it is a malleable building material whose strength indicators are not particularly high. Therefore, it is not recommended to make a product if it will experience heavy loads during operation. It is better to make a folding table from multilayer material. Sometimes small children's tables are made from plywood.
Originality is the main virtue that extols homemade plywood furniture. If you make a table at home, you can decorate it with shelves and other additional elements. For these works, it is best to use sheet material: with it you can make a strong and reliable tabletop. It is recommended to coat the finished product with a layer of varnish, but you need to know: the kitchen table is prohibited from being treated with this solution, since food may become saturated with it.
Photo
If you have extensive experience working with plywood, then the result can be decent:
Trial and error
Dimensions
The width of the working surface was made quite standard - 600 millimeters.
The cabinet underneath is 30 mm narrower; and this turned out to be a mistake.
- When cutting, washing dishes and other work, your knees rest against the cabinet door.
- A significant part of the shelf space is not used. If on the edge a pile of dishes, pots and other useful things somehow spontaneously forms, then in the depths the cabinet gapes with depressing emptiness.
A reasonable cabinet depth is no more than 50 centimeters (see also the article Do-it-yourself plywood cabinet - general recommendations).
The remaining dimensions were made quite standard and did not cause any inconvenience during operation:
- The height of the shelf is 30 centimeters.
- The height of the working surface above the floor is 85 centimeters.
A caveat: a typical kitchen stove is exactly this height; It is clear that if your specimen is slightly higher or lower, the work surface and sink should be level with it.
- The kitchen table top is 75 cm from the floor.
It was decided not to assemble wall cabinets at all: they make the kitchen visually more cramped. The chrome dryer is located at the edge of the work surface; the wall above it was decorated only with a hood and a lamp (find out here how to properly make furniture from plywood with your own hands).
If you decide that you can’t do without wall cabinets, make them as narrow and light as possible. Light colors make furniture less bulky.
Marking
Taking into account the unevenness of the walls and ceiling, the marking of parts had to be done locally. As it turned out, trying to make vertical bulkheads under the work surface of the same size leads to differences in height. The problem was solved by preliminary marking of the wall and floor; Subsequently, all elements were measured and manufactured individually, using the markings as a guide.
Parts processing
The author must repent: due to lack of time, he did not pay due attention to the processing; as a result, minor defects here and there remained noticeable.
How to process parts correctly?
- We fill all surface defects with acrylic putty. It is universal and adheres perfectly to veneer. Due to shrinkage of the putty, you will have to do the job at least twice.
- We grind the surfaces. A sander will save a lot of time at this stage.
- Olifim parts twice with complete drying of each layer. In this case, the kitchen will survive even a long-term immersion in the abyss without deformation or swelling (for example, if the sewer is clogged).
Frame
The next mistake was trying to work with plywood in the same way as with drywall. For the cabinet under the sink, a frame was assembled from a block, which became the basis for the plywood structure.
Where is the mistake? The fact is that 15mm plywood itself has more than sufficient rigidity. Vertical partitions serve as load-bearing elements without additional supports; the block only spoils the external (more precisely, internal) appearance of the furniture and creates additional cracks that have to be sealed.
Rigid material does not require an additional frame.
Further assembly was performed without a frame; galvanized corners were used for fastening to the floor and walls (the kitchen was not planned to be moved anywhere in the future).
Joining parts
Plywood is attached to plywood at right angles, as it turned out, more than simply; neither the usual furniture corners nor any other fastening elements are needed.
The instructions are simple:
- Mark the position of the joined parts with a pencil.
- We drill holes in one of the parts that is attached flat to a perpendicularly oriented structural element and countersink them with a drill of a larger diameter.
- Having pressed the elements together, directly through the drilled holes, we first mark the attachment points at the end with a thin drill (the author used a 3-mm drill; the exact diameter depends on the diameter of the screws); then we drill.
Yes, right to the end: the veneer does not delaminate, it’s been checked. The depth of the drilled hole should be no less than the part of the screw that will go into it.
The photo shows a simple way to additionally ensure against veneer delamination.
- We apply silicone sealant to the end to get rid of the cracks; then we tighten the parts with self-tapping screws with a diameter of 4 and a length of 50 millimeters.
Doors
After they were made, the author was horrified: despite preliminary drying in a horizontal position, there was a clear “propeller”. The solution turned out to be simple: a smaller trim was made from the same plywood on the inside of each door, attached to it with six screws under pressure. The doors turned out to be massive, but perfectly smooth.
Fittings and edge finishing
The accessories required:
- Loops. Decorative awnings were purchased; however, upon reflection, piano hinges seem to be a better choice.
- Pens. Ordinary horizontal ones, made of polished aluminum: excessive pretentiousness of the fittings simply looks out of place.
- Corners for mounting to the wall and floor have already been mentioned.
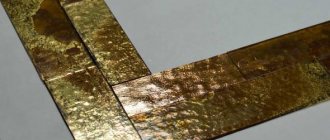
- The edges of the tabletop and work surface were finished with decorative aluminum corner strips measuring 25x10 mm. It was again pulled to the end of the plywood sheet, at the same time pressing the edges of the covering.
Finishing
A better quality plywood kitchen would probably look great with a stain and varnish finish - after protecting the edges of course. However, the low-grade material dictated its conditions, and the front surface was covered with self-adhesive film made in Germany.
When using quality material, you can leave the texture visible. The best coating in this case is waterproof polyurethane yacht varnish.
Important: cheap Chinese films are not only ugly; They also hold up disgustingly. In the described case, thanks to the high-quality finishing material, the appearance turned out to be quite decent.
The ends of the doors were protected by U-shaped plastic edges attached to glue. The inner surface is painted with alkyd enamel (of course, in a horizontal position to avoid drips).
The work surface and tabletop are covered with... class 32 laminate. The floor covering showed excellent performance: no knife marks or any other defects appeared during the year; however, I must admit, it was worthwhile to coat the joints with sealant when laying the laminate with glue. The joints did not swell, but due to frequent contact with water they became noticeable.