- How to make a swing with your own hands: interesting ideas with photo diagrams and drawings, for the garden, cottage, playgrounds
- What types of garden swings are there: characteristics and types of structures
- How to make a swing in the country: features of making a garden swing with your own hands
- Material for making a swing with your own hands
- Advantages of wooden swings
- How to make a swing in the country: photos, drawings, sizes and modifications
- Where to place a swing in a summer cottage
- Drawings and photos of garden swings made of wood
- How to make a wooden swing for a summer house with your own hands: drawings and selection of materials
- Additional materials for creating a family hanging swing in a summer cottage
- Instructions on how to make a wooden swing for a summer house on support posts
- Location and fastening of swing posts to the ground
- Methods of fastening the crossbar
- How to make a wooden swing seat
- Metal swing for a summer house on support posts
- How to make a swing from pallets and boards
- How to make a swing from a hoop or hula hoop
- How to make a “spider web” swing from a hoop, step by step instructions:
- How to make a canvas swing
- DIY hanging swing
- Video: how to make a swing for your dacha with your own hands
What types of garden swings are there: characteristics and types of structures
There are many types of products that are used by both children and adults. Self-made models can have a simple mechanism in the form of a seat that is suspended on a crossbar, or have a complex structure, for example, collective-type options.
Note! During the work process, you can use any available materials left over after construction and repair activities. Such furniture is installed under the roof, in the shade of trees, on the lawn, or on a specially prepared area.
How to make a children's swing at the dacha with your own hands.
Garden swings can be classified based on different parameters:
- Depending on the installation method, they can be stationary or collapsible (portable). Portable – products with compact dimensions and light weight. These characteristics allow you not only to move the swing around the site, but also to put it in a car for transportation to another place during your vacation. As a rule, such products are secured to a tree branch or to a pre-made support.
- Swing vertically or horizontally. In the first case, it is a swing balancer, in the form of a crossbar mounted on a support, which is located in the middle. In the second, these are hanging options.
- By age category, all products are divided into children's and adults. Children's designs can have a significant number of modifications. Most often, the main components of such a product are supports, a small seat and fasteners.
- By number of seats - single, double, multi-seat. The design is based on a long bench, which acts as a large seat that can simultaneously accommodate up to 5 people. In most cases, swings of this type are equipped with their own canopy, protecting them from sunlight and bad weather.
- By type of construction – frame, frameless structures. In the first option, tree branches can play the role of load-bearing support. The latter are distinguished by a more complex device, where the crossbar is placed on reliable supports, and the seat is supported by metal rods or chains.
- Depending on the presence of a canopy, there are open and closed options.
- There are no restrictions on form at all. Both the frame and the seat have a wide variety of appearances, may include forged elements, and have an original, unique design. Represent hammocks, sofas, soft chairs, sun loungers, look like boats, rockets, imitate animals and birds.
Click on the photo to enlarge.
Click on the photo to enlarge.
Do-it-yourself children's metal swing: how to make it correctly in stages
When arranging a playground in the yard, you can implement different versions of swings: from large to single-seater. It all depends on how many children and for what age the attractions will be created.
DIY swing-balancer
To make a swing, you can use any available material. We take rolled metal or pipes that we have on the farm as a basis. The following additional components will be useful:
- board 1.7-2 m long;
- metal plate;
- mounting bolts;
- cement;
- seats and handrails;
- welding machine.
Balance swings may have a different frame PHOTO: bimboka.com
This product can be made in a variety of ways. However, as an example, we recommend studying the step-by-step photo instructions.
Making swings for children at the dacha
The entire process of turning a project into reality begins with preparatory work. You must have a clear plan according to which the work will be carried out, and have all the necessary material at hand.
| Illustration | Description of action |
| We take a strong metal plate, weld tubes to it so that triangles are formed on both sides at the same distance | |
| We also weld the crossbar to the resulting corner. This will make it possible to strengthen the prepared structure | |
| Next, two crossbars are welded; they will also add additional strength. Accordingly, the frames will not bend ahead of time | |
| Next, we will measure the board relative to the welded frame. It is important to set marks on the wood so that it is attached with its center to the upper corner of the metal structure | |
| We take the fastening element and fasten it to the board with the front side using self-tapping screws. Be sure to do this according to the preliminary marks. Please note that a tube is welded on it, which will later be cut in half | |
| We install this tube on the stand and check how the swing will work. They should slope smoothly from one side to the other. For reliability, we install washers on both sides so that the structure does not move to the side | |
| We make wooden backrests at each end. We fix them to the base of the swing using self-tapping screws | |
| We install two T-shaped tubes welded together as handles. Secure the bottom with a metal plate | |
| The children's swing-balancer is ready. All that remains is to sand them, paint or varnish them. |
All that remains is to weld the metal reinforcement to the rack on both sides. It is subsequently placed in a prepared trench and filled with concrete.
DIY metal swing nest
In order to build a children's hanging swing for a summer house, you need to acquire suitable material. To make this attraction durable, its base is made of metal. For implementation you will need:
- gymnastic hoop;
- polypropylene rope - 25 m;
- carbines;
- padding polyester, waterproof fabric;
- thread, needle, scissors.
Not only round, but also rectangular options will look good PHOTO: evehealth.ru
You may also additionally need: a marker, electrical tape, clamps.
How to assemble a children's garden swing
They try to do the weaving with a climbing rope. It has increased strength, so it will wear out for a long time. Let's start creating a swing.
- We divide the hoop into eight identical sectors. We make markings with a marker. This is necessary in order to correctly place the future rope web.
- Measure two diameters of the hoop and cut the required length of rope with a small margin.
- Let's start weaving the web. Remember that the rope should not be taut. The child should then fit comfortably into the seat and not fall out of it.
- All ropes, starting from the center, are intertwined crosswise. In the resulting central unit, multi-layer stitching is performed with nylon thread.
- In the same way, loops and knots are sewn, which are attached directly to the metal circle.
- The workpiece is wrapped with synthetic padding and sheathed with thick, moisture-resistant fabric. For convenience, a specially sewn pillow is placed on the woven web.
- Sew strong loops to the four edges of the circle. We attach carabiners to them and hook the swing on a strong rope to a crossbar or tree branch.
It is allowed not to sheathe the structure with fabric. You can simply wrap the hoop with a thick multi-colored rope.
It is necessary to choose threads for winding so that they do not fade over time PHOTO: the-furnish.otzovy.ru
On a note! One hoop in a ready-made swing can support up to 50 kg. If you need to hold more weight, you will have to take several hoops and twist them together using a rope.
Do-it-yourself outdoor children's swing for a summer residence: production features
If there are two or three children in the house, then you will have to create a multi-seat or at least a double design. Such swings are made quickly using the metal profile you are familiar with.
The available materials are: metal, fasteners and welding. It is also necessary to use the project that can be seen in the photo. Otherwise, there is a risk of making mistakes.
The design is shown in the diagram from all angles PHOTO: youtube.com
The design of the seats is also discussed in the diagram PHOTO: youtube.com
How to make a swing at the dacha with your own hands for two children
Let's start solving the question of how to make a children's swing with your own hands.
| Illustration | Description of action |
| We cut the material to the required dimensions and weld the parts together. You should end up with two identical bases. | |
| Next, you need to weld them together so that the finished frame takes the shape of a triangle. | |
| We take a metal tube and connect it to a wooden block. Making a hole with a drill for a carbine | |
| We hang four chains on the carabiners, which will serve as holding elements. | |
| We cook the seat according to the planned pattern. Don’t forget to create rings through which the chains will be threaded | |
| All that remains is to paint and dry the structure. Option for children's entertainment is ready |
Try to make swing seats from durable plywood. It is treated with moisture-repellent agents and painted. This will ensure that the material does not delaminate over time.
How to make a swing in the country: features of making a garden swing with your own hands
Arrangement of the territory, the correct choice and appropriate design of recreation areas is one of the important tasks facing the owner of a local area. When decorating your property with flower beds, gazebos, and artificial ponds, you should not neglect such an item as a swing. This is one of the few furnishing options with which you can complement the landscape and enjoy a comfortable and cozy stay in the fresh air.
gallery columns=”2″ size=”full” link=”file” ids=”7541,7553″]
A self-made swing allows owners of private country houses and dachas to relax, calm down, and dream while sitting on a swinging bench; moreover, homemade structures are the pride of their owner, an object that can be boasted to acquaintances and friends.
When choosing ready-made purchased designs, it is not always possible to find and select models that satisfy all requests and are suitable in design style for a specific situation. In this case, the best option would be to make it yourself, because a homemade swing has the following features:
- Construction cost. A self-made swing will cost an order of magnitude cheaper than purchased analogues, and you can use any available material for the work.
- Originality of design. Such furniture, made in-house, will be exclusive, stand out, and become a source of pride.
- Quality. Everyone decides for themselves how good the product will be.
- Model selection. At the design stage, you can independently determine the type of swing, for whom it is intended, whether only children or all family members will use it. The design will be a suspended seat or an entire sofa installed under a canopy with an adjustable backrest.
- Choice of material. You can make a swing from different types of wood, metal, rubber, plastic, combine raw materials, give a second life to old things.
- Experience. When constructing structures, a person gains experience, which can later be used to build other buildings.
Material for making a swing with your own hands
To create a garden swing, three main materials are most often used. This list includes wood, plastic and metal. Undoubtedly, each of these materials has its own advantages and disadvantages.
Note! To make a swing at home, when constructing the product yourself, there are practically no restrictions in the choice of raw materials; anything that can be found on your site will do, be it metal pipes, old sofas or car tires.
Wooden swing in the country.
Let us dwell in more detail on the main components used in the process of making a garden swing with your own hands:
Rope. Allows you to build a rope version in the form of a “bungee”. The most basic way to create a makeshift play structure for swinging is to just tie a long rope to a tree branch or crossbar, and attach a wooden seat or log to it from below, which you can grab with your hands.
Plastic. The material is used mainly for seats that can support the light weight of a child. To build a simple structure, just make holes in the plastic seat and attach it to a rope suspended on a branch or crossbar. Can be combined with other materials.
Metal. To work with this material you will need welding skills. The resulting structures are strong and durable. From the raw materials you can make both ordinary welded and elegant forged structures for the street. The only drawback of corrugated pipes is their susceptibility to oxidation, so the metal surface must be treated with special coatings.
Tree. Classic building material. With its help, you can make a design of any shape and complexity. At the same time, wood is easy to work with, which allows even an inexperienced beginner to create a beautiful swing that will fit into any garden.
Note! When it comes to drawings for garden swings, you will not find a more practical and convenient raw material than wood.
Drawing of a wooden swing of the optimal size for one person.
Wooden swings have only one drawback, which concerns the operation of any products made of wood. Such structures without the use of appropriate protective measures can be severely damaged by the influence of negative environmental factors.
These factors include the impact of:
- rain;
- snow;
- direct sunlight;
- fungi and mold;
- insects;
- sudden temperature changes;
- decay processes.
Helpful advice! To extend the service life of the product, it is necessary to treat the wood with special impregnations, varnishes, and paints.
Wood antiseptic for interior and exterior use: how to choose the best composition (read more)
Making a swing
Selecting a location
Before you begin, you need to choose the place where you plan to install the structure. The fact is that the dimensions of the product may depend on this.
Most often, country wooden swings are installed in the recreation area. However, they can also be located somewhere in the garden, among the trees. This option is great for those who like to be alone in nature, for example, with a book in their hands.
Advice! It is advisable not to install the structure under fruit trees, as falling fruits can spoil the rest or damage the canopy.
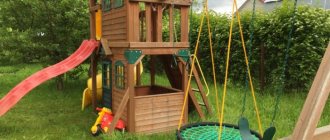
If you want to make an outdoor wooden children's swing for your dacha, then it is better to place them on the playground so that the children are in plain sight.
It must be said that the design of the future product largely depends on the choice of location. For example, if the structure is located in the garden in a shaded place, then a canopy may not be installed. If, on the contrary, it is in an open area, it is necessary to provide protection from the sun.
Sketch of a wooden swing
Project
The next stage is the design of the future structure. You have to make drawings of a country swing with your own hands from wood. To do this, you first need to decide what dimensions the product will have.
As for the design of the swing, it is usually standard and quite simple - it is based on four supports, to which a cross beam is attached. In this case, the bench is suspended from the beam with chains.
It must be said that it is absolutely not necessary to make drawings of a wooden swing for a summer house with high precision with your own hands, while respecting the scale, etc. The main thing is that the project displays the main structural elements of the product, and also contains the dimensions of all parts indicated in millimeters.
Beam 100x100 mm
Materials
Before you begin assembling the product, you need to prepare all the materials that will be required during the work process:
| Materials | Quantity |
| Beam 100x100 mm | 5 pieces. |
| Boards 2.5 m long, 10 cm wide and 25 mm thick | 15 pcs |
| Board 2.5 m long, 15 cm wide and 50 mm thick | 1 PC. |
| Carbines | 6 pcs. |
| Screws with ring 12x80 mm | 4 things. |
| Screws with ring 12x100 mm | 2 pcs. |
| Chains (length should be half the height of the structure) | 4 things. |
The main material for the swing will be timber. It must be said that it doesn’t really matter what type of wood, for example, you can use pine or spruce, the price of which is the most affordable. The main thing is that the wood is dried and does not have cracks, as well as a large number of knots or any other flaws.
Note! Before use, all lumber must be treated with a protective antiseptic impregnation, which will ensure the durability of the structure. This procedure will prevent damage to wood by microorganisms, fungi and insects.
Rack design
Installation of racks
You should start assembling the swing by installing the stands.
The instructions for installing them look like this:
- First you need to prepare the site - clear it of debris and grass, and then apply markings that determine the size of the wooden swing for the dacha.
- Next, at the corners of the markings, you should dig holes for supports, the depth of which should be at least 70 cm. To make holes, you can use a garden auger or an ordinary shovel.
- The bottom of the holes should be filled with a layer of crushed stone about 10 cm thick.
- Then the racks are installed at a certain angle, after which the holes are filled with concrete.
- Next, adjacent racks are connected with bolts. To do this, you first need to drill holes in them.
- Adjacent racks at the top and bottom must be secured with crossbars.
Ready frame
- A few days later, when the concrete has hardened, you install a horizontal beam with your own hands, from which the bench will subsequently be suspended. It can be secured using anchors; in addition, braces are additionally installed. The result should be a strong, rigid structure.
- Next, if necessary, the frame of the canopy is made. There are quite a lot of options for its installation. For example, as a base you can use wooden beams of the upper frame, to which the remaining elements of the gable roof are attached.
An example of a gable canopy design
Making a bench
Now that the base is ready, you can start making the bench.
There are many options for its designs, however, the manufacturing principle is always something like this:
- When starting to make a bench, you first need to make the base of the structure, usually these are two sidewalls, which are subsequently connected by strips that form the seat. If a wooden swing for a summer house is large enough, then an additional stiffening rib must be made in the middle of the bench.
Marking the boardsTo make the base, you first need to make patterns, then apply markings to the boards, from which the parts are then cut. As a rule, the base of the seat and the backrest are connected to each other with self-tapping screws and wood glue, resulting in the formation of one solid piece.
- Next you need to connect all three parts with strips. To do this, you need to correctly position the elements of the base of the bench so that there is the same distance between them, and then fix the first plank with self-tapping screws. It should be located in the transition area from the seat to the backrest, i.e. in the middle, as shown in the photo.
Assembling the benchThis arrangement of the first plank will further allow the remaining slats of the wooden structure to be evenly distributed.
- After this, the base is sheathed with the remaining planks. At this stage, it is important to screw in the caps of the screws flush, otherwise they can hurt you.
- Next, armrests are cut out of the boards and attached to the bench. On one side they are fixed to the base of the backrest, and on the other hand - to a stand, which is attached to the base of the seat.
- Then the bench must be thoroughly sanded with sandpaper or an electric sander. The screw heads can be puttied and the surface can be sanded with sandpaper. If the structure is subsequently opened with varnish, the putty should be matched to the color of the wood.
- The prepared bench needs to be covered with a layer of paint or varnished. To do this, you can use any wood paint for exterior use. This completes the production of the bench.
In the photo - attaching the chain to the bench
Installing a swing
The final stage of work is installing the swing.
This operation is performed in the following sequence:
- First of all, you need to screw bolts with 12x100 mm rings into the horizontal beam. The bolts should be spaced from each other at a distance equal to the length of the bench.
- Then bolts with 12x80 mm rings are screwed into the base of the back and seat of the bench on both sides.
- To complete the work, using carabiners, the structure must be suspended from the base beam on chains. At this stage, you need to correctly adjust the length of the chains so that the seat is horizontal and slightly tilted back.
Advice! To prevent the swing from squeaking during operation, the rings must be lubricated with grease. The work should be done carefully so as not to stain the rest of the structure with grease.
This swing for the dacha is made of wood with your own hands. Now all that remains is to arrange the area around them. It can be covered with sand, laid with paving slabs or filled with concrete.
Advantages of wooden swings
Wood has excellent technical and performance characteristics. Thanks to the properties of this material, you can create a truly comfortable and beautiful design.
Features of a DIY wooden swing:
- Environmental friendliness. Since wood is a natural material, products made from it are completely safe for human health;
- External aesthetics. The structures can fit into any landscape and garden design, since the main part of the environment consists of natural materials (stone, wood) and vegetation. Compared to metal products, structures made of wood significantly benefit in aesthetic terms and can support the exterior of any country house;
- Safety . Due to its softness, wood is convenient to work with and use, and can reduce the number of injuries. This advantage is most beneficial if you intend to design a children's swing;
- Simple installation system . Anyone with basic skills in construction and handling wood can start building a swing;
- Versatility. This type of material lends itself quite easily to various types of processing (grinding, cutting, cutting). Thanks to this, any of the DIY garden swings made of wood, the photo of which you like the most, can be made by you yourself without involving specialists in this process. Wood allows the construction of single-seat structures or swings with large capacity, made in the form of sofas.
How to make a swing in the country: photos, drawings, sizes and modifications
A homemade swing will be an excellent addition to any summer cottage. They will help make outdoor recreation comfortable and cozy, will delight both children and adults, will allow them to enjoy the flight, and will lift their spirits. A homemade structure will be a source of pride for its owner, testify to his good taste, and decorate the area.
Note! If you have decided to start creating a swing at your summer cottage yourself, first of all you should decide on the type of structure you want to install and determine a suitable place to place it.
To facilitate and speed up the design and preparation stage, use a photo of a swing for a summer house, there are many drawings of which on the Internet.
Photos of children's swings made of wood with your own hands and how to create them
Children's design options are much easier to implement, since the requirements for weight loads are much lower. On the other hand, safety standards in this case must be strictly followed, since children are extremely mobile and can swing in various ways.
DIY children's swing made from a skateboard
Where to place a swing in a summer cottage
Any type of construction that is carried out on the territory of a suburban land plot begins with the design stage and selection of the appropriate location.
It is recommended to choose the back of the house to place the swing. Even if your site is fenced off from a noisy street and neighbors, this area will still be the most comfortable and quiet. The backyard in most cases is set up for relaxation, and you can safely use it to install a family or children's outdoor wooden swing for the garden.
Note! The principle according to which the site for construction is selected applies not only to children's swings made of wood. These requirements also apply to other design options.
When placing a children's swing in the garden, it is necessary to provide enough space for swinging.
Whenever possible, you should select a plot of land with a flat surface in your garden. It is advisable that this area be sheltered from the sun and precipitation. The ideal place to create a swing is an area under a tree where thick shadow falls. Installation on a porch protected by a canopy is allowed.
All these conditions directly affect the level of operating comfort, since sitting on a swing seat that is hot under the sun is unpleasant and uncomfortable. And unimpeded exposure to rain can damage the structure.
Portable swings can be moved to any place on the site, depending on weather conditions.
It is also worth taking into account the fact that as the sun moves across the sky, the shadow cast by a tree or other objects will move. For installation, you should select a place where there will be shade at midday. During this period of the day the sun has its strongest and most aggressive influence.
Do-it-yourself garden swing made of wood: photos and drawings, sizes and modifications
If you have decided to start creating a swing at your summer cottage yourself, first of all you should decide on the type of structure you want to install and determine a suitable place to place it. To facilitate and speed up the design and preparation stage, use a photo of a do-it-yourself wooden garden swing, of which there are many drawings on the Internet.
Drawing of a wooden swing of the optimal size for one person
Varieties of DIY garden swings made of wood
The classification of garden swings is quite extensive. In this case, the main types of structures are presented:
- family - have high capacity. The design is based on a long bench, which acts as a large seat that can simultaneously accommodate up to 5 people. In most cases, swings of this type are equipped with their own canopy, protecting from sunlight and bad weather;
The family swing can comfortably accommodate 3-5 people
- children's designs can have a significant number of modifications. Most often, the main components of such a product are supports, a small seat and fasteners. It is important to ensure a full level of safety for the child. For these purposes, the design must include protective elements that will prevent the baby from falling. Such elements include a comfortable backrest, handrails on the sides, a partition located in front, seat belts that secure the child inside the seat;
Original children's swing made of wood in the shape of a horse
- portable – products with compact dimensions and light weight. These characteristics allow you not only to move the swing around the site, but also to put it in a car for transportation to another place during your vacation. As a rule, such products are secured to a tree branch or to a pre-made support.
Portable swings can be moved to any place on the site, depending on weather conditions
Choosing a place to place a children's swing with your own hands made of wood
Any type of construction that is carried out on the territory of a suburban land plot begins with the design stage and selection of the appropriate location.
A simple children's swing made using a wooden board and rope
Whenever possible, you should select a plot of land with a flat surface in your garden. It is advisable that this area be sheltered from the sun and precipitation. The ideal place to create a swing is an area under a tree where thick shadow falls. Installation on a porch protected by a canopy is allowed.
All these conditions directly affect the level of operating comfort, since sitting on a swing seat that is hot under the sun is unpleasant and uncomfortable. And unimpeded exposure to rain can damage the structure.
When placing a children's swing in the garden, it is necessary to provide enough space for swinging
It is also worth taking into account the fact that as the sun moves across the sky, the shadow cast by a tree or other objects will move. For installation, you should select a place where there will be shade at midday. During this period of the day the sun has its strongest and most aggressive influence.
Drawings and photos of a DIY garden swing made of wood for a summer residence
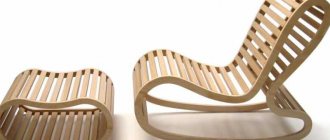
If we talk about universal designs, then a hanging swing, installed on A-shaped supports, will become a real recreational object for the whole family. Moreover, they can be installed both in large summer cottages and in small gardens near the house. And the process itself is not expensive in terms of time and effort.
Swing chair design with soft cushion cover
The list of required tools for work should include:
- tape measure and pencil (the tape measure can be replaced with a measuring tape);
- mechanical or electric jigsaw;
- circular saw;
- hacksaw;
- square for measuring angles (combined type);
- rafter pins;
DIY swing bed
- test square;
- sawhorses;
- thicknesser and planer;
- hammer, screwdriver, clamps, wrenches;
- chisel (25 mm);
- electric drill with a set of drills (10, 8 and 4.5 mm);
- sanding block.
Simple wooden swing for children's outdoor games
A swing in a quiet corner of the garden will allow you to enjoy the aromas of greenery
Drawings and photos of garden swings made of wood
If we talk about universal designs, then a hanging swing, installed on A-shaped supports, will become a real recreational object for the whole family. Moreover, they can be installed both in large summer cottages and in small gardens near the house. And the process itself is not expensive in terms of time and effort.
Swing chair design with soft cushion cover.
The list of required tools for work should include:
- tape measure and pencil (the tape measure can be replaced with a measuring tape);
- mechanical or electric jigsaw;
- circular saw;
- hacksaw;
- square for measuring angles (combined type);
- rafter pins;
DIY swing bed.
- test square;
- sawhorses;
- thicknesser and planer;
- hammer, screwdriver, clamps, wrenches;
- chisel (25 mm);
- electric drill with a set of drills (10, 8 and 4.5 mm);
- sanding block.
Note! Of course, purchasing a ready-made design in a store is much easier and faster. But in this case, it is unlikely to fully meet all your requirements in terms of design, size, etc. Creating a garden swing with your own hands from wood according to your own drawings will allow you to endow the structure with all the necessary characteristics.
A swing in a quiet corner of the garden will allow you to enjoy the aromas of greenery.
Advantages of wooden swings
Resting-place
On the market you will find a huge range of materials from which such structures are made.
But wooden swings for the garden are the most popular, because... have a whole list of advantages:
- Simplicity and ease of manufacture. In order to make this kind of garden element, you need to have minimal skills in working with natural materials;
- Low cost of the final design. The price of a country swing made of wood is an order of magnitude lower than that of exactly the same metal or plastic structure;
- Versatility;
Note! From wood you can make not only small children's single swings, but also large family swings that can accommodate several people.
- Harmony. Garden swings made of wood will fit perfectly and complement the composition of the garden, which cannot be said about metal and plastic models, which should be selected with special care for a specific landscape;
- Safety. Wood material is soft, which minimizes the possibility of injury to children;
Note! In terms of safety, wood simply has no competitors on the market.
- Environmentally friendly due to the fact that wood is a natural material.
How to make a wooden swing for a summer house with your own hands: drawings and selection of materials
At the initial stage, materials are prepared to create a garden swing with your own hands, the photo of which you liked the most. Based on the drawings, you can easily understand how many blanks will be required to assemble the structure and what dimensions they should have.
Dimensional table for creating blanks:
| Detail in design | Dimensions of the transverse part of the workpiece, cm | Final length, cm | Required number of blanks, pcs. |
| Frame part of the structure | |||
| Spacer (upper) | 4.5x14 | 23 | 2 |
| Spacer (lower) | 4.5x14 | 96 | 2 |
| Leg | 4.5x9 | 198,7 | 4 |
| Rigel | 4.5x14 | 210 | 1 |
| Seat parts | |||
| Rear pillar | 3.5x7 | 60 | 2 |
| Bar (support) | 3.5x7 | 95,5 | 2 |
| Bar (for seat) | 3.5x7 | 120 | 2 |
| Armrest | 3.5x7 | 60 | 2 |
| Back strap | 2.5x7 | 130 | 2 |
| Armrest support | 3.5x7 | 27,5 | 2 |
| Seat bar | 2.5x7 | 128,4 | 8 |
| Upper bar | 2.5x9 | 130 | 1 |
In addition, to connect the above blanks together into a single structure, fasteners with different parameters will be required.
DIY country swing for the whole family: popular options
To make a swing with your own hands in the country, metal is most often used.
Interesting do-it-yourself swing made from a profile pipe
To create a swing for a summer house with your own hands from metal, you need to provide the following components:
- quadrangular frame (it should become a load-bearing frame in the finished swing);
- A-shaped sidewall. It is made by welding several crossbars;
- one long tube. It will become the basis for attaching the swinging bench.
A cover of this design can be plastic, wooden or canvas PHOTO: sadovyrai.ru
Next, you need to act according to the step-by-step algorithm.
How to make a swing with your own hands from metal
The process of installing a swing for a garden with your own hands consists of the following steps.
- Using a grinder, we cut the material into separate fragments. To do this, you need to have a preliminary diagram according to which you can make blanks in accordance with the dimensions.
- We sand the boards using a special machine or manually using emery.
- We connect all the necessary parts together using special fasteners, bolts or welding seams.
- We dig 4 holes in the ground, install a metal swing for the cottage and fill it with concrete. Next we paint the structure.
The design and design of the product can be anything. The more complex the frame design, the longer the swing will take to create. PHOTO: krainamaystriv.com
As a result, you get an individual forged swing for the garden. For such a product it is necessary to have a preliminary diagram indicating all dimensions.
Sofa swing for a summer residence
Country sofa swings are in great demand. If it is not possible to buy them, then they try to make them themselves. Metal options are highly durable. And if it is also properly processed, it will not be afraid of moisture.
Tools and materials for manufacturing
For production you will need metal profiles, a welding machine and seating material. Typically, wood is used for such purposes. In addition, you will also need material for the roof. Those who plan to use polycarbonate should know that it is quite hot under it in sunny weather, and it is not practical during hail (the material begins to crack). It is ideal to take a tension awning.
How to make a garden swing with your own hands from metal: instructions with photos
Let's start following the instructions for assembling the garden swing.
| Illustration | Description of action |
| We weld the frame. You can take your own sizes. It all depends on how much material you have. As a result, you should get a base like the one in the photo. | |
| We weld the frame for the swing to which the sofa will be attached. Next, we bend the arcs from the metal profile. They will play the role of armrests | |
| We hang the finished part on carabiners. Next we prepare the tree | |
| The finished version should look like this. The swing folds out into a sofa. The upper part of the frame is attached to the frame using strong chains. All metal parts must be primed and then painted |
To make the bed soft, it can be covered with a special fabric or periodically laid on top of a mattress and pillows for relaxation.
Dear readers, if you do not understand enough about the question of how to make a garden swing with your own hands, do not hesitate to ask questions and share your opinion. Our team will definitely contact you as soon as possible.
Additional materials for creating a family hanging swing in a summer cottage
The final dimensions of the structure are: 2.1 m (width), 1.235 m (depth) and 1.9 m (height). It is recommended to use impregnated pine as a raw material.
Dimensional table of fasteners:
| Fastener type | Dimensional parameters, mm |
| Galvanized screws | 8x65 |
| Screws (24 pcs.) | 8x50 |
| Screws | 8x38 |
| Screws (8 pcs.) | 10x75 |
| Nails (roofing) | 2.5x40 |
| Nails (convex head) | 2.5x65 |
| Screws with a square head and washers for them (8 pcs.) | 8x100 |
| Bolts with a semicircular head and nuts for them (2 pcs.) | 10x125 |
| Eye bolts with washers for them and lock nuts (6 pcs.) | 100 |
Note! Prepare in advance an antiseptic suitable for wood processing, as well as materials for finishing. These points are thought through at the design and planning stage of the future structure.
In addition to the fasteners, you will need a number of additional materials: a pair of wooden spacers for the corner area (length 38 cm), sandpaper with a grit level of 120, hooks equipped with a safety lock (6 pcs., 5 mm), a chain 4.4 m long (link thickness 2 cm).
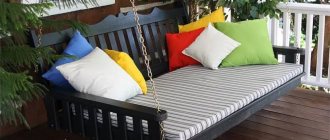
A swing with a soft mattress and cozy pillows is a great place to relax.
Instructions on how to make a wooden swing for a summer house on support posts
The best material for making durable swings is wooden beams. Square lumber ensures simple assembly of the structure, easy fitting of parts, and connection of corners. This favorite garden element of landscape designers is happily used by children and adults. You can make such a swing yourself in any size and shape.
Drawing of the support part for a wooden garden swing.
Location and fastening of swing posts to the ground
Stationary structures must be securely fixed in the ground so that they do not turn over during the movement of chains or metal rods. In the selected area, mark a place for the racks and dig holes. We fill the bottom of each hole with sand to protect the structure from distortions and subsidence. The layer must be at least 10 cm.
Click on the photo to enlarge.
Click on the photo to enlarge.
Before placing the supports in the recesses, their lower part should be treated with bitumen mastic or wrapped with roofing felt. In the pit they must be in a strictly horizontal position. Fill them with cement mortar. While the mixture has not dried, the position of the racks can be adjusted. Further work can be carried out after at least 10 days.
Methods of fastening the crossbar
The wooden crossbar to which the bench or seat is attached can be fixed in several ways. If the swing is in a prominent place in the yard, then it is better to use options that are aesthetically pleasing. They are complex in execution, but will give the street structure a special, presentable look.
Click on the photo to enlarge.
Click on the photo to enlarge.
You can securely fasten the crossbar as follows:
- To an overhead beam attached below the intersection of two supports;
- Lay the supporting beam between the crossed side posts;
- Half-tree fastening. Special cuts are created at the joints.
How to make a wooden swing seat
The seat of a wooden swing should also be made of wood. This is one of the simplest, most convenient materials. It is easy to process and provides full scope for imagination. From it you can create a real carved work of art.
Click on the photo to enlarge.
Click on the photo to enlarge.
You can make a simple design from two frames - one part is for the seat, the other for the back. We make stiffening ribs in them and connect them together using corners and self-tapping screws. According to the instructions, we screw special bolts into the front seat beam and the upper part of the backrest. This seat can be used for an outdoor structure or in an apartment.
Rope is much cheaper than metal, it is more pleasant to the touch, but it can fray, so it requires periodic revision and visual inspection of its condition. In addition, this swing material is less durable. This is an excellent option for hanging simple single-place products, hammocks.
DIY wooden swing.
Wooden swing bench, step 1: design sketch and preparation of parts for assembly.
Wooden swing-bench, step 3: fixing the connected parts with self-tapping screws.
Wooden swing bench, step 2: applying glue and fastening the parts together.
Wooden swing bench, step 5: attaching the armrests.
Wooden swing-bench, step 6: treating the product with protective compounds.
Wooden swing bench, step 4: installation of the back and seat of the structure. The A-frame structure is the most reliable as a support for a swing.
Drawings of a garden swing: how to make a family structure with your own hands
It is recommended to choose the back of the house to place the swing. Even if your site is fenced off from a noisy street and neighbors, this area will still be the most comfortable and quiet. The backyard in most cases is set up for relaxation, and you can safely use it to install a family or children's outdoor wooden swing for the garden.
Wooden swing bench, step 1: design sketch and preparation of parts for assembly
Marking the supporting part of the product
To make the support, you will need to cut the cross beam to the specified size using a circular saw. At a distance of 15 cm from each end, marks are made and a straight line is drawn. It should go along all the faces on the beam. This line will be considered as the outer edge for the A-shape support.
Markings for inclined cuts should be applied to the end part of the legs. To do this, the square is fastened with rafter pins. One of the pins is installed on the larger leg (at a distance of 316 mm from the corner), and the other on the smaller leg (at a distance of 97 mm from the corner). The leg is placed on the edge and marked with the positions of the square. You should have a bevel for making the bottom cut.
Wooden swing bench, step 2: applying glue and fastening the parts together
After this, the positions of the ruler of the square are marked on the edge of the legs. To do this, you need to move the square along the leg to align it with the previous position of the ruler. Having outlined the length of the ruler, you can move the square further.
Wooden swing bench, step 3: fixing the connected parts with self-tapping screws
The last marking line is intended for cross-cutting the beam. These positions are marked using straight lines leading to each of the edges of the leg. To make a pattern, you need to saw off the material on the side that is not processed.
Cutting the supporting part of the structure
To saw off material using a hacksaw, you must first place it on the edge and clamp it in the saw sawhorses. The cutting is carried out strictly according to the markings. Remember to control the sides. This is especially true for the upper cut area. Sometimes it becomes necessary to straighten the bevel. To do this, it is enough to process the end part of the cut with a plane.
Wooden swing bench, step 4: installation of the back and seat structure
To form the second leg, you need to put the first one next to it, joint to joint. After this, all marks on the bevels and length are transferred to the second leg and sawed off according to the markings.
Then both legs are placed on the edge so that the end parts of the vertices are located on opposite sides of the cross beam. The lower part of the legs is moved to the sides until a distance of 1.2 m is formed. The upper part of these parts must be adjacent to the crossbar. To check the bevels, use a ruler, applying it to the ends. Make adjustments if necessary.
Wooden swing bench, step 5: attaching armrests
A distance of 50 cm is measured from the base of the legs and the lower block is applied. Next, the lines of the legs, as well as the upper and lower parts of the bar, are transferred to the corresponding parts. After this, the top block is placed on the legs. This must be done so that it is located 15 cm lower than the cross beam lies, and is parallel to the first bar. The marking is carried out in exactly the same way as in the previous version.
After this, the bars are removed, and the markings are aligned on the surface. At given points, these elements need to be cut to the required length.
Wooden swing bench, step 6: hanging the structure
DIY garden swing drawings: assembly of the support part
The next stage of construction is checking the fit. The markings are transferred using a square to the inside of the legs.
The template is set at the 22 mm mark and markings are made between perpendicularly located lines on the inside of each of the legs.
Wooden swing bench, step 7: treating the product with protective compounds
Further actions are carried out in the following sequence:
- a nail with a convex head (25x65 mm) is driven in from the outside of the leg;
- adjusting joints and driving nails into the frame;
- Forming a hole with a drill whose diameter is 8 mm. The hole should reach the central part of the end of each block;
- forming an installation hole with a drill whose diameter is 4.5 mm. This needs to be done as deep as possible into the end part of the bars;
Drawing of the support part for a wooden garden swing
- tightening parts through the installation hole using screws with a square head, equipped with washers 8x100 mm. You need to do this procedure with all the bars;
- placing the cross beam in the appropriate place at the top of the frame;
- alignment of frame edges with perpendicular markings on the cross beam;
- forming a hole with a diameter of 10 mm in the beam and in both legs;
- fixing parts using a bolt with a semicircular head (125x10 mm) and a nut;
- checking the angles between the beam and the leg;
A-shaped design - the most reliable as a support for a swing
formation of through holes in the leg with a diameter of 4.5 mm at a level of 30 mm from the bottom of the beam. Fixing parts with screws (65 mm). Similar actions are performed in the upper part of the leg. Only in this case, other screws (38 mm) are used for fastening.
Next you need to connect the top bar and the crossbar. The spacer is fixed with a through screw, the size of which is 65 mm. The upper part of this element is fixed to the bottom edge of the beam at the end with a 38 mm screw into a pre-made hole (4.5 mm).
A swing installed on the terrace is a great place to spend time with family and friends
Making a seat for a garden swing with your own hands from wood
The technology for creating a seat is carried out in stages based on an L-shaped frame made of boards (40-50 mm).
Pallet swing, step 1: cutting the pallet to the desired size
Step-by-step instructions for making a seat:
- from the boards you should form 3 frame parts for the bench. They should be L-shaped. Fixation is carried out with self-tapping screws. To adjust the frame part to the curve of the spine, use carpentry tools. Thanks to this, you can achieve a comfortable posture for your back while riding;
- frame elements should be placed along the length of the bench with the same spacing. Use a thin board to hold them together. The resulting design will become the basis for creating a bench. The part with the vertical type of placement will be the back, the horizontal part will be the seat;
Pallet swing, step 2: treating the wooden seat with a moisture-proofing compound and varnishing
- the remaining seating area is filled with boards. Pre-drill holes in them to facilitate the process of screwing in screws and prevent cracks from occurring. Make sure that the boards are located at the same distance and have equal length;
- sand the surface using a grinding tool. Thanks to this, you can eliminate unevenness and burrs on the wood;
- secure the armrests.
Pallet swing, step 3: securing the swing with a cable or strong rope
Photo of a wooden swing for a summer house with your own hands and the hanging process
In order to hang the seat in its side (approximately in the middle), screws equipped with rings should be installed. Two more rings are attached to the bottom of the crossbar. These elements will be used to connect the support and the swing using hangers. In this case, chains are used.
The connecting elements between the main parts will be carabiners. The length of the hangers can be adjusted as desired. The optimal height for placing the bench is 30 cm above the ground.
Drawing of a two-seater swing suspended on metal chains
Swing suspended from a tree with a rope
The final stage of construction of the structure
The next stage of construction will be the final one. In order to protect the finished structure, the swing must be treated with a varnish. It will provide a smooth surface, preserve the natural beauty of the wood and extend the service life of the product.
Depending on personal wishes, the swing can be painted in any of the colors you like or a small canopy can be installed. Show a little imagination at this stage, and you will be able to create a unique product.
Finished designs can be decorated with pillows, blankets and other decorative elements
For greater comfort, you can place pillows or a small mattress on the bench to reduce the rigidity of the landing. Its size must match the size of the seat. Anyone who is familiar with the technology of making upholstery for furniture can be advised to apply these skills when creating a swing. Make soft not only the seat, but also the back, as well as the armrests, if they are present in your design. Do not forget that upholstery is only possible if the product is located under a roof or canopy.
Wooden and metal parts of the swing must be periodically treated with protective compounds
Metal swing for a summer house on support posts
Before starting work, you need to decide on the type of product, whether it will be portable or stationary, equipped with a polycarbonate canopy, stretched awning, designed for a child or an adult.
Metal swing in the country house.
For clarity, let’s look at a master class on building a stationary swing structure:
- We take a profile pipe 40x40 mm or 50x50 mm, using a grinder we cut 4 identical sections of 2.5 m long, and another 2 of 1 m each. For the crossbar you will need a round pipe with a diameter of 30 mm and a length of 2 m.
- On the one hand, on all 4 long profiles used as side posts, we cut the edges at an angle of 30°, after which we weld the pipes in pairs at the cut points, resulting in two isosceles triangles.
- To strengthen the structure, approximately at a level of 2 m from the top, we apply short sections, determine at what angle it is necessary to cut both edges of each pipe so that they fit tightly to the structure and form a single plane with it. Having cut the edges, we weld the horizontal jumpers.
- We weld a round crossbar to the tops of the racks, which are shaped like the letter A.
- We form the seat frame. To do this, cut 5 pieces of 1.5 m in length from a round pipe with a diameter of 20 mm, and another 6 of 0.5 m each. We weld the seat into a single structure, for this we lay out three long pipes so that the distance between the two extreme ones is 0.5 m, On top of them we lay three smaller pieces, two in the corners, one in the middle. In the same way we form the back, with the only difference, without one long crossbar on one side. We connect the two parts together at the required angle. On each side we weld two special eye nuts that will be used to fasten the metal chain.
- We cover the frame with wooden slats 30x30, 20x40, 30x60 mm, 1.5 m long, connecting the bars to the metal using bolts and nuts.
- Stepping back 25 cm from each edge, we drill holes in the crossbar into which the eye bolts will be placed.
- Using carabiners, we hang the seat on a metal chain.
- Next we install the swing. To do this, in the place where the structure will be installed, we dig 4 holes 40 cm deep, and fill the bottom of the hole with a sand cushion up to 10 cm.
- Mix the concrete solution.
- We install the swings with risers in the holes, strengthen each iron pipe in the hole with stones, and pour concrete.
- After the solution has dried, the product can be used.
How to make a swing from pallets and boards
The classic model is a board suspended on a branch or crossbar with four holes along the edges through which a rope or rope is threaded. Instead of boards, you can give new life to old chairs, wooden gratings, and rounded logs.
Pallet swing, step 3: secure the swing with a cable or strong rope. Finished designs can be decorated with pillows, blankets and other decorative elements.
Varieties of metal garden swings that you can make with your own hands
A truly durable structure can only be made from a metal profile. In this case, any cross-section of the material is used. The main thing is to know how to make a swing for children with your own hands. Such designs are usually divided into two options:
- stationary (which are securely installed in the ground using welding or concrete);
- portable (models that are convenient to transport from one site to another depending on the seasons or weather conditions).
A suitable mobile swing model with a small mass PHOTO: krepezhinfo.ru
They try to make mobile copies stable and practical. To prevent them from tipping over during operation, special holding structures are provided. It is advisable to make a swing from metal on bearings with your own hands; they are much more reliable.
How to make a swing from a hoop or hula hoop
From an old metal or aluminum hoop you can build an excellent structure designed for comfortable relaxation.
There are several ways to do this. Let's look at a simple master class, using the example of how to make an unusual hammock from a hula hoop:
- We place the hula hoop on a piece of fabric, cut out two solid circles from it, the diameter of which is 30 cm larger than the rim used. For work we use only thick fabric, it is better to use denim, quilted fabric, burlap.
- We sew a zipper into one of the circle-cut pieces of fabric. To do this, you need to cut the fabric in the middle, not reaching the edges. Make the length of the cut, like the zipper, equal to the diameter of the hoop with a margin of 1 cm.
- Next, using a sewing machine, we sew together the two resulting segments; to do this, we fold them right side together.
- Turning the cover right side out, we make 4 holes in it.
- It is also necessary to drill holes in the hula hoop.
- To make the design more convenient, we cover the rim with padding polyester and place it inside the case.
- To hang the product you will need 4 pieces of rope of different lengths, one pair should be 50-60 cm longer than the other.
- We thread the ropes through the holes made, tighten them on the hoop, and each pair of different lengths should be on different sides.
- All that remains is to attach the structure to a branch or ceiling.
How to make a “spider web” swing from a hoop, step by step instructions:
- We strengthen the welding area of the hoop using metal plates or wire.
- Divide the circle into 8 equal parts and make marks with a marker. For better fixation of the rope, it is necessary to drill 8 symmetrical holes in the cavity.
- We cut 8 pieces of rope, the length of which is equal to two diameters of the circle with a small margin; you must use a strong cord 4-5 mm thick.
- We fold the rope in half, insert it into the holes on both sides, pull it tight, make knots, or, if there are no holes, make a loop on one side and a knot on the other. The sagging of the rope can reach 5 cm.
- Next, we attach the next cable perpendicular to the stretched rope, intertwining it with the first one in the middle crosswise.
- In the same way we start and fix the remaining six segments.
- If there are no holes, use a needle and thread to sew all the fastening points, as well as the middle.
- We fix 4 carabiners to the hoop, installing them symmetrically relative to the center, in the places where the ropes are attached.
- We cover the hoop with padding polyester and make a fabric blanket along the contour.
- Let's start with the longest activity - weaving a web. We start work from the center, make the distance between the rings 4-5 cm, intertwining each rope with each other, hemming the joints with threads.
- Once the structure is ready, all that remains is to choose a place to place it.
How to make a canvas swing
To make a structure from such material, you will need a chain, two metal triangles, and a piece of thick tarpaulin.
To begin, cut out a strip of the required shape from thick canvas. We put both ends of the fabric into metal triangles and bend them down, connecting them to the main part of the fabric. Next, using rivets, we connect each edge to the plane of the fabric. Instead of rivets, you can use regular bolts and nuts.
You can also use this material to build more complex structures in the form of hammocks, cover metal frames with it, and use it as a canopy.
Note! Due to the fact that the canvas is impregnated with fireproof, waterproof, and anti-rotting impregnations, the raw material is perfect as a base or an additional component of outdoor structures.
DIY hanging swing
It is good to install such models in a gazebo or under a canopy, on a patio or terrace, under the canopy of trees or in an open area. The design can be made from different materials; for convenience, the seat is additionally equipped with a backrest and armrests.
Such furniture is attached to a crossbar, a branch, or to the ceiling of a structure using metal rods or chains, long ropes or ropes. For clarity, let’s look at a few examples of what and how you can build a swing yourself.
Note! In terms of design, children's swings do not impose serious restrictions. To create them, you can use any available materials. For example, a rope can be replaced with a chain, a wooden board used as a seat can be replaced with a chair, after first removing its legs. Be sure to use bright colors, as children really like the abundance of colors.
A self-made swing at the dacha or on the territory of a rural farmstead will be an excellent addition to any local area. They will help make outdoor recreation comfortable and cozy, will delight both children and adults, will allow them to enjoy the flight, and will lift their spirits. A homemade structure will be a source of pride for its owner, testify to his good taste, and decorate the area.