Home Home and cottage Hobbies and entertainment
Every parent knows for sure that their child deserves the best. And if this best thing can be done with your own hands, then hardly anyone can resist this opportunity. This article will talk about bedding for a crib and how to sew it at home.
At a very early age, sound and healthy sleep in a comfortable environment is especially important for a baby, which means that equipping his place to sleep with a good crib and soft, pleasant bedding is almost the first necessity.
Today, stores for children present a huge assortment of all kinds of bedding for a crib, surprising with color options and modifications, as well as prices. Sometimes the whole problem lies in the price: you don’t want to pay a fortune for a set of children’s underwear, but giving your baby the best is certainly the main task. In addition, you often pay for the brand name, but the quality remains approximately the same. And it’s no secret that children are one way or another a large expense item, one of which is unlikely to include expensive baby linen for the crib.
Therefore, if you want to save money and at the same time make your child a beautiful set of bed linen to your taste with your own hands, have at least a basic understanding of a needle and thread and are full of enthusiasm - this article is for you.
Preparation
If saving is one of your criteria, you should forget about it when choosing fabric for your baby’s bedding. There are a number of points that you should pay special attention to when choosing a material:
- Avoid artificial materials. The ideal solution would be to purchase material made from 100% cotton. This will ensure convenience, hypoallergenicity, practical use and healthy sleep for the baby, and therefore your peace of mind. Satin, calico, flock are suitable. Despite its delicate and soft texture, it is not recommended to use chintz: such bedding will quickly wear out and lose its appearance.
- Pay attention to the pattern (if there is one on the fabric). Check whether the paint will cause allergic reactions and whether it releases substances harmful to the child if used frequently.
- Carefully study the label that any roll of fabric should have. We are interested in thread quality and density. It would seem that these are not primary issues, but if our task is durable and comfortable bed linen, then the quality of the threads should be high, the threads themselves should be dense, but not thick, and the density of the fabric should be higher than 128 g. per meter All this data must be indicated on the fabric.
- Please note if the fabric requires gentle washing or special cleaning conditions or recommendations. Still, this is a set of children's bedding, not a fur coat. Our task is to sew not only beautiful underwear that is pleasant to the eye and touch, but also practical, which in an unexpected event (and the baby will provide many of these) can be easily and quickly washed and returned to service.
Check in advance whether the fabric will shrink during washing. This determines how your set will turn out and what size fabric you will need when purchasing.
General sewing recommendations
In order not to waste money, effort and time, you should know how to most rationally approach the issue of sewing baby linen for a crib:
- You will wash and iron your children's duvet cover, pillowcase and sheet quite often, so the fabric should be thick and of high quality.
Important! When purchasing fabric, pay attention to labels with instructions regarding washing and ironing temperatures.
- When choosing material for these purposes, be based on the principle: the more natural, the better. Synthetics in large quantities are simply unacceptable for a child, especially a newborn.
Important! Fabric with a natural composition tends to shrink when washed. Therefore, you should allow for seam allowance and shrinkage when cutting out a children's duvet cover.
- If you don’t yet know how to sew a children’s duvet cover with your own hands, then choose a fabric with a large width. It is easier to work with such fabric both in cutting and in sewing itself. Also, wide fabric will help to avoid seams in the middle of the finished product. The ideal option would be if the width of the fabric matches the width of the blanket.
Important! The optimal textile width for sewing children's bedding is considered to be 2.2 m.
- When cutting out, it is recommended to place the fabric so that the grain thread runs along the length of the product. This way you will avoid changing the shape and size of the baby duvet cover after washing.
Important! When purchasing fabric, make sure that the seller cuts the piece you need straight, without distortion. The presence of distortions will significantly complicate the cutting and sewing of bedding for a child.
The following fabrics are used for children's sets:
- Cotton is an environmentally friendly material, soft and pleasant to the touch.
- Chintz is a lightweight cotton fabric.
- Satin is a dense silk material, the front side of which is smooth and shiny. This fabric is usually used for sewing adult bedding.
- Linen – has a smooth surface and matte shine.
- Satin lux is a strong fabric with shine.
- Poplin is a cotton fabric mixed with silk.
- Polyester is a soft material of synthetic origin. It is used extremely rarely for the manufacture of crib sets for children.
Important! Also often used are calico, ranfors and supercotton, which have a dense weave of threads and are therefore durable.
How much fabric do you need for a set?
Now that everything has become clearer with the fabric, we need to start taking measurements. In order not to make a mistake, you will have to arm yourself with a measuring tape and carefully measure each element for the crib: blanket, pillow, mattress so that the duvet cover, pillowcase and sheet fit in size and sewing bed linen for a child becomes a pleasant task and not a difficult ordeal with constant alterations and damaged materials.
For your convenience, below are the standard sizes of bedding sets.
Standard bedding sizes for newborns
- Pillowcase 40 x 60 cm
- Bed sheet 110 x 140 cm
- Duvet cover 100 x 140 cm
For a child after one year
- Pillowcase 50 x 70 cm or 70 x 70 cm
- Bed sheet 150 x 210 cm or 180 x 260 cm
- Duvet cover 143 x 215 cm, 150 x 210 cm or 160 x 220 cm
Before buying fabric, it is advisable to measure the crib, pillow, mattress and blanket again - sometimes the sizes may differ. As a rule, on average, only 4 meters of fabric are needed for a set, but do not forget to take into account the shrinkage of the material after washing, so add at least 10 or more centimeters on each side to your measurements.
Don't forget to take into account that you need to add about 1 cm per seam to the edge of each element.
How to calculate the amount of material?
To ensure that the sewn set does not have to be remade, you need to take the measurements correctly or use standard sizes and make all the necessary calculations.
Standard sizes of children's bedding set:
- pillowcase: height – 40 cm, length – 60 cm;
- sheet: width – 110 cm, length – 140 cm;
- duvet cover: length – 140 cm, width – 100 cm.
Before purchasing fabric, be sure to measure the pillow and mattress, the sizes of which may differ significantly from the standard ones.
To make one standard set, you need to buy at least four meters of material, and for non-standard mattresses and pillows, the fabric consumption is much higher. To this length it is necessary to add at least 15 cm for shrinkage on each product, and for each edge add another 1.5 cm for the seam.
Before you begin the process of cutting out all the pieces of bed linen, you need to do preparatory work, which consists of washing, drying and ironing all the material. These works will lead to shrinkage of the entire material and will eliminate deformation of the finished products.
To rationally use fabric, it is necessary to correctly arrange all elements of the product on the canvas. Experienced seamstresses and specialized literature will tell you the rules for the simultaneous arrangement of all parts of the bedding set.
These rules will help reduce the amount of waste and unnecessary leftover material.
Using a ruler and chalk, you must draw all the necessary lines, the size of which must correspond to the measurements taken. Instead of chalk, you can use small and thin remnants of toilet soap.
Measure seven times, cut once
Now that we have the material, it would seem that we can start cutting and sewing, but first of all the fabric needs to be “decorated”. To put it simply, the material should be washed, allowed to dry and be sure to be ironed with a hot iron so that it shrinks before starting, and does not treacherously turn the entire sewn set into a small misunderstanding after the work has been done. When all this is done, you can start cutting.
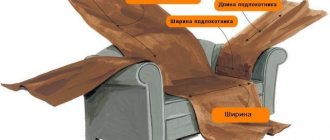
Even if there is enough fabric, it would be more correct to place the bedding elements so that half of the material does not later go into the trash as scraps and awkward pieces. Therefore, the diagram below shows how convenient it is to cut out all the elements of bed linen on your material at once.
We draw the contours on the material with chalk, carefully measure everything with a ruler and cut it with scissors.
Material cutting
Well, finally everything is prepared and bought! Let's start sewing now? But no. First, be sure to wash the fabric and iron it with a hot iron - this is necessary so that after all the work spent, you do not receive the most unpleasant surprise - a set that has shrunk due to washing!
Finally everything is done and you start cutting. How to sew children's bedding so that after work there is much less waste and small pieces left? To do this, you need to correctly position each element on the cut. The diagram will help you figure it out.
Let's start sewing. Sheet
After all the blanks for the future bedding set for the baby have been carefully cut off and are waiting in the wings, we determine a convenient work procedure for ourselves and begin sewing.
Start sewing from the sheet. This is the simplest element of the kit, on which you can train your hand and, at the same time, think about what it will be like - simple, or with an elastic band.
Indeed, the sheet is a rather insidious element of the sleeping set. On the one hand, you can sew it in the most ordinary and easiest way - simply hemming the edges. To do this, we sew them with an overlocker or bend the edges by 0.5 cm and repeat this simple operation again. Thus, we get a double fold of the edge, which we pin with pins or apply a basting with brightly colored threads so that it is clearly visible when working on a typewriter and is easier to remove afterwards. Sew the edge using a sewing machine as shown in the picture.
If you made the pattern correctly, then most likely two of the four edges of your sheet already have a factory edge and do not need to be stitched. However, if there is none or it is very hard, work on these edges as well.
Returning to the question of the sheet, you can, of course, make it with an elastic band. However, immediately keep in mind that this is a more labor-intensive process with calculations and additional patterns. But the baby’s active movements will not knock down the sheet, as is usually the case, which means that it will have to be rearranged or adjusted less often.
We will use standard techniques for its manufacture.
On average, such a sheet will require more fabric than usual. It is necessary to take into account the fit of the mattress (about 10 cm), seam allowances (about 2 cm for each) and the drawstring through which, in fact, we will stretch the elastic.
In total, the total fabric consumption will be approximately 150 or 160 cm by 110 cm.
- It is necessary to sew the fabric at the corners and stitch it so that it turns out nothing more than a mattress cover.
- Then fold the sheet, stitch it and leave four holes with the expectation that the elastic should fit inside freely.
- Distribute the elastic around the perimeter of the sheet and stitch the edges
For those who still don’t dare to bother with an elastic band, there is an optimal solution that is convenient in practice and easy to implement - a sheet with clasps, elastic bands or elastic bands at the corners of the duvet cover.
Soft sides made of four parts for a newborn crib
To sew such bumpers for a child’s crib, you need to prepare:
- cotton fabric of three colors - for the outer and inner sides of the product, for ties;
- filler – sheet synthetic winterizer;
- threads, sewing tools.
Description
We measure and write down the dimensions of the length and width of the crib, the required height of the side.
We cut out two large pieces from two colors of fabric. Dimensions – height of the side by the length of the crib. In addition, we cut out two short parts. Their dimensions are equal to the height of the side by the width of the crib. On all parts we provide allowances around the perimeter of 15 mm.
For the ties, cut out 10 stripes (= 3 pieces for each long piece + 2 pieces for each side piece).
We fold each strip in half, iron it, and unfold it.
We fold the sections of the long sides to the center of the strip along the wrong side. Then we fold the strip in half and iron it. We get a folded edge of the strip. Let's stitch it.
Pin the ties to the front side of the outer parts of the bamber at the corners and one tie in the center of the long side of the larger part.
Fold the outer and inner parts of the side right sides together, pin and sew. We sew together the details around the perimeter, leaving an open area. Through it we turn the part inside out.
From padding polyester we cut out the internal parts for the side. Their size should be equal to the blanks for the sides minus the allowances.
We insert the padding polyester inside the pillowcase. Sew up the holes by hand using blind stitches. You can sew it on a machine, it’s faster and easier.
Sew a duvet cover
With a duvet cover everything is quite simple and easy. We will need that part of the material that you cut out to fit the baby blanket. However, if the patterns given above did not help, then the easiest option to correctly measure the size of the fabric for a duvet cover is to fold it in half and in this form cut off a piece of material the size of a blanket.
Don't forget about the seam margins and leave about 2 cm on each free edge.
When the duvet cover fabric is ready to use, already folded in half, it should be stitched along all the free edges. For strength and reliability, it is recommended to use overlock or zag-zag seams.
Important! On the side that is comfortable for you, do not forget to leave a hole into which you will insert the blanket into the duvet cover.
The hole for threading the blanket is usually made about 30-40 cm and its edges are carefully stitched inward, to the wrong side.
The duvet cover is ready. All that remains is to turn it right side out, straighten it and straighten it well, especially in the corners.
Let's start with the pillowcase
It won’t be too difficult to deal with a pillowcase. Make sure once again that its dimensions match the baby pillow and start sewing.
To do this, we need, by analogy with a duvet cover, to fold the fabric in half, mark the size of the pillow on the folded area, but there is no need to rush to cut anything yet. On the side of one free edge we need to leave a fabric about 20-30 cm long. In the future, this will be the valve of our pillow so that it does not fall out of the pillowcase and looks aesthetically pleasing.
We fold the cut material with the front side inward and the backside, respectively, outward, and leave our valve on the outside. We sew the edges of the future pillowcase and sew the edges of the flap separately, having previously folded them. Turn the pillowcase right side out, turn the valve the other way around, and tuck it in. Voila: the pillowcase is ready.
Make your own bumpers for a baby crib
The bumpers are not only an integral part of the decor of a crib - they protect the baby from unwanted impacts on the backs or bars of the crib, drafts or wind, and direct sunlight. Although, you must admit, the sides also create a feeling of comfort and warmth.
You will be surprised, but it is also possible to make bumpers with your own hands. For this we need not only fabric, but also filler (sintepon or foam rubber)
Make sure the filler is of high quality. Cheap, bad filler can cause allergies in your baby.
As mentioned above, before cutting, do not forget to wash, dry and iron the fabric. To make the side, we need a piece of fabric measuring 110 by 550 cm. Although the size of the crib may not be standard, so if you wish, you can measure the dimensions of your crib yourself and mark them on the fabric, not forgetting about the seam margins.
Otherwise, we cut out the material in accordance with the markings:
We cut out the elements and sew them together, not forgetting to leave one edge unsewn in order to fill the side with filler. Ruffles are sewn in parallel to how each element is sewn, but this is not at all necessary and depends on your desire (we will talk about decorating children's bedding in the next chapter).
Next, cut out the filler. Its dimensions should be slightly smaller than the element into which you plan to insert it (at least 0.5 cm). We put the cut out filler into the side, carefully making sure that the filler fits evenly and in size. Then we sew the open seam and, for greater convenience and practicality, we make a through seam in the center of the side, sewing the fabric and the filling together. This way he won't "walk" inside.
After the border is stuffed, you can sew a hidden zipper into the unstitched edge so that you can wash the filling and the border cover separately. In this case, you should not sew the filling and fabric together.
How to decorate a baby bedding set
Of course, making a set of bedding for a baby with your own hands is already a great achievement, but often parents want to somehow especially decorate their child’s bedding, making it even more interesting and soft.
In this matter, your imagination will play into your hands, but it should be limited. Don’t forget who this bedding set is being made for. Sometimes even manufacturers take precautions by decorating baby underwear sets with buttons or sewing zippers into them. Therefore, when choosing this or that decorative element, keep in mind that there is a child in the crib, and one way or another it is almost impossible to keep track of whether a dangerous piece of bedding ends up in his mouth. Therefore, it is recommended to abandon the zipper in the duvet cover, and it is better to put the buttons that can be used to fasten the pillowcase pocket aside and leave everything as is.
To decorate children's bedding you can use:
- Ruffles
- Lace
- Frill
- Wide ribbons
And you should absolutely refrain from:
- Buttons
- Lightning
- Bus
- Rhinestone, etc.
Dimensions
The consumption of material and, accordingly, our money for sewing children's bedding depends on two parameters: the size of the bedding with a mattress and the width of the linen. The second size for cotton is 140, 150 or 220 cm, including selvages. For a cradle, the first option is sufficient; for children and teenagers (when the length of the berth is 160 cm or more), I recommend immediately taking the maximum width of the canvas.
Below are the most common dimensions of bedding. Let’s immediately make a reservation that the standard for Russian bed linen (GOST 31307-2005) provides for a larger assortment.
Table. Typical sizes of children's sets
| Bed | Mattress/sheet, cm | Duvet cover, cm | Pillow/pillowcase |
| Cradle | 120×60 / 140×90—100 | 147×112 | —* |
| Children's | 160×70 / 180×100 | 180×145 | 30×40, 60×40 / 35×45, 60×40 |
| Teenage | 180—190×70—90 / 200—220×112—140 | 200—220×145—160 | 45×45, 60×45, 60×60 / 50×50, 70×50, 70×70 |
Advice! According to pediatricians and orthopedists, children under 2 years of age do not need a pillow, either simple or orthopedic.
Helpful tips for completing your work
The crib set is almost ready. However, after the work has been done, it is recommended to wash all its elements again, dry them thoroughly and iron them with a hot iron, so that you can confidently and without fear put your baby into a bed made with your own hands. Well, after that you can safely tuck the pillow and blanket into our bedding set and put on the sheet.
Before you start using the bedding for its intended purpose, carefully check to see if there are any needles or pins left somewhere.
As practice shows, this happens, which means sooner or later the baby can get hurt. If you are worried that you may not be able to find the needles or pins used in the cutting process, make bastings with simple stitches using brightly colored threads so that you can easily find them and remove them from the finished product. This process is a little more labor-intensive, but completely safe for the baby.
Another piece of advice: if you liked the process, and more was done than wasted your nerves, then you can sew several similar sets and select fabrics so that the elements of the baby’s bedding are interchangeable. For example, some elements can be monochromatic and combined in color. Then you can always, if necessary, replace, for example, one sheet with another and at the same time maintain the pleasant appearance of the baby’s crib. When choosing special or bright patterns on the material, keep in mind that such a set cannot be “broken” without harm to the appearance, and during the washing process the material risks losing colors and looking stale and old. Therefore, traditionally, fabrics in bedding colors are chosen as materials for children's bedding, with patterns that are not bright and do not irritate the eyes, in order to create the most calm and comfortable atmosphere for the baby's precious sleep.