49063
The main distinguishing feature of corner cabinets is their functional capacity and space saving. A process such as assembling a corner cabinet can be carried out independently at home. In order to do the job correctly, it is worth familiarizing yourself with its main nuances.
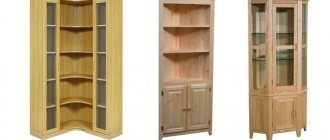
Types of corner cabinets
There are different configurations of corner products, which may cause some differences in the assembly process. We recommend that you first study these features and only then get started.
Table 1. Shapes of corner cabinets.
| View, illustration | Description |
Triangular | Such structures are installed in the corners, thanks to which they save useful space - they completely lack side walls. The only drawback of this product is the internal triangle-shaped shelves, which are not always convenient for use. |
Diagonal | A special feature of this cabinet is the presence of one or two walls. Similar structures are installed near entrance doors or windows. Compared to previous types, this cabinet is considered more spacious, but also takes up some usable area of the room. |
Radial | Such structures are considered quite roomy due to the doors protruding outward. However, installation of this product will require a larger room. Typically, such models have a high cost and are used to create unusual interiors. |
Trapezoidal | Such cabinets have sliding doors and trapezoid-shaped shelves. They are installed in office spaces, living rooms, and sometimes in children's rooms. They are quite deep, so they are not suitable for small rooms. |
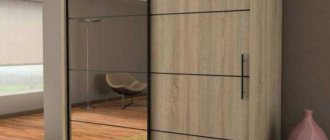
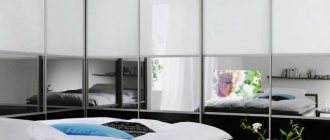
L-shaped | The design occupies a corner and two walls that are adjacent to it - this shape allows optimal use of the room’s area. Such models are ideal for large dressing rooms, and if they have mirrored doors, then for bedrooms. |
Table 2. Differences in the method of installation of structures.
| View, illustration | Description |
Built-in | Such structures do not have a back part; they are attached directly to the wall. |
Hull | They are standard cabinets with rear walls. They are suitable for those people who like to move frequently because they are much easier to move. In addition, you can easily “take” a cabinet with you when moving. |
Prices for various corner cabinets
Corner cupboard
Installing hinges on glass doors
Four-hinged hinges for glass doors are distinguished by the presence of a special tab for attaching the cup and a cover for masking the device from the outside.
If you have no experience working with glass, it is better to turn to specialists to drill holes. Before this, you need to establish preliminary markings of the locations of the loop cups. At the same time, they also take into account the hole where the handle will be hung.
Overhead hinges are also used for glass doors, which can be hung without drilling glass.
You need to place and secure the cup in the drilled holes using a tab, and attach the counter plate to the box with self-tapping screws. Afterwards the door is aligned along three planes.
For glass doors, overhead hinges are also used, which can be hung and fastened without drilling the glass. They are mounted inside the box; accordingly, all shelves in the closet must be recessed inward. Suitable for light sashes only. For example, for the bookcase department.
Four-hinged hinges come in different modifications, which can be selected depending on the location of the panel relative to the box and the cabinet itself in the room.
Invoice
The canvas attached to this loop is completely perpendicular to the body and covers the stand. Used when the door overlaps the side rail of the cabinet.
Invoice
Half waybill
Insert
The door leaf is perpendicular to the post, but does not overlap its end.
Insert
Transformer
Used to create composite facades from several doors or in cabinets with drawers that are hidden
Eight-joint
It has all the characteristics of a four-hinged hinge, only without inserting the cup into the facade body. It is attached with self-tapping screws, so it is only suitable for fabrics with a dense texture.
Eight-joint
What materials are used to make the cabinet?
When purchasing a corner cabinet, the material it is made of is of no small importance. Unsuitable material may cause damage to the cabinet during assembly.
Table 3. Popular material options for cabinets.
| Material | Description |
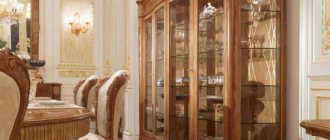
Solid (wood) | Wood is considered the most durable, but at the same time expensive material. It is used mainly for the manufacture of luxury products. The finished structure will be quite heavy, so one person may need assistance during assembly of the cabinet. One of the disadvantages is the poor resistance of natural wood to sudden changes in temperature and humidity in the room. |
MDF | The material is wood chips pressed under high temperature. It is not very durable, so manufacturers use a special polymer film as cladding. At the same time, the material is budget-friendly and environmentally friendly, which is why it has gained enormous popularity. In addition, it does not deform at high temperatures and humidity. |
Chipboard | The material is obtained by gluing sawdust with resin, and compared to other varieties it is not environmentally friendly. Such cabinets are not recommended for installation in children's rooms and bedrooms of allergy sufferers. The only argument in favor of choosing chipboard will be the favorable price. |
An MDF cabinet looks aesthetically pleasing and can be available in a variety of colors
Prices for different types of MDF panels
MDF panels
Corner cabinet assembly tools and components
To assemble the cabinet you will need the following tools:
- screwdriver;
- drill;
- screwdriver;
- hexagon;
- square;
- hammer and rubber mallet (carpenter's hammer);
- measuring tape;
- drawing pencil;
- iron for edge tape;
- cord plumb line (when installing built-in products).
Tools used in assembling the structure
Typically, each factory cabinet comes with all the necessary components. Therefore, when purchasing a product, you should make sure that the set contains:
- fasteners (screws, confirmations, wooden dowels for connecting parts, metal corners, etc.);
- fittings (guides, door handles, hinges, locks, etc.);
- internal filling (will differ depending on the selected cabinet model).
If the kit does not include the above elements, then you will have to purchase them yourself, because otherwise you will not be able to assemble the cabinet - the elements simply will not have anything to hold them on.
The manufacturer usually provides the availability of components
Prices for popular models of screwdrivers
Screwdrivers
Understanding the panels
Any furniture intended for self-assembly is supplied in packages in the form of collapsible elements. Most often, the manufacturer puts numbering on each package and indicates a list of contents, so before assembly you need to read the instructions and then arrange the boxes in the appropriate numbering order.
Corner cabinet diagram
It is thanks to such marks that even a beginner can cope with the process. In addition, even at the factory, they try to arrange the parts in an exact sequence in order to simplify assembly. Typically, the same box contains the frame elements, as well as the side and bottom parts of the structure. In a separate kit you can find the components of the doors, the back wall, the internal parts of the cabinet and fittings.
It is necessary to carefully disassemble the panels and not confuse different packages with each other.
It is quite difficult to make a mistake with the connection of these parts, because each of them already has ready-made holes for fasteners. If assembled incorrectly, these holes will not line up.
Installation of fasteners
Each assembly kit must contain a package with a full set of metal fasteners (hardware), wood and plastic connections. It is recommended that you first familiarize yourself with their description and installation method.
Table 4. Types of fastening elements.
| View, illustration | Description |
Euroscrew (confirmed) | Such fasteners are a good alternative to outdated self-tapping screws; they are distinguished by a large thread pitch. The confirmations are screwed using a screwdriver or hexagon into the prepared holes. They are very flexible, rarely break during assembly and can be easily removed if necessary. |
Ties (eccentric clamps) | The previous fastening option, despite its convenience, will be visible from the outside after assembly is completed. Such problems do not arise with eccentric clamps; they remain invisible after installation (these are collapsible hardware). |
Lamello Tenzo R-14 | A variant of hidden fasteners that are installed in shaped grooves. They are pre-coated with assembly adhesive and then snapped into place, resulting in a very strong connection. The only downside is that such a cabinet will be difficult to disassemble. |
Wooden dowel (chopik) | Before fastening, holes are made in the parts (they must match), into which choppers coated with glue are placed. The result is a hidden connection that does not stick out - most often shelves are attached to choppers. Keep in mind that a cabinet with adhesive clips will be difficult to disassemble. |
Wooden dowel and euroscrew | The previous fastening option is not strong, so in special cases the chopsticks are reinforced using European screws. In this case, there is no need to use assembly adhesive. In this case, the connections become noticeable from the outside, but are quickly disassembled. |
Corners | For the purpose of perpendicular fixation of parts, various plastic and metal corners are used. They are installed at the junction of flat parts, and screws are screwed into the holes. There are other types of corners that serve as shelf holders. |
Video - Assembling furniture. All about furniture joints
Types of hinges for furniture
The following types of hinges are used for cabinet doors:
Types of hinges: hinged (left) and four-hinged (right)
Furniture hinges are divided into several subtypes, depending on the method of application and, accordingly, the area of application. Let's look at them in more detail:
Types of furniture hinges depending on the method of application
Corner cabinet assembly sequence
Any factory product must be accompanied by detailed assembly instructions.
Approximate instructions for assembling the cabinet, which should be included in the package
Important point! It should be taken into account that a separate instruction is developed for each individual cabinet model; it is impossible to replace a ready-made diagram with any other. Experts recommend strictly following the sequence of actions when connecting parts, otherwise the kit may be damaged.
Installation of any cabinet corner cabinets should begin from the lower sections. The following assembly stages are distinguished:
- Installation of the base (if available).
- Connection of body parts and fasteners.
- Installing the back wall.
- Installation of internal parts.
- Installation and adjustment of doors.
Step-by-step instruction
Step one: assembling the frame of the corner cabinet (base), which is located at the base. This is an important part of the frame, because if it is missing, the hinged cabinet doors will touch the floor. Usually the base is located at a distance of about 5-10 centimeters from the floor. The base material is chipboard. In shape, it follows the frame of the cabinet itself, but does not stand out beyond its boundaries (compact).
The parts of the base are connected to each other with self-tapping screws or European screws. Sometimes such an additional element is made high, which allows you to get a lower shelf for storing something.
Base assembly
Step two: installation of housing parts. At this stage it is necessary to connect the side, top and bottom parts of the entire structure. They are fixed using European screws, plastic and metal corners. The place where the parts are combined is additionally reinforced with the help of wooden choppers. In addition, at this stage the partitions should be secured, which give the body stability.
If the design assumes the presence of a base, then all elements of the housing are fixed to it. If it is not available, the cabinet is assembled on a flat floor, after which the cabinet is raised and fixed in a vertical position.
Installation of housing parts
Step three: mounting the back wall. This is an important element of the cabinet design, which not only serves to limit the space inside, but also provides stability. Typically, sheets of durable plywood or fiberboard are used to make this part. The first option is more expensive, and the second is budget (less durable).
It is necessary to secure the rear part in such a way as to assemble the sides into a solid structure. It is fixed with self-tapping screws along the edges. Connecting this part with internal partitions is only permitted if they are securely fixed.
Rear wall installation
Step four: installing shelves and rails. If desired, you can securely fix the shelves or leave them movable. The second option allows you to take them out and change places in the future. Reliable fixation involves installing parts using corners and screws directly to the cabinet walls. In another case, holders are attached to the walls of the structure, and then the shelves are installed.
Guides must be installed in cases where the design involves the presence of moving doors (wardrobe). For such purposes, you will need to take aluminum profiles; they are fixed at the top and bottom. In the finished design they will be invisible. Sometimes additional guides are installed when there are drawers, so that they will slide out smoothly.
Installing shelves and guides
Step five: installation of doors. After installing the guides, it is necessary to fix the sliding doors. They are mounted first from the top edge, and then from the bottom. The door leaves should be positioned relative to each other so that they can be easily moved apart.
Hinged doors are hung on furniture hinges. Previously, shaped grooves are made in the structure. At the same time, they will be fixed from the inside with European screws.
Door installation
Step six: adjusting the doors. Thanks to the presence of hinges, swing doors can be moved slightly. Screw No. 1 allows you to move the door horizontally in different directions. Adjusting screw No. 3 allows you to move the door to the cabinet as close as possible. Other screws are not adjustable; they are used only during installation.
Door fitting
You can adjust the doors on the wardrobe model by pressing or loosening the lower wheel. This is done thanks to the presence of a screw at the bottom.
Lower wheel adjustment
Step seven: close the connections with plugs. If after installation the fastening structures are visible from the outside, they can be covered with special furniture plugs. They are sold in any furniture store in various colors.
Stubs
Video - Assembling a sliding wardrobe
Types of hinges for furniture
Metal parts are made of durable alloys that are resistant to corrosion and mechanical deformation.
Furniture hinges are divided into several types, depending on how they are attached:
Types of furniture hinges.
For cabinets, overhead structures with cup bases are often used, which are connected to the panel using self-tapping screws. Mechanical inserts with a “shoulder” are inserted into these bases and fixed to the door and side panel.
Such fasteners are quite reliable and durable, since they have a reinforced connection to the planes.
For installation on the doors, it is necessary to use certified industrial products - this guarantees the strength and long service life of the furniture and its individual parts.
Helpful assembly tips
Before you start assembling a corner cabinet, it is advisable to study some useful recommendations that may come in handy in the process. Carefully study everything, even the smallest details of the instructions. If the instructions are not included in the kit, you can look for them on the manufacturer’s website or on the Internet. In addition, you can try to contact the store, where they will probably have spare samples of circuits.
If the instructions are completely unclear and contain atypical designations, then you can consult on this issue with furniture makers or consultants of the store where the cabinet was purchased.
It is better to discuss unclear points in the assembly diagram with professionals
Do not immediately throw away the cardboard packaging from the cabinet parts - they can be used as a floor mat. This will protect it from damage during installation.
It is necessary to decide on the direction in which the wardrobe door will open. Moreover, this must be done before installing the awnings for the oncoming traffic. Sometimes, when connecting a corner structure to a sliding wardrobe, hinged doors hit it, so it is better to first take care of installing a door separator. When installing doors, make sure that the stopper is in the closed position. You can close it only after completing the installation work.
The rollers on the closet door need to be lubricated if necessary.
If the cabinet includes a mirror, then a special sealant is first glued along its edges, and then mounted. If the edge is not processed, it is necessary to glue a special tape using an iron - on the reverse side it has a special texture that becomes sticky when heated.
It is important to double-check the markings several times before installing fasteners, otherwise the structure frame will be crooked. Beginners sometimes confuse the back with the front and side of the structure, as a result of which they fasten the parts with the other side. Of course, such an error can be easily corrected, but it will take time, so it is important to carefully monitor this process.
The main thing in the assembly process is the absence of fuss and haste
It is necessary, using a drawing pencil or chalk, to number all the parts according to the instructions, and only then connect them. It is important to optimally secure the fittings that connect the parts to each other - if you loosen them too much, then there will be excess space between the parts of the cabinet. It is not recommended to overtighten it, otherwise the socket in which the fastener is located will be damaged.
Great attention must be paid to the holes for metal fasteners, because they should not be too wide or narrow. This applies only to those products that do not have factory-made holes for hardware.
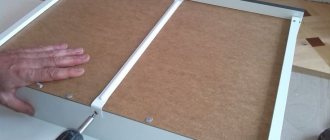
Edge tape fastening process
Important point! In order to avoid problems with installing the cabinet, it is important to choose the correct size of the product. Before purchasing a cabinet, you should first measure the walls.
Leveling and Adjustment
When choosing, you must first of all pay attention to the strength of the product; it should serve throughout the entire life of the furniture.
After installing the fasteners on the cabinet doors, you must carefully try the doors against the sides so that they match exactly. Mark the joints with a pencil. Fix the door and do fastening work on both sides. It is important that the accuracy of all cabinet parts is one hundred percent. Finish assembly and check operation.
When opening and closing for the first time, the doors may move somewhat stiffly if the hinges are not yet lubricated and developed.
After attaching the hinges to the cabinet is completed, it is recommended to drop a little machine oil inside the mechanism. Then you need to wipe the surface with an absorbent cloth.
Check that all elements are working properly.
For a cabinet made of chipboard, it is better to take wide hinges, since the base material can crumble.
The better quality all the elements of the assembled furniture are, the more reliable their operation will be.
Try to adjust the parts carefully so as not to loosen the grooves.
If adjustment does not help, you should replace the old parts with new ones.
When changing fasteners on used furniture, you need to look at how suitable they are for it. It may be necessary to change the location of the new hinges due to loosening of the grooves.
In this case, it is recommended to disassemble the furniture and perform all installation operations again.
After adjustment, check for gaps, tight fit of the doors when closing, overall mobility and evenness of the sash along the axis.
When installing several fasteners, you should make sure that their location does not get on the internal elements of the furniture.
Let's sum it up
Before you begin the process of assembling furniture with your own hands, you should assess the possible risks. It is recommended to entrust expensive or complex cabinets to professional assemblers. But if assembling furniture gives a person pleasure, then this is a great opportunity to save money.
In a special article, we will look at the advantages of sliding wardrobes, the main nuances of their installation, and give detailed instructions on how to independently assemble a spacious wardrobe for a small hallway.