Cabinet furniture is not only one of the best options for storing things, but also a rather expensive element of the interior. Therefore, in case of renovation or moving, it would not be superfluous to dismantle the cabinet for subsequent reassembly. But the wardrobe has its own design features, which can cause certain difficulties during disassembly. Let's take a closer look at how to disassemble a sliding wardrobe correctly.
The first and easiest method is to call specially trained people who will professionally disassemble the furniture. It is important to take into account here that this service is not cheap, so we will dwell in detail on the do-it-yourself dismantling option.
Preparatory stage
Before you start disassembling the furniture, prepare a container in which all fastening elements (corners, screws) will be stored - this will allow you to avoid an unpleasant incident in the form of missing parts during subsequent installation, and it will also be a good idea to write down all the operations performed step by step.
The first step is to remove things, pull-out shelves and drawers from the closet.
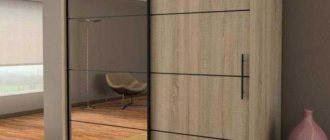
If there are mirrors or glass surfaces on the facades, care must be taken to ensure their safety during movement or transportation.
How to adjust wardrobe doors
Slowly but surely, more and more space in our homes is being occupied by sliding wardrobes. They captivate with their beauty, spaciousness and functionality. Unlike their swing counterparts, they do not take up much space when opening. They can be placed in the pantry and even on the balcony.
Sliding wardrobe with sliding mechanism
Over time, pleasant impressions evaporate at the sight of skewed, almost falling-out doors. Accuracy and care during operation will help avoid these problems. Proper assembly is also very important.
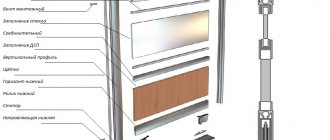
Diagram of the design of an aluminum lower-support coupe door system
Removing the front part
Once all the contents have been removed, you can begin to remove the sliding doors. Sliding wardrobe doors consist of two components: the door leaf and the system through which the doors move.
The canvas includes profiles that form a frame and filler.
The system mechanism consists of the following elements:
- lower and upper strips along which the door leaves move;
- self-tapping screws;
- Additionally, the system can be equipped with closers or limiters that ensure smooth movement of the doors and keep them closed.
Features of dismantling a sliding wardrobe and its subsequent assembly in a new location
Assembling a wardrobe may be necessary not only when it is delivered from a store, when this is usually done by experienced specialists, but also in the event of moving to a new place of residence. And then, most likely, you will have to do it yourself. Moreover, you will first need to disassemble the cabinet. Let's start with this.
Dismantling sliding wardrobes begins with removing the doors, for which all detected limiters are unscrewed, which, for example, may include stoppers and closers. After this, the door panels can be easily removed from the rails. Done - great! Let's move on to analyzing the interior contents of the furniture. Everything is simple here - we pull out everything that can be pulled out, for example, shelves and rods. Next, we unscrew the internal partitions of the shelves and the back wall of the furniture, usually attached to the wall of the room. Traditionally, corners are provided for this purpose in the upper part of the cabinet. The problem is solved - all that remains is to disassemble the remaining part of the body.
Before disassembling the cabinet, it is recommended to sketch its drawing on a piece of paper and mark each element with numbers. The same numbers should be indicated on the parts removed during dismantling - you can simply write the numbers on self-adhesive paper. When transporting, the most fragile items should be wrapped in several layers of paper, or even better, bubble wrap.
Assembling a wardrobe in a new place can be carried out strictly according to the instructions, but if you don’t have them at hand, then it won’t be difficult to figure it out - the process roughly looks like this. First of all, the main body is assembled - the sides, roof, bottom, as well as internal vertical partitions, called mullions. After this, all the shelves are set up and the rods are secured. Now all that remains is to screw the cabinet to the wall of the room on the same corners on which it was previously fixed, and hang the doors, of course, having previously installed the guides and all the stops included in the package. Yes, by the way, you need to assemble by numbers - it’s not for nothing that we marked the parts. Then the installation process will go quickly and without problems.
Of course, the instructions described above cannot claim to be universal, since the designs of modern sliding wardrobes are different, which means that the features of their assembly will also differ. Therefore, it is advisable to find instructions for a specific model.
The online furniture store "Ronikon" sells sliding wardrobes and other cabinet furniture at the best prices. Phone number for orders: +7 (495) 021-021-1.
Wardrobe baskets as an integral part of its filling
What to do if the closet door jams
Instructions for dismantling doors:
The process of removing doors is quite simple and consistent, but the following features must be taken into account:
- Availability of closers. They provide a smooth ride. It is recommended to remove the door closer from the façade panel, leaving it on the frame, this will facilitate the process of reassembly in a new location;
- The presence of locks ensures a tight fit of the door to the wall of the wardrobe. Before dismantling the doors, they should also be removed. Locks are installed near the walls, and, regardless of the number of doors, there are always two of them;
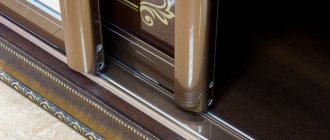
After all the stops have been removed, you can begin to dismantle the doors; to do this, the doors need to be lifted in the closed state and removed from the lower grooves, then the door is lowered down until it comes out of the upper guide. The sashes must be removed one at a time.
When all the facades are removed, the guides are removed by unscrewing the screws.
If you need to shorten the doors, it is better to resort to the services of a craftsman, since this procedure is labor-intensive and requires professional skills, especially if the facade is made of glass or complemented with mirrors.
To facilitate the process of removing facades and avoid injury, it is better to carry out this operation together.
Return to the list of articles in the “Men’s Workshop” sectionCorner cabinet remodel
Part 1. How it all began. Idea. Part 2. Getting started. Part 3. Completion of work. Doors.
Part 1. How it all began. Idea. This part talks about the idea itself. How the idea was implemented in practice is described in parts 2 and 3.
Everything flows, everything changes... What yesterday could have been very, very good, today may no longer be so... Everything changes not only around the person, but over time the person himself changes. It was a lyrical and philosophical introduction. Let's move on to reality. Some years ago we bought a corner cabinet for household purposes. At the time he seemed very rational to us. I wanted to place the cabinets not along one wall, as was customary in Soviet times, but along two adjacent walls. In the corner where the cabinets converged, we installed a roomy, convenient, and rational corner cabinet. I liked everything. Time has passed. Something has changed in life. There was a need to redistribute the living space and, accordingly, rearrange the furniture. We sat, thought, and thought of something. In general, something worked out. But everything ended up in the corner closet. All other cabinets can be easily moved around the room, but the corner cabinet cannot. The corner cabinet is placed only in the corner. There are four of them in a regular room. One is free, the corner where two walls simply meet. In the other corner is the entrance door to the room. In the third corner there is a balcony door. In the fourth corner there are heating pipes. Between the third and fourth corners there is a wall with a window. The closet is in the first free corner and there is simply nowhere to move it to another place, all the other three corners cannot accommodate it, and the closet is quite large. Due to the fact that it cannot be rearranged, it is not possible to make a full rearrangement. What to do? There are four options. The first is to leave everything as it is; this option is immediately rejected. The second is to make a rearrangement without touching the cabinet, the same is swept aside. Why waste time and effort if in the end you don’t get what you did everything for. The third option is to throw it away or give it away, or sell the cabinet and instead buy a new one that is more compact and more suitable; this option is already something. And the fourth is to remake the corner cabinet into a more compact and more suitable one, and make a complete rearrangement. The fourth option is the best. With the fourth option, we make the intended rearrangement, do not waste time looking for buyers of the corner cabinet, and also do not spend the family budget on buying a new cabinet, especially since the old corner cabinet fits perfectly with the existing furniture. In theory, you won’t need a lot of effort and money to remodel the cabinet. We will redo it like this...
Let’s take our corner cabinet (the drawing is, of course, schematic)…
Let's take it apart.
We will make a regular cabinet from the corner cabinet. When remodeling, the doors and walls to which they are attached will remain as is. Only the top and bottom panels will have to be processed. You need to cut out rectangles from these panels. The smaller sides of these rectangles will be equal to the width of the panels to which the doors are attached. The large sides of these rectangles will be equal to the width of two doors plus 1 centimeter. One centimeter is needed to be able to adjust the doors in the converted closet. The rectangles to be cut are highlighted in gray.
We cut out the necessary parts.
We don't need one back wall at all. And from the other you need to cut off a part of a suitable size. The back walls of the corner cabinet can be combined. For strength, part of the wall is made of laminated chipboard, part of the wall is made of hardboard. For a remodeled cabinet you will need hardboard.
After such simple (according to our idea) operations, you can assemble a converted cabinet. A cabinet that can be easily installed almost anywhere in the room when rearranged.
This was our idea. Theory, as we know, is one thing, but practice is completely different. How it all happened in practice. If you are interested, then further...
Part 1. How it all began. Idea. Part 2. Getting started. Part 3. Completion of work. Doors.
November 29, 2011
You drive more quietly... or How to organize the transportation of a cabinet?
The time has come for the final stage - loading the wardrobe into a van and transporting it to the specified address. Here the main question arises: what is the best way to transport furniture? The first step is to rent a van. To save money, many transport furniture in a car with a trailer, but this is a last resort. With this method of transportation, it is difficult to secure parts of the cabinet. In addition, the furniture in the trailer is not protected from moisture, scorching sun or frost.
It is more convenient to remove large parts from the room together. Arm yourself with rigging belts - with the help of devices the work will be faster and easier. First of all, load the wooden parts of the cabinet into the body, lay cardboard between them. We recommend grouping the parts by size - this makes it easier to secure them in the van. Glass or mirror elements are loaded last. Choose the safest place for them in the body, isolate them from other parts of the cabinet. Furniture vans must have fastening equipment - it allows you to immobilize the cargo, thereby protecting it from damage. Despite its apparent simplicity, loading and unloading operations require a certain skill and endurance. The furniture must lie stable, otherwise driving over bumps and vibrations will cause irreparable damage to it. Therefore, you should think twice about whether it is worth saving on the services of movers.
Back to Contents