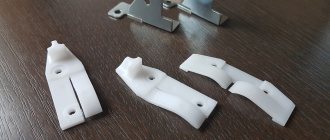
What is a mortgage, why and how is it installed?
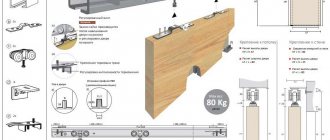
The embedded material is chipboard, a wooden or aluminum beam of appropriate thickness, usually in the shape of the letter P. It is mounted to the ceiling slab using dowels in the place where the cabinet is planned to be installed. This part takes on all the loads associated with fabric tension and is not afraid of mechanical stress. The canvas can be joined to it at any level; this depends on the choice of room design by the owner or hostess. The cabinet is mounted directly to the same beam.
The peculiarity of such a system is that:
- compartment panels are not subject to additional loads;
- the canvas is secured securely and at any height within this beam;
- The embed can be made in the form of a decorative visor, if that is what you want.
- Also, the beam can be made in dimensions exceeding the dimensions of the compartment, and baguettes for hanging fabric in this case can be mounted both on the facade and below, and even on the reverse side facing the door guides. In this case, the hanging canvas can partially or completely cover not only the top panel of the compartment, but also the upper door guides.
And finally, the promised exception to the rules - there are two options when a mortgage is not needed:
- the material of the furniture panels is strong enough to safely withstand the tension of the ceiling;
- the canvas is stretched along the entire perimeter of the room, the furniture is mounted below.
In this article, we briefly described the purpose and options for using (and not using) the mortgage, as well as attaching the canvas to it. What to choose and how to implement it is up to you to decide.
NICOMAX – Your suspended ceilings!
What to do if there is already a suspended ceiling, but there is no mortgage above it?
What to do if you have already had a suspended ceiling installed, but have not made a mortgage for fastening the sliding doors?
There are several opinions on this question. It all depends on how honest the people are working in the company you invited to measure sliding doors. Naturally, no one will work for free, otherwise there is no point in working. The only question is who wants to earn and how much? There are, of course, nuances in which even in theory it is impossible to make sliding doors up to the ceiling. Everyone has long known that in order to make better use of space for storing things, it is of course necessary to make sliding doors of maximum height. Then nothing will interfere with freely placing things, boxes, even the most voluminous ones, on the top shelf. Examples of projects for filling wardrobes can be found here. After all, if the depth of the cabinet is about 55 cm, and a false panel comes down from the ceiling to fasten the doors, then you need space for things to pass freely between the outer edge of the top shelf and the fastening of the doors. We conclude: the greater the height of the false panel, the lower you need to lower the top shelf, which means loss of usable space or reduce the depth of the shelf, but this is not practical.
When a surveyor comes to you and is faced with the problem of lack of mortgage, he evaluates the possibility of getting out of this situation.
Firstly, you need to understand that it is not possible to offer an economical way out of this situation for any cabinet width. As a rule, you will be asked to make a cabinet frame with a roof. This is the most expensive and not very convenient option, since the height of the cabinet is reduced and there is a place for dust to accumulate. But it has its place, especially if you want to add additional external lighting or your closet is located at an angle and has several sections.
Secondly, if you plan to install a suspended door opening system, then you will not be able to get rid of the additional cash costs. You may be offered to make a cabinet roof and sew the mechanism into the box, or you will have to change the suspended ceiling and make a mortgage.
Mounting options
1. Installation method under a regular cabinet
With this installation method there are two options:
- the ceiling is installed, after which the cabinet is ordered;
- installing a ceiling when the cabinet is standing.
A) In the first option, a stretch ceiling is installed, then the height from floor to ceiling is measured, after which a cabinet is ordered. It is necessary to take the measurements correctly so that when installing the cabinet there is a gap of 5-7 cm to the ceiling. The negative aspect of this method is the eternal dust.
B) If the cabinet is already standing, the distance from the rough ceiling to its roof should remain at least 50 cm. This is necessary so that you can reach the wall with a hammer drill, screw the profile and tuck in the canvas. This installation option does not affect the price in any way.
2. Stretch ceiling and built-in wardrobe
There are situations when the wardrobe is fixed to the very top of the base ceiling. Then, before installing the stretch ceiling, a beam is mounted around the perimeter of the cabinet, then the profile and ceiling are attached to it. In this case, the installation cost increases, taking into account additional consumables and installation complexity.
3. Installation of the mortgage
Timber is also used here. It is mounted before installing the canvas to the base ceiling at the required distance from the wall, where the edge of the cabinet will extend. In the future, door guides will be attached to this beam through the material. Thus, the suspended ceiling appears between the “mortgage” and the guide track. It seems as if the track is attached to a suspended ceiling.
Tips and tricks
- Pre-calculate where in the room the cabinet will be located, whether it will be built-in or simply extend to the ceiling surface. If you decide to install furniture in a niche, choose a built-in wardrobe;
- Trust the measurements to professional craftsmen who will help you draw up the correct drawing and determine the location of the mortgage. Then the cabinet is initially installed, after which the decorative panel is pulled on;
- The advantage of built-in furniture is the price. You don’t have to buy a ready-made cabinet; you will need sliding doors, a false panel, and a guide beam for a stretch ceiling;
- When choosing a frame compartment, first install the stretch ceiling sheet. At the same time, precise measurements are taken to determine the distance between the ceiling and floor. The advantage of this option is the ability to dismantle the furniture, move it to another room or move it to a new apartment;
- An important point of combination is the ratio of suspended ceilings and sliding wardrobes by level. That is, the tension fabric is mounted parallel to the upper border of the cabinet and window opening. With this approach, even the slightest deviations will remain invisible.
Combining a suspended ceiling and a built-in wardrobe is a feasible task that can be solved in several ways. Before renovation, carefully consider what the furniture and ceilings in the room will be like; discuss the details with furniture makers and installers of suspended ceilings. Professional craftsmen will give practical advice and tell you how to carry out the installation better and more correctly.
Pairing a stretch ceiling and a built-in closet (there is a stretch ceiling inside the closet)
This option is rarely used, since there is a high risk of damage to the tension fabric during operation of the cabinet. When putting bags, suitcases with locks or sharp corners on the upper shelves, it is easy to accidentally damage the ceiling.
Similar to the above methods, the upper false panel made of chipboard is attached to a wooden beam. The upper door guides are respectively installed on the false panels. To secure the upper furniture track, you will have to pierce the tension fabric right through with screws. Ceiling specialists will require special precision. The places where the fasteners are wrapped are taped with a special film. Another difficulty lies in the fact that in sliding door structures the displacement of the upper and lower tracks is carried out differently.
There are also special features in the fastening of bottom-mounted and suspended door systems. The implementation of this method of existence of a wardrobe and suspended ceiling requires the highest qualifications of ceiling installation specialists. Otherwise, you can end up with a non-functioning sliding furniture system and sagging or torn ceilings. The main advantage of this solution is the ideal joint between the cabinet and the tension structure.
Disadvantages of this design:
- complexity of manufacturing;
- high risk of damage to the ceiling inside the cabinet;
- the work of furniture makers and ceiling installation specialists must be coordinated;
- a difficult project to implement if the cabinet is not located in the entire wall.
Which comes first: cabinet or ceiling
According to the classic scheme of home renovations, they start at the top and gradually work their way down. That is, first they make the ceiling, then the walls and floor. Furniture is placed last. But with tension structures the situation changes.
The sliding wardrobe is assembled in two types:
- Built-in with door guides attached to the ceiling.
- Frame with a top cover that does not touch the ceiling (the height is slightly lower than that of the room).
Since nothing can be attached to the tension fabric, mortgages are pre-installed to the floor slab. And when assembling tall furniture, be careful not to damage the film with a tool or sharp edge.
If you want to install a wardrobe and a suspended ceiling, you can start by installing the canvas or install the furniture first. But each case has its own subtleties and nuances.
It is better to start with installing the cabinet, this eliminates the risk of damaging the canvas during furniture assembly, and the doors will reach the very top without the slightest gap.
If you first stretch the ceiling, you will need to provide mortgages. Otherwise, you will have to get very creative to secure the guides for sliding doors. A cabinet that does not reach the ceiling looks less aesthetically pleasing and requires great care during assembly, since it is easy to damage the fabric.
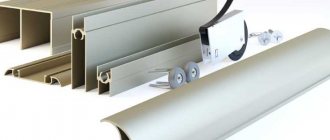
How to install suspended ceilings
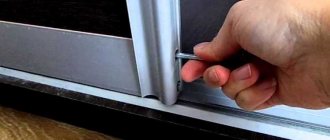
Installation of suspended ceilings takes place in several stages. First, having dropped 40-50 mm from the main ceiling, a special baguette profile is screwed onto the wall level along the perimeter of the room. A regular profile is attached to the walls, but if this is not possible, then baguettes attached to the ceiling are used.
Next, the corners of the canvas are hung in the corners of the room using special clamps. The heat gun turns on, increasing the room temperature to 40-60 degrees and softening the tension fabric. After this, using a special spatula, the edges of the canvas are pushed into the ceiling molding around the entire perimeter of the room, stretching the stretch ceiling.
At the last stage, a decorative profile is snapped into the gap between the wall and the canvas. That's it, installation is complete.
There are several main types of ceiling baguette profiles. Accordingly, they differ in the installation principle. There are also aluminum and plastic profiles. It is recommended to use a more reliable aluminum profile.
Mortgage in a suspended ceiling
Reading time: 4 min.
no comments yet.
Have you ever seen a sail without a mast, a house without a foundation, a truck without a frame? No?
Right. And you won’t see it because everything must have a solid foundation. Otherwise, without it, the whole structure will fall apart like a house of cards. Everywhere and always there is a power element that bears the main load.
In our case, the role of the power element is played by the embedded wardrobe in the suspended ceiling. Some people mistakenly believe that this is an extra detail and that you can do without it and attach the canvas directly to the cabinet by screwing the profiles to its walls with self-tapping screws.
However, this is not the case, and here's why:
- Firstly, the canvas is stretched during installation, and if a PVC base is used, it is also preheated. After cooling, the tension increases (it’s time to remember physics, school course).
- Secondly, the outer walls of the cabinet are mainly made of not too thick and durable material (chipboard, MDF, plastic, etc.), not designed for large external loads. In such a situation, serious trouble is only a matter of time, and most likely the screws will be torn out from their fastening points along with pieces of panels.
To prevent this from happening, during installation they use a mortgage - an element made with a certain margin of safety. Although, any rule has exceptions, but more on that later.
Combination of wardrobe and suspended ceiling
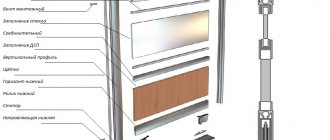
Now you need to figure out in what order it is better to install suspended ceilings and built-in wardrobes. There are several combination options, but we will highlight three main methods.
Installing a ceiling to an already installed wardrobe
This is the first option, almost ideal. Here, the common element of the cabinet and ceilings will be a beam pre-fixed to the ceiling and the top strip of the cabinet. The wardrobe and the ceiling are practically independent and will not interfere with each other if repairs or replacement are necessary.
The wardrobe must be installed first. The top bar of the cabinet must be installed exactly level so that the ceiling attached to the panel also goes level.
- Stretch ceiling fabric
- Ceiling plinth
- Main ceiling
- Wardrobe top strip
- Wood beam. Attached to the main ceiling
- Sliding wardrobe guide profile
- Sliding doors of built-in wardrobe
- Direction of fastening the stretch ceiling
The sliding wardrobe is attached to an already installed suspended ceiling
That is, the continuation of the ceiling will be visible inside the cabinet. Since installing a built-in wardrobe involves attaching the top rail to the ceiling, ceiling installers must secure an embedded beam above the suspended ceiling to secure the profile.
A situation arises in which furniture assemblers may not provide a full guarantee for their product, since they will have to attach the furniture to a beam installed by another organization. In addition, when attaching the cabinet rail to the beam through a suspended ceiling, there is some possibility of damaging the ceiling fabric. The structures of the cabinet and suspended ceiling are highly interconnected, which can make repairs difficult if necessary.
- Stretch ceiling fabric
- Ceiling plinth
- Main ceiling
- Wood beam
- Plastic plate. It is important to glue the junction of the guide and the stretch ceiling fabric to prevent it from tearing and pushing through
- Sliding wardrobe guide profile
- Wardrobe doors
Independent mounting of ceiling and cabinet on one base
Quite a convenient design for pairing a wardrobe with a suspended ceiling. The basis for fastening, as before, will be a beam, to which the profile of the wardrobe and the ceiling molding will be screwed from different sides. This method is often used in cases where it is not possible to maintain the installation sequence.
- Stretch ceiling fabric
- Ceiling plinth
- Main ceiling
- Wood beam
- Guide
- Stretch ceiling baguette
- Sliding wardrobe doors
- Direction of fastening the stretch ceiling profile
How exactly are the different types of cabinets installed?
So, we’ve sorted out the options for the sequence of work, now let’s talk in more detail about the process of installing certain types of sliding wardrobes.
Each type has its own installation features. Now we will look at the main types.
Cabinets with top to ceiling
The peculiarity of such cabinets is that they are ordered and installed most often after finishing work on the ceiling. There are several reasons for this. Firstly, the height of such cabinets varies depending on the wishes of the client. Therefore, before ordering a cabinet, you need to know exactly the height of the room, but you won’t be able to find out this before installing the stretch ceiling. Secondly, it will be extremely inconvenient for installers to install the ceiling if there is this cabinet in the room.
The process of assembling such a cabinet is quite standard, and the end result is a structure that rests evenly on the suspended ceiling and does not create any gaps.
Cabinets with a guide rail designed for mounting
The peculiarity of these cabinets is that the guide rail must be fixed to something. Naturally, it won’t be possible to attach it to a suspended ceiling, because you need something solid and immovable.
Most often they prefer to attach such cabinets directly to the concrete ceiling and only after that install a suspended ceiling. This is the most effective and rational option, as it saves square meters of stretch ceiling and leaves no space for gaps.
The stretch ceiling is attached to the strip in front of the cabinets, so the cabinet stands in a niche
There is another option, in which a beam or mortgage is installed under the wardrobe in the suspended ceiling to fasten the rails. The rails are attached to this beam with a regular screwdriver through the suspended ceiling. There is no need to worry about the ceiling tearing or being damaged in any other way. An experienced master will be able to do everything correctly and cleanly. However, if after the completion of the repair you have problems with the ceiling, you will not be able to contact the company that provides the guarantee. Warranties are provided that the surface has not been damaged and you already have holes in it. Accordingly, there can be no talk of any return.
Cabinets with decorative strips above the rails
Decorative strips look very beautiful and can be found both on cabinets up to the ceiling and on independent cabinets. However, their peculiarity is that a suspended ceiling cannot be attached to them. Practicality suffers greatly from this.
To solve this problem, installers usually place an additional beam along the plank. Often this beam spoils all the beauty, so if you decide to install a cabinet with a decorative strip, try to install the ceiling across the entire width of the room before installing the cabinet. In this case, with correct calculation, the bar will just reach the ceiling. Then it will look quite beautiful, and at the same time will not leave an unnecessary gap.
Installation of an extension or a mortgage under a cabinet:
Assembling the wardrobe after installing the ceiling, the structure is attached to the mortgage nailed in the previous video:
If the canvas is located inside the wardrobe
Using this method, you will be able to make not only the suspended ceiling unusual, because the polyvinyl chloride coating will also be located inside the furniture, and lamps can be attached to it, just like on the ceiling.
In order to implement this idea, you will need to do the following:
- fix the beam on the ceiling (it can be replaced with strips of chipboard), make sure that the wooden parts below are properly polished so that the canvas does not tear;
- install racks or platforms so that lighting can be installed and wires placed there;
- fix the ceiling to the frame, and a plastic plate must be pre-glued to those areas where it is in contact with the mortgage;
- screw the guide to the mortgage (the screw also passes through the above-mentioned plate), which should then be connected to the ceiling plinth using glue;
- install lighting equipment and sliding doors;
- hide the joint under decorative elements, for example, stick an LED strip on the baseboard.
But you need to be more careful, because due to carelessness of the installer, the ceiling may tear. In addition, for work you will have to partially disassemble the wardrobe. But if you do everything right, you can admire the harmonious combination of ceiling and furniture for many years to come.
HOW TO REPAIR UNDER THE CABINET CORRECTLY?
Have you bought an apartment or started renovation? How to plan a room correctly at the initial stage of renovation work. What is meant by these words? Let's say that you have a small area, one room is 10 sq.m., the second is 20 sq.m. There is little space, but a lot of things, and the best solution is built-in furniture. But in order to correctly install the furniture, you need to prepare in advance while the rough work is underway. It is necessary to take into account the possibility of moving doors, building up walls, and placing lighting, if planned. Doing this after the work is completed will be problematic.
Placing a suspended ceiling above a wardrobe
First you will need to screw a wooden beam to the main ceiling slab. The fabric that will be stretched should be flush with the bottom surface of the beam.
Then follows:
- attach the guide to the beam with screws;
- Attach a panel from above to the guide; its function is to decorate the ceiling (the visible part of the screws should be on the panel at the top);
- the panel must be fastened with a baguette to fix the plastic sheet; it is better to use long screws for this;
- assemble furniture except doors;
- install the tension fabric, then you will need to hide the grooves in the baguette with a decorative element and install sliding doors.
The furniture will take up the entire wall. The decorative panel is not a necessary component; instead, you can attach the molding directly to the beam.
Is it possible to make a suspended ceiling if there is a built-in wardrobe?
In the case where the furniture is built up to the ceiling, a beam is mounted at a short distance from the guides. A profile for the tension fabric is attached to it. This results in an independent fastening. But if the cabinet is assembled before the mortgage is installed, it is more difficult to screw the molding on its side. There are two options here:
- Make the gap between the guide and the ceiling beam larger to make it easier to work.
- Try on the mortgage, attach the profile to it and only then mount it to the concrete slab.
If the cabinet has a lid, there will be a gap of several centimeters between it and the ceiling. Then the beam is installed (depending on the size of the gap): close to the guides or directly into the gap.
Attention! The cross-section of the beam should not be more than 10 cm, otherwise it is impossible to insert doors under it.
To install the beam, metal corners are used. The profile for the film is attached to the lower surface of the beam. If the cabinet is not built into a niche, you need to make a walk around part of the perimeter. Then another installation order may be more convenient:
- First, the beams and profile are marked and cut.
- Connect the parts of the mortgage to each other.
- Bend and fasten the baguette.
- The resulting structure is mounted with corners to the slab.
Peculiarities! If the beam is located between the lid and the ceiling, it can be masked with a strip of chipboard. Then the profile for the canvas is attached to the decorative strip.
An extension of the frame for the film is placed on the walls. Using a level, they ensure that the entire profile is at the same level. Then the PVC film is heated and stretched, and the gap remaining at the joint is masked with a decorative plug.
If the ceiling should be located around the cabinet
Stages to be completed:
- mark and adjust the timber blanks, after which you need to make holes in it and the ceiling slab with a drill;
- attach the harpoon baguette to the inside of the blanks with self-tapping screws, not forgetting to adjust the joints in the corners;
- screw the beam to the ceiling (accordingly, baguettes will be attached to it, along the level of which harpoon baguettes designed specifically for walls are attached to the wall);
- stretch the fabric and hide the gaps behind masking tape.
Harpoon systems are not particularly easy to install, so it would be better if you order them taking into account all the parameters of the room. Another advantage of this option is the ability to dismantle the suspended ceiling many times if necessary.
Where to start - a suspended ceiling or a closet?
When ordinary furniture is installed, repairs are carried out according to the rule - from top to bottom. Therefore, first they stretch the PVC film, then the canvas is decorated with edging, and the walls and floor are lined. Then they assemble and install the cabinet. In the case of a built-in model, installation is carried out taking into account the method of fixing the ceiling.
The PVC sheet is attached to the perimeter of the walls with a baguette profile or a harpoon connection. In the first case, first stretch the film, then select the height of the furniture body with the required gap. In the second, the design allows the canvas to be passed through the top of the cabinet so that the facade looks flush with the walls and ceiling.
Mounting option with additional installation
Tip: Before installation, it is necessary to treat concrete surfaces with an antiseptic so that fungus does not form in a closed space. Instead of branded fungicides, a strong solution of copper sulfate is suitable.
Combination options
What does a suspended ceiling or a built-in wardrobe do first? Which is better? There are several options for combining a stretch ceiling with a cabinet.
- the material is located above the furniture
- the material is located inside the cabinet
- suspended ceiling around furniture
- the cabinet is installed after the ceiling stretching work
Option 1: installing a ceiling above the cabinet
With this option, the furniture is located from wall to wall.
Sequencing:
- A wooden beam is screwed to the load-bearing ceiling slab. The level of its lower edge must correspond to the level of the tension fabric. The timber will be considered the base for the top guide
- Next, a guide is installed to the beam itself
- A decorative panel is screwed onto the top of the guide. Note: the screw heads must be on the top of the panel
- A fixing baguette is attached to the decorative panel to attach the film. Note: it is better to use long wood screws, since the decorative panel has low load-bearing functions
- Furniture is being installed
- The tension fabric is being installed. After finishing the work, the grooves in the baguette are closed with a decorative insert
- Doors are being installed
Note: you can discard the decorative panel and attach the baguette to the beam. Thanks to this method, the structures will be independent, which will make their maintenance much easier.
Option 2: internal coating
In this embodiment, the canvas is placed inside the furniture body. The advantage of this option is that PVC film will decorate the space inside the furniture. In addition, you can install lighting inside the cabinet, which never hurts.
Sequencing:
- First, a beam is screwed to the ceiling slab
- Next, stands or platforms for lighting fixtures are produced.
- The canvas is placed on the frame
- In the place where it comes into contact with the mortgage, a PVC plate is glued to the canvas
- Afterwards, the upper guide is screwed to the mortgage through a plastic plate
- Next step: glue the ceiling plinth to the guide
- Lamps are installed inside
- Doors are being installed
Note: the joint itself can be decorated. For example, when using a wide baseboard, you can glue an LED strip.
Option 3: installation around the cabinet
Sequencing:
- To begin with, the timber is marked
- Afterwards, holes are drilled in the supporting slab and in the timber in order to install fasteners in the future.
- The next step is to screw the harpoon baguette
- The beam is attached to the ceiling
- According to the level of the baguettes, harpoon-type wall baguettes are screwed onto the wall
- Next, the canvas is stretched onto the frame
- The last step: seal the cracks with masking tape
This option is considered quite difficult. Therefore, it is better to order the canvas itself along with the harpoon edge. This will allow you to easily install the PVC film.
Option 4: installation under the finished product
Is it possible to make a built-in wardrobe if there is a suspended ceiling? It often happens that furniture is installed after the installation of the stretch ceiling. And, of course, the main desire is for the wardrobe to be located under a suspended ceiling without unnecessary gaps. In this case, when ordering a cabinet from a company, it is worth ordering a few millimeters less than the height of the room. This will allow you to beautifully place the built-in wardrobe in the room without damaging the suspended ceiling.
Stretch ceiling or walls
But here options are possible, since the ceiling is in contact with the walls along the entire perimeter.
Option 1 – walls to be wallpapered or painted
It is believed that the installation of suspended ceilings is a clean and dust-free job. In fact, everything is not quite like that.
- To install the molding on which the ceiling is attached, the walls (or the main ceiling) are drilled every 7-8 cm. This is dust and dirt that settles on the wallpaper or painted surface. Moreover, the plaster in the drilling areas can break off, crumble and remain under the wallpaper, spoiling the appearance of already finished walls.
- During the installation of film ceilings, a heat gun operates, bringing the room temperature to 60-65 degrees. Of course, installers sweat at this temperature. If they touch the wall with sweaty hands or any other part of their body, marks will likely be left on it.
Based on this, we can conclude: first it is better to stretch the ceiling and then stick the wallpaper.
This recommendation can be ignored in the following cases:
- The surface of the walls is very durable and will not crumble during operation of the hammer drill.
- Workers use modern equipment with a built-in vacuum cleaner, so construction dust is excluded from getting onto the walls.
- The walls are finished with a material that, after installing the ceiling, can be cleaned or washed without damaging the surface.
Attention! If you decide to install a suspended ceiling first, then by the time of installation the walls must be fully prepared for finishing - leveled, puttied and primed.
The presence of hidden electrical wiring in the walls can also work against the installation of a stretch ceiling after finishing the walls. If you don't know exactly where it goes, there is a risk of puncturing the wires when drilling holes. It will be much more expensive to restore the wiring if the walls are already covered or painted (see Tools for suspended ceilings).
Advice. Try to allow a few days between pasting the wallpaper and its installation. Otherwise, the wallpaper may swell or peel off during operation of the heat gun.
To be fair, it is worth noting that it is practically much easier to stick wallpaper before installing the ceiling. Since after installing the tension fabric, they will have to be precisely adjusted to the ceiling, at the risk of damaging it. Therefore, when finishing the walls, the ceiling must be sealed around the perimeter with masking tape.
The most correct option would be to first install the molding on the leveled walls, then glue the wallpaper, and after 3-4 days mount the ceiling.
Option 2 – walls with tiles or panels
If the walls are planned to be finished with ceramic tiles or any wall panels, then the suspended ceiling is definitely installed last. In the case of panels, the frame underneath them must be reinforced at the level of the ceiling installation (see How to glue a ceiling plinth to a suspended ceiling: simple solutions to a complex problem).
Stretch ceiling or built-in wardrobe
If before finishing walls and floors people often think about the order in which suspended ceilings are installed, then in the case of built-in wardrobes they also often forget about this.
Meanwhile, this is where the sequence of work is very important. If you do not think through the entire structure in a timely manner, after installing any of these objects, installation of the second may become impossible.
Sliding wardrobe with countertop
If the built-in closet must reach the ceiling, but the guide rails for its doors will be attached to the top cover (countertop), then the sequence of work should be as follows:
- Installation of stretch ceiling.
- Measurements and production of built-in wardrobes at ceiling level.
- Installation of cabinets.
Sliding wardrobe without countertop
Today you can often find fully built-in wardrobes, in which the guide rail on which the doors roll is attached directly to the ceiling. It is clear that a suspended ceiling cannot serve as the basis for such a structure.
When are ceilings installed in this case?
There are two options here:
- First, the suspended ceiling is stretched, but a wooden mortgage is installed between it and the concrete main ceiling at the level where the top rail of the wardrobe will be located. Subsequently, the guide is screwed to the mortgage through the stretch ceiling fabric.
Attention! To attach the guide to the embedded beam, holes for self-tapping screws are pre-made in film ceilings, reinforced with plastic or special rings.
- First, the wardrobe is installed. Then the suspended ceiling is measured and installed. In this case, it is attached directly to the beam on which the upper guide is installed.
As you can see, deciding what to do first - install suspended ceilings, finish walls or install cabinets - depends on the location and situation. If you find it difficult to answer this question yourself, stretch ceiling specialists will always tell you the correct answer.
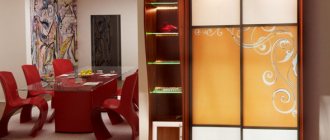
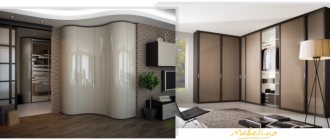
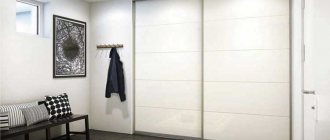
Pros of a wardrobe up to the ceiling
The high design has a number of advantages:
- It is universal and suitable for installation in different rooms.
- Space saving - does not require free space to open doors. This simplifies the operation of such pieces of furniture.
- The large wardrobe is spacious. It makes it easy to hide from sight all the unnecessary objects that clutter up the space of apartments, houses and offices.
- Expanded functionality. The dimensions of the cabinet provide space for organizing the internal contents according to needs; there is enough space to install shelves, cabinets, baskets and all possible filling options.
- Original look. The popularity of such furniture is due to its wide range of models, limitless design possibilities and internal content.
Subtleties of choice
When choosing the required model of a wardrobe up to the ceiling, you should pay attention to some points:
- The length of the upper shelves should be less than a meter, otherwise the entire structure will experience too much pressure.
- Elite class samples are distinguished by the presence of expensive fittings, photo printing on the facades, high quality mirrors, and sandblasted designs.
- Budget models provide only simple finishing options. But the level of quality and reliability is not inferior to luxury cabinets.
CASE STUDIES
1. A niche was planned in the corridor for a built-in wardrobe - a compartment, where there was a turned corner with a room height of 3100 mm
.
The customer did not know what to do to make it beautiful and inexpensive. I contacted our company for help in resolving the issue, they suggested the following: the corner part of the space is closed and covered with plasterboard, a partition is lowered from the ceiling, forming a straight and neat opening for the future wardrobe and the installation of compartment doors. As a result, the customer became the owner of a functional wardrobe in the hallway with a complex geometry, a “ problem angle
” and neatly “fitted” into the overall interior of the apartment
Photo 1
.
In Photo 2
we can see a gap between the vestibule and the wall, which does not look very nice, the choice is yours.
Sliding wardrobe built-in and free-standing. What is the difference?
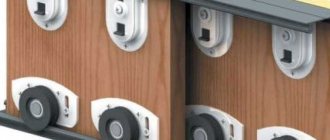
The name of the new furniture speaks for itself. The main elements of such a cabinet are high front panels that perform the functions of a facade and doors. They move along guides, allowing access to any part of the internal space.
If all sliding wardrobes are the same in terms of the method of moving the doors, then according to their design and installation principle they are divided into two groups:
- built-in;
- freestanding.
A standard built-in wardrobe does not have side or back walls, a bottom or a lid. It is a sectional panel with doors. Its decorative frame and door guides are attached directly to the ceiling, walls and floor of the room. Depending on the size and configuration of the structure, the internal shelves are fixed:
- to the walls of the room;
- to the internal vertical partition and to the wall.
If the built-in wardrobe is not designed to span the entire width of the wall, then it will have one external side wall.
A freestanding wardrobe has a conventional box-like structure with walls (side and back), a lid and a bottom. The sliding panel guides are attached here to the upper and lower belts of the box.
How to install a wardrobe if the ceiling is already stretched
The simplest option is to order frame furniture with a lid. It should be below the room. The optimal distance to the top is 5-7 cm. Some craftsmen assemble a wardrobe under a suspended ceiling with a gap of several millimeters, but this is a rather difficult task.
Disadvantages of this solution:
- risk of damaging the canvas when installing furniture;
- accumulation of dust on the top cover;
- unaesthetic appearance.
To get a built-in wardrobe with an already installed stretch ceiling, it is better to choose another method. First, the system of racks and shelves is installed, and then the frame for the door track is assembled. In this case, the support is on the floor and walls. The ceiling remains intact without punctures or holes.
The frame is assembled from laminated chipboard:
- Prepare two side racks. The length of each should not reach the stretch ceiling by exactly the thickness of the chipboard. The width is selected in accordance with the size of the door guide or slightly larger.
- If a plinth is laid around the perimeter of the floor, cutouts are made for the sidewalls.
- The racks are attached and fixed to the walls.
- The back bar is placed on top. Since the height of the sidewalls is precisely calculated, the chipboard strip ends up exactly under the ceiling without any gap or pressure on the sheet.
- Another board is attached to the back of the plank and secured with self-tapping screws to the top and to the sides. This ensures the fixation of the frame.
- Additionally, the fasteners are screwed through the back bar into the side posts that hold the shelves.
- Install the top track. To do this, take short self-tapping screws so as not to damage the ceiling. The heads are recessed; they should not interfere with the sliding of the doors.
An unusual approach to interior design
To simplify the work of installing lighting with wiring, the membrane and furniture can be combined using a plasterboard box around the perimeter of the ceiling. In this case, it will not be possible to damage the thin film even if the furniture is installed carelessly.
A plasterboard box between the cabinet and the ceiling creates additional protection
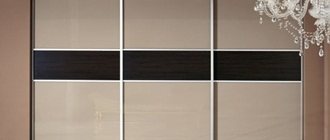
If the facade is made in two contrasting colors, you can stretch the ceiling from a two-color welded membrane to match the furniture cladding. And instead of polymer ceiling plinths, use wicker braid to match the room curtains.
To achieve maximum harmony in the interior, it is better to choose a cabinet with photo printing on the lining in the color of the membrane.