Features and Benefits
If the material for the main structure is clear, the question remains - if you make a closed type of cabinet in the toilet, which door to choose, what is the difference between them, and which is better.
Let's look at the most common options.
Louvre doors
There are two types: roller blinds and pseudo-blinds. The first one is more preferable when there is no possibility to open the door. The second option is made in the form of blinds, but there are no moving objects; such doors are good for poor ventilation.
Pros:
- low cost;
- the door, as a rule, is installed on top of the opening, easily hiding dimensional inaccuracies;
- Installation of such a door is simple, there is no need for special skills.
Minuses:
- you need to choose the same style as the bathroom/bathroom, which is not always possible;
- often such a design looks inharmonious on the tiles;
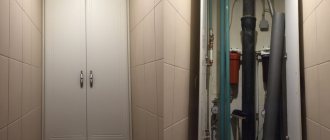
- If you close a plumbing cabinet with such a door, problems may arise in the future: in particular, the doors are designed for a small opening, and in the event of emergency pipes and the need for replacement, difficulties will arise due to the small size of the cabinet.
Plumbing plastic hatch
From the name itself it is clear for what type of cabinet this type of door is preferable.
Pros:
- Available in a variety of sizes, providing a wide choice;
- the ability to choose a door to suit your data;
- the cabinet turns out to be quite spacious, with the ability to install shelves and store necessary things;
- there are no boundaries in the color scheme, but more often the plumbing hatch is presented in the “universal” white color;
- easy to install: after the tiling work in the bathroom/bathroom is completed, the hatch frame is glued into place with sealant or any other fastening agent.
Minuses:
There are no significant disadvantages for plumbing plastic hatches.
Doors to order
It is worth considering this option when the area of the room allows you to open them completely.
Pros:
- possibility to choose according to your own sizes;
- large selection of design works.
Minuses:
- this design will be expensive;
- you have to wait a long time for your order to be placed;
- you will have to look for a good master.
Plumbing hatch for tiles
This type of door of all those listed will be the most expensive, but ideally suited to the design of the bathroom/bathroom. The main requirement for this design is a reliable frame that can support the glued tiles. For a harmonious style, it is advisable to select the dimensions of the cabinet based on the size of the tiles, so that during installation the sanitary hatch coincides with the tile seams.
Pros:
- fairly easy access inside the locker;
- stealth (this will be especially interesting if you are a perfectionist);
- all sorts of sizes (but you need to remember the size of the tile itself).
Minuses:
- if your budget is limited or you want to save money, it is better to choose another option;
- You will need the help of a tiling specialist.
Full height wooden cabinet
If you want to add rigor to your design, you can use this type of cabinet.
Pros:
- if necessary, you can quickly disassemble the cabinet and reassemble it;
- this design provides maximum access to the plumbing pipes, which we are trying to hide so beautifully;
- quite an economical option.
Minuses:
- Not everyone likes a wooden cabinet;
- To manufacture parts and install a cabinet at home, you must have knowledge in the field of carpentry.
Doors can also be divided according to the opening mechanism:
- sliding, similar to sliding wardrobes;
- folding;
- swing;
- roller shutters
The main advantages of cabinets behind the toilet:
saving space (especially important for small areas); the ability to make it yourself; choose the perfect size; low costs; the ability to hide communications; additional space is created for storing household chemicals and other things.
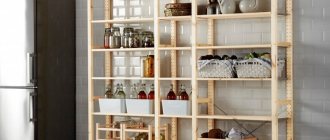
Closet in the toilet from floor to ceiling (or almost)
The cabinet for the toilet room can be a separate piece of furniture. It has a distinctive design that cannot be confused with anything else. At the bottom of the toilet cabinet there are two narrow and high cabinets, which stand at a distance of 50-60 cm from each other. Above them there are one or two sections with or without doors. These are already solid sections with hinged doors.
Various designs: the same idea - maximum use of all available space
The parameters of these cabinets depend on the dimensions of the room. You will not see such products in stores, only individual orders. The same laminated chipboard will not be too expensive, and there is plenty of space for storing chemicals.
There are models that are more economical in terms of space use: in the lower part there are only racks, open and closed shelves are located above the toilet cistern.
If the shelves are only on top
The option presented above is good when the load-bearing capacity of the walls is insufficient to support conventional wall shelves. If you have a partition made of plasterboard, porous or lightweight concrete, you can look in this direction.
What material is it made from?
When you decide to make a closet for your toilet, the question immediately arises of what material to make it from. If we talk about furniture, there are the following options:
- laminated chipboard (LDSP);
- laminated MDF
- wood.
Furniture for the toilet can be ordered from a furniture shop
The cheapest material in this category is chipboard. MDF is four times more expensive and wood is even more expensive. If you assemble doors from edged boards or lining with your own hands, it may not be more expensive than MDF. But such work requires at least minimal carpentry skills. If it is not there, you will have to pay for the work of a specialist, which can significantly increase the final cost of the product.
If you are going to cover the cabinet with tiles, wallpaper, vinyl, plastic, you can use materials other than those listed above:
- plywood;
- GVL (gypsum fiber sheet);
- OSB;
- sheet MDF.
All of the materials listed are quite suitable for constructing a cabinet in the toilet. The only doubt may be about the GVL: will it crumble at the place where the hinges are attached? If large loads are not expected, it is quite possible to use this material.
Frosted glass and mirror are also possible options for facades for a closet in the toilet
Now the question is whether it is worth using moisture-resistant materials. The closet for the toilet can be made of ordinary material, provided that it is only a toilet and not a combined bathroom, i.e. There will be no high humidity in the room. An exception is the situation when the ventilation of the bathroom is done using a flow window through the toilet. Such schemes still exist in houses with old layouts. In all other situations, the use of moisture-resistant materials is optional.
Wall cabinets
A universal option that is presented in any store. The dimensions allow the module to fit even into a miniature space and hang it behind the toilet at the desired height.
Mirrored doors create a deceptive effect of extending the room. However, fingerprints remain on the surface, which must be constantly removed - the main disadvantage of this model.
The matte surface perfectly camouflages objects. During operation, you will not have to clean the inside of the cabinet every day.
The lighting and black tint make the cabinet weightless, its outline literally disappears into the room.
Bright toilet interior. Color accents include red painted roller shutters, plumbing boxes and photo frames.
False wall and niche
In most apartments, the toilet is a narrow and long room. Its width is about a meter, length - two meters or more. Such a long room is inconvenient to use - the area up to the door is still not used in any way. The situation can be improved by installing a false wall. In this case, the toilet can be moved forward and separated by a partition of 50-60 cm. The remaining space is more than enough for comfort, and the one that is “behind the wall” can be used as a closet.
Sewer and water risers will be hidden behind this false wall, which otherwise will have to be covered with a special box. The space behind the toilet does not need to be sewn up tightly. Here you can make a very spacious closet. It can store powders, stocks of other chemicals, which are usually difficult to find a place.
An example of a cabinet design behind a false wall
To install the device, you will have to move the toilet forward, nail strips to the walls and ceiling (40*40 mm will be quite normal), and fill in horizontal strips that will hold the shelves. The doors for such a closet in the toilet are attached directly to the walls. Or rather, to the planks that are fixed to the wall.
The strip is needed 8 cm wide. Since it will be visible when the doors are open, it is advisable that it be trimmed with the same material as the doors. It is attached to the wall with nails/screws/dowels, and hinges are attached to it.
Shape and dimensions
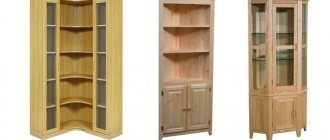
The most common cabinet shape is rectangular - a standard box with several compartments or shelves. However, manufacturers are not limited to just one option. Corner models in the form of a triangle and trapezoid are convenient for placement at the junction of walls. They are roomy and practical. The main disadvantage is that they can be very deep, so you have to reach for distant contents. The most unusual design of radius cabinets is that the side panels are united by a rounded facade. This design does not provide any practical function, but it looks visually more pleasing.
Since usually the bathroom in an apartment is not very large in size, the standard width of the cabinets is also small - about 20 cm. But the depth already varies - the standard indicators are in the range of 35–60 cm. The height of a cabinet with two or three shelves usually does not exceed 70 cm.
If you need to close pipes, choose rectangular or corner models, depending on where the communications run. The latter are also well suited for small spaces. But in spacious toilets you can place radius cabinets - they add coziness and a feeling of comfort. To prevent furniture from visually cluttering the room, it is convenient to hang it above the toilet or sink. If there are niches, you can arrange storage space in them - this is an interesting, and also functional, stylistic solution.
Classification of wall cabinets, their features and placement rules
Rectangular
Angular
Radial
Location in the bathroom
The most popular location options.
Above the bath
The recess placed above the bathtub can have different shapes and sizes, which are determined by the dimensions of the plumbing fixture itself and the parameters of the given room.
For example, for bathtubs with a corner or rectangular configuration, elongated niches placed along the long side are suitable.
The photo shows a small niche with a contrasting design in the bathroom interior.
Behind the toilet
A conveniently placed recess behind the toilet not only allows you to hide various utilities and arrange household supplies, but also significantly saves usable space in the room.
Near the washbasin
These niches can be decorated with decorative accessories, such as starfish or shells, carefully placed in them cosmetics for daily care, or conveniently placed towels that will always be at hand.
Hidden
Such closed-type recesses most often require a design that is in harmony with the surrounding environment, with the help of which you can achieve a modern, laconic and convenient composition that significantly improves the appearance of the space.
Types of toilet cabinets
There are a large number of lockers with different operational parameters and appearance.
Mounted
It is a universal solution for a miniature room, where it is most often located above the toilet. Such hanging furniture pieces on a mounting plate have a wide variety of sizes, depth, content and stylistic design.
The photo on the left shows a narrow wall cabinet above the cistern in the interior of a modern toilet.
Built-in
It has a fairly compact design, easily fits into the interior space and provides convenient access to the filling.
Floor
It is a free-standing model that can be equipped with legs, open or closed shelves.
Retractable
These multifunctional products allow you to save usable space and are therefore especially suitable for decorating a small toilet. Roll-out cabinets are often located near the toilet, which is very convenient.
Open shelves in the toilet
Such designs add special style and comfort to the environment and are mainly used to place various decor, for example, it can be a vase of flowers, wicker baskets, jars of cream or soap, etc.
The photo shows the interior of a toilet with wooden open shelves located above the toilet.
Rack
It is a compact and ergonomic furniture element that can add versatility to even the smallest room. Forged racks have a particularly impressive appearance; they are not only a beautiful and elegant product, but are also suitable for storing towels, napkins and other hygiene products.
Cabinet
Quite roomy and at the same time not occupying much space, the pencil case, thanks to the shelves installed along the entire length, allows you to place all the necessary household supplies inside.
The photo shows a pencil case made in white in the interior of the toilet.
With doors
This option has different sizes, installation methods and designs. Wardrobes with hinged or sliding doors perfectly hide all contents and help create a neat interior.
With roller shutters
It can be a model with roller doors, which is a practical option for a small room and allows you to save additional space, or a cabinet with louvered doors, which provides excellent ventilation for the internal contents.
Hanging
A very compact and at the same time roomy bathroom cabinet. It comes with a sink from , model number 0014000U28. Dimensions - 40x22x60 cm. This product does not imply any difficulties during the preparation or assembly process.
To work you will need:
- MDF sheets;
- knife saw;
- grinding machine or sandpaper;
- metal handle for furniture;
- hanging loops (2 pcs.);
- drill with a wood bit;
- screwdriver and screws;
- screwdriver;
- primer for paint;
- furniture polymer acrylic enamel;
- pencil and tape measure.
The height of the cabinet indicated in the drawing can be slightly reduced or increased if desired. Length and width are limited by the dimensions of the sink and cannot be changed
- The contours of the parts are measured on MDF sheets and each element is marked with a letter or number to make assembly easier later.
- Use a hacksaw to make cuts along the marked lines.
- Cut holes for water pipes and sewer lines.
- The sanding machine is passed over all cuts and surfaces of the boards until splinters and irregularities disappear.
- Carefully rub the primer into the front side of the parts. When it dries, sanding and leveling are carried out again.
- Start assembly:
- connect the body parts together;
- hang the cabinet door and screw on the handle;
- install a shelf in a side niche.
- Install the sink.
Types of opening systems
The very small dimensions of the façade of a narrow toilet cabinet do not leave many options in choosing an opening system:
- Retractable. , which produces all types of retractable screens for the kitchen and bathroom, has made this item so popular that now all such elements are called cargo. It is a narrow compartment that extends forward, equipped with a mesh basket. However, there may not be a grid. Mobility is provided by narrow slats equipped with roller mechanisms. Telescopic ball ones are less commonly used. Guides are attached to the body from the inside. Very reliable and smooth running system. Can be extended fully or partially. You will need free space in front of such a compartment;
- Swing. Classic hinged door with side fastening. Opens outwards towards itself. An approach to the cabinet is also required.
Selection of materials and tools
For finishing the toilet, natural wood or its derivatives (MDF, chipboard) are best suited. When choosing such materials, moisture protection must be provided. Wooden facades are treated with a special impregnation that protects the surface from excess moisture. When choosing chipboard or MDF, also focus on moisture-resistant boards coated with special plastic.
Wood looks the most natural.
To fasten support bars, guides and other elements, it is better to use plastic dowel nails. The dowels themselves must be purchased from high-quality plastic. It is very easy to recognize by its cost, which is an order of magnitude higher than that of other manufacturers
Pay attention to the nylon dowels. These are white and cream colored corks.
To connect wooden surfaces, use wood screws, metal corners and strips.
Here's what tool you'll need.
- Tape measure for measuring the basic geometric parameters of a room.
- Bubble or laser level for horizontal and vertical installation of all bars and guides.
- Construction pencil for marking.
- Construction rule. Used as a guide when cutting material.
- Impact drill or hammer drill. Used when drilling holes in concrete and brick.
- Electric jigsaw or hand-held circular saw. For cutting chipboard sheets and wood blocks.
- Screwdriver, screwdriver.
The set of tools is quite standard.
In addition to this list, you must have a set of drills for wood, metal and drill bits for a hammer drill.
Photo of toilet cabinets in the interior
<
>
A miniature and compact dressing table will allow you to tidy up the interior space of the restroom. At the same time, you will add comfort and coziness to the room.
How to make a sink cabinet with your own hands
Before you start carpentry, you need to prepare the room and the tools needed for assembly and installation. Make all the basic measurements: the installation height of the bowl, the space around the washbasin, the distance to the water supply and drainage pipes, the diameter of all pipes, etc. Don’t be shy about drawings and sketches: the better the future design is visualized, the more errors there will be in its assembly can be avoided.
What are the doors made of?
If you decide to make a closet for the toilet yourself, making shelves is usually not a problem: two parallel planks are placed on the walls, and shelves are laid on them. Instead of slats, you can install furniture shelf holders - they come in different sizes and shapes and are easy to install. A hole is drilled in the wall into which the extended part of the holder is inserted. This is one type. The second is brackets that are attached to the wall. In general, there are usually no problems in this part.
It's not as complicated as it seems
But there may be questions about what and how to make the doors. The easiest way is to order a façade of the required size from a furniture shop. It is better to order together with the strips to which these doors will be attached. You can also ask for hinges to be cut in. Then installing them will be simple: screw them to the wall and that’s it. Possible facade materials: chipboard, LMDF, plastic, aluminum + glass or aluminum + plastic.
There is an option - to make the doors from sheet material and cover them with the same tiles that were placed on the walls. This is in case you don't want the cabinet to stand out. You can also stick on a mosaic of a suitable shade, use flexible tiles (plastic sheets under the tiles), stick on washable wallpaper, paintable glass wallpaper, etc. There are actually a lot of options.
If you are going to make a toilet cabinet “in place” and with walls
Options for finishing doors for closets in the toilet
To make it more convenient...
Closet for the toilet in the process of manufacturing
You can install corners under the slats - if a large load is expected
You can also not make doors, but hang ordinary horizontal blinds, use roller blinds of a suitable color and size. This is one of the simplest and most budget options. To access the shelves, you will need to lift the blinds or roller blinds.
A more serious and durable option is to close the shelves in the toilet with a roller shutter. It is more serious in terms of cost and complexity of installation. You will need to install guides and secure the drum at the top.