Using the bathroom would not be complete without the many different accessories we use for personal care. They all need to be stored somewhere, which means either cabinets or shelves are required.
You can make your own bathroom shelves, or buy ready-made ones. Today we will take a closer look at the first option, study interesting ideas in this direction, features of the work and much more.
Types of shelves
There are several types, or types if you will, of bathroom shelves. This is clearly noticeable if you look at the photo of DIY bathroom shelves.
Shelves can be built-in or external:
- Built-in shelves, as you might have guessed from the name, are mounted into a wall or false structure that is used for decoration.
- The second type of shelves is installed directly on the wall, and therefore they can be changed, re-hanged, and so on without any problems.
Both options are good in their own way, but are suitable for different types of premises. The first type of shelves “steals” part of the space if the recess in the wall is not architecturally provided.
This option is well suited for spacious bathrooms, which are found in private houses and some apartments.
It is worth noting that everything greatly depends on the layout, because in some private houses the bathrooms may be smaller than in expensive apartments.
Hanging shelves are well suited for regular and small bathrooms. They don’t take up much space; on the contrary, they help to gain space by placing small accessories.
At the same time, there is a huge variety of such shelves in stores. Fans of DIY and creativity should also be pleased, because with the help of such shelves you can decorate your bathroom in a very interesting and original way, which we will talk about in our article.
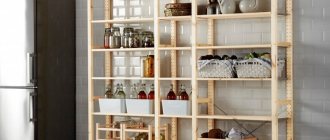
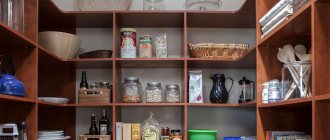
Boxes
We planned for the boxes to be mounted at the same level along the back of the structure. Before assembling the shelves, we marked the mounting height of each box.
Do-it-yourself concrete tables and stands for desserts are easy and quick to create
How you like it: Indian chef showed how to boil eggs (video)
"Children need happy parents." Natalie Nevedrova named the reason for the divorce
We needed trays with certain parameters and taking into account the fact that their size would gradually decrease. For calculations, you need the basic dimensions of the bottom row.
To get them, lay the frame horizontally in the plane of the lower legs and measure the distance between the back and front legs, as well as the width of the spread of the supports. Having the initial data, we noted the height of the boxes:
- The second shelf from the bottom will be mounted at a height of 490 mm.
- The third shelf has a height of 851 mm.
- The highest level of shelves is 1207 mm.
The shelves can be exactly the same size, which will greatly simplify cutting plywood and boards for drawers. If you need shelves of different sizes, then take into account the same step when reducing them, for example, 5 or 10 cm in depth.
This narrow house seems inconspicuous only from the outside, once you look inside
A woman designed her bathroom in Japanese style. Now I want to repeat
The most beautiful face: the world admires the appearance of a model from Israel today (photo)
In accordance with the chosen concept, cut the plywood and wooden boards. Having received the blanks, assemble the boxes, fastening them with nails. The trays are installed on the frame using self-tapping screws.
Hanging shelves
If you make shelves for the bathroom with your own hands, then hang them. Why? Let's start with the fact that for this we will not need to redo the repairs, which is definitely good.
Built-in shelves in themselves are not a decorative item; they are part of the entire interior, its continuation, and therefore fully correspond to the style of the room.
Yes, they can be decorated with small details, but compared to hanging shelves, they are nothing.
Now let's talk about how to make a hanging shelf for the bathroom with your own hands. There are several options here - a traditional approach and a creative one.
Let's start with the first one, because for many it is much closer. In this case, you do not need a creative streak or wild imagination. All you need to do is go online and find drawings or a ready-made hanging shelf design. Next, you select materials and begin home production of interior parts.
The second option looks much more interesting and modern. In this case, you need to find items that fit the role of a shelf. These can be small jars, boxes of different shapes and sizes, baskets and the like.
The point is to find the right element and correctly place it on the bathroom wall.
- Do-it-yourself shoe racks: a review of the best ideas and a step-by-step description of how to build a shoe rack (85 photos and videos)
- Do-it-yourself bag chair - a detailed master class on how to sew a properly comfortable chair (75 photos)
DIY chest - how to make a beautiful and stylish craft from a box, paper and wood (80 photos)
You can secure the same boxes in one of two positions - by the bottom or by one of the walls.
If you need a corner shelf for your bathroom with your own hands, the wall-mounted option is just for you. In this case, installation can and should be done to two walls, for reliability.
As for her, in all other cases, fastening wooden boxes in this way is a very risky step, except that various light small items will be stored in it.
From an aesthetic point of view, this can also be a problem, but this depends on the size and shape of the drawer.
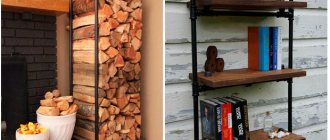
Making a corner shelf from wood: steps
If you decide to make a corner shelf for your bathroom, you need to follow these steps:
- It is necessary to prepare the details.
- Then on paper you should find the middle and draw a circle. Next, the paper is applied to the wood and a circle is cut out using a jigsaw.
- Proceed to start creating grooves in the rail. The raw material itself is applied to the corner, then the future boundaries of the structure are marked with a pencil. Then holes are made in the rail for the shelf.
- Then begin installation of the corner structure in the bathroom. To do this, you need to use mounting bolts or mounting adhesive. It is better to use bolts, as they are more reliable. If you use glue, it should dry well. Then install the structure into the attached grooves.
The main thing is to act strictly according to the plan so as not to miss any important step in installing a bathroom shelf yourself.
As you can see, making a corner option is not difficult. The main thing is to act strictly according to the plan so as not to miss any important step in installing a bathroom shelf yourself.
Shelves in the bathroom should be located in such a place that they can be easily reached from almost any corner of the room.
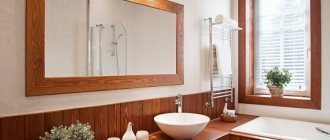
Shelf and bath
Don't forget about small details, places where you can place a shelf so that it looks harmonious. One of the types of built-in shelves is the bathroom shelf.
Making a shelf between the bathroom and the wall with your own hands is worth it at the renovation stage, before all the tiles in the room are laid. Otherwise, you can ruin your repair, and from personal experience I can say that there will be no joy in this at all.
- DIY bread box - step-by-step master class on making and tips on how to decorate a wooden model (105 photos + video)
DIY high chair - interesting drawings and projects on how to make a comfortable and functional high chair (120 photo ideas)
- DIY built-in wardrobe: 115 photos of original ideas and video tips for building built-in wardrobe models
This shelf is a practical continuation of the bathroom with a transition to the wall. It needs to be planned before renovation, because the bath itself should be a little smaller than it could be, because you need space for a shelf.
On this shelf you can store different shampoos, gels, lotions and so on.
DIY multifunctional bath shelf
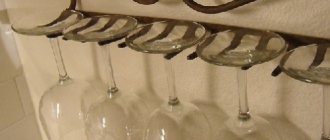
Hello, dear readers and DIYers! In this article, the author of the YouTube channel “Measured Workshop” will tell you about making one small improvement for the bathroom - a convenient shelf on which you could place a glass of drink or wine, shampoo and even a few candles - all attributes that guarantee relaxation and pleasant pastime.
This same shelf can also turn into a “control center”, since it can accommodate a tablet or smartphone.
Materials. — Solid hazel, holly — PVA glue — Wood impregnation.
Tools used by the author. — Circular saw — Thicknesser, jointer — Milling machine — Radius cutter with thrust bearing — Clamps — Forstner drills — Band saw — Belt sander — Drilling machine — Tape measure, ruler, pencil, knife, core — Rasp, chisels. Manufacturing process. For the stand, the craftsman uses holly and hazel wood. The choice of these particular types of wood is explained by the fact that hazel has a pleasant light shade and matches well in tone with the rest of the furniture in the author’s bathroom. And dark holly wood creates a wonderful contrast, and behaves almost the same as maple, plus it tends to burn quickly when sawed.
So, the master measures the most important parameter - the width of the bathroom between the outer edges of the sides.
He begins processing holly wood by running the boards on a jointer.
Two boards are cut to the width of the bathroom. These will be the front and back sides. The master processes the second side of the board using a surface planer.
Then he lowers the saw blade and cuts two grooves in several passes. Now it’s time to process the hazel slab. The author fixes it on the workbench with clamps, installs a stop, and cuts off one edge with a hand-held circular saw, leveling it.
The sheet is cut into thin strips.
The surfaces of the planks are processed using a surface planer.
Cuts them into several pieces of the required length.
The author decided to slightly modify the original design plan and make two shelves at its edges. He will need two rectangles of holly. I had to process another board.
The curves are cut on a band saw.
Since the rectangular blank for the shelves will be flush with the groove, it will have to be cut to a rounded shape. Apply two shelves one at a time and transfer the required bending shape to their ends.
This is the profile on one edge of the shelves. The sides of the shelf will be of different shapes, the back one will be higher in the central part, and the front one will have a small cutout.
The strips are glued to the bottom of the shelves, thanks to them it will be glued into the groove.
Now all the parts are prepared for assembly. First, the craftsman glues the shelves into the grooves of the rear side.
Then he starts gluing the lamellas into place.
All that remains is to glue the second, front side.
After the glue has dried, the rounded parts of the shelves are processed on a belt sander. This will remove any unevenness.
Mark a hole for a glass in the right shelf and drill it with a Forstner drill.
To pass the stem of the glass, a cut is made from the edge of the side to the hole itself. The edges of the hole are processed with a rasp and sanded manually with sandpaper.
The last point, the author adds a small plank. The edge of the smartphone or tablet will rest against it.
The author covers the wood with several layers of finish. In this case, it is oil from Waterlox. It has excellent protective waterproof properties. It is even used for processing yachts. The oil is applied using a certain technology: between applying 2 layers, it is necessary to leave the product for 24 hours.
So, the protective coating has dried, and you can install the stand in its place! Now you can very conveniently place all the necessary items on it.
The author's video can be found here.
Source
Become the author of the site, publish your own articles, descriptions of homemade products and pay for the text. Read more here.
Built-in structures
People with unusual wants and needs can choose the option with a built-in shelf. In this case, after creating an entire structure from profiles, you will begin to figure out how to make plasterboard shelves for your bathroom yourself.
There is nothing complicated about this, but all the work needs to be thought through before it starts - create a plan, make drawings, according to which you will continue to work.
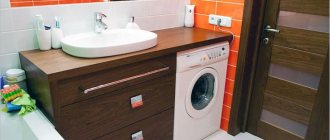
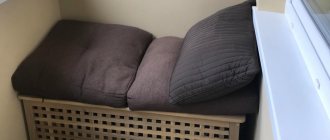
Bathroom cabinets
The bathroom sink will still occupy a certain space. Therefore, they are often installed on special stands. If installed correctly, such a cabinet will have free space that can be organized for storing things.
- DIY corner cabinet: 80 photo ideas and video description of how and what to make a cabinet from. Main manufacturing stages and best design projects
- Do-it-yourself wardrobe for the balcony - 80 photos of how to make a balcony wardrobe from various materials with your own hands
Do-it-yourself wardrobe - a detailed description of how to make and assemble a wardrobe with your own hands at home (110 photos + video)
There is no special science that describes how to make shelves under a bathroom sink with your own hands. Making shelves is very simple - you need to measure the dimensions inside the cabinet, select the mounting points according to the level, and then make the shelves from wood, chipboard or ordinary plywood.
In any case, they should be painted or covered with a thick layer of varnish, because moisture can quickly render them unusable.
An important point - when calculating the space for the shelf and the shelf itself, take into account the layer of varnish that is applied to the latter, because often these few millimeters are the difference between a perfectly installed shelf and one that does not even fit into the cabinet.
The process of creating a shelf in the bathroom
Shelves in the bathroom should be located in such a place that they can be easily reached from almost any corner of the room. It is better, of course, if they are located near the bathtub, which will allow you to take the necessary bathing products without any difficulties. That is why you first need to figure out the location of the future shelf. There are a few more issues to be addressed next.
- Choose a suitable material, be it glass or drywall.
- Draw up a work plan so that everything is clear and consistent.
- Create a mount for the future shelf in advance.
First you need to figure out the location of the future shelf.
After this, the list of works depends on the type of material, if it is wood or MDF sheets, the scheme of actions is as follows:
- first you need to make marks along the edges of the slats using a simple construction pencil;
- then use special glue to place blocks on the marks left on the rail, which must strictly be the same size;
- in the center of each of the fastenings you should also make marks where neat holes are drilled;
- Next, the structure for the bathroom needs to be assembled (you will need screws for the holes);
- When the structure is assembled, proceed with installation on the wall;
- It is advisable to varnish the finished shelf so that it looks presentable.
This option is suitable for a small room with high humidity, which is essentially a bathroom.
Prepare a level, drill holes and insert prepared dowels. Mounts installed on the shelf will allow you to mount the structure on the wall.
As for the glass structure, it is much more practical.
The product is ready. This option is suitable for a small room with high humidity, which is essentially a bathroom.
Using a drill, the shelf must be mounted into the wall.
Glass shelves
Probably the most popular option is glass shelves. At the same time, people often want to make glass shelves for the bathroom with their own hands, and the reason for this is a simple desire to save money.
Plastic looks simple, not solid, glass is another matter - a worthy material for any interior.
It will be quite difficult to completely make such a shelf yourself, and therefore you will need to buy either glass or fasteners, or maybe both parts. In this case, it is much easier to go to the store and buy the option that suits you.
Materials for making shelves
What can you use to make a shelf in the bathroom? Most often used for this:
- plastic;
- tempered glass;
- stainless steel;
- tree;
- chipboard and MDF panel.
Selecting suitable components for shelves must take into account constant humidity. The best option is considered to be plastic and chipboard panels with a protective coating. These materials can withstand daily moisture tests.
Photo of DIY bathroom shelves
Read here - DIY wardrobe bed - 120 photos and video instructions on how to make it and what materials will be needed to build the wardrobe
Did you like the article?
0